Two new routines in my life.
I turned 56 at the end of June. (Unlike other women, I don’t lie about my age.) And although I’m a lot more active than my mother (for example) was at my age, I’m not quite as active and fit as I’d like to be. To make matters worse, I’ve discovered that Mother Nature plays nasty little tricks on a person’s body as he or she ages.
While most people would take the attitude that it’s all part of aging and there’s nothing they can do about it, I’d rather not. So I’ve set August as the beginning of a personal tune-up period and have added two new routines to my life.
Feeling Better through Weight Loss
If you’ve been reading this blog for a while, you’ll know that back in 2012 I lost 45 pounds or approximately 23% of my body weight. (I’ll let you do the math; and you never thought you’d use high school algebra, huh?) This huge weight loss coincided with the beginning of my crazy divorce and lots of folks assumed that stress from the divorce caused the weight loss. It didn’t — although I suspect it did help. I lost all that weight by getting on and sticking to Medifast, a diet plan that two friends had used to lose 80 and 70 pounds respectively. A friend who started at the same weight as me lost just as much as I did in about the same amount of time. Truth is, by the time I got home from my summer job to face the crazy that awaited me, I’d already dropped most that weight and I managed to keep most of it off for two years.
But as you might expect from going off a strict, unsustainable diet plan — I had no desire to eat that “food” for the rest of my life — the weight crept back on. Not all of it, thank heaven. But enough to make me feel the sluggishness and lack of motivation that I felt back in the final days of my ill-advised marriage. So I decided to do something about it.
The question was what to do? Sure — I could get back on Medifast and drop all that weight in another four months. But then I’d secure my seat on a dieting seesaw I never wanted to be on. I needed a more sustainable plan, something that would allow me to eat the food I wanted without counting calories or getting overly concerned about portions.
Enter Whole30
Long story short: six different friends raved to me about Whole30. It’s apparently been around for a while. It’s a version of a Paleo diet. Food is broken down into broad yes/no categories:
| Yes | No |
|---|
| Meats, fish, and eggs | Dairy, including cheese (!) |
| Fruit | Added sugar or sugar substitute |
| Vegetables (with some exceptions) | Legumes |
| Nuts (with some exceptions) | Grains, including whole grains and pasta |
| Natural fats | Alcohol, including wine (!) |
This isn’t everything you need to know, of course. But it is about 90% of what the plan entails.
It’s about your health, stupid.I have no patience for overweight people who claim that they don’t care what other people think of them or that fat can be beautiful or that society places too strong an emphasis on perfect bodies and they don’t care. These people are missing the point.
I’m not saying we should all look like runway models. I’m saying that we should maintain healthy body weight. So many ailments can be avoided or even cured by weight loss. This isn’t bullshit hearsay — it’s the truth. Not only will you look better and feel better when you get down to a healthy weight, but you’ll be healthier and have a much better feeling of self-esteem. Take it from me: I’ve been there. Stop making excuses and start taking care of your health.
The idea is to stick to this plan exactly as written for 30 days (yes, it’s the 30 Day Challenge). The authors of the plan and the book that goes with it make all kinds of claims about how good you’ll feel at the end of that month. Some of them are admittedly outrageous — like claims to “cure” literally dozens of ailments related to “silent inflammation.” I don’t believe all that crap, although I do believe that symptoms of some ailments can be greatly reduced with a good diet and healthy weight. For example, I have had high blood pressure for years; it runs in my family. When I was very heavy, it took three meds to control it. When I lost all that weight, I got it under control with just one med — and that’s where I am today.
(I might also mention here that one of the reasons I was determined to lose all that weight back in 2012 is because my doctor told me I needed to start watching my sugar numbers. Type 2 diabetes also runs in my family and I didn’t want any part of that. My weight loss took the possibility of that off the table — no pun intended.)
 The Whole30 book itself is pretty funny if you read it with a mind as cynical as mine. It’s all “rah-rah” and “you’ll hate us for this but” and other such nonsense meant to encourage weak people. The way I see it, if you want to see results, you have to stick to a plan that’ll work. No amount of coaxing is going to work on someone with no willpower.
The gimmick with the Whole30 Challenge is that for the 30 days you’re following the plan, you can’t cheat. Not even a tiny bit. If you have anything to eat that isn’t allowed, you have to start over. So yes, the 1/3 teaspoon (I measured it) of sugar and half ounce (estimated) of milk that I put into my 18 ounce cup of coffee (allowed) this morning is cheating and I’d have to start over tomorrow. That ain’t gonna happen. I was warned by my Medifast diet coach that coffee, milk, and sugar weren’t allowed on Medifast and I wouldn’t get results if I had them every morning. But I did and I still lost a shit-ton of weight.
And sure, you can throw my words about willpower above back in my face, but my morning coffee is something I’m not willing to give up for a week, let alone a month. I want to find a plan I can live with, not suffer through.
Not a Weight Loss Plan?
I should point out here that the Whole30 book claims it isn’t a weight loss diet plan. I honestly think they say that so you’re not disappointed when you don’t lose weight. But in the book, they say that you will lose weight as a side effect of getting all the bad food out of your system. And although they don’t have you counting calories, they do talk about portion sizes and having just three meals a day — or at least keeping three hours between smaller meals. And that sounds a lot like Medifast.
I guess it’s all the same no matter how different it is.
You Have to Like to Cook
One of the interesting aspects of Whole30 is that because you have no idea what they put in restaurant food, you can’t really eat in a restaurant. And because you’ll likely die of boredom eating plain salad and grilled meat all the time, they have lots of recipes in the book. (There are also a ton online. Want to make a pork dish? Google Whole30 pork recipe.) So you’ll theoretically do a lot of cooking at home. I like to cook so that’s okay with me.
The other day I made their Classic Chili recipe using some of the ground beef I already had in my freezer (from the 1/4 cow I bought last year) and vegetables right out of my garden. It was surprisingly delicious. It also made enough for me to freeze two portions so the next time I don’t feel like cooking, I can grab one out of the freezer, pop it in the microwave, and enjoy.
The book also has a ton of recipes for various sauces to spice up plainly prepared foods. I made an almond- and tomato-based “romesco sauce” yesterday to top garlic shrimp with zucchini noodles. The recipe made enough for several meals, so I used some this morning on an omelet I made with eggs from my chickens and onions, tomatoes, and peppers from my garden. It really did make breakfast more interesting.

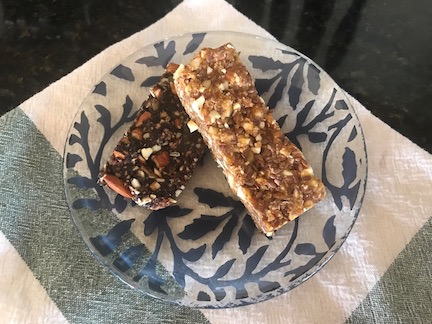
With no added sugar and simple, wholesome ingredients, you don’t need to be on a special diet plan to like these energy bars.
I also found a recipe online the other day for Whole30-compliant energy bars similar to the Larabars you might find in your supermarket or health food store. I made two versions: one with dates, coconut, dried cherries, almonds, and pepitas and the other with dates, coconut, dried apricots, almonds, and flax seeds. I put half in the fridge and used my vacuum sealer to seal and freeze the other half in individual bars. I’ve been eating them for dessert and will likely take them on hiking or day trips. They’re actually quite tasty.
So I guess that as long as I can continue to make interesting foods, I’ll have no trouble sticking with it. My 30 days started yesterday and I’ll go until month-end. I’ll likely blog some interesting things I discover along the way.
But I don’t actually expect Whole30 to be the reason I lose weight over the next few months. I’ll leave that to Invisalign.
Stopping Shifting Teeth
Here’s something I never knew about aging: your teeth shift.
I’ve always had very healthy teeth — only three cavities in my life so far. They were not, however, perfectly straight. When I was a kid, my parents actually debated me getting braces for an overbite and eventually decided that it wasn’t severe enough. (They were right about that.) My bottom teeth, however, have always been a bit crooked, with one of the front ones sitting at a 30° angle to the others. Fortunately, no one sees that when I smile since my front teeth steal the show. So although I was never happy about those bottom teeth, I never saw a need to fix them.
One of the happy side effects of my divorce is that I smile a lot more now. (It’s true! I’m a much happier person!) And about a year or two ago, I started to notice that in photos of me smiling, one of my front teeth seemed to be in the shadows. I realized, with a bit of horror, that it was starting to shift backwards in my mouth and it was affecting my smile.
Now I’m not raving beauty and I came to terms with that years and years ago. But I do look best when I’m smiling so I do it a lot. I found the thought of my smile getting ugly very hard to swallow.
Enter Invisalign
Invisalign is a program with dental “appliances” to straighten teeth. It’s extremely effective in cases where not much straightening is required — like in my mouth — and it’s popular with adults because it’s basically invisible to others. The patient starts with a set of clear plastic appliances that fit over his or her teeth and gently tug them toward the desired end position. Every 7 to 10 days, the appliance is replaced with a new one that continues the positioning. At the end of the program, the teeth should be in the desired end position.
My dentist showed me an animation of my teeth moving into the proper position over time. It was very cool. I’ll see if I can track down a sharable copy.
In my case, I’ll be using 20 sets of appliances. They started me yesterday with my first one. The worst part is the placement by the dentist of small upraised points on several teeth to hold the plastic braces in place. Then they snap in snugly and go to work. I can feel them pulling, but although I thought they’d keep me up, I slept like a log last night — nine full hours!
And yes, I do have to wear them night and day. You must wear them 20 to 22 hours a day for them to work.
I’ll wear these for 10 days, then switch. Then 10 days of that and a switch. Then I visit my dentist so he can see how things are going and get the next batch. I’m hoping that they’re going well enough to do a switch every 7 days instead of 10 to speed up the program.
The net results: I should have all my teeth — even the bottom ones I’d already decided I could live with crooked — straightened within about six months.
Of course, since my teeth will want to continue to shift as I continue to age, I’ll have to wear a retainer at night, likely for the rest of my life. Let’s hope I can live with that.
Invisalign and Weight Loss
Of course, I talked to a bunch of people about their Invisalign experience before plunking down a bunch of money to give it a try. (It ain’t cheap.) And one of the things that came up is the fact that you lose weight when you’re on Invisalign.
What?
Well, it actually makes perfect sense. You have to wear these things at least 20 hours a day and you can’t eat or drink anything other than water while you’re wearing them. Sure, they’re easy enough to take out, but if you take them out to eat, you need to brush your teeth and clean the plastic appliances before putting them back in. This is a huge pain in the ass. So, as a result, people wearing Invisalign appliances don’t do much snacking between meals. That means they lose weight.
So combine Whole30 with Invisalign and it would be a miracle if I didn’t lose weight.
Invisalign and White Teeth
I also expect that my teeth will be cleaner and whiter than they’ve ever been before.
Let’s face it: I hate brushing my teeth. I hate the flavor of toothpaste. (Peppermint has been known to make me nauseous.) When I eat a meal, I want the flavor of the meal to linger on my palate 20 or 30 minutes later, not the minty flavor of toothpaste. So I normally brush my teeth just once a day, and that’s usually right after showering. I do everything in my power to avoid brushing right before or after my morning coffee, which really is sacred to me.
But now I have to brush after every meal or snack. I brushed my teeth four times yesterday. I expect to brush at least five times today as I begin considering my mid-morning snack.
I use a whitening toothpaste. Brushing 4-5 times a day would have to result in whiter teeth, no?
So in six months, I can expect to have the straightest, whitest teeth I’ve ever had.
Is It Time for Your Tune Up?
Getting old sucks. (And don’t give me the tired old saw about it beating the alternative; there will come a point for many of us when the alternative is better.) But you don’t have to take things lying down. You can do what’s within your power or budget to make your life better as you age.
That’s what I’m doing. If you’re not, why not?


 Now I know what you’re saying.

 The
The 