My Geotagging Workflow

How I add GPS coordinates to my photos.

A while back, I decided I wanted to include the GPS coordinates in the EXIF data for my photos. Because my cameras (a Nikon D80 and a Nikon CoolPix something-or-other) don’t have built-in GPS features or communicate via bluetooth (or any other method) with a GPS, I have to manually attach the GPS coordinates to the photos.

I say manually, but I do this with software that automates the process. (I’m not a complete idiot.) Still, there’s a slightly convoluted workflow to get this all together. I thought I’d outline it here for two reasons:

  • Some blog readers might be genuinely interested. I’m not the only photo-snapping geek around.
  • By documenting this, I can look back, years from now, and see yet another example of how technology changes to make things easier and how I solved a “problem.”

So here’s the workflow rundown. I skipped the nitty gritty details to keep it short. (I read somewhere that people don’t like to read long blog posts.)

Step 1: Acquire the Photos

GlobalSat BT-335Bluetooth GPS w/ ChargersWhen I go out to do photography, I take minimal equipment. I don’t like to carry a bunch of stuff. But one of the things I do take with me (other than my camera) is a GPS data logger. I bought a GlobalSat BT-335 Bluetooth GPS Data Logger. I made my choice after lots of research, including this excellent review on bioneural.net. Three things sold me:

  • Price. It’s $69.95 on Amazon.com.
  • Size. It’s small and lightweight.
  • Connectivity. It’s Bluetooth, so I don’t have to deal with cables. (I hate cables.)

As an added bonus, when paired with my MacBook Pro, it puts live GPS data on my computer. Which is kind of cool, even though I currently have no use for this capability.

I’m not saying you should go out and buy this. I’m just saying that I did and I’m very satisfied. And while I certainly welcome comments that suggest other models, my choice has been made, so please don’t try to sell me on your solution.

A GPS data logger like the BT-335 does one thing, and it does it well. It keeps track of where you’ve been by recording GPS coordinates and corresponding times. It stores all this data inside itself with virtually no user interface. I attach it with a wrist strap I bought at a camera store to my camera’s shoulder strap. Before I start shooting photos, I turn it on and it does its thing. I basically forget all about it.

So when I go out to do photography, I turn on my GPS data logger and use my camera to take pictures. Pretty simply stuff, no?

It’s important to note here that the time on my camera must be right — at least within 10-20 seconds (if I’m on the move) or 1 to 2 minutes (if I’m moving more slowly). I check it against my computer’s clock (which is set by atomic clock) and adjust it a few times a year. The GPS data logger gets its date/time information from the GPS satellites.

Step 2: Get the Data and Photos on the Computer

The next step is to get all of the GPS data and the photos onto my computer.

LoadMyTracks
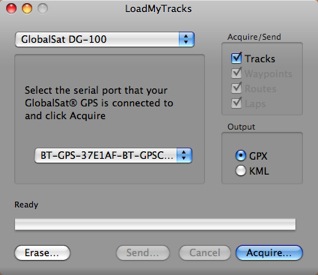
Although GlobalSat has a perfectly fine utility for getting the data off its unit and onto a Mac, I use the freeware application, Load My Tracks. I tell it I’m using a GlobalSat DG-100 and because the unit is paired to my computer, it finds it. I can then download tracks into either GPX (which I need) or KML format. I download both — heck, why not? — into the folder where I’ll soon be downloading the photos. I then erase the data logger so I don’t have extra track points in it the next time I use it.

Next, I use a card reader with Image Capture, which comes with Mac OS X, to download all photos from my camera into the folder where I saved the track logs. They don’t have to be in the same folder, but I like it that way. Nice and neat. And it makes it easy to back up the logs with the photos.

Now I’ve got the GPS data and photos on my computer.

Step 3: Match GPS Coordinates to Photos

Next, I launch GPSPhotoLinker, another freeware application. I use the Load Tracks button to load up the GPX data file for the photo shoot. Then I use the Load Photos button to load all the photos I took during the shoot. I go into batch mode, which has my settings saved from the last session, and click Batch Save to Photos.

GPSPhotoLinker uses my settings and the data to write the GPS coordinates, including altitude, to each photo. It displays a progress bar as it works. When it’s done, the Latitude and Longitude for each photo appears in the appropriate columns in the list of photos. Here’s what it looks like while it’s working. (Yes, I took pictures of very big, red rocks.)

GPSPhotoLinker In Action

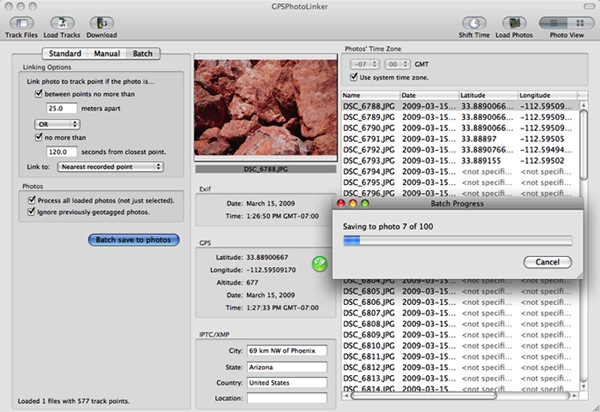
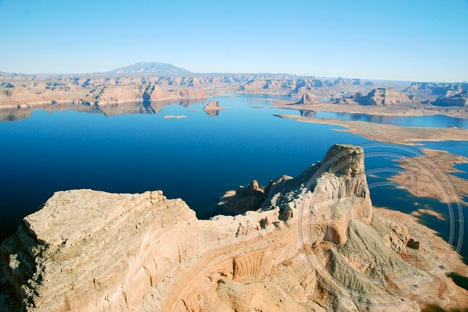
As for the big, red rocks, you can find them here. (But it seems to be off by a 10-20 feet; maybe it’s time to adjust the camera time again.)

Step 4: Backup

After losing a hard disk for the third time two years ago, I have become fanatical about backing up my data. After importing photos and linking the GPS data to them, I burn them onto a CD or DVD (depending on the capacity needed). When the burn is done, I check the CD or DVD to make sure it functions properly. Then I apply a label with the date and some descriptive information and file the CD or DVD in a box with a bunch of others.

I format the memory card for my camera in my camera to clear it out completely.

I then feel good about deleting photos off my hard disk, adding them to iPhoto, or modifying them in Photoshop or some other image editing too.

Sounds Like a Lot of Work?

It really isn’t a lot of work. It’s a whole workflow thing. Do it enough times and you can do it quickly. Steps 2 through 4 take about 15 minutes from start to finish.

That’s my flow for geotagging. What’s yours? Got a camera with a GPS or GPS connectivity built in? Please do brag about it by adding a comment here. I’d love to learn more.

On Aerial Photography

A comment turned into a blog post.

I just read “The Shot” on Helicopter Pilot, Will Travel. (If you’re a helicopter pilot and you don’t read this blog, you’re really missing out on something valuable.) The post was about aerial photography and the difficulties in getting good shots.

Combine from Air
I was a passenger in a friend’s R44 when I snapped this photo.
It was the best image of about two dozen attempts.

I started to write a comment on the post, but soon had more words than a polite commenter should be leaving on someone else’s blog. So I figured I’d just turn my blather into my own blog post on the subject.

I do a lot of flying with photographers and video folks on board. A lot of it is “fine art” photography in places like Lake Powell and Canyonlands National Park. There’s also some commercial photography — bridges, highways, buildings, etc. And lots of “action” photography and video of racing boats and off-road trucks.

I absolutely love this kind of work — especially the high-speed chase stuff. It gives me an opportunity to get “in the zone” with the aircraft. I usually sit the photographer in the seat behind me so we get the same view. This makes it easy to stay on the target.

It gets challenging when slow flight is required — especially if it’s windy or if we’re in high density altitude. I’ve gotten to the point where I know when to expect a settling with power situation and can recover from it quickly, with the minimum loss of altitude. I’m also smart enough to avoid it any time I’m flying low-level.

The quality of the photographer’s work varies greatly. There’s a video guy I work with on off-road races that’s incredible. The four of us — me, my helicopter, the video guy, and an up-front observer — make an excellent team. I’m not sure if it’s my ability to fly close to the racing vehicles or his ability to manipulate the camera — probably a combination of both — but his footage is mind-boggling.

The fine art photographers’ work depends on lighting and where we’re taking the photos. The southwest U.S. landscape is amazing, but early in the morning, just after dawn, or late in the afternoon, just before sunset, I really think it’s impossible to take a bad photo.

You can tell the experienced aerial photographers from the newbies by the equipment they bring — mostly lenses. I’ve had people show up with zoom lenses that not only forced me to fly far from the subject matter to get it to “fit” in the lens, but let in so little light that shutter speed was an issue.

On the other side of the coin is a photographer that always mounts his camera on a hand-held gyro stabilizer to minimize the vibrations coming in from the helicopter. I’m actually thinking of investing in one of these devices, so I can rent it to the photographers that fly with me. Being more flexible with shutter speed would give them more flexibility in terms of composition.

Gunsight

Gunsight Butte on Lake Powell.

My husband was at the controls while I snapped photos.

Unfortunately, I seldom get to try my own hand at aerial photography. You see, both hands are usually busy with the controls in my single-pilot R44. I did get an opportunity to fly with a fellow pilot in his R44 in Washington State last summer (see combine photo above), but more recently, I’ve begun doing some doors-off flying with my husband, who is also a helicopter pilot. We take turns playing with the camera. The shot accompanying this post is one of mine from a recent flight to Lake Powell.

One thing Keith is certainly right about in his post — it can take an awful lot of tries to get just the right photo.

Yes, It’s the Same Damn Boats Again

Another stay at Ventura Harbor.

I’m back in Ventura again, working hard on a new training video for Lynda.com. The schedule is very tough this time around and at the end of the day, I’m absolutely exhausted.

But tonight, I took a few minutes to walk along the path around the harbor. I did it around sunset, waiting for a crescent moon that never appeared. And then I did it again after dinner.

Boats at NightAnd I took some photos of the same damn boats I always take pictures of when I’m in Ventura.

This is a night shot taken not far from my room. The bright light in the sky is Venus. This was a long exposure, a full stop “overexposed” — at least as far as my camera’s meter was concerned.

I used my new Slik tripod for this shot. It’s designed for smaller cameras, but it held up my digital SLR with its fat lens pretty well. I like the pivoting head and really wish I’d gone the same route with the Manfrotto I got for more serious photo work.

I’ll look for that crescent moon again tomorrow.

Photo Info:

Camera: Nikon D80

Focal Length: 19mm

Aperture: f/3.8

Exposure: 3 seconds

Chasing Race Cars

2009 Edition.

I did another flying gig out at Parker AZ again this year. It was wicked windy on the ground when we took off — so windy, in fact, that a Bell Jet Ranger pilot refused to fly. (I didn’t think it was that bad, but then again, I’m not flying a Bell.)

About 100-200 feet up, however, it was dead calm and I was able to do just about any maneuver the camera guy needed. I had an excellent observer on board who kept an eye out for wires and other helicopters without freaking out when I intentionally got close to either one.

For the first flight, we chased the truck featured in the video below, as well as a dune buggy like car. I don’t know the technical terms for any of these things — I’m a pilot, not a dirt racer.

For the second flight, it was windy. We were videoing the guys coming into their pits and a lot of hovering was required. I could only hover when pointing into the wind, which was gusting to 28 knots. When we flew around the trucks in the “Python” area of the course, I couldn’t fly slowly enough with a wind up my tail so I did a lot of circling, keeping the target where the camera guy could keep his camera on it.

In case you’re wondering, our usual setup is to have the camera guy behind me with his door off. (If it were warmer, I probably would have had my door off, too.) This makes it easy for me to see what he sees and keep the car in sight. The observer sits up front next to me. Although I keep a good eye on what’s around me, he’s a second pair to make sure I don’t miss something important.

After the second flight, I could see that bad weather was literally minutes away. After putting the doors back on and estimating that I had enough fuel to get home, I took off. I called the airport later to pay my fuel bill and was told that the downpour started 10 minutes after I left.

I flew a total of 3.9 hours, including ferry time. Judging from the video, I think the guys got just what they wanted.

A Vulture Peak Hike

Another trip up the mountain.

On Sunday, Mike’s cousin and his girlfriend were in town from Seattle. They were bummed out because of the weather — it was rainy with low clouds — but we desert-dwellers were thrilled. We’ve had quite a bit of rain this winter and the desert is lush and green — or as lush as a desert can be, anyway. Every time it rains, we think about how much greener the grass between the cacti will get and how incredible the spring flowers will be in another month or so.

They wanted to do something and we wanted to do something outdoors. So we geared up with hiking boots and jackets and water bottles, packed ourselves into my Jeep with Jack the Dog, and drove out to the Vulture Peak Trailhead, which is about 7 or 8 road miles from our house.

Vulture Peak is the tallest mountain in Wickenburg and, indeed, the tallest peak in the immediate vicinity. It’s the remains of a volcano and has an odd shape that gives it a completely different look depending on what direction you’re viewing it from. From our house, it looks like a tall knob. But from the main trailhead parking lot, it looks like a wide rocky butte.

It was still raining when we drove through the main trailhead parking lot and continued on the 4WD road to the trailhead at the foot of the mountain. To get there, we had to drive down a very steep, very eroded embankment. I’m too cowardly to drive down places like that, so I climbed out and Mike climbed in behind the wheel. He threw it into 4 low and crawled down the hill, letting one wheel and then another hang in the air while the rest of the wheels did all the work. At the bottom, I climbed back in behind the wheel and we continued on the way.

In the Jeep
My Jeep, Packed to the Gills.

The rain — a steady drizzle — let up when we reached the second trailhead. I parked and we tumbled out. My Jeep is a 4-seat Wrangler and it was packed to the gills with the four of us and a 55-lb dog. Good thing I had the doors and back windows off to give us breathing room.

Above us, the clouds were moving briskly from south to north. It was about 10 AM and the sun was trying hard to break through the low clouds. It looked promising. We started up the trail toward the saddle.

I’ve written extensively about Vulture Peak for wickenburg-az.com. That piece, originally written in 1999, is accompanied by the tiny photos the Web site supported back then. One of my goals on this trip was to take some better photos to share on the site, and possibly include in my Photo Gallery. So I had my Nikon D80 with me, as well as two lenses: my 16-85mm zoom and my 10.5mm fisheye.

My companions quickly got a lead on me up the steep trail. I’m miserably out of shape these days, but I never did do well on uphill climbs. Sure, I can do downhill on a trail all day long without lagging, but point me up a hill and be prepared to wait. I’ll get there — eventually — but I need a lot of rest stops along the way.

Hike View
A view from the start of my hike.

I took the opportunity to shoot some photos as I hiked. The brightening desert was all around me and, as I walked, the sun poked out and cast its bright, warm light here and there. And then there was the novelty of wet rocks and drops of water on the cacti. And puddles. Do you know how seldom we see puddles out in the desert? That day, they were all over the place.

Soon I was alone on the trail, huffing and puffing as I hiked upwards. The trail is probably rated as intermediate difficulty from the second trailhead, where we started, to the saddle. (It’s probably rated easy from the first trailhead to the second; a nice 1-1/2 mile stroll on a narrow pathway through the desert.) It’s not a long walk, but it’s steep. After an initially easy straight climb, it zig-zags up the mountain on a series of narrow switchbacks neatly carved into the terrain.

On Vulture Peak Trail
On Vulture Peak Trail.

I was upset to see that some hikers had inconsiderately cut corners, creating “shortcuts” of crumbling rock trails. I was also bothered by the sight of uprooted penstemon — one of the few wildflowers already in bloom — tossed aside on the trail. Who would tear wildflowers out by the root? And why? Apparently there are people out there with far less appreciation for the desert than we have. Perhaps they should have stayed home in front of their TVs and video games and left the plant life alone to grow and multiply.

Within an hour, I was near the saddle where the trail opens up to a wide area offering views in two directions. On one side, to the north, is the rocky peak of the mountain. On the other side, to the south, is a series of secondary peaks that reach up to the sky with jagged, tooth-like edges. I fully expected to be alone there, too. The summit was a short but difficult steep climb away and I assumed Mike and his companions would have made the climb by then. But they were there, waiting for me. Our out-of-town visitors had been spooked by the hand-over-hand portion of the climb and had decided the saddle was far enough up the mountain. That’s unfortunate because the view from up there is 360° and, on such a clear, crisp day, would have been breathtaking.

View from Vulture Peak Trail
View from near the top of the Vulture Peak trail.

I rested up, snapping photos with my camera. I soon realized that exposures would be a problem and used bracketing to ensure I’d get at least one shot out of three that was properly exposed. (What did we do before we had digital cameras? Waste film? Waste time in a darkroom? Waste photo paper on crappy shots half the time?)

We hiked around a bit in the saddle area, then went to explore the areas around the secondary peaks. I’d never hiked up that way. It wasn’t much of a hike, but there were no real trails. We each made our way separately. Occasionally, I’d hear the voices of my companions or see Jack the Dog scampering around the base of a rocky mound.

Looking Southeast Between the Peaks
Looking southeast between secondary peaks.

I climbed up to a point between two rocks and was instantly struck by the view of the line of peaks with the sun full on their wet rocks. I snapped a picture quickly, sorry that I had my fisheye lens on the camera. I switched lenses as the sun hid behind a speeding cloud again. I remained rooted in that space until the sun returned and I could snap a few more shots. Mike joined me and we watched the ever-changing show of light and shadow on the rocks, cacti, and flat desert terrain beyond.

At our feet were geode-like rocks with crystals. I’m sure someone with a knowledge of geology would find them very interesting. Mike picked up a small piece of crystal to show our companions, who had already started back down the trail.

Vulture Peak Trailhead
The Trailhead at the Foot of Vulture Peak.

The hike down was much quicker for me — as it usually is — and we were back at the Jeep within 30 minutes. I paused to take a photo of the peak from the trailhead. This wide angle shot throws things out of perspective a bit, but it gives you an idea of the terrain and destination. The “saddle” is the area in the “V” of the mountain, where that big, puffy cloud is. The main peak is the one on the left; the secondary peaks, which are shorter, are to the right.

We drove back to the main trailhead and I successfully steered the Jeep up the steep, eroded road. (Somehow, up isn’t nearly as scary as down.) The parking area was just as empty as when we’d arrived. Evidently we were the only people who would experience the incredible beauty of this desert mountain right after a winter rain.

Related Links

Here are a few other articles and blog posts I’ve written about Vulture Peak, as well as a link to a slide show of my Arizona images.

On An Eclectic Mind:

On wickenburg-az.com:

On Flying M Photos: