
For most folks, it’s pretty easy.
 I’m often told that I’m a great photographer. While I don’t usually correct the person handing out the complement — hey, everyone likes to have their ego stroked once in a while — I have to admit here that it’s simply not true.
The real truth is, I can occasionally make a great photograph.
What Makes a Great Photographer?
There’s a difference, at least in my mind. A great photographer can consistently make great photographs. He often goes out with his equipment with an idea in his mind of what he wants to achieve. He considers location, lighting, composition, and camera settings. He takes full advantage of his equipment, no matter what it is, to help him achieve great results. Consistently. His worst photos may be about the same quality as my best.
I, on the other hand, try to do all of these things. I don’t usually succeed. I’m limited by my experience, my capabilities, and my equipment. It’s experience that helps you know when the light is just right and how to set your camera for the shot. It’s capabilities that make it possible to use all the tools on the camera to make the shot as good as it can be. Its equipment that ultimately determines whether the shot is composed properly (think lens focal length) and in good focus (think lens quality).
I’m also limited by my willingness to sit in one place for hours, waiting for the light to get just right. Or my willingness to hike that extra two miles to get into the perfect position to frame the shot. Or my willingness to face the cold or heat or strong winds. Or my simple willingness to carry a tripod when the light seems “bright enough” or that extra lens I probably should have with me. (I’m working on getting over all of these personal limitations, but it ain’t easy.)
In the end, I get mixed results. Some of my shots are really good and make me really happy. Others are crap. The rest fall in between. The fact that there’s no consistency is what keeps me from being a great photographer.
And I’m okay with that. I’ll keep trying and, hopefully, get better. But I don’t think I’ll ever be great. I’m okay with that, too.
How to Make People Think You’re a Great Photographer
So why is it that so many people tell me I’m a great photographer? Here’s my trick: I only show off my best photos.
 Too many people share too many of their photos. You know the folks I’m talking about. They go out with their camera and take 50 shots at the zoo. They then dump all (or almost all) of them on Flickr or some other photo sharing site. You go through them and are overwhelmed by the mediocrity. The great head shot of the giraffe munching a leaf is lost in the shuffle of poorly framed images of zebras and ostriches. The interesting image of the rhino’s sleeping face is buried among out-of-focus or poorly exposed images of monkeys and lions. You get bored after the first ten shots and may not browse any further to see the buried gems.
Digital cameras turned everyone into photographers and services like Flickr make it too easy to put photos online. Too many people think they need to share all of their photos. As if every shutter snap is the creation of a great work of art.
It isn’t.
Don’t Share Your Crappy Photos
There’s a lot of crap out there. It’s easy to distinguish yourself from other photographers. Simply share only your best images.
Be honest with yourself. Put one photo against another and keep the best one. Then do the same repeatedly to pare down the 50 zoo shots to three or four.
If necessary, get feedback from others — and I don’t mean the bullshit “great shot!” comments from fellow Flickr users who are fishing for reciprocal comments and “friends.” I’m talking about feedback from people who know good photos when they see them and are not afraid to tell you.
Don’t believe me? Try it and see for yourself. Weed out the crap you’re sharing on Flickr (or other online photo sharing sites) so only your best remain. Then see what people say about you, as a photographer. I think you’ll be pleased.


 The course stretches about 30 miles across the open desert east of Parker, zig-zagging on existing dirt roads, including more than a few power line roads. The land out there is mostly old sand dunes like those shown in this photo. (This photo was taken from about 800 feet AGL; the dots are bushes about 3-5 feet tall.) The land here is remote and mostly barren. A bold pilot could fly 50 feet AGL without fear of hitting anything. Except, of course, the power lines.
 Track locations are identified by mile number. There are no visible markers, though — that would make it too easy. Instead, if you’re lucky you have a copy of the course map and have secured it to something so you can consult it in flight. Remember, at least one door is off, so the wind is whipping around the cabin and loose paper is not an option. Although you could put all the mile markers in your GPS, that would make quite a mess. So I just have about 10 points in my GPS and I can use them to home in on the point I need to get to.
 One of the videographers (A) claimed he weighed 260 lbs. I added 10 pounds, as I usually do, for clothes and equipment. I then calculated my weight and balance several ways, hoping he’d choose a back seat location with his 190-lb still photography companion beside him. Earth to video professionals: If you want to do aerial photography from a helicopter, slim down. If you want OGE hovers and aggressive maneuvers, your pilot will need all the performance he can get.
 Only one of the videographers (B) had ever worn a harness before. I’d brought mine along and he was very happy to have it. He climbed right in and hooked up. I had to assist the other two with the harness. Tragically, C did not fasten the seatbelt behind him before sitting down and the buckle slipped out of the open door during flight. Dangling there in the slipstream, it did serious damage to the paint on the left side of the helicopter. I can’t imagine how he didn’t see or hear the metal buckle banging, but, as I said earlier, he wasn’t entirely there.
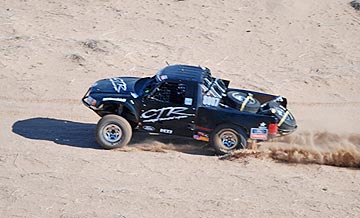 Chase mode. In chase mode, you pair up with the vehicle, putting the photographer(s) in position to shoot. That often means dropping down to 50-100 feet over the desert floor. It almost always means matching the speed of the vehicle you’re chasing. On straight, smooth stretches of road — like one of the power line roads — the vehicle could be going over 100 miles per hour. On roads cutting through lava beds or through canyons or zig-zagging around high tension power line towers, the vehicle could be moving at just 30 miles per hour. The pilot’s job is to keep on the target, always watching out for obstacles and other aircraft, listening to the instructions of the photographer: higher, lower, faster, slower, right, left. It’s tricky when you don’t have brakes or 0-to-60-in-5-seconds acceleration capabilities. I prefer having the photographer sit behind me so I can see the action as well as he can, but that’s not always possible. With two photographers on the left side of the aircraft, I usually can’t see the vehicle — although I can often hear the sound of its engine and passing horn — through my noise canceling headsets and over the sound of the helicopter! — if I’m properly lined up with it. When the photographer has enough footage shot alongside the vehicle, he sometimes asks me to position myself for what I call photo mode.

 It was cloudy to the east when we arrived, so sunrise was pretty much a non-event. Although I did take some photos of the front of the building in first sun (or what we had of it), I detoured to a small shrine-like building on the west side of the main church building. My friend, photographer
  When the funeral ended, we paused as the blue coffin was loaded into the back of a Cadillac Escalade hearse — which I didn’t even know existed. As the mourners departed, the photographers swarmed into the church.
 The main altar area, which is shown here, is a crazy ornate masterpiece of southwestern art. Having grown up Catholic, I can’t imagine sitting through a mass amid such decorations. Yet the church is active and has mass daily. (No photography allowed during church services.)
 There are also candles all over the place. The sale of candles is probably the church’s biggest fund-raiser. They’re not expensive — only $3 each — and they’re quite beautiful when lined up in racks near statues. I bought one in memory of my grandmother. I’m not religious, but she was. She would have liked the place, so I bought a candle and put in in front of Saint Anthony (or “S. Antonio,” as the label at the bottom of the statue said). My grandmother used to have a Saint Anthony statue in the guest room — my mother has it now — so Saint Anthony statues remind me of her.
 By the time we were finished inside, the sun was out and the sky was nearly clear. I shot this photo of the front of the mission, after waiting about 10 minutes for various tourists to meander in and out of my composition. This was shot at f/16 with a polarizer to enhance the color of the sky. There’s definitely some distortion in this shot, but I rather like it. It’ll probably end up in
  I also got a little creative, working with various elements inside and outside the main building. These two photos are examples. The first is of the backs of the church pews. They’re simple carved wood with this unusual scalloped edge. It was sad to see that more than a few people had carved words into the backs of them.
  This shot is a closeup of a scroll design in the stucco finish of a wall outside. I like textures and try to experiment with them in my photography. Although not very interesting, this is a good example.