My First Stab at Night Sky Photography

What I learned at a North Cascades Environmental Learning Center photography class.

I love the North Cascades Environmental Learning Center, which is not far from the Diablo Dam on Diablo Lake on the North Cascades Highway (Route 20). I got my first glimpse of it during a camping trip last summer and later that year returned to take a three-day course about mushrooms. This year, I returned for one night of Base Camp right before an overnight seminar titled “Wilderness Photography: Washington Pass at Night.” Here’s the course description, since I can assume the link to the course page will eventually break:

In the grandeur of the North Cascades, moonless nights with clear skies offer fantastic opportunities to capture vivid images of the galaxy.

Join photographer Andy Porter on this specially-scheduled evening expedition to capture images of the Milky Way on this moonless night. We’ll begin the adventure with a short evening workshop on night photography at the North Cascades Environmental Learning Center. Then we’ll head to Washington Pass where, under the towering peaks of Liberty Bell and the Early Winter Spires, Andy will guide us in capturing our own images of the night sky.

I could go into a lot of detail about my stay at the NCELC and the other things I did while I was there, but I’ll try to stay focused for this post. But I do need to talk briefly about the weather, since it did play a major part in how the course went.

The weather was not very good. It was overcast all day and rained more than a few times. Although the clouds were relatively high, there wasn’t a single clear patch in the sky. It was like this all day, which really didn’t surprise me — it rains every single time I come to this area. I like the rain, mostly because I don’t get much of it at home, but I really wish it wouldn’t rain in the mountains when I’m there.

Diablo Dam to Washington Pass
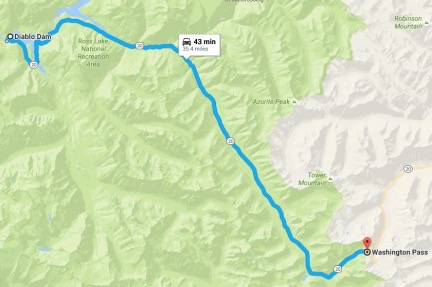
Washington Pass is a 35-mile drive southeast from Diablo Dam on Route 20.

Of course, we weren’t supposed to take pictures in the Diablo Lake area. We were supposed to go to Washington Pass, about 35 miles east. I’d driven through the Pass the day before on my way to the NCELC and it had been partly cloudy, with smoke from a fire I later discovered was burning near Mazama. But the weather information we had showed that Washington Pass was likely just as bad as it was where we were. And there’s nothing worse than making a 70-mile round trip drive to take pictures and not being able to do so.

There was a short classroom session after dinner. Andy introduced himself and showed off a few slides of his work. Most featured an easily identifiable foreground object that was often lighted — like a tent with kids in it or the roots of a fallen log — and a magnificent night sky. He briefly explained how he accomplished the lighted part of the shot by illuminating it for only about a second during the long exposure required to get the night sky. He also admitted to doing a lot of post processing and even showed us before and after shots.

Then he gave us the details on how we needed to set up our cameras for nighttime shooting. Here’s a brief version of his instructions. I’m not giving away any secrets here — all this information is available in a wide variety of places online.

Required Equipment

Before I detail the settings, let me start with the basics. If you don’t have this equipment, you probably can’t do this kind of photography. Or at least I won’t be able to explain how.

  • Camera. At the very minimum, you need a camera capable of setting aperture, shutter speed, ISO, and focus manually. Most DSLRs can do this, although lower end models might have limitations. These days, I shoot with a Nikon D7000, but I’m pretty sure my old Nikon D80 could do the job. And yes, a film camera could work, but the ability to immediately see results and adjust settings make it really impractical.
  • Wide-angle lens. The wider the field of view, the better off you’ll be. In case you don’t know, the lower the focal length, the wider the field of view. I used a 10-24 mm lens for this shoot and set it to 10 mm. Because I don’t have a full-frame sensor in my Nikon camera, that’s equivalent to a 15 mm focal length. There were people shooting with everything from 10 mm to 28 mm in the class.
  • Tripod. You need a good, sturdy tripod. There’s no getting around it. I use a Manfrotto with a ball head and I love its flexibility. If you have options, use one that can be extended so it’s tall enough for you to look through the lens and check image results without having to bend over. Sturdy is especially important if there’s any wind — although this isn’t something you’d likely attempt with anything stronger than a light breeze.
  • Cable or remote shutter release. My camera won’t support a cable release, but it does support a remote shutter release, which I have. If you don’t have either, there is a workaround: use the camera’s self-timer to release the shutter. (This is what I wound up doing when my remote crapped out for some unknown reason during the shoot.) Under no circumstances should you be pressing the shutter release button by hand; it will definitely shake the camera, even on a tripod.

What’s interesting to me is that just about all of the people who took part in the class — and I think there were nearly 20 of us — had brought a bunch of camera equipment. I didn’t bring all of mine, but I did bring my camera body and three lenses. In reality, all we needed was what I listed above. So when it was time to get on the van to drive out to our shooting destination, I secured my camera on my tripod, rested the top of the tripod on my shoulder, and left the rest of my gear behind. I like traveling light.

Camera Settings

The tricky part of shooting the night sky is setting up the camera properly. Andy, our instructor, had us do this in the classroom so we wouldn’t be fiddling with settings in the dark. If you set the camera up right in advance, there’s only one thing you might have to change out in the field.

  • Widest field of view. If you’re using a zoom lens, zoom out to the widest field of view (smallest focal length number). Again, I used 10 mm.
  • Widest aperture. Set your lens so it’s wide open (smallest f-stop number). This enables the camera to take in as much light as possible during the exposure. For my lens, that was f3.5.

  • Manual focus. This can be a setting on your lens or camera or both. (It’s both on mine.) You definitely do not want the camera trying to automatically focus, especially if your camera won’t make an exposure unless focus is locked in.
  • Lock it in!

    This is where I really wish I had some gaffer’s tape with me. This is special tape used in film production; it makes it possible to secure things like you would with any tape, but when you pull the tape off, no sticky residue is left behind. This would have been very helpful for me to lock that focus ring down, preventing me from accidentally moving it during the shoot.

    Focus to infinity. This is actually a lot trickier than it sounds and it took a while for us to all get it right. Simply dialing the focus ring as far as it goes on the infinity side isn’t necessarily correct. You need to play with it a little at a variety of settings out near the infinity symbol (∞). After each setting, snap a photo of something at least 50 feet away and then check it in the review window. Zoom in to see how crisp it is. Then try another setting to see if it’s crisper. Repeat this process until it’s dialed in perfectly. On my lens, the tick mark was lined up with the center of the infinity symbol but it might be different for yours. If you don’t have focus distance symbols on your lens, you might have to use autofocus to get the right focus setting before setting manual focus. I’m pretty sure that’s what Andy helped a few people do.

  • Manual exposure mode. You must set the camera for manual exposure so you’re in charge of how it takes the photo.
  • Calculating shutter speed with the 500 Rule

    If you want to do the math, it’s pretty simple: 500 ÷ Focal Length ÷ Crop Value

    So if you have a high-end camera with a full frame sensor and you’re using a 12 mm lens, the math is:
    500 ÷ 12 ÷ 1 = 41.66, which you can round down to 40.

    With my camera’s 1.5 crop sensor and 10 mm lens, the math is:
    500 ÷ 10 ÷ 1.5 = 33.33, which I rounded down to 30.

    Maximum shutter speed per the 500 Rule. Okay, this is where it gets a little complicated. Andy gave us a handout with a table of settings for the 500 rule, but never explained what the rule was or why it’s important. I did a little research this morning to learn more. We all know that the earth rotates, which means that the stars appear to move across the night sky. They move slowly so we don’t actually see them moving, but if your camera’s exposure is too long, you’ll get star trails — lines made by the stars as their light moves across the camera’s focal plane. To avoid star trails — which is what we wanted to do — you need to set your maximum shutter speed in accordance with the camera sensor size and lens focal length. You can learn more about this on Petapixel, which is also where you can find a table of values. Keep in mind that the shutter speed is in seconds, not fractions of a second. So when I set my camera’s shutter speed, it appeared as 30" in the settings screen. Exposures longer than that require the “bulb” setting on my camera, which means I’d have to manually open and close the shutter based on time I keep with a stopwatch or something.

  • ISO to 2000. This is a good starting point. Of all the settings, this is the one you might be fiddling with in the dark, so make sure you know how to change it. On my camera, it can be done with a combination of buttons and dials but it’s actually a lot easier to just go into the settings menu. I found that my best shots were done at 5000; more on that in a while.

Shooting

Once we had set up our cameras, we all climbed onto the NCELC’s shuttle bus, filling every seat. Andy took a few people in his car. Although it was difficult to see the sky through the tall trees around the campus, it was still pretty cloudy and none of us had very high hopes of getting good photos. They’d decided to try a closer viewpoint: the Diablo Dam Overlook. This offered views of the main lake and dam, as well as up the Thunder Creek arm of the lake and Colonial Peak. With few trees, we’d have a clear view of the sky.

As we drove over the dam, I was looking out the window and saw a single point of light. “I see a star!” I called out. Other people looked but I’m not sure if they saw anything.

Get away from the lights!

Incredibly — to me, anyway — one of the class attendees had to ask the instructor where the Milky Way was. He could see it, but he didn’t know that that the bright band of stars he was looking at was what’s referred to as the Milky Way — the galaxy our tiny planet is part of. This made me sad. I remember my grandfather pointing out the Milky Way when I was five or six years old, sitting with him on the front lawn of his house in suburban New Jersey, long before light pollution hid it from view. Yet this man, in his seventies (!), had spent so much time in the city that he couldn’t even identify the Milky Way when he saw it in the night sky.

Less than ten minutes later, we were at the overlook, which was understandably deserted. It was well after 9 PM and quite dark. But once our eyes had adjusted after the lights from the bus we saw it above us: the Milky Way.

I beelined it to the corner of the overlook where I’d get a good shot up the Thunder Creek arm. My camera was already on my tripod; all I had to do was extend the legs and neck and get it in position. I might have been the first person to take a shot.

And this is where patience is important. Each of my shots was 30 seconds long. Once the shutter closed, the image did not immediately appear. The camera, which is nothing more than a computer with a camera attached to it, had to process all the information it had just collected. I think this took longer than the exposure time — perhaps as long as another 40 seconds. So from the time I started my shot to the time I was actually able to see it in the review screen at the back of the camera was more than a minute.

Thunder Arm at Night
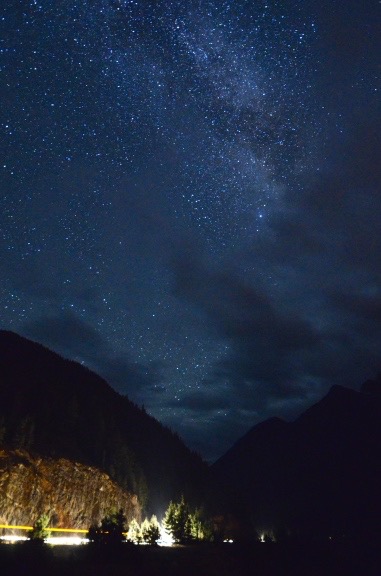
A look up Thunder Arm at night. The cars driving by on the road often ruined shots by illuminating landscape features we wanted to be kept dark.

My first shot came out dark. Yes, I could see the stars, but no, I couldn’t see them well. I thought it might have something to do with my reading glasses, which seem to make things look darker than they are. But Andy took a look and recommended bumping up the ISO, which he’d originally advised me to start at 1600. So I tried 2000. It wasn’t much better.

Meanwhile, other photographers were snapping away, emitting occasional oohs and aahs and cursing at the cars that drove past the view point, illuminating foreground items we wanted to be kept dark. One woman near me had very good luck with her camera ISO set to 5000 so I gave it a try. (My camera goes up to over 24000.) That looked much better, so I stuck with if for the rest of the shoot.

Keep in mind that the higher the ISO setting, the more light is processed in the camera. There is a cost to this, however. High ISO settings lead to grainy images or “noise” (digital artifacts) in the images. Ideally, you want to keep the ISO as low as possible to get the shot you want. But since you can’t open the lens any wider (aperture setting) and can’t lengthen the exposure any longer (shutter speed setting), the ISO is the only thing you can change to vary the brightness of your shot.

I moved around to a variety of places. The Milky Way was mostly overhead, but it did dip down to the horizon in the south. A handful of light clouds drifted by, sometimes obscuring stars.

Diablo Dam at Night
I took a few shots of the dam. The lights reflected off the clouds, reddening them. I think this is the image where digital noise is most apparent, especially in the clouds. (A few people mistook the reddish clouds in their pictures for the aurora. Sorry, but no.)

We shot for well over an hour. I captured about 40 images. I haven’t looked at all of them on my big computer yet; these are pretty much decent random images I grabbed for this blog post. All of these are edited to make the stars “pop” more than they do in the original. If you have good image editing skills, you’ll definitely use them if you do night sky photography. I prefer to minimize editing.

Sky Through Trees
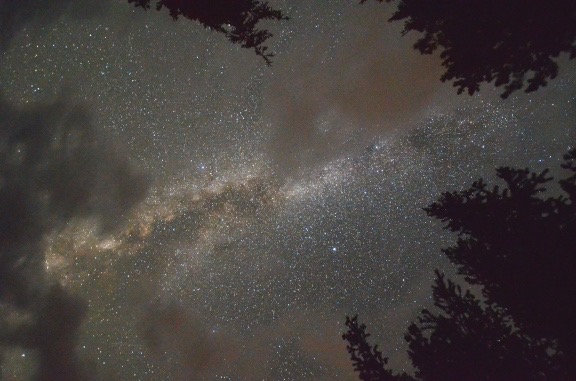
This was shot almost straight up. I think the trees and clouds offer a sense of three dimensionality.

For the most part, the photographers were good to work with. The only real problem we had was with light — too many of them wore headlamps. The trouble with headlamps is that they point wherever you look. So if you look up, your light flashes up, possibly illuminating trees or other foreground object people want dark. This got a bit frustrating and, more than a few times, I called out, “Lights down, please!” One photographer seemed to think that no lights should be on at all and rudely yelled at anyone who used a light, even if it was pointed down at the ground. Sorry, but when walking on uneven terrain in the dark I’m going to use a light — in my case, my phone’s flashlight. If the light doesn’t shine on the subject, it should not affect the photo.

The End of the Shoot… and Beyond

We went back to campus in two groups. I was in the first one. I’d had enough. My remote shutter control had died about halfway through the shoot and I had to rely on the camera’s self-timer to activate the shutter, adding another 20 seconds to each shot. I was burned out and, unlike most of my companions, I live in a dark sky area and can try this again anytime, right at home.

There was no follow-up lesson — although I really think there should have been the following morning. A chance to review and critique what we’d done. I did spend some time at breakfast with other students and got signed up for a Washington State Astrophotography group on Facebook. I’ve already swapped photos and comments with a few classmates there.

Could my images be brighter? I think so. Next time I try this, I’ll do more experimentation with ISO settings. I might need to pop it up some more.

And yes, there will be a next time. I’m thinking of giving it a go on my deck tonight. And I’m definitely looking for companions on overnight outings, possibly with the Turtleback. Washington Pass would make an excellent subject area, especially with the fresh snow I saw on the peaks on my way home. Anyone game for an overnight road trip this coming week?

Throwback Thursday, Birthday Edition

An old photo and some memories to go with it.

I don’t have many photos of myself, mostly because I don’t see any need to. I know what I look like: I see that face in the mirror every morning. But I do have a few older photos to look back on and this is one of them.

Old Photo
These two photos of me stood on the ledge beside my wasband’s desk in our Arizona home. I took the helicopter frame when I packed, but left the rest.

I vaguely remember the day the larger photo was shot. It was at my car in a parking lot at the beach. It was just after sunset. My future wasband was the photographer.

Nissan Pulsar
Here I am with my old car and my dog Spot in front of the first house I owned with my future wasband. I figure this was shot in 1985.

My car in those days was a 1983 Nissan Pulsar. It was metallic blue and a definite upgrade from the 1970 VW Beetle it replaced. I loved that car until I realized how much it lacked in terms of performance and agility. I replaced it in 1986 with a 1987 Toyota MR-2 that I owned until just a few years ago.

The beach was likely Jones Beach on the west end of Long Island in New York. My future wasband and I met there back on July 10, 1983, an event I documented in a blog post I wrote after my marriage to him fell apart 29 years later. The parking lot was called West End 2.

The photo was shot at sunset. We went to Jones Beach West End 2 occasionally to watch the sun set — that’s how we’d met. Back in those days, I lived in Hempstead on Long Island and he lived in Flushing in Queens. Although I doubt this photo was shot the day we met, it was probably shot sometime that same summer.

I like this photo a lot. It’s quite a nice composition; my wasband could be a good photographer when he tried. This is one of the instances when he managed to nail composition and light; he usually focuses (no pun intended) on subject matter and neglects one or both of the other vital components of fine art photography. (I can’t tell you how tough it was to get him to go on photo outings during golden hour light.) But in this case, he took a great portrait of a much younger version of me.

Younger, yes. I was probably 22 in this photo. My birthday had been just 10 days before we met and this had to be within three months of that. It’s one of my favorite photos of myself.

I’ve been thinking lately about how much I’d like to create a modern version of this photo. My face with the same expression — if I can pull it off after so many years of life experiences that resulted in the cynicism I work hard to overcome nearly daily. The position of my head in the lower corner of the driver’s side window of my current little car, a 2003 Honda S2000. The reflection of the horizon, red from the light of a recently set sun.

Or maybe it would have to be in my truck, since my car doesn’t have a back window for the reflection.

I just need a friend with a good eye and a camera to meet with me and make it happen. Another project for another day.

I don’t actually have this photo in my possession. I found it face down near my wasband’s desk when I returned home from my summer job in September 2012. The locks had been changed on the house I’d shared with him for 15 years, but an $8 lock — yes, I found the receipt dated just the week before on the kitchen table — isn’t going to keep me out of my home. (Neither was his lie-studded attempt to use the court to keep me out. No, I didn’t “abandon” him. I went to my summer job, as I had the previous four summers in a row.)

I found it interesting that he’d kept the photo at all. Or the one of the two of us all dressed up, shot only a few years later at a friend’s wedding, which I mailed to his mother as a birthday gift. I was surprised that the desperate old whore he’d hooked up with, who was obviously calling the shots for his life and divorce battle, hadn’t destroyed them when she was in my home, sizing up my possessions for her own future use. (That didn’t work out the way they intended, either.)

I righted the two photos and snapped the picture you see above. Later, I packed the little helicopter frame — I honestly can’t remember if I took the Papillon picture with it; it’s still packed somewhere. But I know I left the car window portrait behind. I think I was hoping that it would jog his memory of the better days together so long ago, before greed and jealousy and anger and frustration had split us apart. Maybe it would snap him out of his delusional state of mind and make him think twice about what he was throwing away. And how much it was costing him to make an enemy of the only woman who truly cared about him.

Of course, none of that happened. I stayed in the house until May 2013, packing my things while I waited in vain for him to see reason and settle out of court. In the end, it went in front of a judge and he wound up paying me and his lawyers at least four times what he would have if he’d agreed to my generous settlement offer. And he could have kept the house! Stupidity? Greed? Bad advice? I think they were all part of his problem. Amazing how a person can change.

But by then I was started on my new life without him, moving forward for the first time in years without a sad sack old man holding me back. Building the home I wanted — without the endless delays and compromises and excuses I’d been dealing with for years — in a beautiful place among good friends. A place where I could build my business and have an active life with the variety and challenges I thrive on.

When I look back on this picture, I remember the good old days when we were young and idealistic and deeply in love. And then I remind myself that the man who took the photo is long gone — and I’m so much better off without the man he became.

Flying with the Global Supertanker

A memorable photo flight and tour of an amazing aircraft.

The first call came from Global Supertanker over a month ago. Would I be interested in working with an aerial photographer to shoot dry runs and water drops made by the world’s only 747 air tanker?

The answer came with only a few thoughts of what this might entail: sure!

But because about 50% of the calls I get to fly Flying M Air‘s helicopter on unusual missions never actually happen, I didn’t get my hopes up too much. I tweeted about it briefly and mentioned it on Facebook. Then I filed it away in the back of my mind and got on with my life.

Until last week. That’s when another call came. And another. Soon I was taking down the names and phone numbers of contacts involved with the demo flight and photo shoot. Checking my calendar for availability and weather resources for forecasts; yes, Monday could work. Getting briefed over the phone about what they wanted to do and how I would help them get the video footage they needed.

I was very excited about the job — and not because of the potential earnings for a few hours of flight time. You see, it’s not always about money to me. It’s often about the opportunity to do something new and different, to meet people who are part of a different world, to participate in a program that’s interesting, to expand my horizons and learn new things. That’s a big part of what my life is about, that’s what drives me to wander down the paths I’ve chosen. It’s about taking on new challenges to make things happen.

And what could be more of an interesting challenge and learning experience than flying a videographer above a 747-400 air tanker as it drops 20,000 gallons of water over a Washington forest?

The date and time was set for Monday, June 20. I’d need to get to Moses Lake, WA by 7 AM so the photographer could install his equipment and I could get briefed with the flight crews of the two planes we’d be shooting.

A Busy Weekend

But I had plenty of other flying to do before then.

Friday was a training day, with me spending about an hour and a half practicing autorotations with Gary, one of the owners of Utah Helicopter, who is also a flight instructor and part of Flying M Air’s cherry drying team. Gary is a great instructor and I did pretty well, actually nailing the spot for a 180° autorotation twice in a row. (I didn’t tempt fate by going for a threepeat.) Afterwards, my helicopter got a 50-hour inspection, which is mostly an oil and filter change and spark plug cleaning.

Friday was also the day one of my Facebook friends excitedly announced, “The Boeing 747 Supertanker just landed at Tucson.” He was under the impression that it was there to fight the wildfire at Show Low, AZ. That got me wondering whether there were two of them. I soon learned that there was just the one and that the only reason it had stopped in Tucson was to refuel before flying on to Moses Lake. Truth is, the Global Supertanker hasn’t been certified yet; I’d be participating in part of the certification process here in Washington.

Saturday was a crazy flying day with rain most of the day and 7 hours of tedious flying over cherry trees. I figure I personally dried about 200 acres of cherry trees, including more than a few orchards that got dried two or three times. My team flew just as much, if not more. While it’s nice to get all those revenue hours, I dread long, widespread rain events like the one we had Saturday. It’s stressful for everyone and exhausting.

Sunday was a lot more enjoyable and nearly as busy, with seven Father’s Day flights, including two short ones for my next door neighbors and one for my mechanic and his family that included a flight down to Blustery’s in Vantage, WA for milk shakes. 5.3 hours logged.

And then there was Monday.

Prepping to Fly

Despite waking up at about 4 AM — I get up very early here in the summer — I got off to a late start. I’d planned 30 minutes to get to Moses Lake, but lifted off at 6:35.

At Moses Lake
Flying M Air’s helicopter parked at Moses Lake with the Global Supertanker.

The sky worried me. It was cloudier in the area than I’d expected based on the forecast and the radar showed rain to the southwest moving northeast, right toward the Wenatchee area. Not a good day to be taking off to the east. Although I’d never be more than 45 minutes flight time from my base, I did not want to break off from the photo flight to dry cherries. Fortunately, I had two pilots in Wenatchee who could cover the orchards. As long as it wasn’t another widespread rain event, we should be okay.

I made it to Moses Lake on time. I set down on the lone helipad in front of the Million Air FBO at almost exactly 7 AM. No one was around, but the big plane was parked on the ramp behind me.

Moses Lake
Moses Lake is a huge, underutilized airport.

I should say a few words about Moses Lake’s airport, Grant County International. First, it’s huge, with five runways, the longest of which is 10,000 feet. A former military airport, it still has a military ramp. It also has a U.S. Customs office, two FBOs that provide fuel, and a handful of flight schools. There’s a control tower but no airline service, despite a very nice terminal building. It’s used by Boeing to test fly 747s coming out of the factory in the Seattle area. They fly them over the Cascade Mountains, land them at Moses Lake, and then fly them around to work out any bugs before delivering them to clients. It’s the only airport I know where you can occasionally see 747s flying standard — but admittedly wide — traffic patterns and doing touch-and-goes. With a Boeing facility on the field, it was an obvious choice for the Global Supertanker people to continue work on their certification process.

Million Air doesn’t sell 100LL, the fuel my helicopter takes. It only sells JetA. But Columbia Pacific, which was supposed to open at 8 AM, sells 100LL. As I went through the shutdown procedure, I saw activity at its hangar and decided to try raising them on the radio. I’d need both tanks topped off before the flight. I got a line guy on the radio and put in a fuel order. He promised to get to it when he was finished with the other plane he was fueling.

I went inside the FBO to look for one of my contacts. It was a while before I connected with the photographer, Tom, who was piling gear on the floor after multiple trips out to his car. He’d driven in from Seattle with his camera mount, a brand new video camera, and a ton of other equipment. He asked me to move the helicopter closer to the building and I was in the process of going out to do so when the fuel guys arrived. Before they could finish, Tom had come out to the helicopter with one of the FBO line guys and his gear and began setting up. I removed the rear passenger-side door for him, stowed it in a Bruce’s Custom Covers door bag I had, and brought it into the FBO office for safekeeping.

Back in the FBO, I waited outside the conference room where a meeting of the pilots, FAA inspectors, and other program personnel was going on. While I waited, an FAA inspector came up to me and introduced himself. He asked if I was the pilot of the helicopter and when I told him I was, he told me he’d ramp-checked me. I was surprised and I think my expression revealed that. He laughed. “Don’t worry. You passed. Everything is fine. But I do need to get some info from your pilot and medical certificates.” I handed them over.

That’s when two things happened. First, I was called into the meeting. Second, my phone started ringing. Caller ID showed it was one of my cherry drying clients. I apologized and excused myself, took the call for an orchard drying request, hung up, and called one of my pilots to give him the job.

I was introduced to those assembled and put a few of my business cards on the table for those who wanted one. Then I was briefed, through map images on a laptop, of the planned routes and what my position needed to be. I got important information such as flight altitudes, operational frequency, and radio calls for various parts of the flight. The operating area was a place called Keller Butte, which was about 50 nautical miles north northeast on the Colville Reservation, not far from the Grand Coulee Dam. There was a fire tower there and one of my contacts was already there with a few other people to do photography from the tower. The other two aircraft was the 747-400 Global Supertanker and the lead plane, a King Air, which would do “show me” flights and then guide the larger plane to the drop zones for both dry and live runs. There were two planned run routes at or below 5,000 feet elevation in the hilly terrain around the Butte.

Wake Turbulence
Wake turbulence, illustrated. The best way to avoid it is to stay far away or above the plane.

My main concern, of course, was wake turbulence from the 747. Wingtip vortices from the big plane’s wings trail out and down. If I flew too close to the plane — especially at a slightly lower altitude, I could be caught in them. Only a week before, I’d been caught in the relatively minor wake turbulence caused by a Dash 8 at Wenatchee. I was far enough back that it wasn’t an issue, but I certainly did feel it. Getting even that close to a 747 configured for a low pass would be catastrophic for me and my aircraft. The solution was to stay above it. I asked about altimeter settings so we would all be dialed in the same way. One of the pilots said we’d start with the setting for Moses Lake and then update it in flight. They said they wanted me at least 200 feet above. I was thinking 500 feet.

I got and made another call while I was in the meeting. Those attending were surprisingly understanding. Now both of my Wenatchee pilots were flying. I knew that if the cherry orchard acreage started adding up beyond the point where my guys could cover it promptly on their own, I’d have to leave to help them. This would inconvenience my new clients and ruin any possibility of future work with them. But when I stepped out of the meeting and consulted Wenatchee area radar, I saw that whatever cells had moved in were already moving out or dissipating. There would be no more calls.

Before the meeting broke up, I was introduced to my front seat passenger, Phil from the FAA. So yes, I had to conduct a complex photo flight with an FAA inspector sitting next to me. No added stress, huh?

Camera Mount
Tom’s camera mount. The camera is facing the wrong direction in this shot.

Meanwhile, Tom, the photographer had set up his camera on a weird hanging mount in the left rear seat. Its heavy padded base sat on the passenger seat with a pole that provided a hook for his camera. The seatbelt held it securely in place, making an STC unnecessary. The camera hung from a bungee cord contraption and had two Kenyon KS-6 gyros attached to it. Tom would sit in the seat beside it and shoot through the window.

I admit I wasn’t happy with the setup. There were two reasons:

  • The camera’s lens was at least 10 inches inside the cabin door. That meant that he’d have less panning range before the door frame came into view. (The Moitek camera mount I have makes it possible to mount the camera with the lens at the door opening, right inside the slipstream. That maximizes the potential range without worries about wind buffeting.)
  • Putting the camera on the opposite side of the aircraft from the pilot with a passenger sitting beside the pilot made it virtually impossible for me to see what he was seeing. At times, my passenger also blocked the target aircraft from view. But although I suggested that he mount the camera behind me, he said that the mission required it to be where it was. I still don’t see why that was so, given that with a variety of runs and angles, we shot pointed in either direction. But the customer is always right, eh?

Still, there was nothing seriously wrong with the setup. It just made more work for me and the photographer and limited his capabilities. So once I’d conducted my required FAA flight safety briefing — using the briefing card, of course, mostly for the benefit of my FAA audience — and satisfied myself that nothing would fall out the open doorway, I climbed aboard with my passengers and started up.

The Shoot

Leg 1 on Google Earth
I beelined it to Keller Butte, did a lot of maneuvering there, and then beelined it to Wilbur Airport for refueling.

The flight to Keller Butte was uneventful. I chatted mostly with Phil. Because rushing air coming in through the open doorway was getting into Tom’s microphone, I had to turn off voice activation. That kept Tom quiet, mostly because he had so much stuff between the seats that he couldn’t reach the push to talk (PTT) button. Later, when we were set up to shoot, I’d turn voice activation on.

We crossed the farmland north of Moses Lake, the desert north of there, and the wheat fields north of there. Then we crossed over Roosevelt Lake, which is the Columbia River upriver from the Grand Coulee Dam. Electric City was just west of us and during the course of the day, we spotted the Grand Coulee Dam several times. (We even did a flyby on our way to refuel.) Keller Butte was one of two small mountains just north of the lake. We zeroed in on the higher of the peaks and saw the fire tower right away.

Then it was time to wait. There was no landing zone up there — why don’t they build helipads near fire towers? — so we had no choice but to circle. By then I was tuned into our agreed upon air-to-air frequency. The folks at the fire tower had handheld VHF radios and kept us informed on what they knew about the other aircraft based on phone calls they were apparently getting from Moses Lake.

Then I heard the King Air pilot coming in. As he got closer, he asked about my position and I told him. He got me in sight and began circling and practicing the runs.

Then the Supertanker’s pilot called in. He also needed to know where I was. I stayed close to the tower, realizing that he was coming in at a higher altitude than the 5500 feet I was maintaining. Fortunately, he joined up in formation flight with the King Air far enough away to make wake turbulence a non-issue for me. They got right down to business, prepping to make the first “show me” run. I moved into the agreed-upon position and climbed to 6000 feet while they descended.

The “show me” run is where the lead plane does the actual run that the tanker needs to do. The tanker pilot stays higher, following him and watching where he flies. The lead plane’s pilot announces when he’s on the line, where the drop should begin, where the drop should end, and when he’s clear. He peels off to one side and the tanker normally peels off to the other. They then regroup with the smaller, more maneuverable plane joining back up with the tanker.

There’s a lot of radio chatter during all this as they synchronize speeds, talk about positions, and establish run altitudes. I stayed quiet unless I thought they needed to hear from me or asked me a question. Phil listened and observed intently. In the back, Tom apparently couldn’t hear the radio chatter and had to be filled in, over the intercom, about what was coming next.

First Leg Spaghetti
Foreflight’s track log feature recorded the details of my flight path. Looks like spaghetti, no? This was just the first flight.

My job was mostly to hover in position with the camera facing the action. Because the camera’s panning range was so limited, I also had to pivot the helicopter so Tom could track the big plane. There was about a 10 knot wind up there and depending on which direction we were facing, maintaining that hover and smoothly conducting that pivot ranged from easy to near impossible. Over the course of the day, I’d get into and (obviously) recover from settling with power twice. Once, a quartering tailwind whipped us around almost 90° before I caught it. But, in general, I did an acceptable job. The biggest challenge was facing a target that I sometimes could not see. Fortunately, the choreography of the runs and shoot position — as well as my front seat observer — made it unnecessary for me to worry about midair collisions.

This went on for nearly two hours. A “show me” run followed by several dry runs followed by a live run with a full drop — which was awesome to see from the air — followed by more dry runs. Tom missed the live run because of camera focusing issues. The two planes moved to the other run location and I shifted position accordingly. Then another cycle of runs. But because they were out of water, there was no live run. They checked in with me when I still had an hour of fuel left. Then did three more runs before announcing bingo and heading back to Moses Lake to refuel.

We didn’t need to go so far. The closest airport with fuel was Wilbur, WA, 20 nautical miles south southeast. It’s basically a paved ag strip with a handful of hangars and a set of fuel pumps for 100LL and JetA. We landed and someone came over to help us with the pumps. There was no credit card system, so I gave him my mailing address and he promised to send a bill.

We hung out for a while. Although the Global Supertanker can refuel and refill with water/retardant in 30 minutes, they weren’t doing it that day. We were told it would be at least 90 minutes. So we killed time by visiting the ag operator’s hangar, finding and using a restroom, and talking. The folks there were very nice. And Tom, the photographer, showed me how to do a trick panorama shot like this one:

Trick Pano
Seeing double Tom? This shot is remarkably easy to make, right in the iPhone’s camera. All you need is a model who is quick on his feet.

I was glad I’d brought along some water. My passengers had, too. There was nothing within walking distance of the airport except wheat fields. The town was in a clump of trees about two miles away. I nibbled at some salad I’d brought for lunch, then put it away. I could wait.

We took off when we figured enough time had passed. It was a short flight back to Keller Butte, where the guys in the tower — now lounging on chairs in the parking area below — told us neither plane had taken off yet. Eager to save fuel, I demonstrated a pinnacle approach and slope landing for the FAA inspector on board. Tom got out and soon disappeared a way down the hill. What is it about men peeing outdoors?

When I heard the King Air pilot make his call, I called Tom back. When he was strapped in, I took off and circled back up near the tower. And then we repeated what we’d done earlier with a variety of drop runs, two of which were live. This time, Tom got the footage. So did Phil, on his phone’s camera:

Supertanker Water Drop
Phil took this picture with his phone. Not bad through plexiglas.

I was just relieved that Tom had captured footage of the drop. It was very stressful to do all this costly flying, wondering whether he’d succeed and satisfy himself and his client.

This went on for another two hours with lots of hovering and circling and pedal turns. Then we all went back for fuel for another run — the two planes to Moses Lake and me to Wilbur by way of the Grand Coulee Dam, which neither of my companions had ever seen.

Triple Selfie
Me, Phil, and Tom. Now you know why I don’t share selfies: I suck at taking them.

This time I fueled up by myself, making the required entry in the fuel sale log book. (Things are pretty laid back in farming communities.) An older gentleman drove up as I was fueling, apparently excited about seeing the helicopter come in. His name was Phil, too, and he and Phil and Tom chatted. I walked back to the hangar to see if I could track down some W100Plus oil for my helicopter — it’s been burning more oil than usual lately, probably because of the engine’s age — and came back with a quart of W100 oil, which would do in a pinch. Then the ag service owner came over and chatted with the guys for a while. I ate my salad and finished a bottle of water. I took a selfie of us.

At 3:30 PM, it was time to go back. We loaded up, I started up, and we took off. We beat the two planes back again, but not by much. It seems that they’d discussed a new run and drop zone while they were in Moses Lake and wanted to do it. They had me hang out south of the tower while they did a “show me” pass to show the big plane, the guys who had been in the tower and were now on a road below it, and me. I picked a spot north of the new run area and told them I’d stick to 6500 feet or higher. Then I watched a few more practice runs while Tom shot video. I practiced and then nearly perfected a forward move that kept us from getting into settling with power and gave me more control over the direction I was able to point the helicopter, making it easier for Tom to get smooth shots.

But I also watched the planes. It was amazing how close that 747 could get to the treetops.

That went on for about an hour, with one big live drop. And then it was over — at least for us. They told us we were done. The two big planes peeled off to the west and I dropped altitude, ducking behind the ridgeline as I headed south. We continued listening to them for a while on the radio. Then, 20 miles out from Moses Lake, I switched frequency and they were gone.

The After Party

I got back to Moses Lake and set the helicopter down near the front of the FBO so Tom wouldn’t have to lug his equipment so far. Then I placed a fuel order. I didn’t even hear the Supertanker land and taxi into its parking spot behind us.

Phil urged me to ask for a tour. There was nothing I wanted more. Trouble was, the plane was in a part of the airport ramp that was not accessible to pedestrians. I asked the fuel truck driver to take Tom and me over and he started to. But then he got to some pavement markings and told me he couldn’t drive across without a green badge. He drove us back to Million Air.

I went inside and asked a guy in an office if he could help us get to the big plane. He very kindly came outside and drove us over in a golf cart. He let us off between the 747 and King Air and Tom immediately went to the King Air to retrieve some of his equipment. I told the FBO guy that I’d find my own way back and thanked him for the ride.

Stairway to Supertanker
The staircase was quite inviting.

I walked over to the big plane, snapping pictures most of the way. On the other side, a long stairway had been set up between the pavement and the door. One of the plane’s pilots, Marco, was there, inviting me in for a tour. He had the King Air pilot, Jamie, with him and another man who did work for the FAA. I climbed the stairs and joined them for a tour.

Marco on the Tanks
Marco explains what the tanks are for and how they work.

I could probably write an entire blog post about the inside of that plane. Formerly a cargo plane, the entire lower level had been stripped out. The front “first class” section remained empty — at least that day — but the back was configured with a collection of cylindrical tanks for air, water, and retardant. The air is used as a “plunger” to force the water and retardant out of the four ports at the bottom of the plane. The system is set up to make up to eight drops with a load. The retardant system can hold two different kinds of additives and drop them with water in any configuration. There’s an extensive leak detection system and a whole procedure for handling leaks in flight. Our guide told us all about it as we climbed over and crawled under huge white pipes.


I actually broadcast this first part of the tour on Periscope, but when the audience level did not rise above 10 viewers, I stopped the video so I could take photos instead. Here’s the video; I’m afraid it isn’t very good due to the tight quarters.

The Crew Cabin
The upstairs first class cabin is pretty much intact for use by the ground crew.

Copilot Selfie
I look ridiculously excited here, sitting in the First Officer seat of a real, operating 747.

747 Cockpit
Now that’s a cockpit.

Under the 747
It was my first — and likely my only — time strolling under a 747.

From there, we went up a sort of ships ladder to the top level. The original upstairs first class cabin was intact; with seats for 12 people, it was used to carry the ground crew to each mission. There were some computer controls in a room behind that. Then the cockpit with its sleeping bunks in a tiny room off to one side. I was invited to sit in the First Officer’s (co-pilot’s) seat while the FAA guy sat in the Captain’s seat. We took pictures of each other like tourists while the two pilots talked behind us about the plane’s systems.

Afterwards, we climbed back down the ships ladder and the main stairs to the pavement outside. I wandered around under the plane, checking out the enormous landing gear and engines and looking up into the four discharge ports that could disperse almost 20,000 gallons of water or retardant over a 3 kilometer path. Around me, workers were tending to the plane: fueling it, filling it with water, cleaning its windscreen. It was the focus of attention even as it just sat their idle, waiting for its next flight.

I looked across the pavement at my helicopter and realized that the two aircraft had a lot in common. They were both used for a purpose, pampered between flights, and respected by their pilots.

As I headed for the Million Air’s shuttle bus, I stopped to chat with one of the men working on the plane. He asked me if I had a challenge coin.

“A what?” I asked.

Challenge Coin
Is this a cool souvenir or what?

“Here,” he said. “I think we have a few left.” He went into a box on the front seat of a van nearby and produced a heavy coin in a protective plastic sleeve. He handed it to me and I thanked him. It’s a great keepsake of the day’s events.

The van drove us all back to the FBO. Jamie and Marco went inside and I walked back to my helicopter. I’d already put the door on and was all ready to go. I took a last look at the big plane I’d been flying over most of the day and wondered if I’d ever see it again. Then I climbed on board, started up, and headed home.

When I shut down, I discovered I’d flown a total of 7.3 hours.


Postscript: As evidence of a day spent dancing on the anti-torque pedals, for the first time ever, my calves were sore in the morning.

Doors-Off Flying

Things to keep in mind.

Note: A version of this post originally appeared in AOPA’s Hover Power blog. If you’re a helicopter pilot, you owe it to yourself to check in there regularly to read great articles written by experienced helicopter pilots.

Summer is on its way and, in most parts of the northern hemisphere, that means warm weather will soon be upon us. Not every pilot is fortunate enough to fly a helicopter with air conditioning. When I lived and flew in Arizona, it was common for me to take all of the doors off my R44 in May and leave them off until September. It was that hot every single day. (And no, I don’t miss it one bit.)

Of course, pilots don’t need warm weather as a reason to take the doors off. Sometimes the mission you’re flying requires it. Aerial photography is a great example — there aren’t too many photographers who would be willing to pay hundreds of dollars an hour to fly with you and be forced to shoot photos through highly reflective, possibly scratched Plexiglas.

Door Off
For this memorable video flight, the videographer sat behind me with his door off.

When you remove the doors from a helicopter, you add an element of risk to the flight. Fortunately, the risk can be controlled if you fully understand it and do what’s necessary to reduce or eliminate it. That’s what I want to touch upon in this post.

Loose objects

The most obvious risk is from loose objects blowing around the cockpit or, worse yet, exiting the aircraft. This is a real danger, especially if an object hits the tail rotor or someone/something on the ground.

Want some examples of how dangerous this can be?

  • NTSB WPR14CA363
    “While in cruise flight an unsecured jacket departed the helicopter through an open window. The tail rotor drive shaft sheared as a result of the jacket’s contact with the tail rotors. The pilot subsequently initiated a forced landing to an orchard where during landing, the main rotors struck and separated the tailboom.”
  • NTSB WPR13CA071
    “Prior to the flight, the doors were removed in order to make it easier for the passengers to board and exit the helicopter…. After the two passengers were transported to a work site location, the right rear passenger exited the helicopter and placed the headset on the hook located behind the front seats. After departing the site, about 3 to 5 minutes later while en route at an elevation of about 1,000 feet above ground level, the pilot felt something strike the helicopter. After landing and upon inspecting the helicopter, the pilot discovered that the right rear headset was missing and that the leading edge of the tail rotor had been damaged.”
  • NTSB LAX03TA150
    “While in cruise flight, the back door on the helicopter opened, and a flight jacket that had been unsecured in the back seat departed the helicopter and became entangled in the tail rotor assembly. The tail rotor assembly subsequently separated from the tail boom, and the pilot was unable to maintain control of the helicopter.”
  • NTSB FTW86LA047
    “The pilot failed to assure the cabin door was properly closed before flight, or the cabin door just popped open during flight, allowing an unsecured life vest to blow out the door and into the tail rotor blades. This resulted in the entire tail rotor assembly departing the helicopter.”

(As some of these examples show, you don’t need to have the doors removed to have an unsecured item depart the helicopter and get into the tail rotor.)

Robinson Helicopter warns about this in Safety Notice SN-30, “Loose Objects Can be Fatal.” It recommends that pilots firmly latch all doors and even goes so far to recommend that pilot never fly with a left door removed. (Remember, the tail rotor is on the left side in a Robinson and many other helicopter models.)

I know that my engine starting check list includes an item to assure that loose items are secure. Yours should, too. While this is always important, it’s vital for doors-off flight.

Be sure you warn passengers of the danger of an item exiting the aircraft. Even something as small as a lens cap or lens hood can do significant damage to the tail rotor in flight.

Never Exceed Speed

You might not realize this, but your helicopter’s never exceed speed might be reduced with the doors off. On a Robinson R44, for example, Vne is reduced to 100 knots with the doors off, even if other conditions such as altitude and temperature would allow a faster speed.

My understanding from the Robinson Factory Safety Course is that this reduction of Vne is for structural reasons. (If someone knows better, please correct me in the comments.) There’s more buffeting wind inside the cabin with one or more doors off than with all doors on.

Check the Pilot Operating Handbook for the aircraft you fly the next time you remove doors to make sure you don’t operate beyond doors-off Vne.

Securing Passengers

This might seem like a no-brainer, but if you’re going to remove doors, your passengers had better be secured in their seats with either seat belts or harnesses.

Because some of my aerial photography or video clients like a greater range of movement in their seats than seat belts allow, I have a mountain climbing harness with a suitable strap for securing it to the aircraft frame. I make this available to clients as an option if they don’t have their own. Under no circumstances do I allow my passengers to fly without being secured, especially when their doors are off.

Keep in mind that while a photographer might use a harness to secure himself in the aircraft, you must make sure he knows how to release the harness from the aircraft in the event of an emergency — just as your preflight briefing must tell passengers how to release their seat belts.

Dangling Seat Belts

Of course, it was my generous offering of a harness to a photographer that resulted in more than $2,000 of damage to my aircraft when he used the harness but failed to secure the seat belt at his seat. The seat belt buckle dangled outside the aircraft for the duration of our 90-minute video flight chasing racing trucks over desert terrain. On landing, the passenger side fuel tank and area just outside the door frame had at least 50 dings and paint chips in it. How he didn’t hear it repeatedly striking the aircraft near his head is something I’ll never figure out.

Of course, it was my fault for not catching this prior to starting up and taking off. Expensive lesson learned.

Conclusion

While I don’t think there’s anything wrong with taking the doors off a helicopter prior to flight, it does give the pilot more responsibilities to assure that everything is secure and all passengers are properly briefed.

Or isn’t that something we’re already supposed to be doing?

Pay the Pilot

Yes, I still get requests like this.

Way back in 2009, I blogged about a video of Harlan Ellison ranting against people who expect professionals to write for free. It’s time to revisit that topic for two reasons.

I Can’t Use No Stinkin’ Badges

First, a Facebook friend pointed out that Idiot’s Guides, an imprint of Penguin Random House, is looking for authors and editors for books and articles. Compensation? “Badges” and exposure. Apparently some writers have mortgages and utility bills that accept that for payment. (Sadly, mine don’t.)

That set off the usual discussion about new writers needing to break into the field and obtain “published clips” countered by my argument that if enough writers are willing to write for free, all the clips in the world aren’t going to help a writer get past the freebie stage because there simply won’t be any paying work for him/her. Publishers don’t seem to care much about quality these days — read most online publications to see for yourself — they just want words that Google well. That’s why there are so many content mills.

I am hugely opposed to writing for free for any publication that makes money from my work. If a publication values your work, it should pay you for it. Period. If it doesn’t, you shouldn’t be writing for it.

If you have a differing opinion and feel a need to voice it here in comments, be my guest. Just (1) stay civil if you want your comment to actually appear and (2) don’t expect to change my mind. You might want to watch that Harlan Ellison video first.

Promoting My Company on Your “Social Medias” Doesn’t Pay for Fuel (or Maintenance or Insurance)

Last night, I got the following email message, submitted using a form on the Flying M Air website; I’ve obviously redacted identifying information:

Phone:

Source: A Search Engine

Message:
Hello,
my name is ***** and I’m a landscape photographer. I am in Page now and I was looking for joining a flight over Lake Powell/Alstrom Point tomorrow 05/27 or in the next days if not available. I would like to know if you would be interested in a collaboration. I would promote your company through my social medias and I will give you the rights to use some of the images I will take for your promotional purposes (such as website and social medias). Also I’m traveling with my partner, the travel blogger behind *****.com and she would also promote you through her social medias + mention you on her blog. Kindly let me know if you are interested in my proposal. If you want to check out my work please follow this link: www.*****.com

Best regards,
*****

I need to point out that this person didn’t think it was appropriate to include his phone number in the field conveniently provided for it. So if I decided that I wanted to take him flying the next day at a location 736 NM from my base of operations, the only way I had to contact him was by email or to go to his website and attempt to find a phone number.

Alstrom Point
The view from above Alstrom Point at Lake Powell. This is just one of at least a dozen good photos I have from this area.

And yes, Lake Powell is over 700 nautical miles from my base of operations. The same contact page he used to send me an email clearly displays my mailing address in Washington state. The entire site provides information about the tours and other services I offer in the Wenatchee area of Washington. So I’m not quite sure why he thought it was remotely possible for me to fly him the next day at a place 700 miles away.

I did a Twitter and Google search for this person. I could not identify his Twitter account and he did not appear on the first page of search results for Google. This pretty much confirms my suspicion that his “social medias” wouldn’t have any value at all.

My first instinct was to simply delete the email. And I did. But then I thought about how well it would work as an example for this discussion in my blog. So I pulled it out of the trash and started writing this.

Then I thought about responding to it. And I wrote a response:

Thanks for taking the time to inquire about our aerial photography services.

Apparently you missed the part on our Contact page — coincidentally the same page where you found the form to email us — where we provided our mailing address in Washington state. Lake Powell is 739 nautical miles from our base, so the possibility of us flying there today to take advantage of your generous collaboration offer is pretty much nil.

If you’re serious about flying with us at Lake Powell, you might be interested in this offer for next spring:
http://www.flyingmair.com/news/lake-powell-photo-flights-april-2017/

You might also benefit from reading and understanding the information here:
http://www.flyingmair.com/aerial-photography/rates-fees/

A “collaboration” has to be mutually beneficial. I don’t need aerial photos of Lake Powell — I have hundreds of them, some of which appear on the Flying M Air site. Some of the photos in my collection were given to me by photographers who also paid me for their flights. I can’t imagine how more photos or promotion on your “social medias” would help me buy fuel, pay for maintenance, or cover my $15,000/year insurance bill.

And by the way, which ***** are you on Twitter? I couldn’t find you. And a Google search for your name didn’t bring up any landscape photographer on the first page of results. Seems to me that you need to fix your “social medias” before you offer them up as compensation for services rendered.

Enjoy your trip to Lake Powell.

Maria Langer
Owner, Flying M Air

I haven’t sent it yet. Should I?


May 25, 2916, 9 AM Update:

Prompted by Brian Dunning’s comment below, I’ve recomposed my response. What do you think of this?

Thanks for taking the time to inquire about our aerial photography services.

Unfortunately, we’re not available at Lake Powell today or the 27th or any other time this week. We are planning a trip there in April. You can learn more about opportunities to fly with us there then on this page of our website:
http://www.flyingmair.com/news/lake-powell-photo-flights-april-2017/

You might also benefit from checking out the additional information here:
http://www.flyingmair.com/aerial-photography/rates-fees/

But your timing is perfect! I have a photography job here near our Washington base that needs to be done this weekend and I think we might be able to collaborate on that. I’ll need about a dozen 20 megapixel photos of the Rock Island Dam shot with a 10mm fisheye lens from a boat near where the water is released from the dam. I’m sure you have or can get the equipment needed for creating such photos. I would sell your photos to my client and mention your name to him; maybe he’ll hire you in the future! I’d also show them off on my social medias to help promote your work. And a friend of mine who has a photography blog might mention your name, too.

Kindly let me know if you’re interested in my proposal.

Best regards,
Maria Langer
Owner, Flying M Air