Construction: The Punch List

And a deadline.

On May 20, 2014, I began blogging about the construction of my new home in Malaga, WA. You can read all of these posts — and see the time-lapse and walkthrough movies that go with many them — by clicking the new home construction tag.

About two months ago, I was driving a rental car down a perfectly straight dusty dirt road alongside an irrigation canal in California’s Central Valley when my phone rang. It was a woman named Susan who writes for The Good Life, a lifestyle magazine for the Wenatchee area. She had been to the Wenatchee Home Show (which I’d missed because of my trip to California) and had seen the time-lapse video of my home construction that I’d given to Western Ranch Buildings to show off in their booth. She’s spoken to Tanya about the place and learned that it wasn’t just a typical pole building. It would be a home and a garage and a place to store big toys like a giant RV and a helicopter.

She decided that she wanted to do a story about it for Good Life.

I was flattered, of course — who wouldn’t be? But my home was far from finished. The kitchen cabinets had just been delivered and would be installed the day after my return. Then the appliances would come. The countertops, floors, bathroom fixtures, and so much more still needed to be done. And all those wires sticking out of the walls needed attention.

I told her it would be ready in May. She promised to call back. I figured I had a 50-50 chance of her remembering.

She remembered. She called early this week. We set a date for her and a photographer to come visit and see the place. I put the date on my calendar. I had just over three weeks to finish up and move in.

Holy cow, was I going to be busy!

Still, I work best and fastest and produce the most when I have a deadline Susan had given me one. If I wanted my new home to look the best it possibly could when when and her photographer showed up, I had to stop procrastinating and get finished.

In an effort to stay focused, I’ve come up with this punch list of items that need to be done. They fall into two categories: inspection items and finish items.

Inspection Items

Although several people suggested that I build my home inside my building on the sly without getting inspectors involved, I didn’t think that was a good idea. Maybe I’m being naive, but I believe that inspections and housing rules exist for a reason — safety — and that having an inspector (or two) look over my work would help me keep my home up to standards. With that in mind, my building permit has two parts: my main building (which has been approved) and my living space inside it (which has not yet gone through final inspection). To legally live inside my building, I need to pass all inspections and get a Certificate of Occupancy (CO).

I should add here that my property will have much greater value if it includes a legal living space. I’m thinking of the future, too.

There are two inspectors:

  • The electrical inspector makes sure my electrical system meets standards.
  • The building inspector makes sure my building and home meets standards.

The good news is, I’m almost done with all items needed for the inspections. I’m pretty sure this is a final list:

  • Close up drywall in garage ceiling and fire tape. My bathroom is immediately above one of my garage bays. In order to complete the plumbing work, we needed to leave part of that ceiling open. The drywall guy provided precut panels to close it back up. I need someone to help me hold those panels in place while I screw them in. The entire garage ceiling had to be drywalled and taped to meet county fire codes and the whole thing is done except this one place. I estimate it will take about 2 hours and I’ll need a second set of hands for about 30 minutes.
  • Deck Rail
    Using “hog panels” as a deck rail solution was suggested by Bob, further developed by me, and executed/fine-tuned yesterday by the two of us. A low cost, rustic solution that doesn’t look trashy.

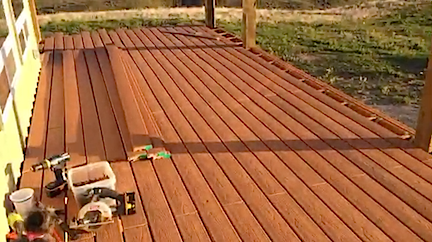
    Finish deck. Because two doors open onto my deck, the deck must be finished for final inspection. That includes not only the floor, but a rail and barrier around the edge with openings not larger than 4 inches. The deck is 600 square feet and the rail is 104 linear feet so it’s quite a job. Other than some assistance getting me started the first day, I’ve been doing the deck floor myself. I have about 400 square feet laid. Yesterday, a friend came by to help me work out an idea we had for the rail and barrier. I suspect I have at least another 4 to 6 full days of work on the deck, which could be shortened up with some dedicated assistance from a friend.

  • Install safety rail around loft. This is a bummer and I’m hoping I can get the building inspector to give a little on it. I have a loft over my hallway and laundry room and bedroom closet. Because it’s tall enough to stand up in the county requires a rail around it like the barrier around my deck. But I don’t even have a ladder to get up there (yet) and won’t be using it. Such a shame to be delayed for this space. It’ll take about 2 days to get this job done — once I figure out how I’m going to do it.
  • Finish electrical work. Yes, there are a few fixtures remaining to be wired. They’re all on the deck. I need to climb a ladder to do them and I figured I may as well wait until I had a deck floor to put the ladder on. There are six light fixtures: two spotlights and four sconces. There’s also the outlet I need to install for my air conditioning compressor; most of the wire has been run and I just need to put in an outlet. (Note to self: call HVAC guy to ask where he wants the outlet. And maybe encourage him to take his man-lift home?) Total time for all electrical work needed to be finished: 3-4 hours, mostly because of some additional conduit I need to run.
  • Install hand rail for stairs. I keep forgetting this one. I suspect I’ll use the dowels that were curtain rods in my old home for this job. So glad I packed them and took them with me — it’ll save me a bunch of money. Total time for this job: about 2 hours.
  • Install doorknobs and locks on fire doors. I was required to have 20-minute rated fire doors between my garage and my living space. There are two of them in the entrance vestibule at the bottom of the stairs. A friend helped me install them well over a month ago and I bought the doorknobs. Don’t know why I haven’t installed them yet. Total time for this task: 1-2 hours.
  • Finish shower stall. I’m actually not sure if this is required for the county. The shower plumbing works, but there’s no enclosure to keep the water in if I used it. This is going to be a bit of an involved task that will take at least 2-3 days. Not only do I need to erect the acrylic block walls I bought, but I need to tile the back wall. And I hate doing tile work. If this isn’t required, I’ll shift it to the list below.

Finish Items

Finish items are the things I need to do to make the house more cosmetically pleasing or functional. They’re not required for final inspection and, therefore, should be done after those higher priority items. This list is extremely long, but I’ve managed to list the ones I want done before the Good Life crew come visit.

  • Doors. Right now, I don’t have any interior doors. Even my bathroom has nothing more than a curtain — and that’s just because I assume my guests would want some semblance of privacy when using the facilities. I need the following doors: bathroom, linen closet, coat closet, bedroom closet. I would also consider doors for the laundry room and pantry, although I think both could be handled with a nice curtain. This will require me to order the doors, wait for them to arrive, pick them up, and install them. I have no idea how long this will take or whether it’s something I can do on my own.
  • Windowsills. I have eleven windows that are deep set into the walls and need window sills. I’m going to make them out of wood. I figure it’ll take me about 3 hours to measure and cut them and then a total of 3 hours to apply stain and two layers of urethane. And then another 2 hours to install them. Of course, none of the wood working projects can be done at one shot — they all need time for the stain and urethane to dry.
  • Ledge around stairwell wall. My stairs are open on top with a wall around them. The top of the wall is unfinished. A woodworking friend will be making a custom ledge to top the wall. He’s coming tomorrow to measure and discuss his ideas with me. With luck, he’ll have them finished and ready to install in a week or so.
  • Wood trim. There’s a gap of 1/8 to 1/2 inch between the Pergo flooring and the walls. That has to be covered with wood trim. I’m using 1×4 lumber that I stain and urethane. I really need to get my act together and get this done. I’m probably looking at a total of 3 days worth of time to prep the wood, measure, cut, and install. A friend loaned me his nail gun so installation should be relatively painless — if I measure and cut right!
  • More wood trim. If I don’t put doors on the pantry and laundry room, I’ll need to trim out the openings. I’ll use ripped 1x6s with 1×2 or 1×3 framing. All this wood needs to be prepped, measured, cut, and installed. I’m thinking a whole day’s worth of time for this.
  • Move in furniture. I don’t think I’m allowed to move my furniture in until I get my CO, but I could be wrong. I’ll find out for sure this week. I’d like to get most of the furniture in so the place actually looks like a home. Most important: bedroom and living room furniture.
  • Get the front yard in shape. I need to reseed and mow the lawn, put in irrigation, and plant vegetables in my front yard planter boxes. I really should get that done soon so it looks good for photos.

These are the important items — the ones I need to make my home look like a relatively finished home for the Good Life crew. There are other things I need to do as well: ladder for the loft, window treatment for the bathroom, shelves/rods in the bedroom closet, shelves in the linen closet, towel rods in the bathroom — the list goes on and on. That’s one of the best things of putting together a new home: the little projects that come with it. Once cherry season starts, I’m pretty much stuck here so I’ll have plenty of time to get these things done. My goal is to be 95% finished by September.

And, as any homeowner can tell you, you can never be more than 95% finished with a home.

Construction: Deck Overview Video

A Periscope video captured and shared.

On May 20, 2014, I began blogging about the construction of my new home in Malaga, WA. You can read all of these posts — and see the time-lapse and walkthrough movies that go with many them — by clicking the new home construction tag.

I’ve been experimenting a bit with Periscope lately. That’s a Twitter-owned app that makes it possible to do live video broadcasts. Although the vast majority of what’s on there is utter crap, there are a few accounts with live broadcasts of very interesting material. (My personal favorite is the Department of Interior (@Interior), which seems to have embraced Periscope as a way to show off our national parks and monuments.) Like Twitter, it’s all about who you follow.

Deck Construction
My front deck is just about done.

While I don’t think my broadcasts are so interesting, they are a way for me to share what’s going on in my life with folks who might be interested — and to answer questions that they type in while the broadcast is going on.

Although Periscope only saves broadcasts for 24 hours, the video I record is also saved on my phone and can be copied to my computer. From there, it can be edited and shared to non-Periscope users. That’s what the following video is.

In this video, I offer a narrated overview of the work I’m doing on my deck. The front deck, which measures 10 x 30, is just about done; I still haven’t started the side deck, which is 6 x 48. I haven’t done the railings yet, but hope to get them started this weekend. In the video, I discuss the materials and tools I’m using and why I made some of the decisions I made. The wind machines in nearby orchards were going while I recorded and you can hear them in the background sounding a lot louder than they really do.

The only drawback I see to recording in Periscope and then sharing is that Periscope seems to severely limit the resolution of what it records. As a result, any Periscope video I share on my blog is at only 240 pixel resolution which, quite frankly, sucks.

Spring Day from My Deck Time-Lapse

A windy spring day.

I set up my GoPro on a tripod on the deck outside my bedroom door for a time-lapse on Monday before dawn. Unfortunately, Monday was a rather ugly day — cloudy and kind of dreary. The resulting time-lapse would not have been share-worthy.

So I left the GoPro running and captured enough images for a 4 AM to 10 PM time-lapse on a much prettier — but windier — day. Can you see the point where the wind blew over my tripod? (I deleted the shot of my deck roof.)

Should have set this to music but I didn’t. Sorry!

I’ll try this again in a few weeks with the image zoomed in a bit. I thought I’d set it right for this one, but apparently I didn’t.

Construction: New Kitchen Video Tour

It’s about 95% done and I love it!

On May 20, 2014, I began blogging about the construction of my new home in Malaga, WA. You can read all of these posts — and see the time-lapse and walkthrough movies that go with many them — by clicking the new home construction tag.

After losing a full day to an unscheduled (but lucrative) trip to Sacramento on Sunday night through Monday afternoon, I finally finished up the shelves in my pantry. That enabled me to put away a lot of the things that were sitting around my countertops, thus making my new kitchen presentable in photos and videos. I thought I’d show it off now, before I start my next big project.

Because I only had 1200 square feet of total space to play with, I had to limit the size of the kitchen. Somehow, however, I managed to create a good-sized, highly functional space.

Kitchen
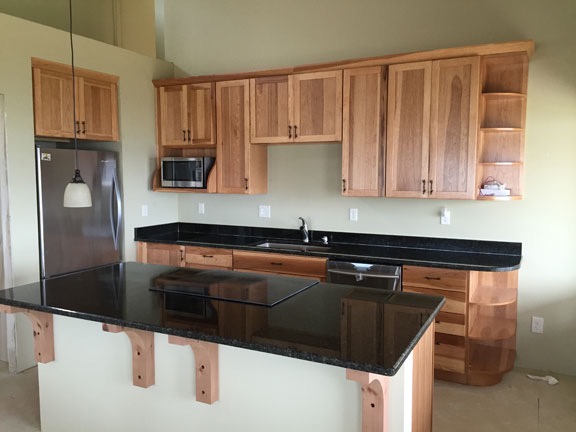
My kitchen is now about 95% done. Most of what’s left to do is just trim.

I designed the kitchen space from scratch, carving an area at the end of my great room that shared a wall with my bathroom. The idea was to minimize plumbing costs by minimizing the plumbing runs. With the sink on that wall and the stove on an island, the refrigerator would be set into the adjacent wall, completing the “triangle” that’s so important in kitchen design.

The countertop length was limited by the fact that there’s a window at the end of that wall, but it’s still a full 11 feet long. The island is 3-1/2 feet wide by 7-1/2 feet long. Frankly, I think I have almost as much counter space in this home as I did in my old Arizona home with its extremely spacious kitchen.

Anyway, I’ll let you take a look at it for yourself. Here’s my narrated video:

It’s not quite done. As you saw in the video, I still have these little projects ahead of me:

  • Install under cabinet lighting.
  • Install trim around walls and cabinets.
  • Install transition trim between appliance floors (adhesive vinyl on plywood) and main floor (Pergo laminated hardwood planks).
  • Wrap finish (with wood trim) pantry doorway and hang pantry doorway curtain. (This is temporary until I can get a custom door, likely sometime next year.)
  • Install white trim on pantry shelves and paint shelf support ends and screws.
  • Hang pendant lamps.
  • Hang fifth track lighting fixture.
  • Put decorative baskets and silk plants atop cabinets.

As one of my friends pointed out not too long ago, the work never really ends when you build or own a home. I don’t mind. I have plenty of free time at home in the summer months and always need a project to work on.

Construction: Countertop Installation

Two visits, amazing results.

On May 20, 2014, I began blogging about the construction of my new home in Malaga, WA. You can read all of these posts — and see the time-lapse and walkthrough movies that go with many them — by clicking the new home construction tag.

When I designed my new kitchen, countertops were a big question for me. Back in Arizona, I had tile countertops which looked fine and could handle direct contact with hot pots and pans, but lacked a smooth surface for rolling out pie/cookie dough and were a royal pain in the ass to keep clean. (Think white grout.) I knew I wanted an easier to care for surface, but I wasn’t sure what I wanted. The Home Depot kitchen design person helped me make the decision: granite.

Ubatuba granite
The color I chose is called Ubatuba, which is mostly black with greenish gold specks that work well with my cabinet and wall colors.

Granite! I’d always wanted stone countertops but it was just many of the things that were apparently not within the realm of possibility in my old life. Home Depot had a sale going on granite and I really liked one of their “level A” (i.e., least expensive) colors. Why the hell shouldn’t I treat myself to some nice countertops?

She worked up an estimate for the two countertops — main and island — and backsplash on the main island. She included the radius cut I’d need for the end shelf unit. I chose the simplest bevel, which was available at no extra charge. After an initial sticker shock with the final number she came up with, I signed and paid for my purchase.

That was back in January 2015.

Some people might question why I went with Home Depot for my countertops. Simple: I used them for my cabinets and the price was acceptable. Installation was included. I didn’t have to visit a half dozen shops and be told a dozen different things about two dozen different options. I had enough on my plate as general contractor and electrician for the project. I wanted to keep things simple. That was worth maybe spending a little bit more than tracking down two matching pieces of granite, getting them properly cut and delivered to my home, and finding someone with plenty of experience to install them. Home Depot would take care of everything with their vendor so I wouldn’t have to worry about it.

The Template

My project started really coming together in February when the insulation, drywall, and painting was done. (I really need to blog about that one of these days.) I was on a 16-day vacation in Arizona when they were finishing up, but I scheduled the cabinet delivery for soon after my return. I had a shorter trip to California the following week and scheduled the cabinet installation for the day after my return from that trip. When I had a solid date for the cabinet installation, I booked the countertop measurement appointment. They needed the cabinets in place to create their template.

Two installers showed up on Friday, March 13 in a small truck with a bunch of previously used white corrugated plastic, tape, and a glue gun. While I continued working on my electrical system, they busied themselves in my kitchen, measuring spaces and cutting/gluing the plastic into the shape of my future countertops. That would be the template they’d use back in the shop to cut my countertops.

Countertop Template
The templates for my kitchen countertops were made of corrugated plastic.

They asked me a few questions and tried halfheartedly to upsell me a fancier bevel, which I didn’t want. Then they advised me to get wooden corbels to support the breakfast bar side of my island countertop, which would overhang 12 inches. They told me the corbels should be 10 x 16 inches in size and that I should mount them with the long side against the wall. They advised me to avoid metal brackets because metal bends and wood doesn’t. I took notes, signed the paperwork they presented, and watched them leave.

Because the countertop company only came to the Wenatchee area once every two weeks from the Seattle area where they’re based, it would be two weeks before my countertops arrived. That was a good thing, mostly because the cabinet company had screwed up and made my lower end cabinet out of the wrong wood. It would need to be replaced. The cabinet folks and Home Depot were already on it. It would arrive in plenty of time before the countertop installation.

The Corbels

Getting wooden corbels the exact size the countertop guys recommended was not easy — at least at first. I worked the web over the weekend and found all kinds of corbels, none of which came very close to the size they suggested.

Then I found ProWoodMarket. This company makes and sells a huge range of wooden brackets, braces, corbels, and other decorative and structural wood pieces. I put in a request for custom corbels and got a response back within an hour. The price was within reason — actually, no more expensive than the non-custom corbels they offered on their site. Unfortunately, to get them on time, I’d have to either put a rush on the order or the shipping or both. I paid a rush fee to get my order to the front of the production line and took my chances on shipping. My order was shipped out the next day via UPS.

I took another trip to California. The package arrived the day I left — I saw it sitting on my doorstep in the view from one of my security cameras. Fortunately, the weather was good that week and I didn’t have to worry about the box getting soaked.

When I got home, I opened the box and was pleasantly surprised by the size and appearance of the corbels. They’d been carved out of cedar and I could see the character of the wood, including tree rings and knots. The color was perfect — I wouldn’t have to stain them. Just a clear coat finish — a woodworking friend suggested tung oil — and they’d last forever.

The trick was to get them installed on the stub wall of my kitchen island. The problem wasn’t finding solid studs to fasten them to — I could see exactly where the studs were because the top of the wall was unfinished and the fasteners I’d used to attach the studs were visible. The problem was lining them up to be level with the countertops — which where slightly taller than the stub wall — and holding them steady while fastening them into place. That took more than two hands. I’d need help.

My friend Bob came to the rescue. He’s off on Fridays and I asked him to come by after breakfast. I made a 6 AM run to Home Depot to buy the right fasteners — 4-1/2 inch super-duty wood screws — and wood buttons to cover the screw holes. He showed up around 8:30 AM and let me make him a cup of coffee while his dog, Skip, played with Penny. Then we got to work.

I have a lot of tools — and seem to be acquiring more every day — but Bob has even more. He brought along his Forstner drill bit set. These bits are perfect for making inset drill holes that would accept a wood button. We marked two places on each corbel to drill holes and Bob did his magic. Then we used my four-foot level to position each corbel against a stub wall stud, level with the cabinet tops. The screws sucked the corbels hard into place. We were done in half an hour.

Corbels
The corbels after installation on the stub wall. I bought the wrong size wood buttons; need larger ones I’ll get on my next Home Depot run. (And yes, that’s a quiche on the stovetop — the first I baked in my new oven.)

The Installation

Although the installers were supposed to arrive between 8 AM and 11 AM on Friday, March 27, they were late. They called around 10 AM and claimed they were having trouble with their truck. That was disappointing; I’d been trying to get the plumber in that afternoon to plumb my kitchen sink and dishwasher and I knew he didn’t want to come on a Friday afternoon. The countertop delay gave him the excuse he needed to put it off until Monday. It was a good thing, because the countertop guys didn’t actually arrive until after noon.

Carrying Countertop up the Stairs
Here are the installers, carrying up the countertop for my kitchen island. I can only imagine what this piece of stone weighed.

They didn’t waste any time — I might have been their first installation for the day, but I wasn’t their last. One by one, they brought the two pieces of my main countertop in through the front door and up the stairs. (The countertop was more than 12 feet long and couldn’t be created in one piece; there would be a seam in the middle of the sink.) When they laid one piece atop the cabinets near where my sink would go, I saw how perfect the color would go with my cabinets and walls.

While they worked, I stayed out of their way. I had begun laying Pergo in the great room while I waited for them and kept at it, stopping every once in a while to check out their progress and answer questions. They had a lot of small tasks to do, including setting my under-mount kitchen sink in place and drilling the holes for the faucet and soap dispenser. They worked slowly and carefully — a team that obviously knew exactly what they were doing and wasn’t going to let their late start affect the quality of their work.

Installing Countertops
The countertop installers align the two halves of my main kitchen counter.

It took them nearly three hours to do the job. That included laying in the back splashes, setting the stove in place, applying a sealant to the granite, and caulking everything that needed caulking. When they were finished, it looked — well, amazing.

Finished Countertops
I can’t believe how good my kitchen looks now that the countertops have been installed.

They packed up, had me sign a few papers, suggested that I apply granite sealer again, and gave me some advice about not putting hot pots on the stone. I gave them some cash and told them to have dinner on me. Then I watched them drive away.

Brewing Coffee
Another milestone: brewing coffee on the countertop in my new kitchen.

Later, I brought my coffee maker upstairs and set it on the counter. This morning, I brewed my coffee in my new kitchen for the first time.

Tonight is “ladies night” again at my house. It’s a special occasion: Kitchen Box Unpacking. We’ll enjoy some wine and munchies while I unpack the multitude of boxes packed with kitchen things I brought from my old Arizona home. I’ll see what fits in my drawers and cabinets — whatever doesn’t fit or I don’t want anymore, I’ll give out as door prizes to my guests. Should be fun!