General Delivery

How you can get mail delivered to you anywhere in the country without having your own mailing address there.

I’ve been living for more than a week or month at a stretch in temporary homes at various times for about twenty years now, mostly for work but increasingly for vacation. Sometimes it’s a hotel or motel, sometimes its at a short term rented space, and, sometimes it’s at a location that simply does have a mailing address — like the backwater campsite where I spent nearly two weeks at the beginning of the month. Often, I’ll need to get something shipped to me while I’m away — perhaps a package of mail being forwarded or an item I ordered from Amazon. That’s easy enough when I’m staying someplace with a regular mailing address, but what if I’m not?

Last week was a good example. Tired of transporting my kayaks inside the Mobile Mansion on this year’s snowbirding trip, I decided to order a roof rack with kayak supports for the roof of my new used truck. I did some research online, found a good solution at a reasonable price on Amazon, and ordered it. I didn’t want it shipped to my home, since neither the kayaks or the truck were likely to be back there for a few months. And I didn’t want it shipped to my friends in Wickenburg, where I’d be staying much later in the month. I wanted it shipped to where I was then: Ehrenberg, AZ.

Amazon Shipping Label
Here’s the FedEx Home delivery label on my package from Amazon. Because I included the post office’s street address, it was delivered to the post office and held for me. (Please do not ship anything to me at this address; it is temporary and I won’t get it.)

So I used the post office’s General Delivery service.

General Delivery is a service that makes it possible to ship something to someone who doesn’t have a mailing address or even a post office box in a specific town. You address the package with the recipients’ name, the words General Delivery (very important), and at least the city, state, and zip code of the post office you want it to go to. The USPS has a format example on their website. Add postage and mail it. When the package arrives at the destination post office, it is held for the recipient, who normally has to provide identification to claim it.

On Rural Post Offices

I just need to say a few things about rural mail and package delivery. It’s not like you might experience in the big city.

The biggest difference is that the postmaster and mail carrier, as well as the UPS and FedEx drivers, really get to know the people they serve. The post office will call when you receive a delivery of something unusual — for example, live chicks — so you can come pick it up as soon as possible. UPS and FedEx know where it’s safe or not safe to leave a package on a doorstep. When my gravel road is difficult to traverse because of snow or my UPS driver has a lot of deliveries, she’ll text me to meet her somewhere on her route or make arrangements to leave my package with someone else or at the Post Office. She’ll also let me take packages she might have for my neighbors to save them the bother of retrieving them at the UPS office when snow keeps her off our road.

In some rural locations, the post office is a center of the community, with publicly accessible bulletin boards for posting For Sale items, access to local news, and people who gather outside to chat with neighbors.

And there’s almost never any sort of line in the post office.

There is one big drawback as far as my local post office is concerned: they close for about an hour every day at lunchtime (so the clerk can get lunch) and are only open for two hours on Saturday. And you thought “bankers’ hours” were bad.

This works extremely smoothly for anything sent via US Mail. I can’t tell you how many times I’ve picked up General Delivery packages sent to me in places I’ve visited throughout my travels.

There are a few caveats:

  • Some post offices that receive a lot of General Delivery mail for seasonal residents may request that you get on a General Delivery list in advance. Ehrenberg, which gets a lot of Quartzsite snowbirders, is an example. To my knowledge, this is not required, but if you expect to get a lot of mail you really should talk to the postmaster or clerk to see what they prefer.
  • The post office has no way to notify you if it receives a package for you. If you don’t know something is coming, you probably won’t pick it up. So if you give the address to a friend or family member, remind them to let you know if they’ve sent you something.
  • The post office receiving the item won’t hold it forever, so you want to pick it up within a reasonable amount of time. Each post office varies on how long it will hold an item.
  • You normally have to wait on line with other customers to ask for the package at the counter. So if you have several post offices near where you want the item sent, pick the one that’s the least busiest to save time at pickup. (I chose the Malaga post office over the Wenatchee post office for my summer mail forwarding from my old Arizona home because there was never a line in Malaga. Oddly, not only did I meet one of my best friends there — who happens to be the postmaster — but I wound up moving to Malaga when I relocated in 2013.)
  • Some cities have multiple post offices. Make sure you use the zip code that applies to the post office you want an item delivered to.
  • This is pretty much guaranteed to work with any item shipped via USPS. Items shipped by other means — FedEx or UPS — might not be delivered. It depends on the post office and how the item is addressed. If you include the street address for the post office, which you can find in Google maps, the carrier may deliver to that post office. What the post office does with it is likely up to the postmaster there. In Ehrenberg (and Malaga, for that matter), they will hold the item like any other General Delivery shipment. Other larger post offices might not. When in doubt, ask in advance or use USPS for shipping.

Unfortunately, Amazon shipped the two components of my kayak rack system separately. One arrived via FedEx at the post office on Friday. I called ahead to make sure it was accepted before I drove over. (You can do that with small post offices; try that in Manhattan or Phoenix.) The other is scheduled to arrive on Monday — Martin Luther King Day, when the post office is closed! I can only assume that the rural FedEx driver knows not to attempt delivery on Monday. With luck, I’ll be able to pick it up Tuesday.

So the next time you spend an extended amount of time away from home and need something shipped to you, consider the local post office. It’s easy and safe.

My Weathercam

A picture speaks a thousand words.

A few months ago, I set up a weather station on my shed. I was mostly concerned with getting wind information back home when I was out flying. But the weather station also provides temperature, humidity, barometric pressure, and rain information. This information is uploaded to the Weather Underground website, where anyone who wants current weather information hyperlocalized to my home can get it.

When I shared the weather link with friends on Twitter and Facebook, some wise guy pointed out that the webcam couldn’t be found. Duh. It’s because I didn’t install one.

That’s not to say I didn’t want to install one. I did. I just had trouble justifying another expense for yet another interest that had taken over my wallet.

But I really wanted one. And when I snagged a frost control contract again this year — my fourth consecutive season; amazing what you can do when there’s no one anchoring you to a dreary existence in a dead town — and the contract guaranteed me even more money than the previous year’s contract, I decided to splurge. I ordered an AmbientCamHD outdoor weather camera.

The camera arrived Thursday. I had to drive out to my mailbox to fetch it — it had been snowing all day and I advised the UPS driver (who texts me when I have a package) not to try the road. I’d spent most of the day with two visitors who had helped me with an electrical project in my garage and then stuck around for lunch and half a bottle of Crown Royal. (Never a dull moment here.) It was still light out when I fetched the package (and dropped off another package for a neighbor on my way home) and I really thought I could have it fully installed before it got dark. But my Mac wouldn’t read the installer disk and the downloaded software, when used with my Firefox browser, insisted on installing an unusable EXE file with the required plugins. (How’s that for geek speak?) After leaving a voicemail for tech support, I tried again with Safari and managed to get the plugins I needed. Unfortunately, it was fully dark when I set the camera out on my deck to share a disappointing picture with the world.

On Friday morning, after breakfast, when the snow had stopped and the clouds drifted out — at least for a while — I went outside with my impact driver, the screws provided with the camera mount, and a Philips bit. It took three tries to fasten it in a good spot on one of my deck posts. (The second try ripped the heads off two of the three screws; I used drywall screws on the third try.) I aimed it out toward Wenatchee, at my “big view.” I made sure enough sky would show to give weather watchers a good idea of conditions.

Webcam after Setup
Here’s what the webcam image looked like right after I completed installatioin.

Of course, less than 30 minutes later, the clouds moved back in and obscured the view. With 5 inches of snow already on the ground, a fresh snowfall — unforecasted, mind you — began again. As I type this Friday morning, visibility is only about a mile in a medium snowfall.

The geek that I am, I quickly discovered the URL for my webcam’s images, which are uploaded to the Weather Underground once every 5 minutes. That makes it possible for me to share the current image on my blog. Here’s what it looks like as you’re reading this; keep in mind that if it’s dark or foggy you won’t see much:

Current Webcam image
Here’s the most recent web image. It’s best viewed on during daylight hours on a relatively clear day.

Of course, the webcam image is now available when you click the Webcam tab on the Weather Underground page for my station. It’s also available from the various Weather Underground smartphone weather apps when you look at the weather in my area or at my station, “Malaga Heights.”

Whew. Glad I got this out of my system.

A Word about Pole Building Costs

In answer to an email message.

The other day, I got the following email message from a reader:

Thank you for posting the information on your home. We are interested in doing something similar and were wondering if you had any ball park cost you could share on your project.

I’ve been blogging about the construction of my new home, which was built using post-frame (“pole building”) construction, since May 20, 2014. I’ve even created a series of daily time-lapse movies that show how the building was built.


Although each day’s time-lapse can be viewed separately on this blog, I’m pretty sure this is the only place you can find the compilation of all videos.

A lot of people have asked me why I chose this type of construction. After all, at the end of the day I’m living in a metal building. While it isn’t unattractive, it doesn’t have what most folks would consider “curb appeal.” Surely I could have made something nicer looking with normal framing construction.

Curb Appeal
As this photo hints, the reason I have such a big RV garage is because I have two big recreational vehicles to put into it. And yes, they do both fit inside.

That could be true, but I seriously doubt I could have done it on the same budget. After all, my building has a 60 x 48 footprint with a high roof peak about 30 feet up. That’s a lot of 2 x 4s. And let’s not forget the fact that the RV garage portion of the building has a 16 foot internal clearance with no central posts for support. It took some seriously engineered trusses to make that work. And how about the vaulted ceilings in the living space? Do you know how thick the five glulam beams that support the roof over that area are?

Of course, I have no answer for this person’s question. Every building is different, every builder has different pricing and materials. Before choosing a builder, I got quotes from four of them and they ranged in price from $50K to $250K. Were they all trying to sell me the same thing? I don’t think so.

My building was (obviously) custom, built to my specifications with design assistance from the builder, Western Ranch Buildings. I don’t think they’d ever done a building with such a large open space inside it (24 x 48 x 16) and I know for certain that they’d never done one with so many windows (20). I’m extremely happy with the way it turned out and have absolutely no complaints about the builder, who was completely professional, flexible, helpful, and patient with me. And this was my first (and likely only) time as a general contractor.

Of course, Western Ranch only provided the building shell. I handled everything inside either myself or by hiring subcontractors. There was additional cost for all that. So reporting what I spent on just the building shell wouldn’t offer a complete picture of my building cost. And reporting what I spent on the entire project would include all the high-end finishing touches such as the vaulted ceiling, oversized ceiling fans, custom kitchen cabinets, granite countertops, Pergo flooring, soaking tub, glass block shower stall, etc., etc.

I guess what I’m trying to say is this: The cost of any building project depends on the contractor(s), the materials, the type of construction, the size, and the features. My project is unique, so reporting its costs would be meaningless. If you’re interested in building your own pole building, come up with a plan and submit it to several builders. See what they say it’ll cost. Western Ranch was right on the money with their estimates — a reputable builder in your area should be, too.

A(nother) Foggy Winter Morning

Typically beautiful.

I’m always up before sunrise in the winter and I usually only have a vague idea of what the sky is like outside until it gets light enough to see. In the winter months, this area is prone to fog that usually forms over the Columbia River and drifts through the valley. Sometimes it builds enough to completely envelope me at The Aerie, which is about 700 feet above the river’s elevation, surrounding me with a damp white cloud. Other times, it fills the valley below me, making me feel as if the few homes I can see are the only ones on earth.

While December isn’t nearly as foggy as January can be, we’ve been having more than the average number of foggy mornings — and days — lately. This morning is one of them.

As I took my first look outside this morning, I suddenly recalled a morning about a year ago. I’d been living in my RV, the “mobile mansion,” in my big RV garage, waiting to continue work on my home upstairs. For some reason, I decided to go upstairs and take a look out at the view. It was cold in the garage — probably in the 30s — and it wasn’t much warmer upstairs, which was completely open to the RV garage and uninsulated. The walls were no more than framed skeletons of what would be fleshed out later with drywall, the floor was still dusty plywood. I went down what would be my hallway into what would be my bedroom. I opened the door to the non-existent deck and looked out.

And I saw something remarkably like what I saw this morning.

Foggy Winter Morning
Not a very good photo of what’s outside this morning — my iPhone doesn’t handle low-light situations very well. But you get the idea. Wenatchee is somewhere in the middle of this shot, under the cloud.

Later, if the sun breaks through the higher clouds — which is unlikely today based on the forecast of a “wintery mix” all day — various parts of the view will glow in the sunlight. I have photos like that, too.

Anyway, last year, when I looked out at this view, I tried to imagine what it would be like to roll out of bed and see this from my bedroom window. My imagination just couldn’t do the job. Living here, having this ever-changing vista part of my daily life, is something that simply can’t be imagined. I feel so amazingly fortunate to have found this place and rebuilt my life here.

Not long after that December morning, I moved forward with my project. I had my HVAC system installed. I got to work on the wiring. I hired plumbers. I contracted with the insulation/drywall/painting guys to put my walls in. I bought plumbing fixtures. I laid tile in the bathroom and Pergo throughout the rest of the space. I did the job of a general contractor to get my home built. You can read the details in my numerous new home construction posts.

Now my home is just about done. My deck, finished for months, is a perfect place to sit and look out over the view. The photo above was taken from the same place I looked out last December — but from the rail around the deck instead of from a piece of plywood balanced on the deck supports.

The folks who read this blog and see my Twitter and Facebook posts might be sick of me sharing this view. But I can’t ever get sick of it. I wish I could share it with everyone.

My New Weather Station

Getting the hyper-local weather information I crave.

I’ve always been interested in weather. Yes, I’m the kind of person who’d leave The Weather Channel on all day as background noise — in the days when they actually broadcast live weather information all day. And always know the most up-to-date weather sources. And have multiple weather apps on my mobile devices so I could check one against the other.

My Thirst for Weather Data

Not long after moving into my Arizona home in the late 1990s, I bought a solar powered wireless weather station. My future wasband mounted it on the roof of the shed near the horse corral and it beamed back weather information to a panel at my desk. For a while, I had it connected to a Windows PC I had — the software wasn’t Mac compatible in those days — and put live weather information on a Wickenburg website I ran. In 2003, when I got the fuel manager contract at Wickenburg airport, we moved the weather station there — it was far more reliable than the ancient setup in use. (Wickenburg now — finally — has an AWOS.) When I sold the contract, I included the weather station among the assets of the business. For all I know, it’s still there.

Although I didn’t miss the weather station much as life dragged on in Wickenburg, I definitely wished I had weather stations in Washington where I spent my summers starting in 2008. I get seriously tuned into the weather during cherry season, checking radar throughout the day and always knowing the forecast — from multiple sources — for the next three days. I dreamed of having portable, Internet-connected weather stations with accurate rain gauges and webcams so I could place them at each orchard when it was under contract. You see, I fly when it rains and knowing exactly when and how hard it was raining would benefit not only me, but also my clients. Trouble is, orchards aren’t usually in places where Internet access is available and the cost of a 3G/4G/LTE connection for each station was prohibitive.

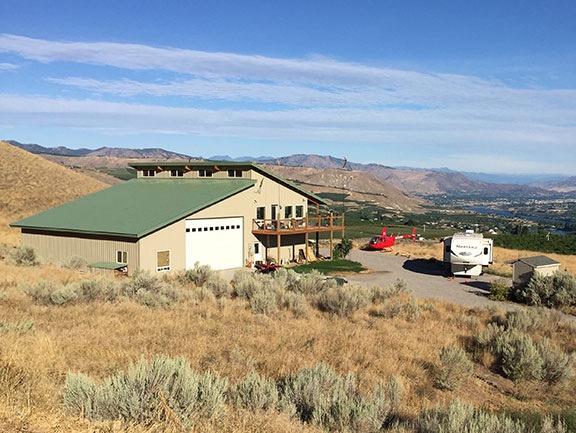
Fast-forward to the late summer of 2013. I moved to a 10-acre lot I’d bought at the base of the basalt cliffs in Malaga, WA — a place I like to call Malaga Heights. From my aerie, I could see the weather coming and going from the southwest to northeast. With a new home base, I started thinking seriously about a weather station again.

Weather Station Options

Technology had moved forward in the ten years since I last owned a weather station. The main thing I wanted was the ability to monitor weather from anywhere in the world on my cell phone. I had some practical applications for this, but it was mostly just a desire to get hyperlocal weather information, live, anytime, from anywhere.

I did some research. I discovered that weather stations fell into four categories:

  • Basic home weather stations. These are the ones that put a panel in your house and one or more sensors outside that can broadcast data to the panel. I already had one of these — heck, I’ve had these forever. In 2013, when I was still living in my RV, it became extremely valuable for me to monitor temperatures during the winter at my water source and RV basement. But systems like these are extremely limited, not only in range but also in the available instruments. It’s usually just temperature, humidity, and barometric pressure.
  • Weather stations with limited connectivity. These are weather stations that have a full set of instruments for temperature, humidity, wind speed/direction, and rainfall, but they just send that information to nearby information panel. That’s what I had back in the early 2000s.
  • Weather stations with Internet connectivity. These are weather stations that have a full set of instruments for temperature, humidity, wind speed/direction, and rainfall, and they transmit data via the Internet, through wifi or a direct connection to a router. They often also transmit to a panel where the user can view data locally.
  • Weather stations with Internet connectivity and direct smartphone access. These are weather stations that have a full set of instruments for temperature, humidity, wind speed/direction, and rainfall, and can transmit data directly to the Internet as well as to a smartphone app. Again, they also often transmit to a panel where the user can view data locally.

My main goal was to be able to view current weather conditions for my home on my iPhone. This would make it possible for me to assess conditions for landing my helicopter, which lives in my garage. When I fly home and put it away, I need to land on a 9×9 platform parked on my driveway on the east side of my home. With very strong winds in the area, landing there is difficult — so difficult that I prefer to land at a secondary landing zone on the north side of my home. I can then wait until the wind dies down, fire the helicopter back up, and move it to the platform. I don’t have to do this often — I think I did it just twice in all of 2015 — but it’s nice to know what to expect at home before I arrive. What’s interesting is that when the wind is howling at the airport across the river, it’s often quite calm at my driveway. This is likely because of my home being sheltered on two sides by terrain. That’s one of the reasons I built it where I did.

So at first it looked as if I’d need that last type of weather station — the kind with an app to get the data on my phone. Unfortunately, the stations I found that met that criteria were quite expensive — in the $250+ range. And I really couldn’t justify the expense, especially when I seldom have a real need for that weather data. After all, I only take the helicopter out about 50 times a year and the streamers on poles on my deck offer a decent indication of wind conditions when I get here. (I also have an airport-style windsock, but I positioned it too far from my landing zone to be of any real use to me. Long story there.) Maybe I was just trying to use flying as excuse for a new weather station? Probably.

More research showed me that Internet-compatible weather stations could usually be set up with The Weather Underground website. I started exploring stations already online there. I found one down at Crescent Bar, not far from one of the orchards I provide cherry drying services to. I clicked a link to get more information about the Weather station there and learned that it was an Ambient Weather WS-1400-IP.

WunderMap of my area
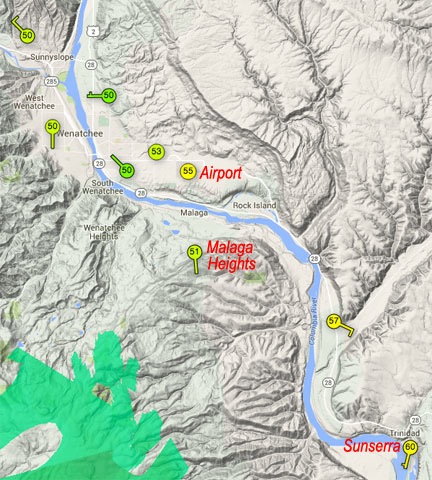
The WunderMap of my area shows the personal weather stations (PWSs) in the area. I’ve marked the one in Quincy and mine as well as the official weather station at the airport.

I did some more research and found that two Ambient Weather stations would meet my needs if I went with the Weather Underground: that one and the Ambient Weather WS-1001-WIFI. The difference: the more expensive ($299) WS-1001 had a panel to monitor the weather inside the house and did not require an ethernet connection to my router while the less expensive WE-1400-IP ($159) could only be viewed from a Web page or app and required an ethernet connection to my router. Both had the same basic set of instruments and were equally easy to mount. Both also had a solar panel to keep the station’s batteries charged.

WS-1400-IP
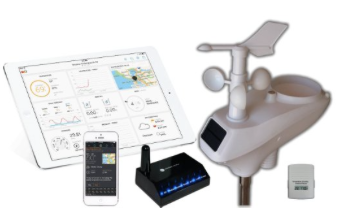
The Ambient Weather WS-1400-IP includes outdoor weather instruments mounted together in one cluster; an indoor temperature, humidity, and pressure sensor; and an ObserverIP receiver that must be connected to a router. The iPad and iPhone in this marketing photo apparently indicate that data can be seen on mobile devices after registering the station with the Weather Underground.

I was fortunate in that I planned to mount the station at my shed, which was about 100 feet from my building. The line-of-sight receiver would go in the window overlooking the shed by my desk, which was less than two feet from my router. So as far as the connection went, requiring an ethernet cable was not an inconvenience. So the question was: Is the viewing panel worth the extra $140? My answer was no. I bought the WS-1400-IP.

Setting It Up

Mast Kit
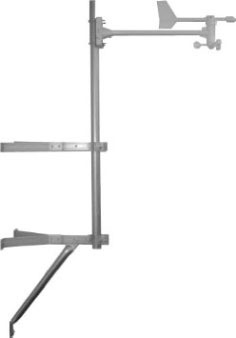
This mounting kit is perfect for mounting on the side of a building.

I wanted to mount the weather station on the side of my shed, preferably with all instruments above the sprinkler head I’d put up there for fire season protection. That meant I needed some mounting hardware. Rather than trying to rig up my own mount — and likely being frustrated every step of the way — I spent another $44 (with shipping) on the Ambient Weather EZ-30-12 Mounting Kit with Mast.

Assembling the weather station was pretty easy. All I had to do was attach the wind vane at the top and one of the two short mounting poles on the bottom. The crimped pole fit snugly into the top of the mast that came with the mounting kit. I added two batteries to the indoor sensor and set it on a shelf near my desk. I then connected the receiver’s DC adapter to an outlet and ethernet cable to one of the four LAN ports on my router. Done.

The next step was to register my PWS on the Weather Underground. The weather station’s manual provides the URL. I had to create an account and then provide some information about my location and the weather station. At the end of the process, I received a weather station identifier.

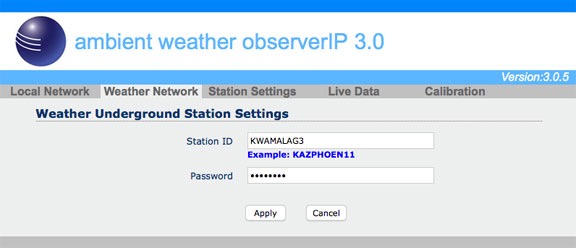
Next, I had to use the IPTOOL application on my Mac (a Windows version is also available, of course) to locate the weather station’s receiver on my network and connect. That opened a configuration page in my Web browser. I used that to enter the station ID provided by the Weather Underground, as well as my password on that system. I could use other settings pages to provide the station model number, time zone settings, and units of measure. The Live Data page showed a rather user-unfriendly table of data collected from the station.

Configuration
The Weather Network configuration screen for my weather station lets me put in my Weather Underground ID.

Of course, since the weather station was still inside as I did all this, it registered inside temperatures and wacky wind readings as I moved it around. It was time to install it. I certainly didn’t want bad data going out on the network.

Installed Weather Station
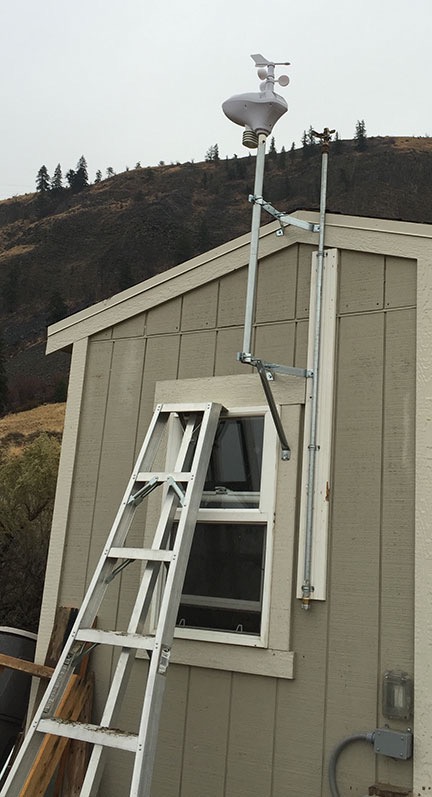
The weather station is positioned just slightly above my fire season sprinkler head. I’ll need to raise it (or lower the sprinkler head) before next fire season.

My timing was good and bad: it had turned kind of nasty and was about to rain. That was good if I wanted to record rain information (which I did) but bad if I didn’t want to be on a ladder in the rain (which I didn’t). Still, I went out to the shed and climbed on the orchard ladder with a drill and impact driver and all the parts I needed. Within 15 minutes it was installed, level and pointed the right way. It’s not quite as tall as I’d hoped; in the future, I’ll likely add a second mast pole to raise it another three feet.

The rain started before I was done. I admit I was tickled to see it registering in the Live Data screen when I got inside. (I am such a weather geek.)

There was one more thing I needed to do — although I didn’t realize it until the next day. I thought the weather station would automatically adjust the pressure reading for my elevation of approximately 1550 feet above sea level. But when I realized that the readings were significantly lower than what they should have been, I did some additional research to see how I could fix it. The answer was to enter a relative pressure offset amount in the Calibration page of the weather stations settings. To do this, I needed an accurate pressure reading. I waited until the automated weather observation system at the airport just three miles away across the river updated and calculated the amount of offset to enter. I plugged that figure into the right box, updated the settings, and was good to go.

Viewing Weather Data

Weather Station Data
Here’s a snapshot of the display for my weather station as I wrote this blog post.

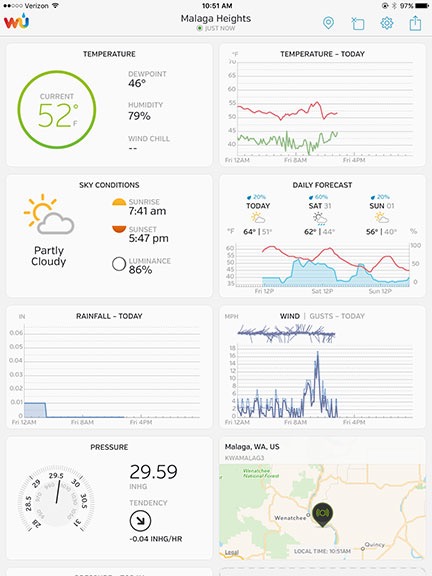
Although the Weather Underground claims it can take up to 24 hours to display a PWS on its site, mine was visible within an hour. It’s got its own page, which can be viewed by anyone at any time; I called it Malaga Heights. Here’s a screenshot of what you might see if you go to that link.

As you can see, there’s a lot of data, including current conditions pulled right from my PWS, sunrise and sunset times, moon information, and a radar map of my area. The current conditions are updated regularly; if you keep watching, you’ll see it change, especially if the wind is variable.

The weather history section summaries and graphs weather information for the day or a period you choose. As you can see, the temperature has been pretty steady on this overcast day, the wind really kicked up a few hours ago, and the pressure is falling. Solar radiation is likely measured for the solar cells on the station; it always rises after sunrise and drops back to zero by sunset.

WunderStation App on iPad
The WunderStation app on my iPad.

All of this information is also available in the various Weather Underground apps you can install on smartphones and tablets. For example, the WunderStation app on my iPad displays rearrangeable tiles of data that update automatically. I can even set up multiple PWSes in the app and switch from one to another with a swipe. Similarly, the Wunderground app on my iPhone displays information about any PWS, including my own. Both apps are free, and if you’re a Weather Underground member — a bargain at only $10/year — they’re also ad-free. (I hate ads).

But wait! There’s more! You can also install a “sticker” or widget on your website or blog. You can see the style I prefer at the top of this blog post; one that fits better in the sidebar appears at the bottom of the sidebar on every page.

What’s Next

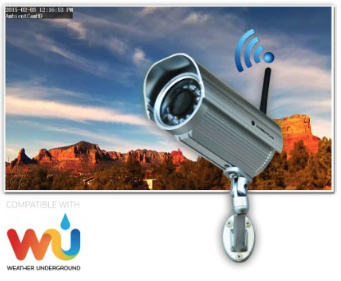
Of course, all this is not enough for a true weather geek like me. The Weather Underground supports a PWS webcam.

I’ve had webcams on and off for years and would really like to have one here. After all, not only do I have an amazing view to share, but my view of the sky would clearly show weather conditions that would interest other weather geeks.

AmbientCamHD
There’s always something new to add to a system, isn’t there?

The one that I know will be compatible with the system is the AmbientCamHD Outdoor WiFi WeatherCam. It has a few features I think I could use to create time-lapses. I’ve added it to my Amazon wish list, but I suspect I’ll likely break down and just buy it for myself before Christmas.

Some things I just can’t resist.