Hauling Water

When the water stopped running…and what I did about it.

I first heard about the problem when I got an email sent out to all members of the road maintenance association on February 8:

The water main has frozen at the S turn near Lot 7. Neighbors are experiencing very low or no water. Malaga Water district has reviewed the situation and believes it will stay frozen until thaw.

They have offered to get 5 gallon water jugs to the Malaga Water district HQ and make them available to us if needed.

I was in Arizona at the time, in transit between Wickenburg and Willow Beach on the Colorado River, where I’d camp for two nights and soak in a wonderful desert hot spring. It was t-shirt weather on a beautiful sunny day. It was the final month of my 2016/17 winter snowbirding trip south and I didn’t plan on getting back to my home in Washington for another month. The email message sent me a mixed message: “stay frozen until thaw” sounded like a long-term issue but “water jugs…available to us if needed” sounded like hauling in water might not be needed.

I should mention here that this isn’t the first time this has happened. It’s the third. The last time was eight years ago — years before I bought my lot — and the line stayed frozen until March 22. When it finally defrosted, the water company supposedly put a concrete “blanket” over the pipe and reburied it. They assumed the problem had been solved when it didn’t happen again.

Until this year.

Winter Weather
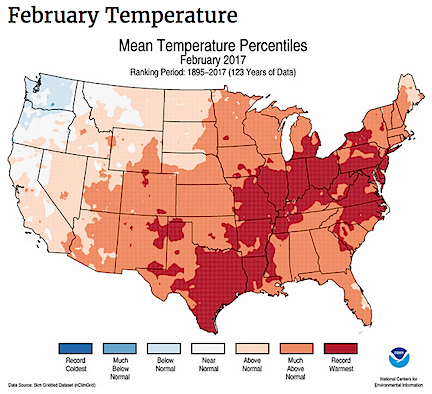
Mean temperature percentiles per the National Weather Service. Find more info here.

This has been an unusually cold winter here in the Pacific Northwest. While it was warmer than average nearly everywhere else in country, the northwestern United States, including all of Washington state, has been colder. There’s also been a ton of snow, some of which remains on my driveway in front of my car garage after having slid off the roof multiple times all winter. More than a few of my friends in the area made a point of telling me that I picked a good winter to go away. (Little do they realize that I plan on going away most winters.)

Cathedral Rock Road
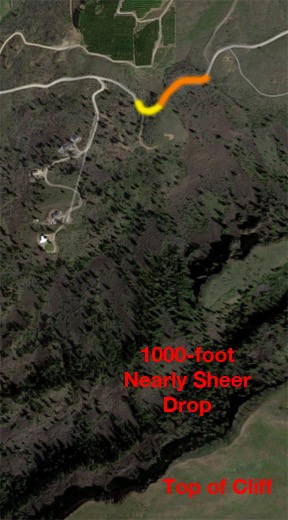
A satellite view of my road with the cliff to the south. The originally suspected problem area is in yellow; the actual problem area is in orange. I live nearly a mile east of this spot.

Making the problem worse is that the water line runs under our privately maintained road, which gets zero direct sunlight for months at a time in the winter. Why? Because it’s on the north side of a nearly sheer 1000-foot cliff. Because of our northern latitude, the sun doesn’t rise high enough in the sky in the winter to clear the cliff, leaving the road in shadow. I’ve observed this phenomena at my own home and blogged about it here. My place, which is farther north of the cliff than the road and many of my neighbors, is in the shadows for just six weeks; the problem area of the road is in the shadows for more than two months.

Time went on. I continued my trip northwest through Death Valley and eventually to the Sacramento area. I flew back to Arizona to fetch my helicopter, which would be on a frost contract in that area for two months. I tried to have fun in “sunny California,” but it seemed to rain more often than not. I got a temporary job helping a friend with his spray operations. But the whole time I was in California, I was feeling homesick and wanted to go home.

I checked in with my next door neighbor regularly. The water still wasn’t flowing. She and her family of five were showering at the Y. They made weekly trips to the laundromat. At first, they melted show for toilet water; now they were hauling it.

But by March 12, I’d had enough of my extended road trip. I began the drive home, taking a leisurely route up the California coast with the idea of getting in on March 17. The trip was great — at least the first few days — but then the weather turned nasty. I pointed my rig inland on March 15 and rolled down my driveway the following day.

There was still no water.

Of course, my camper had water. I also had my four 6-1/2 gallon water jugs with me. I’d stopped at the water company office to top everything off. I figured I could always use the camper’s toilet and shower.

But I didn’t want to. I wanted to use a real toilet and shower.

I hauled water up the stairs in those 6-1/2 gallon jugs for a few days. During my travels, I’d rigged up a DC pump with hoses to transfer water from the jugs into my camper without having to lift the jugs; I now put that to work in my kitchen so I could wash silverware and pots with “running” water. (I was using paper plates.)

My neighbor, Elizabeth, had a well with a broken pump. She had the pump fixed and invited neighbors to shower at her place. I took her up on that offer. She has a nice shower in her guest bathroom. I also filled water jugs there.

But when March 22 came and went, I’d had enough. I needed a better solution.

Water Tank
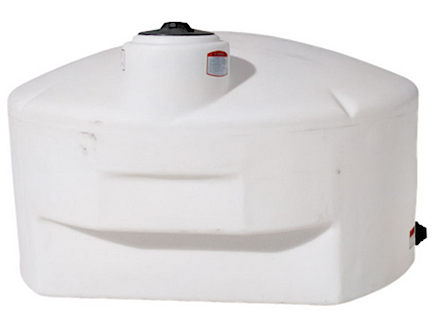
Tanks like these are designed to fit in the back of a pickup truck for transporting water.

My neighbors, Al and Kathy, have a winery (and a well). The previous autumn, I’d noticed that they had a water hauling tank sitting neglected and unused in their yard near their burn pile. I’d asked if they were using it and was told they weren’t. I asked about buying it — with the crazy idea of gathering water for irrigation off my huge roof — and they said yes. But I hadn’t done anything about it then.

Fortunately, it was still sitting there in March, nestled in the snow. I asked again. The 425 gallon tank had never been used — in fact, it didn’t even have fittings or a valve at the bottom. Other than cobwebs and a bit of organic matter, it was pretty clean. I bought it for $100 — what a deal! I just found the same tank online for $332 — and Al and another neighbor, JR, loaded it onto my truck. I used a ratchet tie down to prevent it from sliding out the back.

I followed JR’s suggestion and brought it down to the car wash where I cleaned the inside as well as possible with a power washer.

I went to a local irrigation supply place and spent $25 on a valve and fittings to connect it to a standard garden hose.

I went on Amazon and spent $80 on a Shurflo pressure regulated pump that would automatically shut off when there was no demand for water. The trick was finding one with enough power to get the water up about 15 feet to my second floor living space. And I spent another $10 on fittings to attach that to a standard garden hose. And another $5 to turn the pump’s loose wires into a plug.

By Saturday, March 25 — nine days after returning home — I was ready.

Flashback: Howard Mesa 2005

My wasband and I used to own an off-the-grid camping cabin on 40 acres of land in northern Arizona. That area is notorious for its low water table and nearly everyone up there hauls their own water — including us.

Water could be purchased from a vending machine off the main road between Valle and Williams. You’d pull your tank up under it, set the hose in the top of the tank, and stick a $10 bill into the vending machine. 450 gallons of water would immediately gush out of the hose and into the tank.

Hauling Water in the Chevy

I remember hauling water once using a neighbor’s tank like the one I have now. The truck would be pretty stable until I hit about 50 miles per hour. At that point, the sloshing would make it difficult to control and I’d have to slow down. I only did it once or twice — it was a vacation home and we had 2,100 gallons of water storage up there — but can’t imagine what it must have been like to do it several times a week for a family.

I went to Elizabeth’s house with my new tank and wrenches and fittings and some plumbers tape and set the valve and fittings into the tank. I turned off the valve so the tank would hold water.

I ran Elizabeth’s garden hose to the top of the tank and turned on the water.

The tank holds more than 400 gallons. It takes a long time to pump 400 gallons from a garden hose. I sat in my truck and read the newspaper. Every once in a while, the truck would creak and shift as the weight of the water settled it lower and lower on its axles. Do the math: 400 gallons x 8 pounds per gallon = 3,200 pounds.

Tank on the Truck
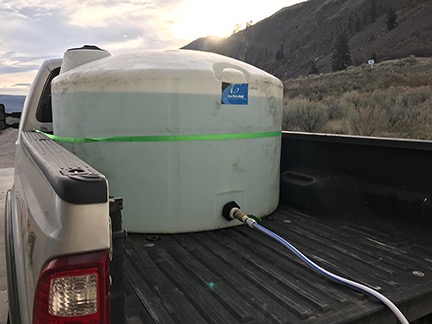
Here’s the tank on my truck, parked on my driveway after yesterday’s refill.

At about 300 gallons, I got tired of waiting and turned off the water. I put the cap back on the tank and started the drive home. The water sloshed, making the truck feel somewhat unstable. But it was a short drive — only about a mile — and I didn’t go very fast. I backed the truck up on my concrete apron in front of my big garage door. I threw about a half cup of bleach into the tank to prevent algae from growing in it.

I noticed a slight leak from the fittings. Not much; maybe three drips per minute. I tried tightening up the fittings but didn’t see much improvement.

Pump
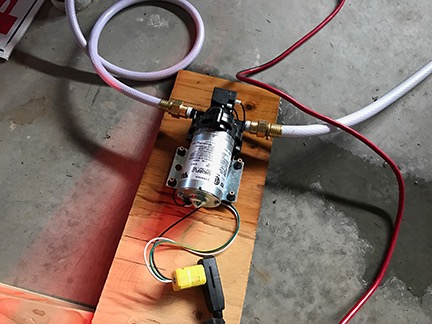
Here’s the pump after mounting it on a piece of scrap wood and propping it up so the water leaks away from it. I think that when this is all over, I’ll rework the fittings and permanently mount it near the hose bib.

I connected a garden hose from the tank and ran it into the garage. Then I connected it to the pump. That’s where I had some difficulty. You see, Shurflo pumps are designed to be used with Shurflo fittings. Although the manual said it should connect to a standard 1/2 inch pipe fitting, it didn’t thread exactly right. I had a bitch of a time getting it set up — on both sides of the pump. Eventually, however, I got it connected for inflow and outflow and connected the outflow end to a hose bib in my garage.

Water Source
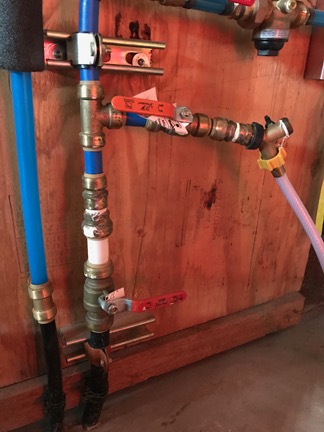
I call this my Frankenstein monster. Water comes into my home through the black pipe on the right through a valve (off in this photo) and then into a number of PEX fittings that bring it down to 3/4 inch. From there, it goes up into my home as well as to the right through another valve (on in this photo) to my hose bib. My first plumbing job. Hey, it works.

This is where things are a little non-standard. Regular readers might recall that I lived in my RV inside the garage for the winter before my living space was done. When I set up the water system in my building, I included a hose fitting with its own valve that I was able to use to feed water to my camper. It can also be used to drain all the water out of my home’s plumbing system. So I was already set up for water input, although I hadn’t ever expected to use the valve this way. I just shut off the water from the street into my building and turned on the valve between my building and the hose attached to the pump. Then I plugged in the pump.

It ran. It ran for well over a minute. I was just beginning to wonder whether it would automatically shut off when the system was fully pressurized when it stuttered a few times and went quiet.

I went upstairs and flushed the toilet. (I have my priorities straight.) The tank had fill automatically and was filling again.

There was water at the sink faucet.

I came back downstairs to look at the pump. It was leaking at both fittings. I wasn’t surprised. Still, I knew I’d done the best that I could. (Later, I’d order Shurflo fittings and wind up not using them when they arrived. If it ain’t broke…)

I mounted the pump on a piece of scrap wood and angled it up so the water would drip away from the pump. There’s a drain in my garage so the water would eventually find its way out.

Then I turned on the water heater. (I’d had a friend turn it off while I was away when I heard there was no water. I was slightly concerned that the water would somehow drain out and burn up my heating element. None of that happened.) I’d have my first hot shower at home later in the day.

I figured that since I had come up with a solution, the water would come back the next day. But no, there’s still no water to the homes on our road.

Since then, it’s been pretty much business as usual at my house. I turn on the tap and water comes out. I do laundry and use the dishwasher. I shower and wash up. I am a bit more thoughtful about letting the water run and I admit that I haven’t filled up my 80-gallon bathtub yet.

The only difference is that I don’t drink the tap water. I have bottled water for making coffee, cooking, and drinking.

That first tank of water lasted me nearly a week. Yesterday, I drove out to Elizabeth’s again. While the tank filled with water, I helped her install chicken wire at the top of her chicken coop to prevent birds of prey from getting in or chickens from getting out. This time, I let it the water go almost to the top. It must have taken at least a half hour to fill. Back home, I connected the hose to the tank, turned on the pump again, and was good to go.

Is this a hardship? Not with this solution. Living a week without running water was driving me nuts — and I had to come up with a solution. It’s unfortunate, however, that my truck is tied up with water duty. I need to buy some lumber for a project and will have to drag my old cargo trailer behind my Jeep to get the lumber home.

It’s been nearly two months now since the water stopped running and some of my neighbors have been dealing with it — without a solution like mine — for that long. I don’t know how they’re doing it.

The problem was in the paper about a week ago. The water company says it can’t dig until the water starts flowing again. When they do dig, it’ll be quite a mess since there’s only one way in and out on this road and the pipe runs right down the middle.

In the meantime, my neighbors are confident that the problem will be fixed for good. I’m not that optimistic. But I am prepared for next time.

April 2, 2017 Update: I got a call from a neighbor at 6:30 AM. He jubilantly announced that the water was back on. Although I’m thrilled that our little ordeal is over, I’m left wondering what I’m going to do with the 350 gallons of water in the tank on the back of my truck…

April 3, 2017 Update: I found a home for all that water! One of my neighbors needed to do a water change in his fish pond and was thrilled to get 350 gallons that he didn’t have to run from his tap.

Congratulations! You’ve made it to the end of yet another lengthy blog post here on An Eclectic Mind. If you got this far, you must have gotten something out of what you read. And isn’t it nice to read Web content that isn’t full of annoying ads?

How about doing something to show your appreciation? I’d love it if you’d add a comment at the end of this post to share your feedback with me and others. But I’d really love it if you’d visit my Support page and chip in a few dollars to help cover the cost of hosting this blog and motivate me to keep writing new, interesting content. It’ll only take a moment and I really would appreciate it!


Living with Cheap Power

When conserving power seems silly.

I live in what’s referred to as North Central Washington State, an area on the east side of the Cascade Mountains with a high desert like climate. If you’re familiar with Prescott or Flagstaff, Arizona, you know exactly what the weather here is like: four seasons with very little rain, some snow, and relatively mild summers and winters. Sure, summer temperatures can get over 100°F, but not often or for long. Likewise, winter temperatures can dip into single digits (F), but not often or long. It’s actually a lot like where I grew up in the New York Metro area, but with a lot less rain and a lot more sun.

Washington Map
Here’s a satellite view of the State of Washington with an X where I live. The closest city is Wenatchee (98801) about 5 air miles away.

(When I looked at that map, I realized that I live pretty darn close to the center of the state. So I Googled “What is the geographic center of Washington State?” and discovered I’m just eight or so miles away. So I really don’t know why they call this area North Central Washington when we’re really just Central Washington.)

Washington State power companies have huge investments in hydroelectric and wind generation projects. I live just 2 air miles from the Columbia River and there are two dams (Rock Island and Rocky Reach) with hydroelectric plants within 10 miles of me. Reach out another 20 or so miles and there are two more dams (Lake Chelan and Wanapum) with power plants and a huge wind/solar facility (Wild Horse).

It should come as no surprise that my area has one of the cheapest electricity rates in the country. (I’ve been told that Chelan County is actually the second cheapest in the country with Douglas County, across the river, being the cheapest (currently 2.33¢), but I haven’t confirmed that.) Our rates? 2.7¢ per kilowatt hour.

My Electricity Cost
My electric bills for the past 13 months, charted. Not sure what was going on last winter. (Note to self: talk to house sitter.) Even with those two peak months, the average for the period is only $45/month.

I see this on my monthly electric bill. While it’s true that we had a mild summer this year, my air conditioning did run. I heard it. I even cranked it up a few times. But you wouldn’t know it looking at my electric bill; it never topped $32 for any one month. Indeed, it was higher in the spring — and I still can’t figure out why. And it did get over $100 in February for January’s usage.

What’s your local electricity rate? You can look at your bill or even Google it. Or if you want a statewide average, here’s a handy table. The rate where I last lived, in Wickenburg, AZ, is currently 11.96¢/kilowatt hour — about 3.4 times what I’m paying now. And where I lived before that, in Harrington Park, NJ, the rate is currently 15.40¢/kilowatt hour — 4.7 times what I’m paying now. The national average is 12.73¢/kilowatt hour. These are all residential rates, of course. Often the rates are different for commercial and industrial users.

This is great for me — obviously. It’s wonderful to have such a low monthly electric bill. More money in my pocket, right?

The trouble is, it takes away most of my motivation to conserve power. After all, if letting the air conditioning or heat run 24/7 isn’t going to cost much more than making sure it’s turned off when I’m not around, why should I bother?

People might argue that it’s better for the environment to conserve power. Normally, I’d agree. But with most — if not all — of my power coming from renewable energy sources like hydro, wind, and solar, why conserve? These renewable energy sources are producing more than enough power for my area. And with loss in transmission, even sending the power I could save into the grid wouldn’t make a difference.

And yes, that’s the reason I didn’t cover the huge roof on my home with solar panels. There isn’t any point. I’d never save enough money to cover the cost of such an investment and there’s no need for the extra power generation in this area.

It’s also why if I bought a new car while I was living here, I’d definitely buy an electric car.

Now don’t get the idea that I waste energy. I’m the person who turns out the lights in rooms I’m not in, uses a programmable thermostat, and runs full loads in the dishwasher, washing machine, and dryer. All my appliances are “Energy Star Compliant” — as if you can get them any other way. I live in a small space and although all my appliances are electric, there’s just one person using them. But still! 2.7¢/kilowatt hour? It would be difficult to get the $200+ electric bills I saw every winter and summer in Arizona.

All this might make you wonder why the country isn’t investing in more renewable energy projects. Sure, not every river can support hydro projects. And yes, wind generators can be unsightly. And all large-scale energy projects impact the environment in one way or the other — ask me about the raptor surveys I did for wind projects in Arizona, New Mexico, and Nevada.

But renewable energy resources can reduce or eliminate our dependence on dirty fuel, non-renewable energy like oil, natural gas, and coal. It can reduce the cost of energy, which would have a positive economic impact on people who struggle to pay utility bills. It would help encourage more people to buy electric vehicles, further reducing our use of fossil fuels and helping to clean our air.

This is a no-brainer, folks. Don’t let politicians pandering to the coal and oil industries tell you otherwise.

Now just don’t talk to me about my water bill. That’s a whole different story.

The Bighorn Sheep in My Yard

Wild Kingdom* out my window.

There are bighorn sheep in the cliffs across the road from my home. I often hear them clattering around in the rocks, creating mini landslides. I’ve also seen them quite often.

Last year, they’d show up pretty regularly across the street in my neighbor’s yard. By regularly, I mean around midday every day. For weeks. I even had the misfortune of seeing my neighbor outside, buck naked, taking photos of them when I was watching them through binoculars and movement caught my eye.

They were gone for quite a while. Sure, I’d hear them up in the cliffs and the sound would often get Penny all worked up. Despite numerous helicopter rides with me, her hearing remains excellent and she often hears them before I do.

A few weeks ago, they started showing up again. A pretty big herd of mostly females. One time, they even put on quite a show for some weekend guests who’d come with their RV. We sat up on the deck having a late breakfast while they grazed on weeds in my neighbor’s yard.

Bighorn Sheep
It wasn’t easy to take photos of the sheep at the road; the sun was right behind them.

The other day, they were on my side of the road. I watched them, fearing that they might start grazing on the willow trees I’d planted alongside the road last year. But they seemed more interested in the weeds than the trees. Good.

Penny and Sheep
A cropped cell phone picture of Penny facing off with one of the sheep.

On Thursday, I was working on some shelves in my garage when Penny started barking at something. Turned out that she was near the end of the driveway, facing off with one of the bighorn sheep. I managed to get a photo with my phone before the sheep bounded off. I mean that quite literally — it ran off with a hopping motion that was actually quite funny to see. But what really surprised both Penny and me was that the sheep wasn’t alone — are they ever? There were at least a dozen more in my front yard, hidden from view by the tall weeds and my shed. They took off after their friend, running across the road.

I took a break and went upstairs for some lunch. I ate out on the deck. The sheep had moved into the road about halfway down my property line. Some of them were actually lying down in the road. I live on a dead end road and there are only three occupied homes beyond mine, so there isn’t much traffic.

Cathedral Rock Traffic Jam
Seriously? Lying down in the road?

Eventually, however, one of my neighbors went out. Even though they obviously saw the sheep — how could you possibly miss a herd right in the road? — and they drove slowly, the sheep moved.

Into my yard.

As I watched, they came closer and closer to my home. I know they saw me up on the deck watching, but they didn’t seem too interested. They came to the north side of my place, the side that faces the Columbia River and Wenatchee Valley. They were nibbling on the tops of the native grass and weeds that grow wild there. (I have 10 acres and the vast majority of it has “nature’s landscaping.”) They came closer and closer. At one point, one of them was right at the edge of the gravel drive, not 100 feet from where I watched from the deck.

Herd of Bighorn Sheep
My Nikon was handy and I’d popped the 70-300mm lens on it when they first came into the yard. They were so close that I had to zoom all the way out to capture this group of the herd. This is 70mm from my deck, uncropped. A handful of others didn’t fit in the frame.

They were beautiful. And healthy. Adult females mostly, with a few youngsters.

momandkid.jpg
Another shot from my deck. This was shot at 300mm and is not cropped. They were close!

This is the video I Periscoped. It’s a shame it saves a downsampled version of the video.

I took pictures, of course. Lots of pictures. And video. I did a live broadcast on Periscope and another on Facebook. I wanted to share my experience with my friends. (I guess that’s what this blog post is about.)

I’d left the door open and when I saw them looking down at something, I followed their glance. Penny was out there, sizing them up. I didn’t want her scaring them off so I called her, softly. She seemed to debate whether she should come. But then she trotted back into the house and up the stairs. She joined me on the deck to watch them and stayed quiet.

And then they just left. After about 20 minutes grazing in my side yard, one of them headed off purposefully and the others followed. I watched them go. They crossed my driveway and then the road and headed back up toward the cliffs.

Did they come back yesterday when I was out hiking and hunting for mushrooms with a friend? I don’t know, but I bet they did. And I bet they came back today when I was out doing helicopter rides in Quincy. Tomorrow, I plan to get some work done at home. Maybe I’ll see them again.

I hope so.


* Mutual of Omaha’s Wild Kingdom was a television show about animals that originally aired from 1963 until 1988. I grew up watching this show. A new version began airing on Animal Planet in 2002. Learn more here and here.

Construction: The Garage Shelves

It was a mess. Now it’s not.

On May 20, 2014, I began blogging about the construction of my new home in Malaga, WA. You can read all of these posts — and see the time-lapse movies that go with many them — by clicking the new home construction tag.

I need to start by reminding readers that I have a very large garage. The 60 x 48 footprint is split into a four car garage (24 x 48), a double-wide RV garage (24 x 48), and a shop/general storage area (12 x 48). If you’re doing math, that’s 2880 square feet.

Of garage.

Woody Says
My friend Woody wrote this on my big white board during my moving party back in 2014. He wasn’t kidding.

The great thing about a big garage is that there’s plenty of space to store stuff. The bad thing about a big garage is that there’s plenty of space to store stuff.

I’m doing what I can to keep the garage organized, but even though most things have their place, that place isn’t exactly neat and orderly.

It Started with the Bungee Cords

The other day, I decided to clean up and sort out my bungee cords and ratchet tie downs — you wouldn’t believe how many I have because even I’m having trouble believing it.

I’d been racking my brains on a solution that would enable me to hang them neatly in order of size in a place that was out of the way. That’s when I remembered the curtain rods. When I lived in my Arizona house, I’d bought a few really nice ones. I wasn’t about to leave them behind — not even with shrimp stuffed in them (look it up) — so I packed them. Of course, I don’t have curtains on my windows here so I don’t need curtain rods. They remained wrapped up in bubble wrap in a corner of the garage.

Bungees
Some of my bungees and tie downs and ropes after putting up the curtain rod. I found a bunch more here, there, and everywhere the next day. The horizontal wooden beams are called girts, by the way. I live in a post & beam building. Beyond the vapor barrier is the metal exterior of my building. The car garage is not insulated.

I unwrapped the living room rod and grabbed a bungee cord. Sure enough, its hook fit neatly over the narrow black rod. A half hour later, the rod was hung on one of the girts in my Jeep garage — each garage bay is assigned a vehicle; the Jeep is in the first bay — and I was taking great joy in arranging my bungee cords and ratchet tie-downs. And ropes and straps.

The Shelves Came Next

I started thinking about how stupid it was to have all that dead space right below the bungee cords. How about a couple of shelves?

Big Shelves
This was the first set of shelves I built for the garage. (Tiny dog for scale.) They’re free-standing and very heavy duty. And just plain heavy. I made two more shorter sets and a workbench with two shelves based on the same design. The RV garage/shop is insulated.

I should mention here that I’ve created shelves elsewhere in my garage. The biggest project was a set 8 feet long and 8 feet tall made of 5/8 plywood and 2 x4 lumber. It was quite a chore to build them, which I did with them lying down on the floor. When I tried to stand them up, I couldn’t. I had to wait for a friend to come by and lure him down into the garage — which was about as difficult as it sounds. (Men love my garage.)

I had limited space in the car garages, though. After all, I had to fit the cars in. Each garage bay is about 12 feet wide. There aren’t any walls between them — it’s one big open space. I knew I could fit shelves that were about 12 inches deep. (The big ones are 24 inches deep.) And I realized that I could build them in place, right against the wall, using the tops of the girts as supports for the shelves. That would save another inch and a half because each shelf could go right up against the exterior metal walls.

So I went to Home Depot and bought a sheet of about 1/2 inch plywood. While I was there, I saw a really nice piece of sanded 1/2 inch plywood that was in the cull pile because of a nasty scratch in one corner. But 70% off? A $35 sheet of wood for $10? No brainer! I brought both pieces over to the big wood cutter and got a Home Depot guy to cut each of them into 8 foot x 1 foot strips. Then I picked up a few 2x4s, along with some very nice 2×3 cull pieces and a long 2×4 cull piece. I don’t see anything wrong with using cull lumber to build shelves in a garage.

Did I mention that I also returned a bunch of lumber I’d bought about a year before but never used? The return completely covered the cost of the new lumber, as well as some additional screws and other supplies I needed in my shop. I threw everything into the back of the pickup, hung a red flag on the long 2×4, ran a few errands, and went home to make dinner with a friend.

The next morning, I really should have tended to my bees, but my truck was blocking my quad and I figured it would be best for me to offload the lumber and move the truck. Or maybe just offload the lumber and build the shelves to get the lumber completely out of the way.

So I did.

Let me explain a little bit about how a post and beam building — or pole building — is constructed. They start by digging holes in the ground and planting vertical posts. My building is made with a combination of 6×6 and 6×8 pressure treated posts. Then they nail the girts in horizontally, 24 inches on center. Next, they put the roof trusses atop the posts. They add rafters to finish framing out the roof. They cover that with insulation or a vapor barrier or both and then screw on the metal skin. They pour the concrete slab last — if the building has one (mine does). If you’re interested in seeing my building built in a time-lapse movie, be sure to check out this blog post.

The posts are usually 12 feet apart. In the bungee cord area, however, the distance between the door to my stairwell and the first post was only 7 feet. The reason: the front door and entrance vestibule is also on that wall. So the shelves needed to be just 7 feet long.

I dragged the saw horses my friend Bob had made me — they’re taller than standard sawhorses and much nicer to use — to the driveway outside the garage door, which I opened. I used my circular saw to make the cuts; later, I used my miter saw and table saw to get cleaner cuts when needed. And bit by bit I assembled the pieces I needed to build a short set of shelves with just a top and bottom shelf. The bottom shelf needed two cut outs — one for an electrical outlet (long story) and the other for the pipe for the outside hose bib. I got to use my new 1-1/2-inch hole saw, which I’d actually bought for a beehive project.

Bungee wall with shelves
Here’s my bungee cord wall with the new shelves. I arranged all the tools I used for the project on the shelves.

I had to make a few blocks out of scrap wood to support various components of the shelves as I assembled them and screwed them together. I drilled pilot holes — I always do a neater job when there’s a hole predrilled for a screw. I used two 2×2 lengths that had been sitting around forever for the front horizontal shelf supports. These were small shelves so they didn’t need to be very heavy duty.

When I was done, I realized that I also needed a center vertical support. So I used a piece of scrap wood leftover from my windowsill project. Done.

And Then More Shelves

The truck wasn’t empty yet. I still had plenty of wood. I also had a really messy wall at the front of that garage bay. And time.

Old Shelves
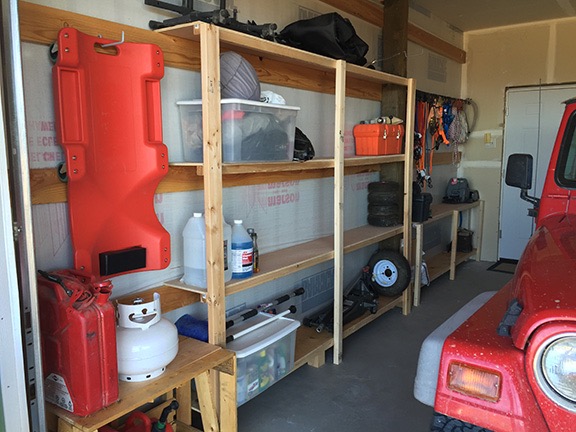
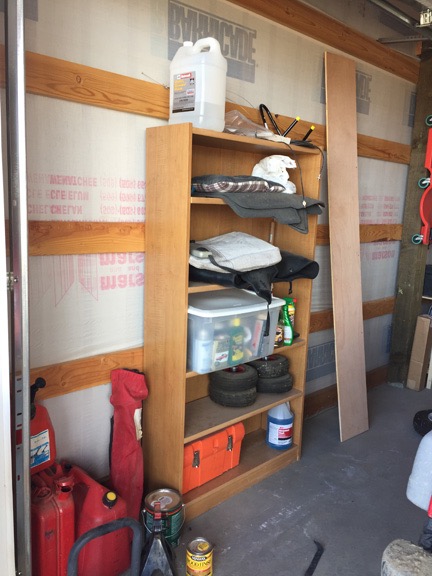
Here’s the old shelves with a bunch of car stuff on them. This whole area looks like crap here — and this was after I’d moved some trim wood stored there.

A long time ago, I’d bought a very heavy duty bookshelf for my books. I have a lot of books. I don’t remember if this shelf was from my New Jersey home or if I got it for the office I had at my condo in Wickenburg for a while. In any case, it eventually made its way to my Wickenburg hangar where I stored a lot of stuff on it. When I moved from Wickenburg to an East Wenatchee hangar and eventually to my new home in Malaga, the shelves came with me. I’d put them in the front of that garage bay and was using it to store miscellaneous auto-related stuff.

But it looked like crap.

I texted a friend of mine who has rental properties. Want an old bookshelf in decent condition? I sent a picture. Sure, she answered. Send a man with a truck, I told her. (She’d also taken my old Sony Trinitron off my hands.)

I took all the things off the shelves and used a hand truck to move the shelves over to a spot between Bay 2 (Honda S2000) and Bay 3 (Ford truck). Hopefully, the man with the truck will come within a few days. I swept. And then I got to work.

Four shelves, no shelf cutting needed because 8 feet was fine. I ripped two 2x4s on my table saw and used them for horizontal supports for the front of the shelves. Then I cut 2 2x4s to 79 inches and started piecing all of it together.

Penny and Sheep
I had to crop the heck out of this cell phone photo. My truck mirror is on the right.

And that’s when Penny started barking like a little nut. I went out to investigate. She was halfway down the driveway at a standoff with a bighorn sheep. After some more barking, she spooked it and it bounded off. And then a dozen of its friends shot out of my side yard after it. There had been a whole herd of them less than 100 yards from where I was working and I didn’t even know it.

I took a break for lunch. I saw the sheep again later. They got very close. I got photos. But I’ll save that for another blog post.

I eventually got back to work. Again, I had to cut supports as I mounted each shelf. But once I got the hang of it, it went very quickly. I was done within an hour.

I put away my tools and set about organizing car and motorcycle-related stuff on the new shelves. I found a garage door opener for my old house. I found the stock mats that had come with my old Ford F350. (It had custom rubber mats so these were brand new; I photographed them and put them on Craig’s List.) I walked around my whole garage, looking for anything remotely car or motorcycle related and moved it to the shelves. I still had lots of space to fill.

I had some extra wall space between the shelves and the garage door. I measured a crate I had in my shop and moved it into position. I cut a piece of wood to give it a sold top. Then I moved my gas cans and spare propane bottle onto it. It made sense to keep stuff like that near the door where it could be quickly removed.

I found a few more bungee cords and put them away.

I spent some time admiring my handiwork. I might be the Queen of Clutter, but it isn’t by choice. If everything has a place, everything can be put away. The trick is finding a place for everything. Now I have a place for my car stuff.

Finished Garage Shelves
These shelves look a lot nicer than the mess I had there before.

Up Next

Before I called it quits for the day and went upstairs to get cleaned up, I took a look at the wall in Bay 4. That’s where my little boat and motorcycle live. It’s a big mess and could really use some shelves. I’m thinking it might be a good place to organize all of my extra beekeeping equipment.

Looks like I’ll be hitting Home Depot for more lumber again.

Footnote

After writing this and posting it and then re-reading it online, I started thinking about all the work I’d done to build these shelves — and to do all the other things I’ve done as part of the construction of my home. A lot of it is difficult, challenging work that requires me to use my brains as well as my physical strength to get a project done. A lot of people would shy away from work like this and either hire someone else to do it or not do it at all. I know this from experience; so many projects at my Arizona house just didn’t get done. Or got done the way a contractor did them — which might not be the way it should have been done to meet needs.

Doing things like this myself is a task and a challenge I really look forward to. I don’t have a regular job that requires me to show up at an office or sit at a desk and make calls all day. My time is infinitely flexible. I could spend it sleeping all day or watching television or just goofing off. Yet many days, I choose to spend my time working hard on projects like this. The way I see it, there are four benefits:

  • I get the thing done and get the benefits of that. In this case, I’ve got a bunch of neat, new storage spaces where I used to have a wall with a lot of stuff piled up on it.
  • I save money on what it would have cost to hire someone to do the job. It’s a lot cheaper for me to spend a few hours on a project like this than to pay a carpenter to do it. It’s not like I don’t have the time.
  • I learn new techniques, often through trial and error. The things I learn can be applied to other projects. The way I see it, if I can’t learn something every day, why bother getting out of bed?
  • I get an amazing feeling of satisfaction every time I look at something I created with my own hands. My home is full of things like this. Read my construction posts to see what I’ve done; I’m proud of every single project I finished.

The people who think I’m doing these things because I’m cheap or bored are completely missing the point. They likely haven’t taken on projects like these, projects that can meet a specific need and give them so much satisfaction for every minute of effort put into them. It’s not difficult if you think it through and have the right materials and tools. Dare I say it? It’s fun.

Try it sometime and see for yourself.

The “Million Dollar View”

A friend reminds me about what I now take for granted.

Not sure if anyone is noticing, but I’m doing my best to blog every morning these days. That means keeping them short when I have other stuff to do. And believe me, I have a lot of other stuff to do.

Inbox
I’m ready to declare email bankruptcy and just clear all of this out.

After spending about an hour with my coffee and nightmarish email inbox, I looked up and realized that the sun had come up. I looked out my side windows — the ones facing the Wenatchee Valley and Columbia River — and was instantly rewarded with the amazing view I’ve come to take for granted.

My Amazing Morning View
Here’s what I see most mornings, right from my windows. Not too shabby, eh? Click the photo to view a much larger version where you can see the detail — including my “Lookout Point” bench in the bottom right.

I had a friend over for dinner last night. As the sun was setting, she remarked that I had a “million dollar view.” I looked out and agreed that it was beautiful. (I didn’t mention that it so often looked better.) I told her that it looked best in the morning in the golden hour light, when the low-lying sun cast deep shadows that bought out the texture of the mountains and hillsides. Like in the photo above. Same in the afternoon, when the cliffs across the river were illuminated just right. (Note to self: add photo of that.)

I’m a view person, as I’ve mentioned elsewhere in this blog. Looking out and seeing the world around me energizes me and puts me at peace — at the same time. Yes, I like tall pine trees and forests and canyons, but being surrounded by those things in tight quarters would stifle me, making me feel closed in and possibly smothered. Being able to look out and see for miles and miles makes me feel good about myself and my world.

The seasons are changing now; autumn is coming. The view changes with the seasons. Right now, the cherry orchard on the right has irrigation turned off and is being allowed to die; I suspect that when apple harvest is done, they’ll tear out those trees. Will they get new ones in before winter? Probably not; it’ll be a project I can watch in the spring. There’s still a tiny bit of snow up in the Enchantments, which are hidden in this photo by the low clouds on the left. The river bends as it makes its way into Wenatchee; in the evening, it reflects the changing color of the sky.

So much to see, right from my windows. Like an ever-changing series of paintings, a triptych with more than just three panels, separated by a few inches of wall between each view.

I cannot express how glad I am that my life took the turn it did back in 2012 when I became free to make all of my life decisions. That freedom made it possible to buy 10 acres of undeveloped land high on a cliffside shelf overlooking an amazingly beautiful valley. It made it possible for me to plan and build the home I wanted, a home that would meet my needs and bring this view into every room.

A “million dollar view”? That’s a bit of an exaggeration. But it’s priceless to me.