I’ve Got the Power!

Literally.*

Last week, I blogged about cleaning my hand-me-down temporary power box in preparation for rewiring it and installing it on my 10-acre lot in Malaga, WA. At the end of that post, I mentioned that I hoped my friend and I could have it in place later that day.

Well, I got what I hoped for. When my friend rolled up just minutes after publishing that post to this blog, he was eager to get started on the job. By the end of the day, the pole was in place.

Rewiring

Power Box After
Here’s what we started with.

The first job was clearing out the old wires to replace them with new ones. Not everything had to go. We had to remove the wires on the left side of the box and replace them with a new set that I’d bought the previous week. On the right side, we had to connect wires to the 30 amp breaker and run those wires down to an RV outlet that had to be positioned farther down the pole.

I backed my pickup down to where the pole was and we lifted it into the back of my truck with the business end on the tailgate. Then I moved the truck forward into the shade of the house under construction — now nearly finished — where I’m currently living. I fetched all the pieces I’d bought at Home Depot and the electrical supply shop the week before and got out some tools.

I think my friend was pretty surprised when he realized that I knew how to use tools. Apparently, a lot of women don’t. When he pointed out which wires needed to be removed, I grabbed the right screwdriver and got to work on it. After all, I was supposed to do all the wiring myself — that was a requirement of my permit. (In Chelan County, either the homeowner hires a licensed electrician to do all the work or does it all herself. The rule didn’t say anything about coaching from a knowledgable friend.)

I had most of the tools needed to get the job done. There were only two I didn’t have — and got the next time I was out: a good wire stripper and a hacksaw. The wire stripper was needed for obvious reasons — each new wire’s end had to be stripped before it could be fastened into place. The hacksaw was to cut the plastic conduit that also needed to be replaced.

Step-by-step we worked our way through the box. I learned about how the box was organized and what each wire did. It was surprisingly simple. And safe — it wasn’t hooked up to any power yet.

Then we were finished. It had taken less than an hour.

Planting the Pole

We closed up the tailgate, climbed into the truck, and headed out. I think my friend was more excited about getting the pole set up than I was. Don’t get me wrong — I was eager to get it set up. But when you consider that he had plenty of other things to do that day, it was really nice — and so refreshing! — to be with someone who was so focused on helping me get a job done. (That’s part of what real friends are all about.)

At my property, my friend was pleasantly surprised at the trench and hole I’d dug. After seeing me limp around on a bad foot for three weeks, I don’t think he had very high expectations. I think he’d come with the idea that he’d have to do some digging, despite the fact that I’d assured him that I’d dug the trench to specs. He later told me that out of everything I’d done so far on this project, digging that trench was the most impressive. (I have to agree. I surprised myself.)

Because he’s a man, though, he had to pick up a shovel and extend the trench a little in front of the transformer box. I’m not sure if he did it because he thought we needed the extra length or if he was trying to see for himself how difficult it was to dig. If the later, he discovered that it was quite easy to dig. After all, a middle-aged woman with a gimpy foot had done it.

I backed the truck up as close to the post hole as I could and we wrestled the pole out of the truck and into the hole. It was a bit of a struggle, mostly because of the conduit hanging loose with a 90° angle at the bottom and 10 feet of wire hanging out. But we finally got it into place. We threw some rocks into the hole and followed that up with some dirt. We realized that the fastener we’d brought to connect the grounding wire to the grounding rod wasn’t big enough. I’d have to come back and make that connection another time.

Power Pole Installed
My friend took this silly photo of me with the power pole and box installed.

The last step was putting in the two required supporting poles each in a different direction. We used the same poles my friend had used for his setup. The heads on the screws he’d used stripped immediately, but I had some long nails in my toolbox to get the job done.

My friend voiced some concern about the grounding rod being inside the hole. He seemed to think it needed to be driven in from the surrounding grade to make it more sturdy. But it was sturdy. If I could have pulled it out, I would have — just to drive it in elsewhere. It would have to wait. I could aways get another rod if I needed to.

Finished, my friend took a picture of me by the pole. Then we put away the shovel and other tools and celebrated by going out for a late Thai lunch in town.

I called the Chelan County PUD and told them the power pole was ready for inspection. I knew it would be at least 24 hours before the inspector came out.

Fastening the Grounding Wire

Later that day, while doing laundry at a local laundromat, I stopped at a hardware store to pick up the piece I’d need to connect the grounding wire to the rod. But rather than take care of it that day, I went out to dinner with another friend. We spent the evening back at the Mobile Mansion where we chatted and drank wine and I helped him fix a problem he was having with his GPS. (Once a techie, always a techie.)

The next day, I had a charter flight down to Othello and Pasco. I had to pick up my passengers at 8 AM sharp. Before leaving, however, I put the grounding rod connector piece and a screwdriver in my bag.

Helicopter Parking
Heck, why make the drive when I was only a few minutes away by air?

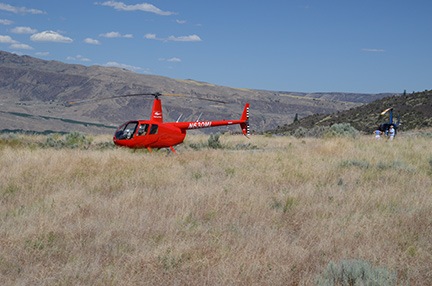
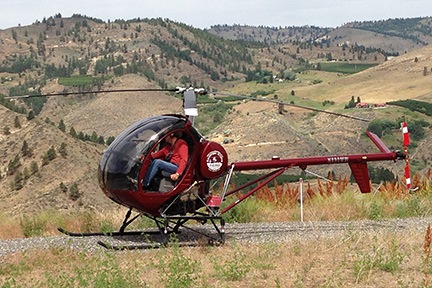
At about 1 PM, when the flight was done and I’d dropped off my passengers, I flew over to the property and landed at the end of the driveway. I shut down and took the connector and screwdriver over to the power pole.

Connection
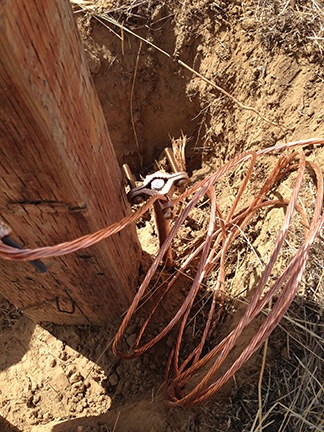
I sure did drive that rod in close to the pole.

I ran the connector through the very long piece of copper wire and made the connection to the rod. My friend had told me I could bury the extra wire. Seemed like a shame to me, but I really didn’t care. All I wanted was to pass the inspection.

The Inspection

I was home for less than an hour when the phone rang. It was the inspector. He said he’d be out on the property by 3 PM.

Thinking that showing up in a helicopter would be a wee bit too cocky, I jumped into my Jeep and made the 30-minute drive from Wenatchee Heights to Malaga. I had to stop for gas, of course — why is it that my vehicles always need fuel when I’m in a hurry? But even though I arrived early, the inspector was already there, looking at my pole and the trench and the hole.

Penny and I hopped out of the Jeep and I extended my hand as I walked up to the inspector. “What do you think of my trench?” I asked proudly. “I dug it myself.”

We both laughed.

He did the inspection, pointing out the few minor things that were wrong with the setup. Because they were minor, however, he let the pole pass inspection. He put the official sticker on the box.

Another hurdle jumped.

I’ve Got the Power

That was on Tuesday. Part of the inspector’s job is to call the Chelan County PUD and arrange for them to hook up the power. I had no idea if I needed to be present, but I figured that they had my phone number and would call if they needed me.

The rest of the week rolled by. I got busy. (I always get busy.) I didn’t hear anything about the power pole.

On Saturday, I had a charter flight. I was taking a couple up to Tsillan Cellars in Chelan for dinner. I had to meet them at the airport at 4 PM. But it was a nice day and I felt like flying. So I fired up the helicopter and took it out for a spin in the Leavenworth area where some friends of mine were hiking in the mountains. One of them had texted me his general location with some landmarks. I thought it would be fun to try to spot them from the air. And I hooked up the GoPro to get some video while I was out. (More of that in another post.)

By 3 PM I was ready to head back to Wenatchee. I needed fuel and wanted to relax for a while before meeting my passengers. I figured I’d fly by my property to see whether I could tell if the power had been installed.

Meter on my Box
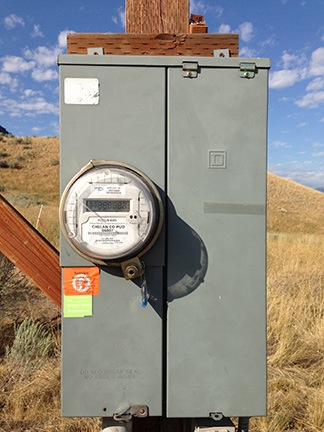
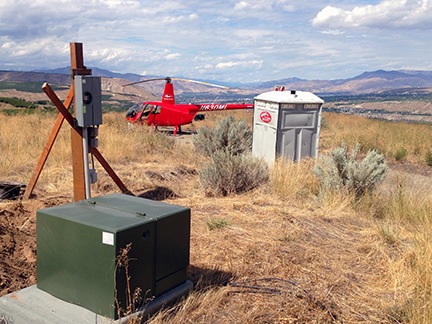
The meter on my power box confirmed that power was available at my lot.

I didn’t want to land there and shut down, but I did have to get close. I hovered near the transformer box. The wires I’d left loose were buried. As I flew away leaving a nasty cloud of dust (from the digging) behind me, I realized that I now had both water and power on the property.

I confirmed that the power worked just yesterday when I drove out to take a look. There was a meter on the box and it was running. I took a shovel and finished filling in the hole and ditch.

I was another step closer to my new home.

[*Note: Thanks to my old friend Steve for inspiring the title of this blog post.]

The Little Dig

Hard work, but not a difficult task.

This past week, I made a radical decision: I decided to install my own temporary power box at my future homesite.

Chelan County Electric Guide
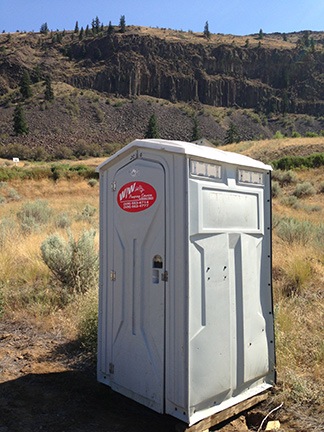
Temporary power is what’s commonly installed at a construction site to provide power to the builders for their tools. It consists of a 4×4 post with a circuit box, meter, and outlets. Chelan County is very specific about how the box should be installed. It’s all detailed in their 74-page book, Residential Electrical Services Connection and General Information,” which is available as a PDF from the Chelan County PUD website.

I’d spoken to two electricians about doing the work. One wanted $500, which included “renting” me the post for six months. He never did say what it would cost if I still needed it after that. The other promised to come look at the site but never showed. I called him to follow up and left a message. But by the time he called back, I’d already made my decision.

A friend of mine had a power post he no longer needed. All I needed to do was buy some more outlets and wire and some conduit and a grounding rod. He went with me to Home Depot and an electrical supply place. I spent $120 for the items I needed, along with a electrical how-to book.

The biggest challenge, he told me, would be to get the hole dug and drive in the copper grounding rod. The rod was about seven feet long. It had to be driven all the way into the ground. He said that driving in that damn rod would be the hardest part of all.

I went out to the property the next day. I wanted to scout out where I’d put the pole. I also wanted to measure the distance from the pole to where I planned to park my RV during construction. I was hoping to run 30 amp power to the RV. I needed 75 feet of cable. I think I had 50. I began rethinking the parking space.

Pole Placement
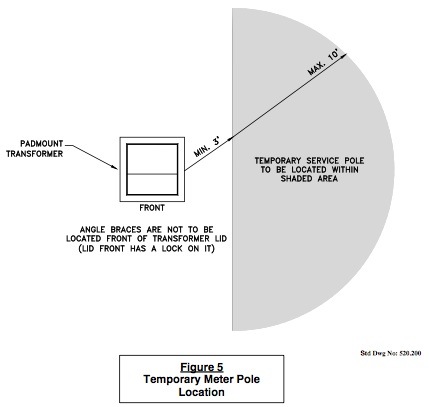
You see, the power pole has to be 3 to 10 feet from the transformer, which is already on the property. So I’m limited as to where I can put the pole. Fortunately, the transformer and pole location will be quite close to the building site. That’s good because the building must be within 100 feet of the transformer. So I’m all set for that.

While I was there, I took a shovel and thrust it into the dirt, expecting to hit rocks. After all, I’d had a hell of a time driving the T-post for my name/address sign three weeks before. But the shovel went in smoothly. I dumped a shovelful of dirt to the side. Easy. The next one wouldn’t be that easy, though.

I dug again. It was.

I got out my tape measure and measured about 7 feet from the transformer, in a line almost abeam my city water spigot. And I dug.

I dug for a good 15 minutes, always expecting to hit rock. I didn’t encounter a single stone.

Start of my Hole
I got pretty far the first day, just looking for rocks I never found.

By that time, I had a good trench going but I was sweating hard. It was afternoon on a sunny day. I wasn’t dressed for digging. My foot, which I’d sprained more than two weeks before, ached. I’d have to come back earlier in the day, before it got warm out.

That day was yesterday. I showed up at 8 AM. After a little weed whacking to clear the area, I got to it.

The trench needed to be 24 inches deep. The hole for the pole needed to be 36 inches deep. Unless you’ve actually dug a trench and hole that deep you have no idea how deep it really is. It’s deep.

But there were no rocks. The dirt came up easily, shovel after shovel. I had no trouble getting down to 20 inches on the trench and 30 on the hole. Then it started to get a little harder — the dirt was packed solid.

I drove down the street to where my friend Kathy lives. She’s an avid gardener. She was outside with her husband, talking about plans to add a new tasting room to their winery. I asked her if she had a “digging stick.” I described it as a long, pointed pole that was heavy. I had one back in Wickenburg but had left it behind. No problem. Kathy had one. And a post hole digger. We loaded both into my truck and I drove back.

I pounded with the digging stick to loosen up the soil. The post hole digger worked great to pull the dirt out of the trench and hole — after all, they weren’t much wider than my shovel — but was too heavy for me to work over and over. I went back to the shovel.

By 11 AM, after several breaks, I was done.

But there was one more thing: the copper rod.

I brought it over to the hole and lowered down onto one side. Then I got the post driver I’d bought to put in my name/address sign and put it over the rod. I rammed it down hard. The hit made a gawdawful clanging sound, but the rod must have gone in 6 inches.

I put on a pair of earplugs and got back to it. Soon I was kneeling beside the hole, banging away with the fence post driver. When the rod was about 4 inches out of the ground, I stopped. I could always finish it off later.

The Finished Trench
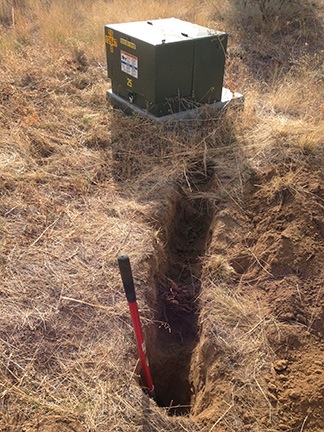
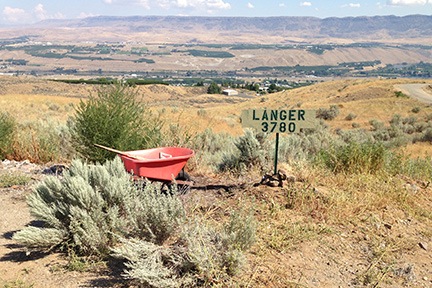
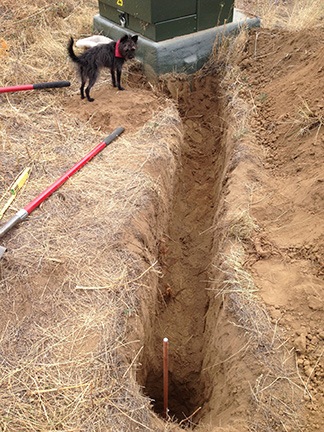
Here’s the finished trench and hole, approved by my tiny inspector.

I stopped and took a photo. When I put it on Facebook, my friends joked about using it to bury my wasband. We pretty much agreed that the ditch was so narrow he’d have to go in sideways. I told them I’d rather use it for its intended purpose since it was unlikely that I’d be able to cram his mommy in there with him.

On the way home, I stopped to chat with my next door neighbors whose home, the subject of my wasband’s investigation back in April, is nearly done. (I still giggle about that every time I drive by and see their RV parked there.) They were cleaning up after the builders — their way of saving some money. They’d loaded up their little flatbed trailer (another giggle) with scrap wood while their three sons played in the dirt. We exchanged phone numbers and talked about road maintenance.

Then I continued home, stopping just long enough to drop off the digging tools I’d borrowed.

Digging had been hard work, but it was surprisingly easy. As someone on Facebook mentioned, the lack of rocks was like some kind of good omen — it was meant to be. Still, you can bet I took plenty of ibuprofen last night.

Cherry Drying: My Sixth Season

The whole season in summary.

I’m just finished up my sixth season as a cherry drying pilot in North Central Washington’s Wenatchee area. I thought I’d take a moment to summarize how things went.

What Cherry Drying is All About

I’ve blogged about this extensively and you can quickly zip to other cherry drying related posts by following the cherry drying tag. In a nutshell, it’s like this:

Split Cherries
These Rainier cherries are split and cannot be sold. Cherry drying by helicopter can prevent this.

During the last three or so weeks before a cherry is harvested it is susceptible to damage by rain. Growers are most worried by splits, which can occur when water accumulates in the cherry’s stem cup and is absorbed through the skin. The cherries get too fat for their own skin and split. Other damage can include mildew and rotting.

Because of this, growers want to get the cherries as dry as possible after a rain. So they hire helicopter pilots to hover over the cherry trees after it rains. The downwash of the helicopter’s main rotor blades shakes the water off the leaves and cherries, allowing them to dry much quicker without absorbing so much water.

Keeping the cherries dry is vitally important for a successful crop — as this year so clearly demonstrated. During the relatively short cherry season, dozens of helicopters are on standby with pilots waiting to fly when it rains. And when the rains start falling, all hell breaks loose over the cherry trees.

The Flying M Air Team

One of the things I pride myself on is the ability to provide prompt service and quick dry times to my clients. I do this by never contracting to cover more than 100 acres per helicopter and by utilizing helicopters well-suited to cherry drying missions. Because of this 100 acres/helicopter policy, I need to contract with additional helicopter crews to help out during “crunch times.”

Robinson R44
I’ve been providing cherry drying services in my Robinson R44 since 2008.

My Robinson R44 can thoroughly dry an average of 40 acres per hour. (Of course, actual drying capacity varies depending on tree size, row density, orchard obstacles and terrain, and the wetness of the trees. The more I dry, the better feel I have developed for all this.) That means that if it rained on all my clients at once and they all called at the same time, I could dry 100 acres in about 2-1/2 hours. That’s a long time, but still within requirements. Fortunately, it seldom rains everywhere at once and I’ve never had all my clients call at once.

Of course, I do contract for more than 100 acres at a time. That means I need help to get the jobs done promptly. This was the second year in a row that I had two other helicopter crews helping me complete my cherry drying contracts.

MTAS Hiller
The MTAS Hiller was on contract with Flying M Air for its second year.

Mike and Ron manned the MTAS Hiller for the second year in a row. For the first four weeks of their contract with me, they covered three orchards in Quincy, WA. For the fifth and final week, they provided backup coverage for orchards in East Wenatchee and Wenatchee Heights.

Canyon State Hughes 300
Woody at the controls of Canyon State’s Hughes 300.

Woody manned the Canyon State Hughes 300 for the first time. He was on contract with me for just 8 days during what I think of as a “super crunch” time when overlapping contracts made me responsible for about 250 acres of cherry trees. Although I prefer working with helicopters that have big two-bladed systems — such as the Robinson R44, Hiller, Bell 47, and JetRanger — this little Hughes got the job done using the Flying M Air technique of flying very low and very slow over the treetops. If Woody does come back next year, however, he’ll likely return in either a Hiller or R44.

If you’re a helicopter owner/operator with an R44 and at least 500 hours experience in helicopters (50 or more of which is in your R44), you might want to check the Help Wanted page at Flying M Air next spring. I’m always looking for good, reliable pilots with helicopters to help out.

Old Clients, New Orchards

This year, I contracted with all of last year’s clients except one. He decided to skip helicopter services. That was a loss of 55 acres. (Not sure how he did because I didn’t ask.)

Two of my clients added orchards to their contracts. One added three orchards totaling 61 acres. Another added one orchard that was 23 acres.

So I had a net gain of 31 acres. If I hadn’t lost that 55 acres, I would have had to hire on another helicopter without enough standby pay to cover it, so it’s kind of good that I lost it.

My contracted orchards stretched from George, WA to Monitor, WA. Most were in Quincy, Wenatchee Heights, and Malaga. The crunch time fell from June 20 through July 24, with super crunch falling in the middle of July.

I was based at Quincy for the first half of my season and then moved to Wenatchee Heights for the second half.

Busy, Busy!

This was our busiest season ever. My teammates and I flew a total of about 62 hours for the total of 16 weeks we were contracted (10 for me, 5 for MTAS, and 1 for Canyon State).

Now if you do the math, you’ll find that 62 ÷ 16 comes out to just about 3.9 hours per week. That’s not very much flying. But still, it was the most we’ve flown in a cherry season. My first two years I flew only 5 hours in 7 weeks (less than 1 hour per week average) and 5 hours in 10 weeks (about 1/2 hour per week average). There’s not a lot of flying in cherry drying work. It’s definitely not a time-building job.

Cherry Drying Action Photo
Here I am in action, hovering with my skids nearly in the trees.

The busiest time was what I refer to as the week from hell. It was the last week in June and I personally flew almost 30 hours in just 6 days. On several of those days I dried more than one orchard three or four times. I flew orchard after orchard, sometimes stopping only long enough to refuel and head back out.

I wasn’t happy about it.

Yes, I like to fly because I make money doing it. But no, I don’t like my clients to be put through the wringer by the weather, worrying and spending money on my services and still losing cherries because there’s simply no way to keep them dry when it rains all day long. So yes, I hope I never have another cherry season as busy as this one. My clients, for the most part, are too nice.

As for my competition, they were flying around like crazy people, too. I heard them all on the radio, playing follow the leader to guide unprepared pilots to the orchard blocks that needed drying. Some operators will contract for blocks as small as 2 and 3 acres, so their pilots often spend more time flying from orchard to orchard — without compensation — than actually drying. I’d rather take contracts for a small handful of big orchard blocks so I spend more time over the trees than in transit.

Early, Compressed Season

This was also the earliest season ever. My first contract started May 29; it usually starts the end of the first week in June. And my last contract ended by August 10; last year, it ran until August 25.

It was also a compressed season. Estimated start dates for mid to late season orchards, which were provided at the beginning of the season, creeped forward little by little, causing an uncomfortable overlap in scheduling — which is why I brought Woody’s company on board. That explains how my season started a week earlier than usual and ended two weeks earlier.

Late Season Rain

We also had an unusual amount of late season rain. Indeed, many growers don’t bother getting helicopter standby coverage because it so seldom rains in late July and August. But this year it did. Huge rainstorms hit on the evening of August 1, the morning of August 2, and the evening of August 4. I made five flights, covering my contracted orchard five times and another orchard three times (at my client’s request).

It was a good thing I did. My client reported that on the day of the last storm, I was one of only two helicopters flying in the area. While the packing plant reported minimal splits for his cherries, other orchards that did not have helicopter hover service reported up to 50% splits.

Maybe some lessons were learned? I guess we’ll see next year.

That’s It In a Nutshell

That’s pretty much how the season went for me.

It was my best season ever — but will it be as good next year? Or will we have a bad crop and lose contracts due to frost — as was the case in 2008? Or not have many rain events — as was the case in 2008 through 2010? Or will some upstart company come in and undercut operators like me by taking contracts for as many as 300 acres per helicopter at half the standby pay, crossing their fingers that it doesn’t rain and they’re not actually called to dry? That’s happened more than a few times in the past and those fly-by-night operators never seem to come back for a second season.

It’s all a gamble, a crap shoot. It’s why I don’t put all my eggs in one basket, why I save as much as I can for leaner days when the revenue just isn’t flowing.

But that’s just part of being a small helicopter operator. I love the challenge — especially when things work out just right.

Week One as a Landowner

Getting a lot done by myself.

Here's My SignAs I blogged last week, I finally purchased that 10-acre view lot in Malaga, WA that I’ve been wanting for over a year. And I wasted no time getting started on turning that piece of land into my next home.

Utilities

One of the great things about this lot is that it already has important utilities on it. It’s just a matter of getting them set up and turned on.

  • Water
    Water was the easiest of the utilities. I have “city water” meaning that the water is provided by Malaga Water District. No well or pump to share or maintain. A water pipe comes out of the ground and has a spigot handle on top. According to the water guy, the pipe is designed for cold weather use; the pipe drains when the water is turned off so winterization isn’t necessary. When my building is constructed, the plumber will tap into this pipe below ground and run the water line in a trench to the building. Until then, I can simply fasten a hose to the pipe.
    Getting the water turned on was easy. I made one call to tell them I wanted it turned on. They sent me a contract that I received the same day — such is the benefit of living in a small town where the utility guy drops off a stamped envelope at the post office and the postmaster puts it right in your post office box. I filled out the contract, put a deposit check in the envelope, and mailed it back. Two days later, they called to tell me the water was turned on.
  • Electricity
    Electricity is a bit more involved. Because there’s no building on the property, I need temporary service set up by an electrician. He then submits an application to the Chelan Public Utility District (PUD) and when they approve it, they turn on power. Later, when my building is constructed and wired, I’ll go through another process to get electricity turned on there.
    Fortunately, there’s already a transformer on my lot so it won’t cost a thing — at least not payable to the PUD — to turn on temporary power. It will, however, cost about $500 to have a temporary power post with plugs and circuit breakers installed and left on my lot for a year. The post is a rental; I could buy one if I needed it for a longer period of time. I’ll have it set up with 2 110v outlets, a 30 amp outlet, and a 50 amp outlet. That’ll make it easy to plug in just about anything, including power tools and my RV.
    So far, I’ve had one bid on the temporary power pole. I should get another bid on Sunday. Once I choose an electrician, the power should be turned on within a week.
  • Fiber

    Not Fiber Optic Cable
    I have enough phone cable to wire the entire neighborhood.

    Fiber is the tough one. Although I thought the cable coming out of the ground near my electric transformer box was fiber optic cable, it’s really telephone cable. Who wants that?
    Fortunately, fiber optic cable already runs down my road past my lot. And a conduit for fiber optic cable has already been put in place between the source on the road and a spot near my transformer. So all I need is for the Chelan PUD to run the cable down into the conduit and the local internet service provider, LocalTel, to set up service.
    The PUD guy who checked my transformer box told me that dropping the cable is an easy job. Unfortunately, there’s backlog and it could take several months for the drop to be done. I did what I could: I got myself on the list so I’d eventually get service.
    And the service is definitely worth waiting for! 100Mbps download and upload speeds. That’s 100 times the speed I had in Wickenburg and 20 times the speed I had in Phoenix.
    LocalTel also offers television service, which I may get. It depends on what kind of DVR they’ll make available. I don’t watch much television and I certainly won’t watch live television. Life’s too short to sit through commercials.

Septic System

Septic System Plan
A good portion of the septic system design preparation work was already done.

The property’s previous owner had been preparing to build on the lot. That’s one of the reasons it has utilities as discussed above. They’d even gone so far as to begin work on a septic system. In fact, they’d already done a percolation test (or perk test) to test the suitability of the land for a septic system. That was good news for me. It meant that if I put my septic system in the same place the designer had tested for, I didn’t need to get another perk test. That would save me about $300 and at least a week.

Of course, I didn’t really want the septic system where the original owner wanted it. But I did want to save money on a perk test and I definitely wanted a gravity system. So I had the septic system designer over and we discussed it. In the end, I chose a location near where the original owner planned to put his septic system. No additional perk test would be needed. The designer could draw up plans and prepare the application for me in less than a week. Once I had the plans in hand, I could get bids. By the time the plans were approved by the county, I’d have the crew on site to dig. There was a distinct possibility the septic system would be installed by month-end.

The “Necessary” Building

Outhouse
My stepdad would call this the “necessary building.”

During the week, I also arranged for a portable toilet to be delivered to the lot. That took just a single phone call; a man with a gray plastic building showed up two hours later.

The toilet building was really a necessity. First of all, some builders require one to be onsite. And even if they didn’t, I don’t want workers pissing all over my property.

(A side note here. There’s a house under construction down the road from where I’m currently living. As I drove down into town one day, I witnessed a worker urinating on the house near the front door. Seriously? How can anyone have so little respect for someone else’s property?)

I needed the toilet there, too. Even though my visits to the property are usually only a few hours long, it’s nice to be able to take a leak if I need to. And if I move my RV to the lot before the septic system is done, I’ll need the building to reduce the load on my RV’s tank until it can be dumped.

Those building, by the way, aren’t gross if they have limited use and are kept clean by someone who actually cares. That’ll be me. The hose is nearby; I don’t expect that building to get or stay very dirty very long.

And in case you’re wondering, it will be serviced — i.e., pumped out — once a week. So it shouldn’t get very gross at all.

Name and Address Sign

Sign Before
You can barely see the previous owner’s name sign behind all these weeds.

Sign After
Here’s my sign after pulling most (but not all) of the weeds. The sage bushes in the foreground went, too.

This week I also took care of putting a name and address number sign on the lot near the end of my driveway. The old sign, hand painted with the name “Young,” just wasn’t going to cut it. I wanted a nicer sign so I got a piece of scrap wood from the pile where I’m living, painted it with my landlord’s exterior house paint — a nice shade of sage green — and used spray paint with a stencil to add my last name and street number. The resulting sign looked pretty decent for something I cooked up myself.

I bought a t-post and a t-post driver and some screws with nuts and washers. I drilled holes in the wood (with my new drill), pounded the post into the ground, and ran the screws through the post to hang the sign.

Seeing the sign there made me very happy. It made my ownership of the lot more real to me. (It’ll also make it a lot easier for my wasband’s “investigator” to find the correct lot if he feels a need to “investigate” or take photos of my progress over the coming weeks and months.)

My War on Weeds

War on Weeds
I attacked the kochi a with a weed whacker, a pruning saw, and a hedge trimmer. The wilted plants here show the effect of the weed killer.

The final bit of work I did this week was to begin my war on weeds.

An invasive weed was growing in a few places along my driveway and en masse along my road frontage. The weed, which is called Kochia (Kochia scoria), reminded me a lot of tumbleweed (Russian Thistle), which had pretty much taken over our Howard Mesa property’s prime building area when we failed to get it under control. With shallow roots, the bushy plant grew as tall as me in some places. Each plant would yield thousands of seeds which, fortunately, would only remain viable for a year. If the plant could be removed before it went to seed for a year or two, it would be gone.

Pruning Saw
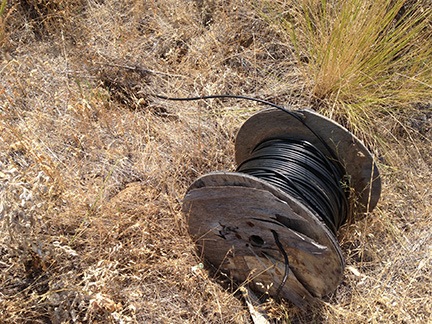
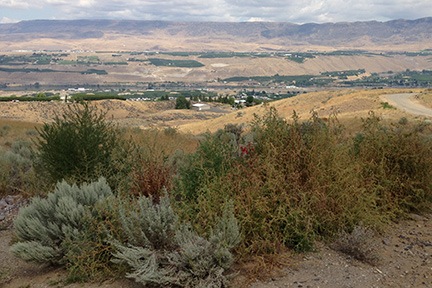
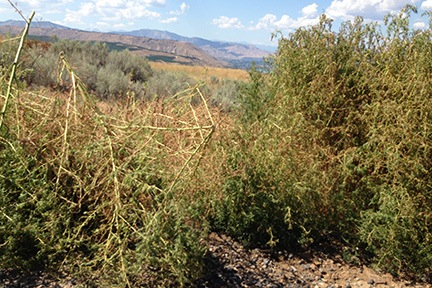
I was able to pull the smaller plants out by the root. The slightly larger ones could be cut back with my weed whacker. But the larger ones were a real pain. The best way to get rid of them was with a pruning saw. It was hot, back-breaking work. I spent about 2 hours a day for three days in a row working at it. On the fourth day, I attacked them with a hedge trimmer I’d rented from Home Depot.

And I was winning.

I managed to clear them completely out of my driveway and make a dent in the ones along the roadside. I should mention here that the road association — my property is on a private road — sprayed the weeds along the road. By that fourth day, I could see that the spraying was taking effect. The weeds were beginning to die. Maybe, if I was lucky, they’d be killed by the weed poison and I wouldn’t have to deal with them.

Then, that afternoon, I sprained my foot. Doing more weed control was out of the question, at least for a few weeks. And I have to admit that that’s the only good thing about having a sprained foot — it gives me an excuse not to deal with those damn weeds.

But I know I’ll face them again in the future. And I’ll win.

Up Next

More of the same…and then some. Stay tuned.

Buying the Land for My Next Home

It’s a done deal. I’m a land owner!

Back in the summer of 2011, I had a chat with a friend of mine from the east coast about my summer job. I told him him how much I liked the Wenatchee area of Washington where I was working. As he reminded me just the other day, he said to me “Looks like you found your next home.”

I didn’t think much of that idea then. After all, I was married and living in Arizona in a house that would soon be paid off. Although I wanted very badly to move — and even started looking for a new place to live as far back as 2005 — my husband was firmly entrenched in a 9 to 5 grind after bouncing from one dead-end job to another. His only two suggestions for a new place to live — Santa Fe or San Diego — would simply not work for me or my business. So in 2011 I was stuck there in Arizona, waiting for him to wake up and dig himself out of the rut he was living in.

But in the summer of 2012, things were different. First, my husband announced that he wanted a divorce. That got me thinking about a life without having to wait around for him to start living again. Next, I started doing a lot of winery tours, including a flight to a winery along the base of the cliffs in Malaga. The winery was on Cathedral Rock Road, a 2-1/2 mile stretch of winding gravel with 10- and 20-acre residential lots overlooking the Wenatchee Valley and Columbia River. What a nice place to build a hangar home, I thought.

I had a friend who owned land along that road and one day, on a whim, I called him to ask who his Realtor was. I told him I was interested in possibly buying a lot on that road.

“It’s funny you should call right now,” he replied. “My wife and I just decided the other day to sell our lot. Do you want to look at it?”

I did. He described which lot it was and I easily found it from the air. I landed there one day, shut down, and got out to walk around. It was amazing.

Two Helicopters
On July 5, 2012, I met my friend Don at the lot — we both flew in by helicopter. I wonder what the neighbors thought?

Over the following weeks, I brought other people to see it. My friend Pete. My friend Jim. My friends Don and Johnie. The day I met Don and Johnie there was the same day I flew in with the owners, Forrest and Sharon. We had two helicopters parked on the driveway. Turns out, Don had worked for Forrest’s dad when he was a kid. Small world, huh?

Forrest pointed out the boundaries of the 10-acre parcel. It sat on a shelf on the river (north) side of the road. A hill on the west side shielded it from the homesite on the next lot — which had also belonged to Forrest and Sharon. There were expansive views to the northwest to southeast — 270° — that included the city of Wenatchee, the river, the airport, and countless orchards. To the south were tall basalt cliffs. Although the land sloped down toward the river, at least 80% of it was completely buildable with a minimum amount of earthwork. Electricity, water, and even fiber-optic cable were already at the ideal homesite. Quiet and private, it was exactly the kind of place I like to live without being too far from town. And with friends living just down the road, it was a real win.

But it was the views that got me. I’ve always been a view person.

I knew before the middle of July that I had finally found the place I wanted to make my next home.

The Deal

The sellers told me what they’d planned to ask for the property and agreed to reduce that price for me since a Realtor wasn’t involved. I would, however, have to cover all the closing costs. I did some math and decided that the cost was reasonable and within my means. After all, my husband had told me he wanted a “fair and amicable divorce.” If we couldn’t patch things up when I got home in October — which I still had hopes we could do — I’d take my share of the value of our paid-for house in Wickenburg and apply it to my new home in Malaga.

Of course, this was before my husband got a lawyer and some very bad divorce advice. Before we began the year-long battle to settle. Someone’s idea of “fair” wasn’t very fair at all.

As far as the land deal was concerned, I wouldn’t be able to close until 2013 anyway. The sellers had sold another lot — the one next door — in 2012 and didn’t want two sales in the same year for tax purposes. Even though things on the divorce front looked bad, I figured that my husband would eventually get smart and take my very generous counter proposal.

I was wrong.

The Long Wait Begins

When Christmas came and went and my husband’s lawyer managed to postpone the court date from January to April, I realized I wouldn’t be closing as soon as I’d hoped. The sellers were very patient, though. We chatted once or twice on the phone during the winter. They weren’t in any kind of rush to close the deal.

In January, I flew out to Wenatchee for a week to see what the place was like during the winter months. I was a bit concerned about that big cliff on the south side of the property, knowing that the low sun angle and short winter days that far north could leave the land in complete shadows for days, weeks, or even months at a time. But in January, the lot did get some sunlight. There was snow on the ground that week but the road was passable — even in a rental car. I only got stuck twice and managed to unstick myself both times by myself. Driving up there in the winter would be fine in my Jeep or 4WD truck.

I got to experience the winter fog so many people had told me about. It hung over the river, right about the level of my lot. I went to visit a friend in Wenatchee Heights and got the pleasure of climbing above it, seeing the Wenatchee Valley as a white puffy blanket of clouds beneath the high hills.

I also talked to a builder and a septic system guy.

In late February I returned with a friend. I had to drive my truck up from Arizona to get my avgas fuel tank installed in the truck bed and move my RV down to California for a frost contract. My friend was very impressed with the land and shared my excitement about moving there.

Time moved on. There was a lot of talk on the news about property values recovering. I knew that property values in Washington were already healthier than those in Arizona. I worried that the owners would change their mind about selling or change the price. Several of my friends had already asked me if I had a contract to buy and I admitted I didn’t. I decided I needed to change that.

Fortunately, the sellers lived in Arizona in the winter, not far from my home in Wickenburg. In late March, I drove down to Sun City to meet with them, bringing along a standard real estate sales agreement I’d picked up in a stationery store in Wenatchee when I was last there. We filled out the form and I gave them a check for $5,000 in earnest money. The following week I opened escrow with Pioneer Title Company in Wenatchee. We’d agreed on a closing date on or before June 30, 2013. My birthday.

Financing Woes

Meanwhile, my divorce dragged on. My husband rejected every attempt I made to settle. He apparently thought he could get more if he let the judge decide.

The divorce put a stain on my finances. The legal fees drained my personal savings and began tapping into my business savings — the money I was setting aside for the helicopter’s costly overhaul. I had originally intended to pay cash for the land and finance the building, but now I didn’t even have enough cash for the land. I had to finance it.

And that was the challenge. Everyone told me I should get a construction loan, but no bank wanted to finance the land and building with the type of building I’d decided to build — a pole building with living space. Understand that my first priority was to get storage space for my helicopter, RV, and vehicles; I’d build temporary living quarters above the garage to live in until I could afford to build a “real” house. I did not want to live in my RV year-round. But banks wouldn’t finance that kind of building because they couldn’t get comps for it for appraisal purposes.

My New View
In April and May, my future home was covered with huge yellow flowers.

So I decided to finance the land and pay cash for the building. And I found a lender who would not only lend me the money on the land, but offer a great deal on that loan. You see, because of the size and location of the land, it qualified for farm credit. I could get a farm credit loan.

In May 2013 I finally applied for the loan. In the financial information section of the application, I listed all of my personal and business assets except my home — after all, my husband wanted it and would likely get it in the divorce. (I certainly didn’t want it.) Being completely debt-free, I look very good on paper. I was sure I’d get the loan.

But there was a snag: the lender said he could not process the loan until my divorce was finalized. I needed the divorce decree.

Once again, I found myself waiting for my husband.

The Bridge Loan

In late June, when I still didn’t have a divorce decree in hand, the owners agreed to push back the closing date to July 31. I had to cough up another $5,000 for the escrow deposit. That wasn’t a problem. I’d been working on cherry drying contracts since the end of May and had a good cash flow again.

But I was getting worried that the sellers would back out. The real estate agent who had sold the lot next door for them was nagging them about listing the lot they were selling to me. I knew that they’d be able to find another seller pretty quickly, perhaps for even more money.

Meanwhile, the lender had already told me that once they got the divorce decree and a preliminary loan approval, they still had to get an appraisal for the land. That could take three to six weeks. They refused to get the appraisal without preliminary approval, even though I offered to pay for the cost without any guarantee of the loan. The loan simply could not move forward without the decree and even when that piece of paper was produced, I could expect to wait up to two months for the loan to be finalized.

There was no way I could meet a July 31 closing deadline.

I racked my brain for options. As anyone who knows me can tell you, I’m a very resourceful person. But I was coming up empty.

Except for one option.

Early on, the sellers and I had talked about them carrying a loan on the land. I had done this with a condo I sold back in 2008 and it was one of the best deals I’d ever made. Monthly income at a good rate of return — surely two retirees would like that. Yes, they said. But their accountant advised them to not allow me to build on the land until it was paid for in full. Obviously not a workable solution for a long term loan.

But how about short term? Would they be willing to carry it until year-end? By that time I’d surely have the farm credit financing I wanted.

We spoke about it and I was frank about my concerns. They were frank about their Realtor wanting to list the land. They came up with terms I could live with. I requested that I be allowed to put a septic system on the property — the last component I needed to move my RV there — and they agreed. After all, it would increase the value of the property. We went to the title company agent and she drew up papers.

There was only one more requirement: that I get a life insurance policy for the amount of the loan naming the sellers beneficiaries. No problem, I thought.

I was wrong.

The insurance agent informed me that if I got a life insurance policy in the state of Washington I was required by law to list my husband as a beneficiary. While it was true that I could list him for just $1, I had absolutely no intention of listing him on any financial transaction I made. I was told that if I represented myself as an unmarried woman, I would be committing fraud and the policy would be invalid.

And that made me wonder about how the property would be titled if I closed before the divorce decree was filed with the court. As far as I was concerned, it had to be titled, right from the start, to me as an unmarried woman.

So I had to wait.

Closing

Meanwhile, the sellers came to the title company office and signed all the necessary papers to sell to me and set up the loan. I told the title company that I couldn’t get the insurance as quickly as I expected. (No lie there.)

Yesterday’s blog post goes into a bunch of detail about my wait for the divorce decree. It finally arrived on Tuesday, July 30, a day I now consider Freedom Day, the first day of my new life.

I spent most of Tuesday talking on the phone and exchanging email and texts. There were so many people who wanted to know the outcome, so many people I needed to talk to. It was a good day. I ran my phone battery down three times and got all kinds of good wishes from friends, family members, and even business associates.

But on Wednesday morning, I headed down to the insurance company to get that policy taken care of. It took 30 minutes and $70 to get what I needed. I decided to take it over to the title company, which was nearby, and drop it off.

Closing Papers
I’d signed half the papers before I realized I was actually closing on the land deal.

The title company agent was full of congratulations for me. We went into her office where I handed over the insurance paperwork. She pulled out a file and had me start signing papers. I’d signed about four things when I realized something with a start: I was finally closing on the property I’d been trying to acquire for the past year, the property where I planned to build my new home and life.

I voiced this realization and she confirmed it. All she needed was a certified check for my downpayment and a voided check for the automatic loan payments. I handed over the voided check without hesitation, glad that I’d brought along my checkbook, tickled that it included my new physical address as well as my P.O. box mailing address.

Purchaser
It made me very happy to see this line on the closing papers.

Afterward, I went to the bank to get the certified check. I’d already transferred the necessary funds into my personal checking account, so it only took a few minutes. I then drove back to the title company and dropped off the check.

Done.

The deal was filed with the county on Thursday. I’m now the proud owner of 10 acres of view property in Malaga, WA.

Next up: getting a septic system installed, power turned on, water turned on, and bids for my building. You can bet I’ll be pretty darn busy over the next few months.