Construction: The Oil/Water Separator

Another do-it-yourself project for my home.

On May 20, 2014, I began blogging about the construction of my new home in Malaga, WA. You can read all of these posts — and see the time-lapse movies that go with them — by clicking the new home construction tag.

I had a lot of time to design my new home. A lot of time. And not only did I have time to think about the building and how I would use it, but I also thought a lot about the land.

The Plan — or at least the relevant part of it

I decided that I’d try to plant a small vineyard. The rolling hills on the east end of my property are well-suited for wine grapes and, after all, there is a winery less than a half mile down the road. If I did everything right and could produce some good grapes, I could sell them for supplemental income. I don’t expect to get rich and I certainly don’t want to become a winemaker, but it would be a nice way to join the agricultural community beyond my short season cherry drying work. Of course, all this is a bit in the future — 2 to 3 years, I think — but it got me thinking about features I could incorporate into my building to make it more attractive for someone who might want to buy a vineyard and start making wine.

And that’s what got me thinking about the floor drain. If there’s one thing you need when you’re making wine, it’s a place to rack the wine. Wine racking involves pumping wine out of the barrels where they’re aging, cleaning the lees (dregs) out of the barrels, sterilizing the barrels, and pumping the wine back in. The process is time consuming and labor intensive and since you’re dumping the lees and rinsing the barrels, the runoff has to go somewhere. Being able to do this indoors, in the shade, in a possibly temperature-controlled space would be a big plus for a future winemaker, making my property a bit more attractive than it otherwise might be.

As if the view and the privacy and the giant garage and the wrap-around deck weren’t enough.

Besides, I reasoned, I’d like a drain in the floor, too. It would make it possible for me to wash a car or my RV indoors or simply hose off the floor.

The Drain

I talked to the builder and we decided on a 24-foot long drain with a grate on top and pipe leading the water out the back of the building. I already had a drainage channel dug back there to take rainwater off the roof away from the building. We’d tap into that.

I went to Home Depot and bought the parts: 2 10-foot lengths and 1 4-foot length of drain channel, 12 2-foot lengths of snap-in grating, 2 10-foot lengths of plastic pipe, 3 drain channel fittings, and 1 drain channel end cap. I spent just over $500.

When the workers prepped the floor for the concrete pour at June month-end, they installed the channel and the cap. It sat above the gravel grade; the concrete would be poured around it. They covered the grate with duct tape to prevent concrete from getting in. And then they poured.

Pouring Concrete around the Drain
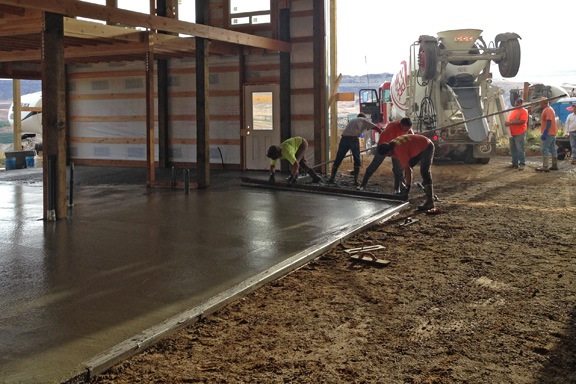
In this shot, the drain channel divides the poured concrete from the unpoured gravel floor. The concrete is basically as thick as the drain channel is high.

Finishing around the Drain
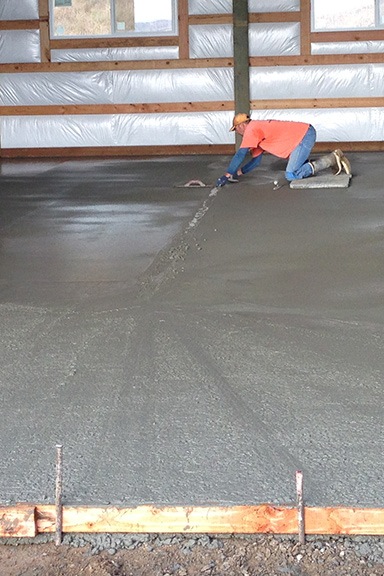
You can barely see the drain in this shot; they used silver duct tape that really blends in with the concrete color.

Finishing took effort. The drain runs down the center of a 24 x 48 foot space. The front, back, and sides needed to slope down gently to the drain so if water got into that space, it would eventually end up in the drain. I was told that the slope would not be steep and that was fine with me. I didn’t expect to use it very often anyway.

The Drain in my Floor
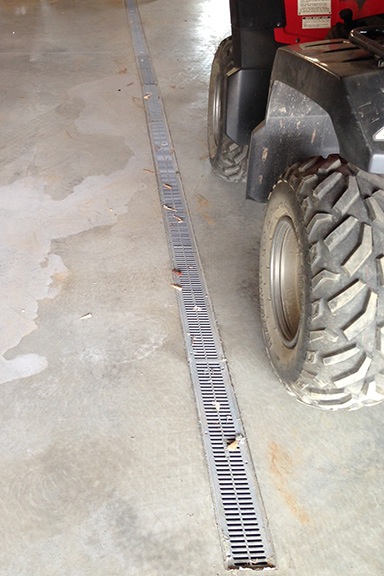
Here’s the drain looks like today, although it’s actually longer than what you see here. The white “stain” is from me hosing off my tile saw; some of the water came back into the building and went where it’s supposed to go: into the drain. That’ll wash away the next time I use the hose.

Later, when the concrete was dry, I peeled off the duct tape. I even took out a hose and hosed down the floor to watch the water flow into the drain. I walked around the back of the building and watched the water move away. Cool.

The Oil/Water Separator

There was a bit more to the drain than just the drain itself. Because the drain was in the floor of a garage space, it needed an oil/water separator. That’s a contraption (for lack of a better word) that prevents oil that might wash away from vehicles from getting into the ground. Instead, it’s trapped and, when enough has accumulated, can be cleaned out.

Before buying the drain parts, I did some research. I found a very simple oil/water separator that I thought I could make myself. It was basically a container with a water inlet from the drain and outlet to the drainage ditch. Inside the container were two baffles or dividers. One was short but went to the bottom of the container; sludge would gather between the inlet and that first baffle. The other was short but went nearly to the top of the container with space beneath it. The water would move through there but the oil, which floats, would stay at the top. The water would then go through the discharge outlet, clean.

Oil/Water Separator
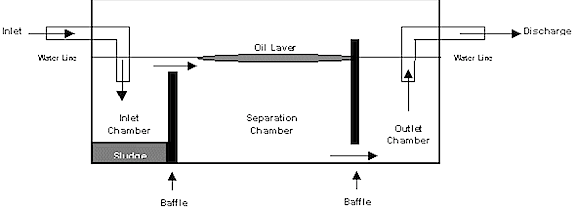
Here’s the design I found on the Web.

Box Diagram
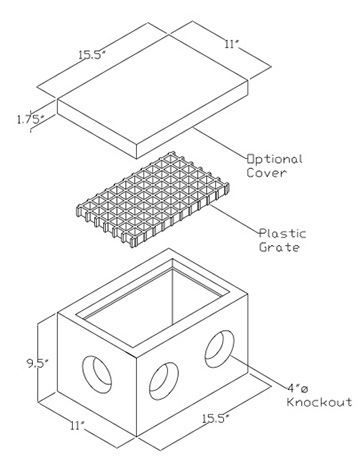
Here’s a diagram of the box. I didn’t buy the grate, mostly because I wanted it completely covered; I don’t want to be fishing dead rodents out of oily sludge.

I sent this image to the plans inspector to see what he thought. He agreed that it would do the job. I suggested making it out of a heavy-duty plastic toolbox. He said that wasn’t heavy-duty enough.

It took a while to figure out what I could use as the container. It was Tanya who suggested that I go to H2 Pre-Cast near Wenatchee Airport. I sat down with the sales guy and showed him my drawing. He showed me concrete boxes on his computer screen. I spent $70 for a small one with a concrete lid.

The Concrete Box
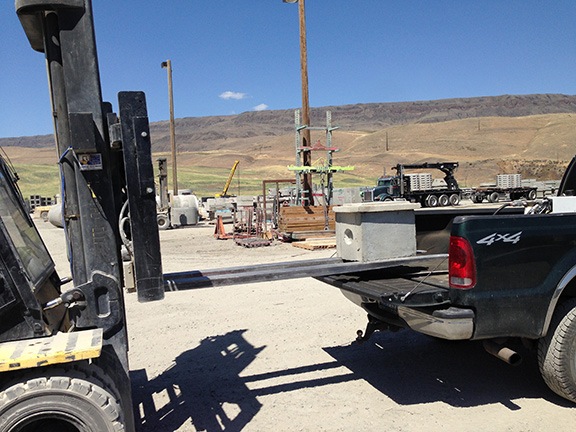
They used a forklift to load the box onto my truck for a reason — it’s very heavy.

When I realized I how heavy it was, I rushed home to get there before the crew working on my building went home for the day. I let them use their forklift to get it off my truck. They stowed it in the building. Later, when they’d gone for the day, I used the forklift to move it to the back of the building so it would be out of the way.

When the concrete was poured, the box was waiting for the rest of the installation: digging a hole for the box, moving it in, and putting in the baffles. That was my job — and I had no idea how I was going to do it.

The Concrete Solution

I thought about how I would do this for almost a month. I talked to friends. My friend Bob suggested using the concrete pavers I already had to build the dividers. He had a masonry saw he thought could do the job. Because the interior of the box was smaller on the bottom than the top, if we cut the pavers just the right size they should slip into place. We could then use a cement paste to sort of “glue” them in.

It sounded good to me.

In the meantime, I had to get the box into the ground. That meant digging a hole in compacted earth. Fortunately the earth there has very few rocks and I have a very heavy digging stick. I made short work of the job one morning before it got hot and the spot was still in the shade.

Of course, I still needed to get the box in the hole. And I couldn’t budge the box.

The solution came on a motorcycle: my friend Mike. Looking for an early morning destination with his dirt bike, he showed up at 6 AM on Tuesday. After giving him hot coffee and a bacon and egg breakfast, I led him around to the back of the building to the little moving problem I’d discussed with him on the phone. Together, we knocked out the holes on either side of the box — guess who I was thinking of as I banged away with a heavy hammer on one of the punch outs? — and lowered it into the hole. Then we connected a cut length of pipe to the pipe coming out of the building to make the inlet and used the rest of the pipe as an outlet.

Now I was ready for Bob and his masonry saw.

But it was Tuesday and Bob works 10-hour days during the week. The soonest he’d be able to come would be Friday — if he didn’t have something else on his plate for his only weekday off. And I’d been thinking about other solutions.

Like concrete.

I figured I could make 2 concrete forms for the inside of the box, mix up some concrete — I already had portland cement and sand — and pour the concrete into the forms.

And that’s exactly what I did on Wednesday. I cut some 1-1/2 inch foam insulation sheets I had lying around into 4 dividers. I positioned the dividers for the pour, being sure to place more foam under the dividers on the outlet side to leave a space under the baffle. I used scrap lumber to hold everything in place. It looked extremely makeshift.

Dividers
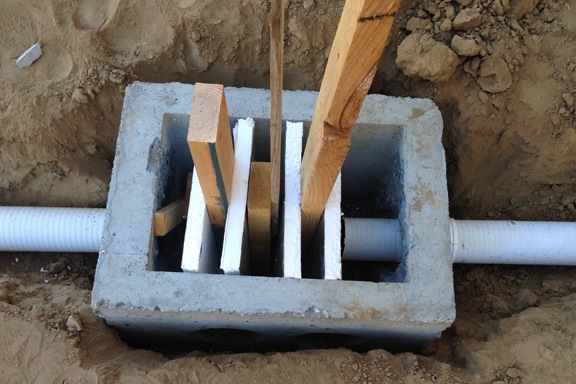
Foam dividers are held in place by pieces of scrap lumber.

Then I mixed up some concrete in a big paint bucket. I tried 4 parts portland cement + 4 parts sand + 4 parts water but the mixture — once I got it mixed up enough — seemed too thin. So I added 2 more parts of cement. The resulting blend looked like it might be thick enough to stay within the forms.

So I poured it.

Concrete immediately began leaking from the first form. But only for a moment; it seemed to sort of clot itself, like blood on a wound. So I kept pouring. I poured both forms, stopping the inset side form about 2/3 of the way up and bringing the outlet side form (with the foam beneath it) within a few inches of the top of the box. Then I got down on my hands and knees, scooped up the leaked concrete and slapped it against the walls where the pipes came in and out. I did the best I could to use all the concrete in the baffle forms and around the pipes. It looked awful when I was done. So did my hands.

After the Pour
Here’s the big picture after the pour. You can see the box lid standing up against the side of the building as well as one of the pavers Bob wanted to cut for baffles.

I cleaned up and resisted the temptation, for the rest of the day, to pull off the forms. Instead, I used a level and a shovel to make sure the outlet pipe sloped down. I put the paver on top of it and closed up its mouth with some hardware cloth to keep the rodents out. (Around here, you don’t wonder if the mice will get in. You assume they will and take preventative measures to keep them out.) Then I buried both pipes and brought the dirt around the outside of the box.

On Thursday, I could resist no longer. In all honesty, I didn’t think it would work. I couldn’t imagine why freshly poured concrete would adhere to the concrete walls of the box. But it did. As I pulled the forms out, cracking and cutting them as I worked, I revealed the smooth walls of my new concrete baffles. With a little cleaning up, it would be all ready for inspection.

Finished Separator
Here’s my finished oil/water separator after cleaning it up a bit. The inlet from the drain in the building is on the right; the outlet is n the left. Although you can’t see it, there’s space beneath the left side baffle.

Inspection and Test

I was hoping I’d be around when the inspector stopped by so we could test it together, but I was on a charter flight at an orchard near Othello. He called me to get access to the building, which is secured by a keyless lock. He asked me to remind him what he was supposed to inspect.

“The oil/water separator and the framing,” I told him. “If you want to run the hose over to the drain in the building to test the oil/water separator, you can. Just don’t add oil unless you have to.”

“Oh, I already looked at that,” he told me. “It’s fine.”

And that’s that.

Of course, I wanted to test it. I wanted to make sure the water drained out properly.

Besides, who doesn’t like playing with flowing water?

So I ran a hose into my RV garage and laid it down by the drain. Then I turned on the water and ran around to the back of the building. I’d just managed to turn on my phone’s video camera when the water arrived.


Here’s the test. The water was only turned on partway — I have excellent water pressure. But the outlet drain kept up with the inflow of water and none of the water went over the top of the outlet side baffle.

Success!

What I like best about my solution for the oil/water separator is that other than the concrete box, I already had everything I needed to get the job done: foam for forms, scrap wood for supports, cement, sand, hardware cloth. So rather than spend over $1,000 for one of the many of the pre-made solutions out there, I got the job done for about $70. You gotta like that.

One More Thing

Of course, not everything could go perfectly smoothly.

Wrong Lid
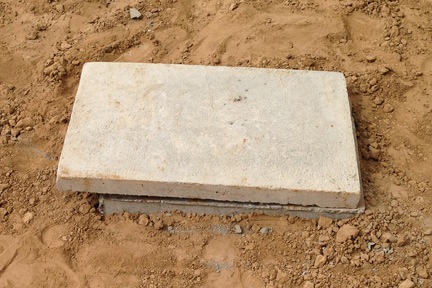
Duh-oh! These two pieces were sitting around here for two months and I never noticed I had the wrong size lid.

When I was cleaning up the area after the test, I put the lid on the box. That’s when I discovered that I had the wrong size lid.

Well, at least I can lift it to return it for the right one.

Putting Away My Toys

Well, most of them, anyway.

July 4th was a big day for me. It marked one week after the concrete had been poured for the slab of my new home. That meant it was safe to drive on it.

But what that really meant to me was that I could move most of my vehicles back into covered parking.

Three of my four garage bays were cleared out and ready to accept vehicles. The fourth was my temporary dining area for entertaining dinner guests. I couldn’t really get a vehicle into that garage anyway because of the pile of scrap lumber out front, effectively blocking the entrance.

My Four-Car Garage
Here’s what the inside of my garage looked like on July 4. It’s a panoramic image; the only way I could shoot the whole thing.

Up for storage: my 1999 Jeep Wrangler, my 2003 Honda S2000, and my 1995 Searay Sea Rayder boat. My 2003 Ford F350 SuperDuty diesel truck would have to wait outdoors.

I backed them all in and took a photo before closing and locking the doors.

Toys Stowed
This might explain why I wanted a 4-car garage.

Later in the week, I parked my 1992 Yamaha Seca II motorcycle between the boat and the table and my 1999 Yamaha Grizzly ATV between the Jeep and the Honda. eventually, they’ll be moved into the RV garage where they’ll be easier to get out when needed.

(None of my vehicles are new, but I like to think they’re in decent shape. And they’re all paid for, which is more than most people can say about the flashy new vehicles that are part of their credit-driven lifestyles.)

After more than 10 years living with my vehicles scattered all over the place or parked out in the hot sun, it’s nice to finally have them all under one roof.

Construction, Day 28: The Stairs are Built

And I get a front door lock.

On May 20, 2014, I began blogging about the construction of my new home in Malaga, WA. You can read all of these posts — and see the time-lapse movies that go with them — by clicking the new home construction tag.

Day 28 wasn’t a terribly busy day, at least from the outside. I wish I’d set up a camera indoors.

The main task was to build my stairs — something I really wanted them to finish as quickly as possible. The stairs would run from a vestibule just inside the front door straight up to the second floor. Without them, the only way up was on a ladder — they’d taken away the man lift on Sunday — and I just wasn’t comfortable climbing a 12-foot ladder.

They got started early enough and I went out to run an errand. While I was out, Corey called to tell me they needed to run up to Leavenworth to deal with an emergency situation on another project.

“Did you finish my stairs?” I asked hopefully.

He admitted they didn’t, then went on to tell me how important it was to handle this other project as soon as possible. I understood. I assumed that my project had gotten priority over someone else’s during the past six weeks. If I’d waited this long for stairs, I could wait a little longer.

In the meantime, I started setting up my new shop area in the front corner of the big RV garage side of the building. The shop side was 12 feet wide (when looking from the front) and 48 feet deep. I thought of it as having four sections separated by the posts that were spaced 12 feet apart. My boxes of packed items were taking up most of the two back sections. A few days before, some friends had helped me mount my 10 foot long white board — a school surplus equipment sale item I picked up for just $20! — in the second section. They’d also helped me move the three pieces of my old desk into the front corner that would be my shop. I’d toyed with the idea of listing the desk on Craig’s List or giving it to a client who had just set up a new office in town. But I realized that although the work surface — a Formica laminate — wasn’t suitable for working with tools, the tables were a good height and size. I could cover them with a more substantial surface material, like 3/4 inch plywood. It would certainly save the cost of buying or the bother of building a real workbench.

I dragged my rolling toolbox out of the shed and into the building. I placed the new top toolbox on top of it. And then I rearranged the desk components to make an L-shaped workspace. I was pleased with the results.

My Shop
I started to set up my shop on July 3.

As for the desk I’ll use for my computer work, that’ll be much smaller than this old setup. I have a desk and matching file cabinet I bought for the Phoenix condo I lived in part time with my wasband before our divorce. It’ll be perfect in the space I’ve set aside as a home office upstairs. Until then, it’ll wait with the rest of my furniture for the final move.

I should mention here how weird it was — at least at first — to start setting up a permanent workspace. I’ve been living in a number of temporary homes for the past two years: my RV in Washington, my house in Arizona, my RV in California, my house in Arizona, my RV in Washington in three separate locations, a house nearby, my RV in California again, and then back to my RV on my homesite. My worldly possessions have moved from my Wickenburg house and Phoenix condo to my Wickenburg hangar to a Wenatchee hangar and then finally to my building. This has been going on for almost two full years and the temporary nature of my living situation had become almost second nature. But now I had a permanent home, something that belonged to me now and in the future. I’d designed it to have storage space for my things, a shop, and living space. The shop area was ready to move into — why not make the move? This was an entirely novel idea to me, but one I warmed to quickly as I began drilling holes in the girts to hang power tools and cables. It was my space to do with as I pleased.

I think I might have been on Cloud 9 most of the day, despite the stalled stairs.

I was working on my shop when the builders came back. I was surprised. I thought they’d have to wait until the next day. But they showed up around 2 PM and got right to work on the stairs.

Stairs in Progress
Corey and one of his guys working on the stairs. The final staircase has four stringers, making them extremely solid.

While they worked on the stairs, I set about my next task: installing doorknobs and locks on my front door. I’d never installed a doorknob or lock before, but I couldn’t imagine it being very difficult, especially since the door and jamb were already cut to accept a doorknob and deadbolt. The project price included doorknobs and locks, but I didn’t want them to waste money on the typical Kwikset locks everyone seems to use. I wanted something more secure, so I bought a Schlage set with a door handle instead of a knob.

Keys
It was an emotional moment for me when I realized I was holding the keys to my new home. And yes, I know someone could theoretically cut a set of keys based in this photo. But I later added a keypad-activated deadbolt, and that’s what I use to lock up.

The set went in smoothly — except for the fact that I put it in the wrong hole and needed to move it (duh-oh!) — and worked well. Later, as I walked back to my shop area to put away my tools, I looked down at the keys in my hand and realized I was holding the keys to my new home.

Corey and his helper worked late. Some friends came for dinner; I had leftover chicken and pork tenderloin from the night before. When the builders left, my friends and I tried out the new stairs. I gave them my standard “tour” of the upstairs, knowing that the walls would be in place soon.

What was really nice was that the garage area was finally cleaned up — the builders had done a great job of picking up their stuff and sweeping before leaving that evening.

Clean Garage
My garage/temporary dining room, all cleaned out.

Much later, Mother Nature rewarded me with a sunset so amazing and huge that I needed to use the panoramic feature of my phone’s camera to capture it all. What a great day!

Sunset
An amazing sunset, shot from my front door.

Here’s the time-lapse for the day. Lots of coming and going, but not much in the way of exterior activity. Is it work watching? I don’t know. The movement of the clouds is kind of fun.

Construction, Day 27: Finishing the Front Wall, Framing the Deck

A lot done in one day.

On May 20, 2014, I began blogging about the construction of my new home in Malaga, WA. You can read all of these posts — and see the time-lapse movies that go with them — by clicking the new home construction tag.

I’m way behind on my construction project blogging. Part of reason for that is because construction really slowed down around the time they prepped to put in the concrete. As a result, there isn’t much to report.

But a lot of work was done on July 2.

The workers arrived bright and early and got right to work on the side deck. They’re framing the deck — not finishing it — but it’s still quite a task considering its 58-foot length.

Before lunch, they moved around to the front deck and got started on it. But they couldn’t really get into it until the missing metal pieces arrived. That happened around noon and they spent much of the afternoon removing the temporary pieces and putting in the correct ones.

The last thing they did was to close up the big RV garage doorway. With the help of a bunch of friends, I’d moved all of my worldly possessions into the building on June 28. At that time, the building had no garage doors. The four smaller garage doors were put up on Monday. But the big garage door was still on order and not expected until July 15. That meant I had absolutely no way to secure my home. Someone could drive up with a truck while I was running errands in town or on a cherry drying flight, back right into the big door, load up, and take off.

Yes, the chances of that happening were very slim. But there was still a chance.

The builders remedied the problem by building a solid (although not very attractive) wooden wall across the bottom of the doorway with heavy duty plastic sheeting across the top to keep out rain. That’s what occupied the crew at the end of Day 27. When they left, my building was pretty much secure.

Building Front on July 2
When the builders left on July 2, the metal on the front of my building matched and the big doorway was secured with a temporary wall.

Traegered Chicken
Another day, another meal from my Traeger. This was a locally raised and butchered free-range chicken that turned out very tasty indeed.

Later, when the builders had gone, the guy I hired to do the living space framing showed up with his bid. He made the fatal error of hanging around longer than he needed to — any strong pairs of arms that spend idle time at my place are soon put to work helping me move heavy items. He helped me move my dining table from where my friends had put it in the back of the RV garage into one of the garage bays. When he left, I set up chairs around it, opened the garage door, and hosted a dinner party for four friends on my dining table for the first time: smoked local chicken and grilled pork tenderloin.

Here’s the time-lapse from the day’s work.

Sunrise from Lookout Point

When was the last time you sat quietly to watch a day being born?

If you’ve been following this blog, you know that about a year ago, I bought 10 acres of view property sitting on a shelf at the base of some basalt cliffs in Malaga, WA. I’m a view person and its the view that sold me on the land. From the spot where I had my building constructed this summer, I can see all of Malaga and most of East Wenatchee and Wenatchee, including the Columbia River which runs between them. There are grassy, sage-studded hills, small lakes, orchards, snow-covered peaks, and dramatic cliff faces, with a scattering of homes nearby and the more populated Wenatchee area in the distance.

My Bench at Lookout Point
Looking back at my future home from the bench at Lookout Point. See the tiny dog curled up on the right seat?

But a short walk a bit farther to the north, to the point just before my land drops down off a steep hill, takes me to what I’ve begun calling “Lookout Point.” It has a 270° (at least) view that also takes in Mission Ridge and the mouth of Lower Moses Coulee. When I bought a used shed last autumn and found a crude bench in it, the obvious place to put it was at Lookout Point. I fixed it up with a coat of paint and bought new cushions for it. I often sit out there in the evening with a glass of wine to watch the sun set.

The View from Lookout Point
There’s nothing special about the bench; it’s what’s in front of the bench that’s amazing.

I woke up this morning shortly before 5 AM. It was already light out — it gets light very early here in the summer — and rather than turn on the radio and have my coffee at my desk while listening to the news on NPR — as I too often do — I decided to have my coffee out at Lookout Point.

I think it was the sight of the pickers driving into the cherry orchard below me that triggered the idea. Two or three summers ago, when I lived at a friend’s building site in Wenatchee Heights, I used to sit out on his unfinished deck at dawn, watching the pickers getting to work in the orchard across the road. The deck was close enough to the orchard that I could hear the dull clunk of cherries hitting the bottom of the picking buckets as pickers started work.

Anyway, I took my coffee and headed out, leaving the door to my RV open behind me. Penny the Tiny Dog was still asleep on my bed, but I suspected that she’d follow me out if she sensed I was leaving. Sure enough, I was halfway down to the bench when I saw her following on the path behind me. When I sat down, she jumped up onto the seat beside mine, curled up, and went back to sleep.

The sky on the horizon to the northwest was pink; the sun was just touching the tops of distant snow-covered peaks. The valley was still in the shadows.

I sat quietly and listened. I could hear the whine of a sprayer in a nearby orchard. It was a sound you learn to live with here — during the growing season, they start as early as 4 AM and, depending on what they’re spraying and what the weather is like, they could continue all day long. Fortunately, none of the orchards are close enough that the sound becomes a nuisance.

Predawn from Lookout Point
The sun was just kissing the snow-covered peaks when I sat down at the bench.

Golden Basalt
I love the way first light and last light makes the cliffs behind my home glow with a golden light.

Sprayer in Orchard
You can easily see a sprayer from above — the cloud of chemicals is hard to miss. Sometimes, when I’m flying, I’ll see dozens of them at work in orchards all around me.

Sunrise
The sun broke over the horizon at exactly 5:30 AM.

Morning Light
I watched the golden morning light creep down the landscape. Can you see my shadow on the left?

Wenatchee Valley in Shadows
But while I was in full sun, the Wenatchee Valley was still in shadows. The sun wouldn’t hit them for another 30 minutes or so.

Off in the distance, I heard another familiar sound: a spray helicopter. I didn’t see it, but I suspect it was working out to the west, either on Stemilt Hill or Wenatchee Heights. I wondered what the people living in that area thought about helicopters doing extended spray operations near their homes at 5 AM.

Closer, I heard tools clanking where the pickers had gone. Maybe ladders being repositioned? Or bin trailers being hooked up to tractors?

Occasionally, a bird cannon fired. These propane-powered devices emit a sound a bit like a shotgun every few minutes to scare birds off the ripening cherries. Like the sprayers, bird cannons are a seasonal sound that lasts only as long as red cherries are on the trees. By July month-end, the orchards in my area will have been all picked and the bird cannons will be put away until next year.

Across the river, the sound of a motorcycle on route 28 drifted up on a breeze. And then a truck. I can sometimes hear trains on my side of the river, but none seemed to go by.

Birds — I heard them, too. Song birds greeting the day. Robins, magpies, quail.

One of my bees flew over to the bench and poked around. Maybe she thought my purple tank top was some sort of enormous flower that had blossomed overnight. Penny, bothered by the close buzzing, sat up. It wasn’t until she lunged at the bee that it flew away.

Meanwhile, the earth rotated toward the east and the sky got brighter and brighter. A golden light reached out and touched the basalt cliffs behind me. Then it began creeping down from the mountains and cliffs and hillsides, bathing everything it touched with a golden light.

The new day was born.

Bunch Grass in First Light
Bunch grass in first light.

It’s funny, but when some people watch a sunrise or sunset, they look at the sun. But that’s not where the show is. The show is in the opposite direction, where the changing light makes deep shadows and glowing highlights on the things we see every day.

I watched the light shine on everything around me. I especially liked the way it touched the tips of the bunch grass I’d left long around Lookout Point.

The light spread like a carpet over the earth. Shadows filled in with light. The magic of first light faded quickly at Lookout Point. Too quickly. I wished it could last all day.

Dawn in Malaga
A new day is born.

As I sat there with Penny, savoring the last few minutes of the sunrise, I thought back to sunrises I’d experienced years ago. Back when I was in my early 20s, I’d dated a man who liked sunrises as much as I do. I distinctly remember waking up very early one morning and driving through the darkness to Montauk Point out on Long Island in New York. We found a rock to sit on and sat close together, looking out toward the brightness of the eastern horizon while waves crashed gently on the shore. If I think hard enough, I can remember — or at least imagine — the way the sun’s first light felt warm on my skin and the way his body felt comfortably close to mine. Afterward, we lay back on that big, flat rock and I fell asleep in his arms.

I miss moments like that, long gone and likely forgotten by the man I shared them with. Over the years, he grew and changed. Like so many of us, he forgot about the simple beauty of a sunrise and the wonder of a day being born, caught up instead with chasing the almighty dollar and keeping up appearances for people who really don’t matter. His loss — but he probably doesn’t even realize it.

Are you guilty of that, too? Be honest with yourself. I think I was, at least for a while.

I think that moving here has helped me reconnect with the simple things in life — getting back in tune with nature, stopping to look and listen and experience my surroundings. Gone are the days when I spent too much time commuting between two homes and dealing with the noise and crowds of a city I never really wanted to live in. Last night, I enjoyed squash from my garden; this morning, I ate cherries I picked yesterday with yogurt I made the day before. My chickens will soon be laying eggs; I can’t wait to make my special pound cake with those rich fresh eggs and butter. I’ll fill the hummingbird feeder in a while and check my bee hives for capped honey frames. Maybe I’ll head down into town for lunch with some friends.

Life is what you make it and my life is good.