Construction: Wiring my Home

The hard part is done. Finally.

On May 20, 2014, I began blogging about the construction of my new home in Malaga, WA. You can read all of these posts — and see the time-lapse movies that go with many them — by clicking the new home construction tag.

As regular blog readers know, I decided to do all — or at least most — of the wiring in my new home. Although this might seem like a daunting task, it really isn’t a big deal once you get an idea of what you’re doing and gather together the right tools for the job.

The Basics

Electrical BookI learned 90% of what I needed to know from an electrical wiring book I bought last year, Ultimate Guide: Wiring, 7th Edition. This book explains the basics and has lots of wiring diagrams to help ensure that I get it right. I’m a visual person and can easily match what I see in the diagrams.

If you don’t know much about wiring, here’s the gist of it: Every home has a number of circuits, each of which runs to one or more devices such as outlets and light fixtures. Normally, circuits serve a certain area — for example, my bedroom’s outlets and ceiling fan/light has a circuit and my bathroom has another.

Each circuit has a specific amperage or strength of electric current; 15 amps and 20 amps are most common, although some circuits have 30 amps (such as my dryer and water heater), 50 amps (such as my range), and 60 amps (such as my heat pump/furnace). The type of wire you use depends on the amperage of the circuit. For example, a 15 amp circuit needs 14 gauge wire while a 20 amp circuit needs 12 gauge wire. (For wire gauge, the smaller the number, the thicker the wire.)

U.S. electrical code, which forms the basis of state electrical code, has certain requirements. For example, I’m required to have two 20 amp circuits in my kitchen for the outlets and they have to be GFCI-protected. The bathroom needs a dedicated 20 amp GCFI-protected circuit. There are a lot of little rules like that, some of which are obvious and some of which aren’t. The Wiring book I have covered most of what I needed to know; friends with experience wiring their own homes filled in the gaps.

The Plan: There is No Plan

Maria the Electrician
Here I am, dressed for a typical day of work: Layers of clothes to keep warm, tool belt so all my tools are handy, and kneepads for working on the floor.

When a home is designed by an architect or engineer, the plans include a wiring diagram. In my situation, I didn’t have this luxury. I designed my home so I had the complete freedom to design the electrical system, too. But rather than sit down and make a written plan, I did it all on the fly. After all, I was also the electrician.

This seems to confuse some people. In fact, one of my Facebook friends advised me not to post so much about doing my electrical work because he said the local inspectors could find out.

News flash: the local inspectors know. In Washington state, you can get an electrical permit as an owner/builder. Although the inspectors hold you to the same standards as a regular electrician, you are permitted to do all the work yourself. In fact, you’re required to — you’re prohibited from paying a non-electrician to do the work for you. So although I could have a friend come by and help me run wire — which sometimes required two people to do — I could not pay that friend. (I don’t think a few beers or half a rack of ribs at the end of the day is considered payment.)

At first, I was at a loss on how to proceed. It’s very daunting when you have no experience and face what looks like a huge task. But a friend told me to simply indicate on the walls where I wanted outlets and lights to go. I could do this by writing on the studs or nailing in the blue boxes that hold device wiring. Then I’d connect the boxes with the appropriate type of wire for the circuit I needed to run. Finally, when I was done, I’d run a “home run” of wire from the first device on the circuit back to the circuit panel downstairs.

And this is pretty much what I did. I went through my home, one room at a time, and nailed in the boxes. Then I strung them together in logical groups and ran the home runs.

Switch Box
This is probably the most complex box in my setup. It has switches for three separate circuits: a three-way switch for the light over the entrance downstairs, two switches to control the wall sconces in the living room (three on each switch), and a three-way switch to control the light in the hallway. One circuit is 20 amps; the other two are 15 amps each.

Of course, I made lots of mistakes along the way. Most were silly mistakes, like running the wrong kind of wire or putting an outlet in a dumb place and having to move it. I got good at removing wire staples and those blue boxes. I can’t think of any serious mistakes — other than what the inspector found; more on that in a moment — but then again, maybe I’ve blocked them out of my mind.

I worked at a leisurely pace, doing it in my free time. I admit that I wasn’t very motivated. For a while, I didn’t expect to make the next big steps on my project — namely insulation and drywall — until late in the spring. And having no heat upstairs as winter arrived made it even less appealing to get the work done.

But in early December, I took advantage of Home Depot’s Black Friday appliance deal and bought all five appliances for my home: washer, dryer, dishwasher, range, and refrigerator. I put off delivery as long as I could — 90 days. And then, a week later, I finalized my kitchen design with the folks at Home Depot and ordered my cabinets. After Christmas, I ordered my countertops — yes, granite!

Sometime right after Thanksgiving, after getting some very good news from my divorce lawyer, I decided to forego my planned winter trip to California and Arizona — I don’t call my current home a “mobile mansion” for nothing — and, instead, finish up my new home as quickly as I could. I had the heat pump/furnace installed and dove into the electrical work I needed to do. (I also hired a plumber to do the rough in for my water lines and drains — I’m so glad I didn’t do that myself as I’d originally planned.) If you’re a regular reader, you may have seen my walk-through video, shot last week.

A Little Help from My Friends

There were three difficult (for me) parts of the project that I needed help with:

  • Attaching the ceiling fan fixture boxes to the ceiling in the living room and bedroom. My ceilings are high — they range from 10 to 20 feet with the ceiling fans at about 15 feet. Although I had a scaffold to climb on, my fear of heights kicked in without the guardrails around the scaffold top. (The design of the rail makes it impossible to install it on my scaffold when both six-foot units are stacked. My living space has a high ceiling, but not that high.) My friend Don came to the rescue, hanging all three boxes and running wire to two of them. He would have done all three but I ran out of the necessary wire. I managed to get my wits about me enough to run the final 50 feet. Don also helped a few days later when I needed to run ceiling outlets in my garage bays for future garage door openers and he cut the hole in my living room floor for a floor outlet.
  • Setting the fixture boxes for my deck and garage bay lights. Part of this was my fear of heights again; another part was just not knowing exactly how to do it. My friend Tom came to the rescue, climbing a ladder out on the unfinished deck, drilling through my metal building, and screwing the boxes into place. I helped by handing him tools and making the rear supports out of scrap wood that had to be cut to size. Later, I did all the wiring for these boxes. The trick, I learned, is not to look down when standing on a stepladder perched on a piece of plywood on the frame for a deck 10 feet off the ground.
  • Range Wire
    I don’t think I could have run this heavy 6/3 wire from my kitchen island to my circuit panel in the garage ceiling without Pete’s help.

    Running the home runs for my range, water heater, and dryer. These three circuits required extremely thick wire. Although I was able to come up with a good route and drill all the holes needed to bring the wires to the panel, I simply lacked the physical strength to get the wires through the holes on the last 20 or so feet of the run. Pete came to the rescue, stopping by after a day of snowboarding up at Mission Ridge. In less than an hour, we’d pulled the wires into place. He also volunteered to make a slight adjustment on one of my doors that he thinks might get sticky over time.

I also got help and moral support from other friends:

  • Bob helped me back in September when I needed to set up my electric meter and circuit panel.
  • Barbara came by a few times to keep me company and help me run wire. She was a huge help when I had to get the 4 gauge wire run for the heat pump/furnace.
  • Mike's Drill
    Mike’s most excellent (and powerful) angle drill. Yep, this is the one that nearly crushed my finger the other day.

    Mike came by with a pizza one day and stuck around to help me run a few home runs from the kitchen area to the circuit panel. Mike is also the guy who loaned me his excellent angle drill. I can’t tell you how many times I used this drill — and how glad I was to hand it off to him at dinner yesterday.

I still can’t believe how many great friends I have here.

I also have to thank the folks at Dick’s Heating and Air Conditioning. Not only did they do a great — and unusual — install of my HVAC system’s heat pump/furnace, helping to warm the place, but they graciously left behind their man-lift. I drove that darn thing all over my garage, using it as a platform for drilling holes in the floor joists and running wires in them. It also came in handy to run a few of the home runs. The plumber made use of it to lay in the drains under my third garage pay. And I expect that both the insulation and drywall guys will use it on the big wall between my living space and RV garage. Don’t worry, Ken! I’ve been taking good care of it, keeping it warm, dry, and charged.

Inspection

My electrical inspection was yesterday and I did a lot better than I expected. I’m not sure what the inspector liked more: the way Tom and I had set up the light fixture boxes for my deck or the Ken Burn Jazz CD music coming out of my shop’s stereo — he commented on both of them.

Of course, it wasn’t perfect. (Wouldn’t that be sweet! And amazing!) There were just three corrections needed, two of which required some wiring changes that I got done yesterday after the inspector left:

  • My refrigerator, which I’d put on its own 15 amp circuit at the advice of a friend who had done the same, needed to be on one of my two kitchen circuits. That was kind of a bummer because that’s how I’d originally planned to do it. Running the extra circuit had been a bit more work that I didn’t need to do. I ran some 12/2 wire from the last countertop outlet to the refrigerator cubby and removed the 14/2 wire for the home run. Total time to fix: 30 minutes.
  • My over/under counter lights and kitchen exhaust fan, which I’d put on the kitchen circuits, were not supposed to be on those circuits. I ran the lights from my loft circuit and the exhaust fan from one of my living room circuits. In each case, I needed less than 10 feet of wire and the fix took about 30 minutes.
  • I hadn’t provided grounding pigtails as necessary throughout the wiring job. (What this means: Because all the circuits are grounded, each device needs a bare or green wire to attach to it. Any time there are more than two sets of wires in a box or two devices to be installed in the box, they need to be connected with a grounding wire attached to them. This is done with a green wire nut.) I knew this and I’d done about 80% of them before inspection, kind of hoping the inspector wouldn’t notice the ones that were missing. I think that if I’d done 90% of them, I would have gotten away with it. (I did plan on doing them all properly for the final wiring job.) I started going through my home, box by box, checking and fixing this problem as I found it. It takes less than 5 minutes to fix one of these. All I have left is the deck and the ceiling fans. (Reminder: don’t look down.)

I figure that I can call today for a re-inspection and the inspector will come out on Friday to approve of my work. In the meantime, he approved me for insulation, meaning that I can get the place insulated but not drywalled. If he approves on Friday, I can drywall, too.

What’s Next

Deck Lights
In this example from the box inside the door to my front deck I’m going to have three switches. On the left will be a three-way switch that controls the five lights on the north deck; the other switch will be in my bedroom by that door. In the middle will be the spotlights for the front deck, which I consider my “entertaining deck.” On the right will be the switch for the small light beside the door, which will offer a dimmer alternative to the spots. My deck will be an important part of my living space. Note the three bare round wires and three black power wires — one for each switch.

The insulation guys get to work on Thursday — yes, tomorrow! If I get the approvals I need, the drywall guys, who work for the same company, will come in right after them. The same company will texture and paint the walls and ceilings — not sure exactly when because I have a trip coming up.

The wiring is far from done. So far, only the hard part is done. My home is full of blue boxes nailed to the walls and ceilings with wires and green wire nuts sticking out of them. I have to go through and change all of those to outlets, switches, light fixtures, and ceiling fans. I don’t think they need to be inspected again, but who knows? I take things one step at a time.

Meanwhile, outside my circuit box is a bunch of wires just hanging out of the wall. Eventually, they need to be brought into the panel and attached to circuits. My friend Tom will help me do a few of those today so I can have power upstairs.

Twigs Sconce
I ordered six of these wall sconces for my living room.

I’ve started buying light fixtures: flush-mount sconces for the living room, bathroom, and deck; ceiling fans for the living room and bedroom, track lights for the hallway and kitchen, hanging pendants for over my breakfast bar. They’ll go in when the drywall and painting is done.

The kitchen cabinets arrive February 16 and, with luck, can be installed that week. The appliances arrive at February month-end. Once they’re installed, the countertop people will come and measure for their template; I expect the countertop to be delivered and installed in March.

And then there’s the bathroom…

But now I’m looking too far ahead. I need to remember: one step at a time. It’s amazing how it all falls together when you can make it happen.

And yes, I’m enjoying this project immensely. It’s so rewarding to see something you dreamed up become a reality. It’s great to have a hand in the actual work and to be there for every step of the way.

Despite the occasional difficulties and hurdles, and despite the sore arms and fingers from pulling wire and working with wire nuts, it’s an experience I will cherish forever.

Construction: January 8 Walkthrough

Too busy to blog. Watch this video instead.

On May 20, 2014, I began blogging about the construction of my new home in Malaga, WA. You can read all of these posts — and see the time-lapse movies that go with many them — by clicking the new home construction tag.

I’m working hard to meet a deadline for inspections and really don’t have any time in the morning to blog. In the evening, when I have plenty of time, I’m too exhausted!

So here’s a walkthrough video I shot today with my iPhone and threw together with iMovie. It’ll show you the interior of my place as it was this morning, with an emphasis on layout and electrical setup. Enjoy!

What do you think?

Construction: The Heat is On

My heat pump/electric furnace are installed in a unique location, fired up, and sending out heat.

On May 20, 2014, I began blogging about the construction of my new home in Malaga, WA. You can read all of these posts — and see the time-lapse movies that go with many them — by clicking the new home construction tag.

When I decided late last month to forego my winter trip south and concentrate instead on finishing up my home to make a spring move-in date, getting the HVAC installed was a top priority. The main reason was because I wasn’t sure where the ductwork would go and I needed to know before the plumbing went in.

The Options

I’d gotten bids on the job in the fall from four different contractors. Two bid just “ductless” or “mini-split” systems, one bid just a ducted system, and the fourth bid both.

I was leaning toward a ductless system, with a unit in the living room and another in the bedroom. I thought it would be easier and cheaper. But I soon learned of a problem inherent in those systems: when the temperature drops below 20°F — as it sometimes does here in the winter — the ductless systems simply can’t produce heat.

The ducted system, which combined a 2-ton heat pump with a 10KW electric furnace, solved that problem. When it got very cold, the electric furnace would automatically kick in.

Considering that the two systems cost pretty much the same thing, it was a no-brainer to go with the ducted heat pump plus furnace system. That said, I decided to work with Dick’s Heating and Air Conditioning, which came highly recommended by several people, including the folks who built my building.

Installation Location

The next challenge was deciding where to put the darn thing. In addition to a compressor, which would go outside, I needed a sizable air handler/furnace system. I also needed ductwork — ducts to deliver conditioned air to four locations within my living space and another duct for return air. Ken from Dick’s came by to look at the place and come up with some ideas. Two required sacrificing one of my two hall closets, another required sacrificing some floor space in my storage loft. All of the options required having a possibly noisy air handler in my living space and ugly ductwork hidden behind drywall boxes — mostly because I absolutely refused to put them in the floor. Very discouraging.

Of course, all this was back in October. I was still sitting on the fence about getting the HVAC started before winter. I put it on hold to think about it.

Then a friend suggested hanging the unit in the garage or shop area.

When I decided to move forward, I called Ken over again. He came with the two guys who would be doing the work. We discussed different options for hanging the air handler. We finally decided to hang it right below the ceiling in the RV garage portion of my building, just outside the wall to the loft. The ductwork would run outside the living space and patch into the wall with flexible ducts in five places. Special fire-safe registers would meet county fire codes for separation between living and garage space. The only special thing I’d have to do was build a catwalk up in the rafters so the HVAC guys could easily access the unit without bringing in a man-lift in the rare cases they needed to access it.

Heater Location
Future location of my heater. I was standing on my RV roof when I shot this photo. The RV had to be moved for them to get to work. The plastic on the right, which was left behind (at my request) by the guys who put the spray insulation in the ceiling of my living space, will form a barrier between my garage and living space to keep some of the heat in until the drywall is done.

There was some concern over whether the trusses on that side of the building could support the 100 or so pounds of furnace plus catwalk plus worker. Ken and I each contacted the builder independently. I sent photos. Ken met with her. She talked to the truss manufacturer and the county inspector. It was a go.

Installation and Wiring

Installed Furnace
The fully installed air handler/furnace up in the rafters of my RV garage. The plastic-covered wall separates my living space from the garage and will eventually be insulated and drywalled.

Air handler/furnace installation took less than two days. They came last Monday, worked about half a day, and then finished up on Wednesday. They used a man-lift to get to the installation location 20+ feet off the floor of my garage. They told me that since they didn’t need the man-lift for any upcoming jobs, they’d leave it behind so I could use it to run wire, etc.

Running wire was exactly what I had to do. The installation didn’t include electrical wiring to a 60 amp circuit. I had to get 4 gauge Romex style wire from the circuit panel to the furnace and I’d definitely need the man lift to get up there. My scaffolding is only 12 feet tall.

I bought the wire on Monday. I figured I needed about 50 feet but wanted to make sure I had enough so I bought 70 feet. (I learned my wire lesson back when I ran wire out to my shed.) I had to go to three suppliers before I found it. The 70 feet of wire cost nearly $200 and weighed a ton. I was advised to keep it in a warm place until I was ready to run it. I put it in my RV living room.

On Wednesday, my friend Barbara came by to help me run the wire. It was definitely a two person job. But we’d barely started when I realized that I didn’t have any clamps strong enough to hold it in place. So we just brought it up near where it needed to go and used plastic wire ties to fasten it to the second floor girts. I sent the far end of the wire up to the air handler with one of the installers and told him to just drape it over one of the rafters up there. When we were done, it was roughly in position. I could do the actual fastening myself, without help.

The rest of the week was pretty busy for me, with kitchen design appointments at Home Depot, Lowes, and Bagdon’s, a wine tasting with friends, dinner and dancing with another group of friends, and helicopter repositioning after nearly a week on display in Pybus Public Market. It wasn’t until Friday afternoon that I got around to using rubber-lined clamps to fix the wire to the building frame. The man-lift came in handy; I just ran it alongside the wall between the shop and my living space and raised it into a comfortable position to screw in the clamps. Then I drove it along the wall, fastening wire along the way. The clamps will need to be removed and replaced when the drywall goes up, but the current setup should breeze through inspection.

I used the man-lift to climb all the way into the rafters — which took some carefully positioning of the lift before ascending and fine-tuning once up there to avoid the horizontal members of the trusses. I brought the wire right up to the furnace box and stopped.

I didn’t know where the wire had to go.

I pulled off the panel that looked like it led to the electrical components. Lots of circuitry in there. I saw a partially covered punch-out that might work for getting the wire in. I saw two other places that also might work. But once I got the wire in, I had no idea what to do with it. I’d gone as far as I could with wiring.

I did know that I had about 20 feet too much wire hanging from the rafters. I guessed about how much wire could be needed up there, took my big bolt cutters, and cut about $45 worth of wire off. Then I descended back to the ground, climbed off the man-lift, and called it a day.

Electrical Hookup

My friend Tom is a retired electrician. He’s been providing advice and guidance, along with some complex conduit and wiring work, when I need it. I’m trying hard to do everything myself and I’m doing surprisingly well — considering I’d never wired a thing in my life before this past summer — but I simply can’t do it all.

I knew I couldn’t do the furnace. But I was also unsure whether Tom could do it. He’d had some back surgery earlier in the month and had told me he might not be able to help me again until February. Although I wanted him to help — I really like working with him — if he couldn’t, I needed to find someone who could.

I waited until Sunday. I’d been running wires in my bedroom and had finished the wiring in the wall between the bedroom and bathroom. It looked so neat that I wanted to share it with him. I took a photo and texted it to him. He told me that he was out getting a manicure with his wife and that an electrician couldn’t do better than what I’d done.

On Monday, I texted him again with a question about the maximum number of devices I could have on a 15 amp circuit. (He advised no more than eight.) I had some other questions that couldn’t be handled by phone or text. I asked if I could stop by for a consultation. He told me to come over.

On the way, Ken from Dick’s called. He was sending a guy out on Wednesday to finish up. I needed to have the wiring done if I wanted heat. I definitely wanted heat. I needed to ask Tom if he could help, but I wanted to see his condition first.

His condition was perfect. Hard to believe he’d had surgery on his spine just two weeks before. He was animated, walking around without any restrictions in his motion. He said he was already off the pain killers and felt great.

We did our consultation, which required me to draw a lot of pictures of a circuit I was planning for my hallway, laundry room, and bedroom closet (long story). A three-way switch was involved, along with outlets and two other light fixtures with switches. He set me straight on how to proceed; told me about the amperages I’d need for my range, dryer, water heater, and washer; and gave me some good advice on how to wire the six wall sconces I planned for my great room.

Then I filled him in on the progress of my HVAC setup. I asked if he could help me wire my furnace or recommend someone else to do it.

He said he’d come the next day.

Tom Does the Wiring
Tom wired the furnace while I looked on and handed him tools.

He came right on schedule with a small bag of tools. Together, we rode up in the man-lift, raising it as high as we could without hitting any of the trusses. I asked him to admire the way I’d run the thick wires and he complied. He used my drill to make a hole in the furnace cover in one of the spots I’d noticed, attached a connector I’d been given by one of the HVAC workers, and ran the wire in. He told me I’d cut the wire the perfect length, which amazed me. It was not an easy job. 4 gauge wire is about as thick as a pencil and not very pliant at 40°F. Even if I knew what to do, I doubt my girly fingers could have gotten the job done.

The Furnace Wiring is Done
The finished wiring. The red box indicates where the wires went.

Of course, I only had one connector and I needed two. That meant a trip down to Stan’s in Wenatchee, the closest hardware store. It was a 20-minute drive (each way). I bought a ladder while I was down there. I’d gotten tired of lugging my 8-foot aluminum ladder — bought for preflighting my helicopter and hauled up to Washington from my hangar in Arizona — when I needed to climb higher than my step stool allowed and bought a far more practical 6-foot Fiberglas one. I also bought some tamales for lunch.

I was working on hallway wiring again when Tom returned. Another struggle to get that thick wire into place in the circuit panel. I already had the 60 amp circuit waiting for him. He was done in less than 20 minutes.

Before leaving, he told me he’d be back on Monday to check up on me. I told him I hoped to have heat by then.

Turning on the Heat

An inspector from Dick’s showed up Tuesday, too. He was inspecting the ductwork. He left behind a document for the county inspector and told me they’d wire the thermostat and run up the heater for me if I was ready.

I was ready when they arrived Wednesday morning. There was snow on the ground and Ken had come along with his crew of two different guys. He was ribbing them because he’d had to drive the 2WD van for them while they followed in his 4WD truck.

Ken complemented me on my shop’s holiday decorations — small tree, chili pepper lights — before getting down to business. We reviewed the location of the compressor, which would be installed outside before the “trim” stage of my construction project. We also talked about where various wires and pipes had to go. Then Ken left in the truck, after ribbing his guys some more about driving back in the van without his help.

The guys got right to work. I went upstairs to work on the wiring for the wall sconces in my main room. The wiring was easy — because of my double exterior wall framing, I didn’t need to drill a single hole.

My friend Bob showed up around noon with his dog Skip and burritos from his favorite Mexican food place. By that time, I’d reassembled my big dining table upstairs. We had lunch there — the first meal at that table in my future home.

The guys finished up the work they had to do and we fired up the heater. I could not believe how quiet it was. Yes, you could hear air moving through the ducts, but it was hardly noticeable — certainly a lot more quiet than the HVAC system had been in my Wickenburg home. I was incredibly relieved. If there’s one thing I hate, it’s white noise.

The Heat Is On

On Wednesday evening, as I left to attend a dinner party in town, the heater was pumping warm air into my partially insulated living space. It had been at it for a few hours and I didn’t notice much of a difference. I suspect it’s because the ducts didn’t have any registers on them so the air was not forced out in any specific direction. Heat rises and I have very high ceilings. The heat was going straight up. Would there be enough of it to warm a partially insulated space that size? All I wanted was for the temperature to be over 50°F so I could finish the wiring without being all bundled up every day.

When I returned around 10 PM, I checked the temporary thermostat. It registered 55°F. I set the temperature to 60° and went to bed.

Inside my RV (inside the RV garage) the sound of the furnace overhead was a quiet, steady hum that I had to listen hard to hear.

In the morning, after my coffee, I went upstairs to check the situation. The temperature still registered 55°F. I suspect that’s as warm as it will get until the outside temperature increases or the insulation is put in.

Good enough for me. And now I’m even more motivated to get the wiring done.

Planning My New Kitchen

It’s small but functional, with lots of counter space and plenty of light.

On May 20, 2014, I began blogging about the construction of my new home in Malaga, WA. You can read all of these posts — and see the time-lapse movies that go with them — by clicking the new home construction tag.

I had two main points of consideration when designing my new home:

  • The total living space needed to be less than 1,200 square feet. That’s because I’m not building a primary residence here. Instead, I’m building the secondary living space allowed by Chelan County on a lot zoned like my 10 acres. The idea is to leave the primary building location — the one that can take better advantage of the views — available for either me or a future property owner to build a house on. That house can be any size as long as this space is 1200 square feet or less.
  • I needed to include lots of windows. What sold me on the lot is that it has amazing views, especially out toward the Wenatchee Valley. Big windows would not only let me take in those views from any room in my home, but they’d also let in lots of light. So I have lots of big windows. The entire building has 21 windows, not including those on each of my five garage doors or three man doors. Sixteen of those windows are in my living space.

Got Windows?
Got windows? I do! My living space is above my garage. I designed it to have regularly spaced, large windows so I could take in the view from indoors.

These two factors combined determined my floor plan. The walls had to be placed between the regularly spaced windows. This made special challenges in the bathroom and kitchen — you can’t put fixtures or cabinets right up against a window that starts 18 inches off the floor and stretches five feet above that.

Although I played around with several designs for my kitchen, I finally came up with a design that utilized a “galley” style with an island/breakfast bar. The key was setting the refrigerator into a wall and putting the stove on the island. That gave me more than 47 square feet of counter space in a room roughly 9 x 13 in size, even though I can’t take the counter all the way to the window. And because my ceilings are so high, I was able to use tall wall cabinets and for extra storage space.

Floor Plan
Here’s the latest version of my floorplan, with my appliances and some of my furniture included. Measurements are rough and don’t account for the thickness of drywall (1/2 inch). The gray shaded area is a storage loft above the hall and utility area.

Understand that although my kitchen in Arizona was large, it was not ideal. The textured tile countertops made it impossible to do something as simple as roll out a pie crust or cookies — and let’s not even talk about the chore of keeping the grout clean in a household where only one person knows how to use a dishrag to clean up spills. The appliances, although supposedly high quality, left a lot to be desired, as I discussed here. Food storage was in the cabinets rather than in a dedicated pantry; small appliances lined the countertop because there was no other practical place to store them. And while it might be difficult to believe, the abundance of countertop space made cooking a chore by allowing multiple work surfaces to leave bowls, measuring spoons, and ingredients — and to clean up.

While I certainly didn’t have the same amount of space in my new home, I could design a better kitchen to meet my needs.

Help from Home Depot

Getting an idea of the kitchen layout was the first part of the process. Getting actual cabinet configurations was another. For that, I turned to the local Home Depot.

Kitchen Drawing
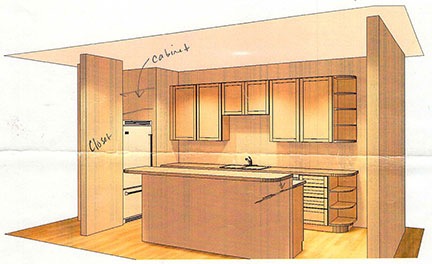
Here’s Home Depot’s first stab at my kitchen. In this original version, I’d planned to mount the microwave in the cabinet below the stove in the island. The island’s breakfast bar was also designed higher in the back. We forgot about cabinets over the refrigerator.

I visited Home Depot back in July to get the process started. This helped me see how cabinets might work in my kitchen. With their kitchen planning software, they selected and placed cabinets to my specifications, then provided me, on request, with a printout of the configuration and a conceptual drawing. This made the room more real to me and gave me some time to think about it and how it might work. It also spit out an estimate of cost, although I wasn’t really thinking much about that yet.

Time passed. I got my living space framed to fit the kitchen we’d designed. I got other things done, like the ceiling/roof insulation and, more recently, the HVAC air handler and ductwork. Although I’d toyed with the idea of going south for the winter, I decided to stick around and finish construction work on my home this winter so I could dedicate early spring to settling in and late spring to putting in the massive garden I was planning.

I’d also had some other thoughts about the kitchen layout. After visiting a new friend’s place in Friday Harbor, I realized that putting the microwave down low would not be a good idea — especially when I considered how much I used my microwave. And although I’d hoped to use the microwave I’d brought from Arizona — the one my parents had given me as a housewarming present for my New Jersey home back in 1986 (!), I decided I deserved a new one. I’d get a large shelf model and put it on a shelf beneath the cabinets. I also decided to keep the island all one level — I saw that at the Friday Harbor home, too, and really liked it. More homey and lots of contiguous counter space for baking and cheesemaking projects.

My goal was to fit a dream kitchen into a small space and I was pretty sure that the changes I had in mind would help me achieve that goal.

Getting Serious

With those changes in mind, it was time to get solid price quotes from at least two sources: Home Depot and Lowe’s. I visited both yesterday.

Lowe's Kitchen
Home Depot's Kitchen
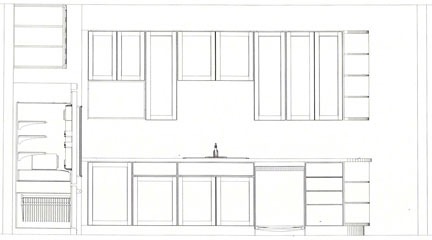
The kitchen drawing as prepared by Lowe’s (top) and Home Depot (bottom). I like the way Home Depot does a cutaway of the fridge.

At Lowe’s, we created the kitchen design on their computer system — which is virtually identical to Home Depot’s — making sure to get every detail. It took a long time and, since my appointment was delayed due to the previous customers taking longer than expected, I ran out of time before we could get into the countertops. Still, she designed the kitchen as I wanted it and gave me a printout of the primary wall’s layout, along with a detailed price quote.

Then I went to Home Depot. Fortunately, my design was still in their computer. We modified it to match what Lowe’s had drawn for me so I could compare apples with apples. I got a printout of the main, refrigerator, and island parts, along with a price quote. We also had time for me to pick out a granite countertop, select options, and get a quote for that. (That’s how I know I have 47 square feet of countertop.)

At this point, I’m leaning toward Home Depot. Their kitchen came in about $1,000 cheaper than Lowe’s for the same quality product — and that’s after manufacturer and retailer incentives. To get the incentives, I have to order at Lowe’s by December 15 or Home Depot by December 21. Both offer an additional 5% savings for using their credit card — which is one reason I have one for each company. Both will charge about $1,500 – $2,000 for installation, which I’ll likely get so I’m sure it’s done right.

As for the countertop, I need to get more estimates. Although the $54/square foot installed price sounds pretty good to me — and the few other folks I’ve asked — I might be able to get a better deal elsewhere. I will definitely check in at Lowe’s.

Keeping It Simple

One more thing… a lot of people have told me not to use Home Depot or Lowe’s for my kitchen. They say there are better options: Ikea, a local kitchen place called Bagdon’s (which I am visiting later today), and various local cabinet makers. But these people need to understand that my decision to use these big box companies is being driven by three factors:

  • Cost. I don’t have an unlimited budget. This is a small living space and I can’t pour a lot of money into it that I might never get back. (Although everyone seems to agree that I’ll have no trouble selling this place for far more than I put into it.)
  • Time. I can’t wait for various contractors to come and measure and plan. I want this done already. I’ve waited long enough.
  • Ease. I’m not interested in buying cabinets at Ikea and cabinet fronts at some local cabinet maker and finding some contractor to put it all together. I want to pick something out in one place, know it will work, and pay one organization to put it in my home. I have way better things to do with my time than play around with vendors and contractors.

While I’d love to spend my money locally with small organizations to get the perfect custom solution, I also need to do what’s right for me. And what’s right now is keeping it simple.

A Snowy Weekend

First snow of the season is just right.

It started snowing Friday afternoon.

It had been forecasted, so I was expecting it and got all my errands done early in the day. There was a sleety mix coming down in town as I headed home. By the time I pulled into my driveway, the sleet was more snow-like. It could have been our elevation — my home’s elevation is about 800 feet higher than town at the river’s edge. I put my Jeep away in the garage, let Penny out, and settled down to an afternoon catching up on paperwork.

First Snow Reading
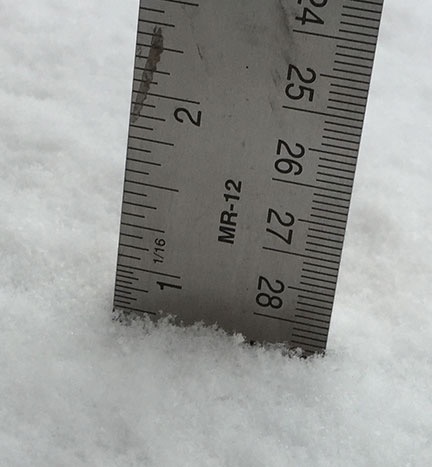
By mid-afternoon, there was just three quarters of an inch of accumulated snow.

By 2:47 PM, there was 3/4 inch on the ground. Not very impressive.

But it kept snowing. I chatted with a few different friends on the phone, watching the white stuff come down in big flakes outside. Inside was toasty warm and smelled of the ham and cheese quiche I had in the oven. I was sipping a hot coffee with eggnog and milk — a do-it-yourself eggnog latte.

Later, after dark, I let Penny out to do her business. She stood at the doorway just looking at the snow, completely uninterested in stepping out. Later, before bed, when the snow was deeper but still coming down, I had pretty much the same luck with her. I suspected I might have a problem.

Of course, a tiny dog can only hold it for so long. She woke me at 3 AM, needing to go out. I obliged, standing at the doorway while she managed to find a satisfactory spot under the front deck to take care of business. It had stopped snowing and the sky was full of stars with just a few low clouds floating around. The cliffs behind my home were illuminated by the starlight and reflected light from town miles away. It was a beautiful night — perfect for some photography.

Now wide wake, I went back inside and set up my camera and tripod. I experimented with some shots from the deck outside my bedroom door and then the front deck. Although I couldn’t get a satisfactory shot of the cliffs, I did get an acceptable one looking down toward town. (I need to get my camera checked; there’s something screwy going on with exposures.)

Wenatchee at Night
I made this photo of the lights of Wenatchee from the deck outside my bedroom door.

Total Snowfall
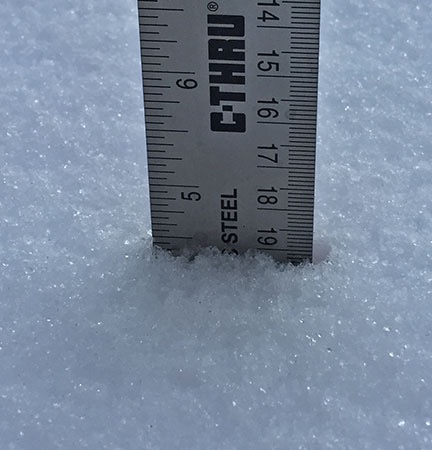
Total snowfall was about 4-1/2 inches at my place.

I went in to have coffee, write in my journal, and do some blogging. I had some quiche for breakfast. Somewhere along the way, it got light out. I went back out with my ruler and stuck it in the virgin snow on my driveway apron. Four and a half inches.

The stuff was not wet but not quite powdery. The temperature was right around 32°F and didn’t feel cold at all. There was no wind. And it was amazingly beautiful with all that untouched snow on the ground.

I put on my Sorrels and walked back out to check on the chickens. They were out and about in their yard and looked up at me, as they usually do, expecting food. Their water was free of ice — I’d bought them a heated waterer — and although there was snow in their food dispenser, it didn’t look wet. I threw them a scoop of scratch and checked for eggs. There were three of them, one of which was still warm. Apparently, my chickens hadn’t gotten the memo about cutting back on egg production when the days got short.

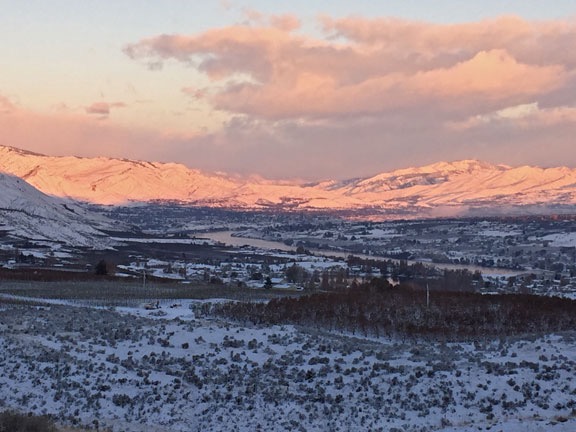
First light was just hitting downtown Wenatchee. I went back upstairs and took in the view from the deck outside my bedroom. The light was pink as it touched the mountains and valley to the northwest. I felt as if I could have watched the view change all day, but it was time to get some work done outside.

First Light on a Snowy Morning
First light hits the Wenatchee Valley on a snowy morning.

Although my driveway is quite long, I don’t plan on ever shoveling or plowing it. I have a Jeep and its tires are still good. The driveway doesn’t have much of a slope to it. I don’t expect getting in or out with the Jeep to ever be much of a problem, especially since snow doesn’t usually stick around long here. Even my truck has 4WD, so if I need to get out with that, I know I can. How do I know? I used it to pull my RV out last February after a heavy snowstorm for a two-month trip to California. The Honda? Well, the Honda is in for the winter at this point.

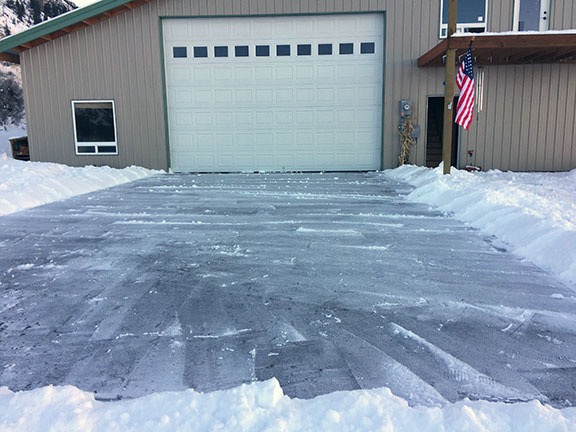
But I also have a concrete driveway apron, which I need clear if I want to get my helicopter out for a flight. I didn’t have any flights scheduled until after Thanksgiving, but who knows what might come up? I had already decided to keep it clear of snow and ice. I had a good shovel and a bag of ice melt. With temperatures expected to rise during the day, I wanted to shovel now, before the snow got soft and heavy.

It didn’t take long and I have to admit that it felt good. That might sound weird to the people who consider snow-shoveling a chore, but I do it so infrequently (so far) that it’s more of an excuse to move around outdoors than any kind of real work — especially when the snow is still light and there’s no ice to contend with. I felt the same way last year when I shoveled the walk at the home I was housesitting at after a snowfall. The whole job took about 20 minutes — the driveway apron is only 22 x 30 feet — and I barely broke a sweat in my fleece sweatshirt.

Shoveled Driveway
My shoveled driveway apron, just in case I need to pull the helicopter out for a flight.

I didn’t spread any ice melt on it. The way I see it, there’s no reason to spread that crap around unless there’s ice to melt. I figured I’d monitor the condition of the driveway apron and, if the little snow left did turn to ice, I’d spread some ice melt to get rid of it. But as the day wore on, the snow melted and the resulting water dried. No ice.

While I was out with the shovel and still energized, I shoveled a path from my front door to the chicken yard. This would give Penny a better place to run and do her business. But she had already figured out that she could stay under the front and side decks to get around the building without having to walk through much snow. In fact, while I was shoveling she disappeared around the back of the building, possibly tracking the scent of a rabbit that had left tracks in the snow back there.

Snowy Home
A look back at my home from Lookout Point on a snowy morning.

Before going back inside, I walked down to Lookout Point, my little bench overlooking the valley. I’d brought the bench cushions in when the weather began changing two weeks ago and the bench looked abandoned and kind of forlorn with its covering of snow. I looked back at my home and liked what I saw: the neat symmetry of the building, the smooth blanket of snow on its big roof, the pine trees on the cliffs behind my home, accented with white. The path back to my home from the bench looked inviting. I looked forward to mornings like this when I could stoke up a fire in the fireplace and sip hot cocoa while looking out over the valley.

And that’s when I realized that I liked winter.

It’s odd because I left New Jersey to escape the cold. That put me in Arizona, which I soon grew to dislike for many reasons, not the least of which was the brutally hot summers. But my home in Arizona also lacked seasons — the only thing that changed was the average daytime high and nighttime low. There were no fall colors, there was no snow, there was no springtime leafing out. The seasons were more subtle, marked by temperature changes, wildflower and cactus blooms, and thunderstorms.

We bought some vacation property in northern Arizona, mostly to escape the hot Phoenix area summers. We went up there pretty regularly in the summer early on, and I spent much of the summers of 2004 and 2005 in my old RV up there. But we also enjoyed going up there in the winter time. How many Thanksgivings and Christmases did we spend in the cabin we built together? I remember waking once to a hushed, snow-covered landscape, cosy and warm under a thick comforter up on the loft, going downstairs to make a hot breakfast of Pillsbury orange danish. We spent part of that day at the Grand Canyon, walking the shoveled rim trails, before dinner with friends at El Tovar. That property, bought for summer use, became my winter treat. The chain of Christmasy red and white stars I’d bought still hung from the loft the last time I was there.

Now I’m back in a four-season place. Indeed, the winter here is remarkably like the winters in northern New Jersey, where I spent more than half of my life. But there’s the added benefit of a wide variety of winter sports nearby: downhill skiing, cross-country skiing, snowshoeing, and skating. There’s life here — that’s another thing I’ve been missing for too long.

I didn’t spend much time outside that morning. I had things to do inside before heading out to visit a friend and then participating in a cider tasting outing with other friends. Dinner out came afterward. The temperature rose throughout the day but it got cloudy. The roads were icy on the way home, but I threw the Jeep into 4WD and had plenty of traction.

The next day, Sunday, was even warmer. My garage got up to 50°F before I realized I didn’t need the space heater on while I did my warm glass work. Snow was melting everywhere and my driveway apron was dry. The chicken yard was snow-free — they’d trampled it all down into wet dirt and they were still making plenty of eggs. It was 46°F outside when I left at 1 PM for a football party at a friend’s house. I took my truck because I needed to run my trash cans out to the main road. It had no trouble on the unplowed driveway.

Temperatures this week will continue to rise, with a daytime high on Wednesday expected to be 50°F. The National Weather Service is predicting a warmer than normal winter here and if the cold snap we had earlier this month is an anomaly — which I believe it is — we might not get much more snow at all. Although I hope to get some cross-country skiing in before I head south for a month or two, I don’t really care one way or another. This snowfall was a treat and I’m sure there will be many snowy weekends in my future.