A video progress report.
Here’s another walkthrough of my work-in-progress. This time, it’s showing off the nearly completed drywall.
I promise the next video — which I’ll do in about two weeks after they paint and clean up — will be better.

A video progress report.
Here’s another walkthrough of my work-in-progress. This time, it’s showing off the nearly completed drywall.
I promise the next video — which I’ll do in about two weeks after they paint and clean up — will be better.
Too many choices!
I’ve been choosing colors for my new home since early December, when I ordered my appliances. That was an easy choice: brushed stainless. I had stainless in my old home and I liked its clean look, despite the fingerprints that always seemed to appear as if by magic on the refrigerator. I think it looks modern and timeless at the same time.
The next color choices weren’t so easy, mostly because there are so many choices I could make.
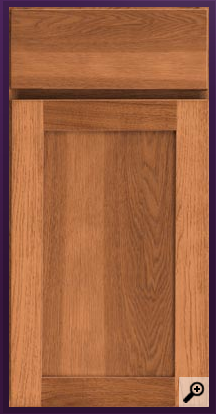
The cabinet style and color I ordered.
The kitchen cabinets were the next thing I ordered. I went with Kraftmaid ordered through Home Depot. They had a special offer going on that saved me about $1,000 on some good quality cabinets. Not only would I get soft-closing doors and drawers — a real step up from what I had in my last home — but the lower cabinets would include slide out drawers, making it easy to access items such as pots and pans.
Style and color were the tough parts. I knew I wanted a light color and I knew I wanted a more rustic look. So I went with something called Honey Spice on a Hickory wood. The style was simple, with a beveled panel in the doors. Easier to clean. Although my old home had an attractive southwestern trim on all the cabinets, they were a bitch to keep clean, with dust and grime accumulating in every single crack.

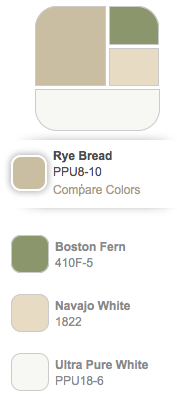
I’m really looking forward to having granite countertops. This color looks amazing with my cabinets.
Countertops needed to be ordered next. I knew I wanted a dark color and I knew I wanted a surface that didn’t need a lot of care and maintenance. My old house had tile, which was attractive and durable but it was a royal pain to keep the grout clean, required regular sealing (which I only did once in the 15 years I lived there), and was impossible to use as a surface for rolling out dough.
I went with granite. Again, Home Depot was having a special and I scheduled my purchase to coincide with the dates of that deal. Granite comes in multiple price levels and I saw absolutely nothing wrong with the lowest level, so I saved a bunch of money. The color I chose is called Ubatuba. It’s basically black with gold and greenish gray speckles. It looks amazing with the cabinets.
This week, I needed to come up with my paint selections. The contractor I hired to do the insulation and drywall is also texturing the walls and painting for me. He’ll likely get started with that sometime next week. Right now, they’re still taping.
Although the painter will be using Sherman Williams paint and not the Behr paint shown here, he’ll match the colors from the chip I got at Home Depot. For a great online color tool, visit Behr’s Color Smart page. It’s a great way to see how colors work together and help you come up with eye-pleasing combinations.
My old house started out Navajo white through and through. It was mind-bogglingly dull, especially when paired with the off-white carpet and mellow peach colored tile. The first five or so years I lived there, I began repainting various rooms to add color. A friend helped. We used colors thinned out with glaze and applied with sponges or brushes. Some rooms came out great; others didn’t.
This time, I wanted to start with something other than white while keeping the color relatively bright. My new home has vaulted ceilings in every room, starting at about 10 feet high and going as high as 20 feet in the great room and my bedroom. Even the bathroom ceiling rises to at least 15 feet. There are lots of windows so the place is very bright. I like that. There’s nothing I hate more than living in a dark, closed-in space.
I toyed with the idea of using actual colors — green for the great room, rose for the bathroom, and possibly blue for the bedroom. I even bought paint samples to paint onto sheetrock pieces and hold in each room. But when I presented my samples to my friends at a get together the other night, the one they all liked best was the one I’d chosen first and then discarded: a color called Rye Bread. Even the painter liked it best — and he saw the painted out samples. When I put it with my cabinet and countertop sample, I agreed that it looked great.
But the real selling point was when a friend said that it would look great with red. The focal point of my living room area is a red leather sofa. I was sold.
The last color decision is flooring and I’m still working on that.


Two options currently in the running for the floor in my home: inexpensive TrafficMASTER “Handscraped Saratoga Hickory” and more costly Bruce “Mineral Wood”.
I’d like wood look floors and will likely go with a textured wood laminate for durability and cost effectiveness. The snap-together planks are easy enough to install that I can do it myself. Everyone I know who has installed a floor like this loves it.
As for color, my biggest worry is having a wood floor that clashes in color with my wood cabinets. This is a serious concern. At first, I wanted a light colored floor, but have since been considering darker colors — even black or near black. My friends agree that my rooms are big and bright enough to support a dark colored floor. One friend said she loved the idea of black but warned me that it shows dirt. I have a Roomba I plan to run daily, so dirt isn’t really a worry for me. What I need are some samples I can hold next to my cabinet sample. I see yet another round of floor store visits in my future.
Although I was planning to put the same floor in every room, “floating” floors like this are not compatible with my freestanding bathtub. That means I either have to put vinyl or tile in my bathroom. I’m not happy about that. Not only does it change the overall look I’m hoping to have in my home, but I don’t like the look of vinyl and hate working with tile. Unfortunately, that’s the room I need to do first — I have to get all my plumbing finished before I get my kitchen appliances installed — so I need to make up my mind quickly.
Any suggestions for me?
Although the actual construction of my home began in May 2014 and there were a few delays along the way, things are coming together quickly now. The insulation, drywall, and painting are a major step forward. It’s hard to believe that just two weeks ago I was looking at the same old framing I’d been looking at for months. Today, I’m looking at sheetrocked walls and, within two weeks, I’ll be looking at finished walls.
I’m already thinking about my first dinner party upstairs in my fully enclosed and heated space.
My home gets a cozy inside blanket.
My new home is a pole building. That’s a type of construction where heavy duty posts are anchored into the ground, a frame is built with horizontal girts, and the roof is constructed with trusses, glulam beams, and purlins. The whole thing is covered with a metal skin.

This photo shows the start of my shop roof installation. The white stuff is the insulation, which came in rolls with a vapor barrier on the other side.
I ordered my building with R-8 insulation in my shop and RV garage — that’s the big open area beside my car garage and living space. It’s minimum insulation, mostly to take the edge off winter cold and summer heat. The insulation in that area was placed between the girts/purlins and the metal skin. You can see it being installed in one photo; the other photo shows what it looks like on the inside.

This 12 x 12 corner of my shop area shows what the inside of that insulated space looks like.
The living space was not insulated, mostly because it required more insulation than what could be installed between the building’s frame and its skin. Instead, I’d have the insulation done as part of completing that space. The builders added a vapor barrier to the walls but left the ceiling bare.
Because I didn’t want the posts to show in my finished space, the framer built a house frame inside the building’s frame. This gave me a very generous area between the inside and outside walls. The roof sat on the purlins and glulam beams. I wanted the beams to show in my living room, kitchen, and bathroom; the ceiling would be attached to the purlins.
There was some confusion at first about how the roof would be insulated. Apparently, my construction isn’t anywhere near standard for a home. (Surprise, surprise.) It was finally decided that I’d get my total of R-38 insulation in the roof with an R-25 layer of insulating foam and R-13 batting beneath it. The walls would be R-21 batting and the floor would be R-30 batting, placed under the subfloor in the garage rafters.
Following all this so far?
Getting the foam insulation wasn’t a big deal. I called two contractors and got two bids. They were pretty close. In the end, I went with the company that included insulation for the pony wall between the roof of the RV garage and the roof of my living space. Although it wasn’t required to meet code, if the cost was the same, why not do it?

Here’s the foam insulation in progress. You can see the bare metal roof it adhered to.
They came on October 29 with a big truck that had a generator and sprayer in it. The covered my walls and floors and glulam beams with plastic. Then they covered up with paint suits and masks and went at it with their spray hoses.
I stayed out of the way. I did go up to take a peek at their progress when they took a break for lunch. I had no idea what I was looking at, but I took pictures for my scrapbook.
When they were done, they stripped off most of the plastic, leaving (at my request) the plastic between the living space and RV garage. This would later help me contain heat in various heated parts of my building — at least until the rest of the insulation went in.
A friend of mine stopped by to see it when they were finished. He said they’d done a terrible job. I called the guy who’d given me the quote and voiced concerns. He came over with a stiff metal wire marked with the thickness the foam was supposed to be. He climbed a ladder in various places to test it. Although it wasn’t even, even in the thinnest areas it met the requirements.
Of course, all that really mattered was what the inspector thought. He came by to take a look and was thrilled. He signed off and I was ready for the next step.
I should mention that the added benefit of the foam insulation is that it adhered tightly to my metal roof panels, thus adding strength to my roof.
Time passed. For a while, I sat on the fence about moving forward this winter with construction or waiting until spring. I decided in early December to move forward. That meant I needed insulation done.
I got handful of bids. One of them was for a company that could do the insulation, drywall, and painting of the entire place for just a bit more than another guy wanted for drywall only. I went with the all-in-one solution, knowing that it would make the process faster — no need to coordinate multiple contractors for tasks that could be done in quick succession. And because my walls were so thick and R-25 insulation cost the same as R-21, they’d put R-25 in the walls.
I scrambled to get my electrical rough-in done and inspected. And the plumbing rough-in gone and inspected. And fix a few things the county wanted done. January 15 was set as the start date.
Five minutes after the electrical inspector left that morning, he called me from his cell phone. “Were you expecting the insulation today?” he asked.
I confirmed that I was.
“Well, a truck and trailer filled with insulation has jack-knifed on your road.”
Long story short: despite the icy condition of the road I live on, the insulation guy, Bill, had decided to give it a go in 2-wheel-drive. That was the day he’d learn the valuable lesson I’d learned the year before: If you have 4-wheel-drive and have to drive in ice or snow, turn on 4-wheel-drive.
I climbed into my truck with my 10,000 pound tow strap, and headed out to find him and offer assistance. His Ford F-150 pickup truck was pointing away from my home and his trailer was off the road on about a 45° angle to it. Must have been some slide! There was no way the hitch could be undone. I drove around the inspector, who was apparently doing paperwork while he waited for the road to clear and managed to drive around the truck by straddling the ditch on one side. (No matter how much I dislike my big, ugly one-ton diesel pickup, I have to admit that it’s a real workhorse.) The inspector followed my tracks and got on his way. We transferred some of the bales of insulation to the back of my truck and Bill offloaded the rest from the trailer. Then, as I watched, he managed to get the truck and mostly empty trailer back on the road. I headed home at his urging, leaving him to reload the trailer and follow.
The only thing I regret is not getting a photo of his mishap. It was quite impressive.

Here’s Bill, stuffing insulation into the west wall of my bedroom.
He arrived an hour or so later. I was finishing up some electrical fixes with my electrician friend when he started offloading the insulation and stowing it in my garage and living space. Rather than lose him for another hour or more while he went to get lunch, I grilled up some chicken sausage and served it with a salad. I could tell he appreciated it.
A while later, his helper arrived and they got right to work. They managed to do a good portion of the space before calling it quits for the day. They did notice that they’d gotten the wrong width insulation for the ceiling — the purlins were 24 inches on center instead of 16. Bill made a phone call and, before leaving for the day, pulled all of the wrong R-13 insulation bundles aside.

Here’s a look through my kitchen, bathroom, and bedroom with the insulation in the north wall.

Here’s Bill on the manlift, installing the insulation in the garage ceiling beneath my bathroom. The outlet box and wires are for my garage door opener.
They came back the next day and continued working. Bill loaded up the wrong insulation and drove off to meet the delivery guy, returning a while later with the right stuff. They started work on the ceiling, using thin metal rods to hold the batting in place. When they were almost done upstairs, they went downstairs and got started on the garage ceiling — a task that required me to work with them to move the cars out and the boat aside. They used the manlift that the HVAC guys had kindly left behind for our use. I think that saved them a ton of time and effort — my garage ceiling is 10 feet up.
I had to do some work, too — we needed nailers above the garage doors. I spent some time on a ladder with cut 2 x 4s and my impact driver, getting it ready for the drywall.
The work continued on Monday. As the wall between the living space and RV garage filled in, my living space became noticeably warmer. The heater even shut itself off — it finally reached the desired temperature. At the same time, my RV garage and shop got cooler — no more heat from above!
On Tuesday morning, the drywall guys showed up. The inspector came by not long afterwards to look at the insulation and gave us a thumbs up to keep going.
We were ready for the next step: drywall.
Reflecting on goals and achievements.
I’ve been thinking a lot lately about where I am in my life.
Most of my thoughts these days center around my new home, still under construction. It was nearly three years ago, in the spring of 2012, that I first laid eyes on the land I’d later buy to build my home. Back then, I had an inkling of an idea — a simple summer home where I could escape Arizona’s heat with my helicopter parked onsite for my cherry season work. In those days, I had a man I thought was my life partner and I honestly thought I’d make that summer home with him. But things don’t always turn out the way you expect and I wound up moving forward on my own, rebuilding my life as I built my year-round home.
It’s that home that I’ve been thinking about most lately. What started as a vague idea moved on to a series of sketches that were fine-tuned along the way with input by friends and contractors with more experience than I had as a builder. Some suggestions were good and changed my plans; other suggestions did not meet my needs or ideas and were discarded.
Emotional and financial challenges delayed the purchase of the land to July 2013. More of the same delayed the start of construction to April 2014. But all the time I kept working my ideas and fine-tuning my plans. Even as the shell of my building started to go up in May 2014, I was fine-tuning floor plans for my living space and resizing my deck.

The shell of my home this past summer, before I brought the helicopter inside.
But what I find most amazing — and what I’ve been thinking most about recently — is how something that came out of my head materialized over time on my land. I drew the building I wanted and did all the ground work to line up the people to build it. They built exactly what I designed. And they said it was good — not because they built it but because it was something they liked, something they understood would meet a need. I didn’t compromise and it showed.
And it is good. It meets my needs entirely: a place to store the things I’ve accumulated and need to get my work done and enjoy my life. Yes, I do have three cars — but I use all of them and I’m thrilled to have them all under one roof. Yes, I do have a boat and a motorcycle and an RV — but I use all of them to stay active and enjoy time with friends or on the road and I love having them secure at my home. Yes, I do have a helicopter — but I use it to earn a living and you can’t imagine how happy I am to have it under my own roof.
Now, as I work with contractors and friends to finish my living space, I’m reminded over and over about how that inkling of an idea for a summer home germinated and grew into a structure of my design for a year-round residence. As I run wire in my kitchen, I think about the microwave or coffee maker that’ll plug into the outlet I placed exactly where I wanted it to be. As I order cabinets and countertops, I think of how I’ll store my plates and glasses and silverware and how I’ll prepare meals and chat with visitors at my breakfast bar. As I buy appliances and bathroom fixtures, I think about doing laundry and baking cookies and soaking in my tub in front of the big bathroom window. As I stand at the door to my deck and gaze out at the world around me, I think about the afternoons I’ll sit out on the deck with friends, sipping wine and chatting about life as we take in the magnificent view.

I shot this photo from my deck the other day, while I was running wires for the lights out there. How can a person not be happy with this out their window? (You can click it to zoom in and see the details of the river and orchards and snowcapped mountains.)
Yes, I’m still dreaming, but bit by bit those dreams are becoming a reality.
And it’s my hard work that is making this happen.
I spent nearly every day of the past two weeks up in my future living space, running wires to electrical outlets. My fingers are sore and my cuticles are cracked. I broke my toe by stubbing it, nearly broke a finger by crushing it with a twisting drill, and have cut myself more times than I care to count. I’ve gone to bed exhausted and have woken up stiff and sore.
To pay for the materials and the work provided by others, I’ve made numerous lifestyle sacrifices, the most significant of which is living in an RV since I left my Arizona home for good in May 2013. While my RV isn’t exactly uncomfortable, it isn’t nearly as comfortable as a rented apartment or house would be. But why pay $1,500 a month or more on rent when that money can be used to buy appliances or pay a plumber for my own home? And besides, I worry that getting too comfortable in a temporary home might take away the urgency I feel about getting my new home done.
The reward for my hard work and sacrifices is seeing my dreams come true.
I cannot express the immense feeling of satisfaction and joy I get when I look at my new home and remind myself that it came from me. I designed it, I did what it took to get it built, I made all the decisions and paid all the bills.
And that feeling of joy is pumped up every single time someone comes by and says “This is going to be a great place when it’s done.” Do you know how often I hear that? Almost every time someone comes up to visit or work on my place. Over and over — they all say the same thing. From the UPS delivery guy to the guy who runs the pole building construction company. Inspectors, plumbers, drywall guys — they all tell me how much they’d love to live at my place. Can you imagine how that makes me feel?
I know I got it right — but I have so many people confirming it.
And as weird as this might sound, I have to thank my wasband and his girlfriend for making this all possible. If it wasn’t for him pulling the plug on our marriage and her convincing him to make me an enemy by going after my business assets, I never would have had the freedom to finally move forward with my life. Years of stagnation, living half of every year in a rut he’d dug, waiting for the man I loved to get his head and life together and fulfill his promises to me finally ended. Although the ending wasn’t the way I would have chosen, I know now, in hindsight, that it was the best way. A clean break is the best break. No more grief, no more frustration.
And now I’m moving forward again, rebuilding my life as a better life, making my dreams happen.
I love where I am in my life: happy, healthy, free, surrounded by friends, living in a beautiful place. Seeing the results of my hard work materialize before my eyes.
What else is there?
The hard part is done. Finally.
As regular blog readers know, I decided to do all — or at least most — of the wiring in my new home. Although this might seem like a daunting task, it really isn’t a big deal once you get an idea of what you’re doing and gather together the right tools for the job.
 I learned 90% of what I needed to know from an electrical wiring book I bought last year, Ultimate Guide: Wiring, 7th Edition. This book explains the basics and has lots of wiring diagrams to help ensure that I get it right. I’m a visual person and can easily match what I see in the diagrams.
If you don’t know much about wiring, here’s the gist of it: Every home has a number of circuits, each of which runs to one or more devices such as outlets and light fixtures. Normally, circuits serve a certain area — for example, my bedroom’s outlets and ceiling fan/light has a circuit and my bathroom has another.
Each circuit has a specific amperage or strength of electric current; 15 amps and 20 amps are most common, although some circuits have 30 amps (such as my dryer and water heater), 50 amps (such as my range), and 60 amps (such as my heat pump/furnace). The type of wire you use depends on the amperage of the circuit. For example, a 15 amp circuit needs 14 gauge wire while a 20 amp circuit needs 12 gauge wire. (For wire gauge, the smaller the number, the thicker the wire.)
U.S. electrical code, which forms the basis of state electrical code, has certain requirements. For example, I’m required to have two 20 amp circuits in my kitchen for the outlets and they have to be GFCI-protected. The bathroom needs a dedicated 20 amp GCFI-protected circuit. There are a lot of little rules like that, some of which are obvious and some of which aren’t. The Wiring book I have covered most of what I needed to know; friends with experience wiring their own homes filled in the gaps.

Here I am, dressed for a typical day of work: Layers of clothes to keep warm, tool belt so all my tools are handy, and kneepads for working on the floor.
When a home is designed by an architect or engineer, the plans include a wiring diagram. In my situation, I didn’t have this luxury. I designed my home so I had the complete freedom to design the electrical system, too. But rather than sit down and make a written plan, I did it all on the fly. After all, I was also the electrician.
This seems to confuse some people. In fact, one of my Facebook friends advised me not to post so much about doing my electrical work because he said the local inspectors could find out.
News flash: the local inspectors know. In Washington state, you can get an electrical permit as an owner/builder. Although the inspectors hold you to the same standards as a regular electrician, you are permitted to do all the work yourself. In fact, you’re required to — you’re prohibited from paying a non-electrician to do the work for you. So although I could have a friend come by and help me run wire — which sometimes required two people to do — I could not pay that friend. (I don’t think a few beers or half a rack of ribs at the end of the day is considered payment.)
At first, I was at a loss on how to proceed. It’s very daunting when you have no experience and face what looks like a huge task. But a friend told me to simply indicate on the walls where I wanted outlets and lights to go. I could do this by writing on the studs or nailing in the blue boxes that hold device wiring. Then I’d connect the boxes with the appropriate type of wire for the circuit I needed to run. Finally, when I was done, I’d run a “home run” of wire from the first device on the circuit back to the circuit panel downstairs.
And this is pretty much what I did. I went through my home, one room at a time, and nailed in the boxes. Then I strung them together in logical groups and ran the home runs.

This is probably the most complex box in my setup. It has switches for three separate circuits: a three-way switch for the light over the entrance downstairs, two switches to control the wall sconces in the living room (three on each switch), and a three-way switch to control the light in the hallway. One circuit is 20 amps; the other two are 15 amps each.
Of course, I made lots of mistakes along the way. Most were silly mistakes, like running the wrong kind of wire or putting an outlet in a dumb place and having to move it. I got good at removing wire staples and those blue boxes. I can’t think of any serious mistakes — other than what the inspector found; more on that in a moment — but then again, maybe I’ve blocked them out of my mind.
I worked at a leisurely pace, doing it in my free time. I admit that I wasn’t very motivated. For a while, I didn’t expect to make the next big steps on my project — namely insulation and drywall — until late in the spring. And having no heat upstairs as winter arrived made it even less appealing to get the work done.
But in early December, I took advantage of Home Depot’s Black Friday appliance deal and bought all five appliances for my home: washer, dryer, dishwasher, range, and refrigerator. I put off delivery as long as I could — 90 days. And then, a week later, I finalized my kitchen design with the folks at Home Depot and ordered my cabinets. After Christmas, I ordered my countertops — yes, granite!
Sometime right after Thanksgiving, after getting some very good news from my divorce lawyer, I decided to forego my planned winter trip to California and Arizona — I don’t call my current home a “mobile mansion” for nothing — and, instead, finish up my new home as quickly as I could. I had the heat pump/furnace installed and dove into the electrical work I needed to do. (I also hired a plumber to do the rough in for my water lines and drains — I’m so glad I didn’t do that myself as I’d originally planned.) If you’re a regular reader, you may have seen my walk-through video, shot last week.
There were three difficult (for me) parts of the project that I needed help with:

I don’t think I could have run this heavy 6/3 wire from my kitchen island to my circuit panel in the garage ceiling without Pete’s help.
Running the home runs for my range, water heater, and dryer. These three circuits required extremely thick wire. Although I was able to come up with a good route and drill all the holes needed to bring the wires to the panel, I simply lacked the physical strength to get the wires through the holes on the last 20 or so feet of the run. Pete came to the rescue, stopping by after a day of snowboarding up at Mission Ridge. In less than an hour, we’d pulled the wires into place. He also volunteered to make a slight adjustment on one of my doors that he thinks might get sticky over time.
I also got help and moral support from other friends:

Mike’s most excellent (and powerful) angle drill. Yep, this is the one that nearly crushed my finger the other day.
Mike came by with a pizza one day and stuck around to help me run a few home runs from the kitchen area to the circuit panel. Mike is also the guy who loaned me his excellent angle drill. I can’t tell you how many times I used this drill — and how glad I was to hand it off to him at dinner yesterday.
I still can’t believe how many great friends I have here.
I also have to thank the folks at Dick’s Heating and Air Conditioning. Not only did they do a great — and unusual — install of my HVAC system’s heat pump/furnace, helping to warm the place, but they graciously left behind their man-lift. I drove that darn thing all over my garage, using it as a platform for drilling holes in the floor joists and running wires in them. It also came in handy to run a few of the home runs. The plumber made use of it to lay in the drains under my third garage pay. And I expect that both the insulation and drywall guys will use it on the big wall between my living space and RV garage. Don’t worry, Ken! I’ve been taking good care of it, keeping it warm, dry, and charged.
My electrical inspection was yesterday and I did a lot better than I expected. I’m not sure what the inspector liked more: the way Tom and I had set up the light fixture boxes for my deck or the Ken Burn Jazz CD music coming out of my shop’s stereo — he commented on both of them.
Of course, it wasn’t perfect. (Wouldn’t that be sweet! And amazing!) There were just three corrections needed, two of which required some wiring changes that I got done yesterday after the inspector left:
I figure that I can call today for a re-inspection and the inspector will come out on Friday to approve of my work. In the meantime, he approved me for insulation, meaning that I can get the place insulated but not drywalled. If he approves on Friday, I can drywall, too.

In this example from the box inside the door to my front deck I’m going to have three switches. On the left will be a three-way switch that controls the five lights on the north deck; the other switch will be in my bedroom by that door. In the middle will be the spotlights for the front deck, which I consider my “entertaining deck.” On the right will be the switch for the small light beside the door, which will offer a dimmer alternative to the spots. My deck will be an important part of my living space. Note the three bare round wires and three black power wires — one for each switch.
The insulation guys get to work on Thursday — yes, tomorrow! If I get the approvals I need, the drywall guys, who work for the same company, will come in right after them. The same company will texture and paint the walls and ceilings — not sure exactly when because I have a trip coming up.
The wiring is far from done. So far, only the hard part is done. My home is full of blue boxes nailed to the walls and ceilings with wires and green wire nuts sticking out of them. I have to go through and change all of those to outlets, switches, light fixtures, and ceiling fans. I don’t think they need to be inspected again, but who knows? I take things one step at a time.
Meanwhile, outside my circuit box is a bunch of wires just hanging out of the wall. Eventually, they need to be brought into the panel and attached to circuits. My friend Tom will help me do a few of those today so I can have power upstairs.

I ordered six of these wall sconces for my living room.
I’ve started buying light fixtures: flush-mount sconces for the living room, bathroom, and deck; ceiling fans for the living room and bedroom, track lights for the hallway and kitchen, hanging pendants for over my breakfast bar. They’ll go in when the drywall and painting is done.
The kitchen cabinets arrive February 16 and, with luck, can be installed that week. The appliances arrive at February month-end. Once they’re installed, the countertop people will come and measure for their template; I expect the countertop to be delivered and installed in March.
And then there’s the bathroom…
But now I’m looking too far ahead. I need to remember: one step at a time. It’s amazing how it all falls together when you can make it happen.
And yes, I’m enjoying this project immensely. It’s so rewarding to see something you dreamed up become a reality. It’s great to have a hand in the actual work and to be there for every step of the way.
Despite the occasional difficulties and hurdles, and despite the sore arms and fingers from pulling wire and working with wire nuts, it’s an experience I will cherish forever.