Construction: My Finished Kitchen

It’s been a long, ongoing project but it’s finally done.

On May 20, 2014, I began blogging about the construction of my new home in Malaga, WA. You can read all of these posts — and see the time-lapse movies that go with many them — by clicking the new home construction tag.

This morning, I put the finishing touches on my kitchen when I finally removed the paper backing from an adhesive light strip and stuck the over cabinet lighting to the cabinet tops. At this point, all the difficult work in the kitchen is done. There’s just some trim around the floor, which I’ll likely do next week some time.

I decided to sum up the entire project with pictures and links to related blog posts. When you buy a home that’s already finished, chances are you have no idea what went into building it. This blog post will give readers a pretty good idea of what’s “under the hood” in a kitchen and how I built mine. Although it’s been mostly done — and certainly in use — for the past eight months, it’s nice to take a look back and remember what I did, with the help of contractors and friends, to get where I am today.

The Long Road

Framed Kitchen Wall
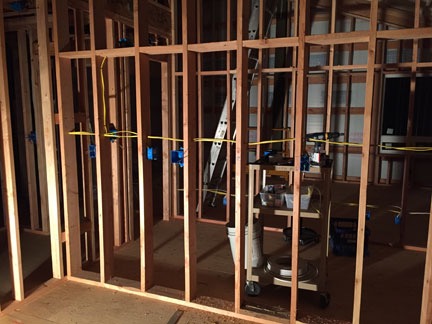
The back wall of my kitchen in December 2014. The framing was done and I’d just begun the wiring.

I started planning my kitchen well over a year ago. Back then, all I had was a framed out wall between the future kitchen and the bathroom behind it. I knew I wanted a galley kitchen with an island for the stove and breakfast bar. The framing was done in September and I didn’t wait long to take the next step.

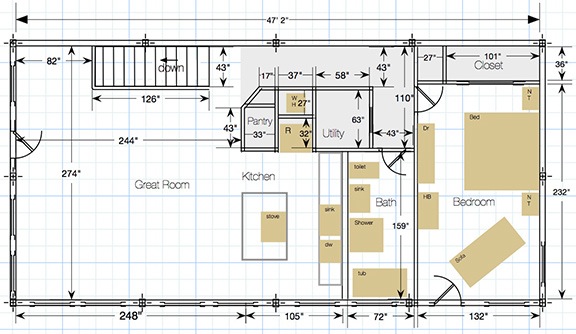
Final Floor Plan
Here’s the framing floor plan with wall widths taken into consideration.

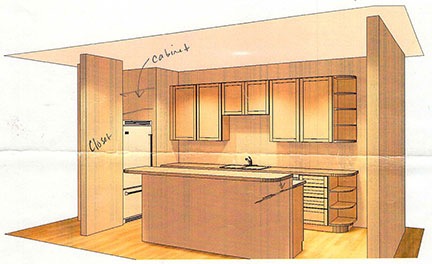
Kitchen Drawing
Here’s Home Depot’s first stab at my kitchen.

That next step was to talk to the folks at Home Depot and Lowes about kitchen cabinets and appliances. I go into some detail about that in a blog post about planning the kitchen. That’s also where you can read about getting quotes for cabinets and the things that were important to me that led me to finally place an order with Home Depot for Kraftmaid custom cabinets and granite countertops. And because I wanted my kitchen to be “perfect,” I also arranged for professional installation.

I actually ordered the appliances more than a week before I ordered the cabinets and countertops. I ordered them from Home Depot, too, taking advantage of their big “Black Friday” appliance sale to buy a Samsung Dishwasher, a Samsung Range, and a Whirlpool refrigerator, as well as a Samsung washer and dryer for my laundry room. Not long after placing the order, I realized that the refrigerator I’d ordered would be too wide for the space framed out for it; I had to change the order to buy a slightly narrower model.

Once the cabinet dimensions and layout were set in stone (so to speak), I could build the stub wall for the center island. I had a framer over to do a few other odd framing jobs, including the wall around the stairwell, which was open to the area below. I copied the way he did that wall to build the island’s stub wall. Then, after a lot of measuring — “measure twice, cut once” — I screwed it down into the floor, making the exact location where my center island cabinets, stove, and countertop would go.

I did the wiring for the whole place, including the kitchen. I was crazy about including outlets and placed the ones on the countertops three feet apart with alternating circuits. I added two more outlets on the island. I originally had the refrigerator on its own circuit, but electrical inspector said it had to be on the same as one of my 20 amp outlet circuits. Likewise, I had the over/under cabinet lighting outlet and switch on a 20 amp outlet circuit but the inspector said it had to be on a different circuit. So I wired it into the loft’s circuit. The same went for the exhaust fan, which they allowed me to put in the wall rather than the ceiling; I had to wire that into the living room circuit. When all that was done and the electrical inspector was satisfied, I got the okay to cover — that meant I could have them do the insulation and drywall work.

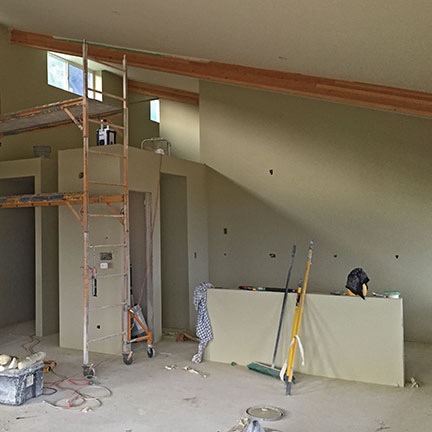
Kitchen Drywall
Here’s the kitchen with the drywall done and the painting almost done. The large opening is for the fridge and its cabinet; the small opening would be my pantry.

In January, a contractor began work on the insulation, drywall, and painting for my home. I think the task was a lot bigger than they had expected — especially the drywall for my 20-foot tall interior wall and vaulted ceilings. As the drywall was finished, each room — including my kitchen, of course, suddenly began feeling like a room. They’d put in the shell for my living space. I left for a trip to Arizona while they were still working on it, but when I returned in mid-February, I was thrilled to see mostly painted and ready for the next step.

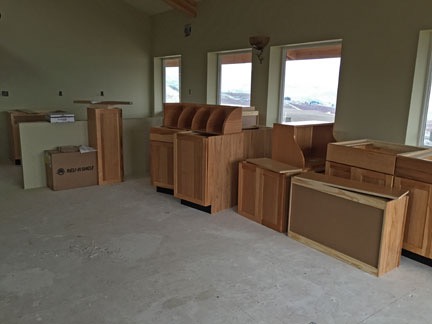
Delivered Cabinets
The cabinet installers unboxed and inspected each cabinet before bringing them upstairs.

Not a moment too soon! I got right to work on the electrical outlets and lighting. I needed the outlets done before the appliances would be delivered and I couldn’t get in the way of the cabinet installers, who were coming next. I wired a lot of outlets in a very short time. I took delivery of the cabinets the day before the installers came to measure again, unbox the cabinets, inspect them, and carry them upstairs.

Then it was off to California with the helicopter for frost season. I stayed a few days before returning home.

When I got back, the cabinet installers returned and got to work. They did most of the job in two days. There were some minor problems. Two cabinet doors needed to be replaced and the lower shelf unit was the wrong color. They ordered replacement parts and more trim.

Cabinets
Here’s how my kitchen looked by the end of the first day of cabinet installation work.

The appliances came a day or two later, on February 28 — the delivery date I’d specified three months before. (I really know how to cut things close.) I’d had just enough time over the previous day to prepare vinyl adhesive plank flooring for under the fridge, dishwasher, and stove. The rest of the floor would get Pergo and the manufacturer recommended that the appliances not be placed on top of “floating flooring.” The vinyl was practical, and didn’t look bad. It would be mostly covered anyway.

The appliance delivery went very smoothly. There was some confusion about the refrigerator two weeks later when I turned on the circuit it was plugged into — it wouldn’t work. But then I pulled it away from the wall and realized the installers hadn’t plugged it in all the way. Those darn tamper-resistant outlets!

Kitchen in Progress
With the appliances installed, it started looking like a kitchen.

The countertop guys came and took exact measurements based on the cabinet installation. It would be a while before they were back with the countertops. Before they left, they told me I’d need corbels to help support the weight of the granite over the void of the breakfast bar area. I went in search of an appropriately sized, relatively attractive solution and came up empty. So I found a company that made corbels and ordered four of them, placing a rush order so they’d be at my home on time.

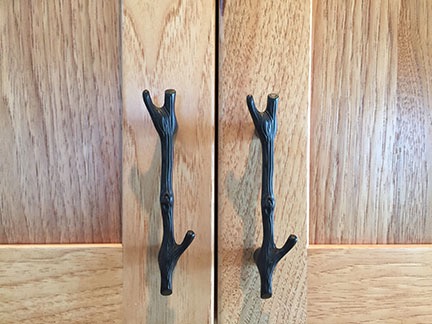
Cabinet Pulls
I wanted something unique and I found it — at Home Depot, if you can believe that.

Meanwhile, the cabinet guys came back and finished up their work on the cabinets. That included replacing the bad doors and off-color shelves, adding trim, and adjusting doors and drawers. They also installed all of the cabinet and drawer pulls. I’d chosen an unusual twig design available online through Home Depot. (The twig seemed to go well with the design of my great room sconce lighting, which features a sort of vine support.) They did a fine job, but they’d ultimately have to return one more time for some final adjustments. This is one of the best things about working with Home Depot; the contractors they send do the job right, no matter how many trips it takes. And there’s no surprise on pricing. (I wish I could say that about my drywall contractor.)

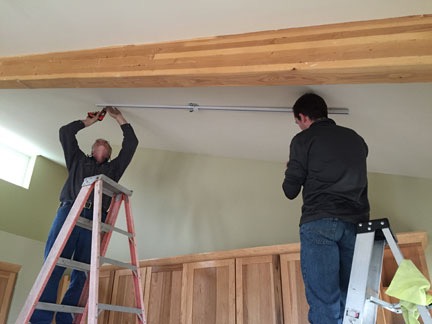
Track Lighting
Jim and Cy hung the track lighting. (I couldn’t do it on my own.) Their wives, Kriss and Alix, came along and a dinner party broke out.

Track Light Head
I chose these art glass light heads for the hallway and kitchen.

Some friends came by one evening to help me with the track lighting in the kitchen and hallway. I’d bought the tracks and 10 art glass light fixtures at Home Depot but was unable to hang them with just one pair of hands. The beauty of track lighting is that you can easily add, move, and point fixtures wherever light is needed. and with the right track heads, it doesn’t have look like a throwback from the 1970s. I thought I’d be helping Jim, but Cy stepped in and the two of them knocked off the job in no time at all. That cost me a smoked rib dinner and was so totally worth it (especially since it gave me an excuse to make and eat some ribs, too).

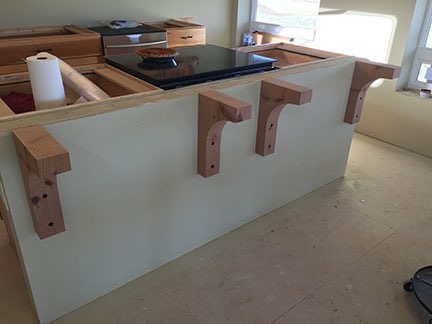
Corbels
Bob and I attached the corbels one Saturday or Sunday. I rewarded him with a fresh-baked quiche. By this point, I’d begun using my stove pretty regularly, although I still lived in my RV.

When the corbels for the breakfast bar support arrived, my friend Bob came with a set of forstner drill bits and helped me install them with special screws I’d bought at Home Depot. Each screw is inset; one of these days, I’ll cover the holes with wood buttons.

The countertops came next.I felt sorry for the guys who had to carry those huge granite slabs up the stairs. They did a great job in only a few hours, handling the installation of my under-counter composite granite sink as part of the job. I was thrilled that the 4 x 8 island came in one piece; the 12-foot main countertop was split in two at the sink but the seam is barely visible. I should mention here that I’d decided early on to keep the island at just one level rather than raise the breakfast side. This gives me a huge surface for food preparation.

Finished Countertops
At this point kitchen was at least 90% done. You can see in this shot that only one of my three hanging pendant lights have been hung.

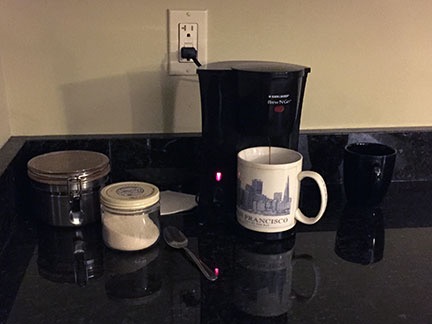
First Cup of Coffee
First cup of coffee in my new kitchen.

On March 28, 2015 I moved my coffee maker upstairs and made coffee in my new home for the first time. While that might not sound like much, it was a huge deal for me.

Almost Done Floor
I almost got the floor done in time for my kitchen unpacking get-together with friends.

Meanwhile, I’d been working hard on the Pergo floor, starting at the east end of the room and working my way toward the kitchen. I had planned a get-together with some of my girlfriends to unpack my kitchen boxes and I really wanted the floor done before they arrived. Unfortunately, I came up just shy of being finished. But we unpacked the boxes anyway and I put most of the things I’d packed two years before in Arizona. It was great being able to use my Calphalon pots and pans and Mikasa dinnerware again after two years of cheap Silverstone and Corelle in the RV.

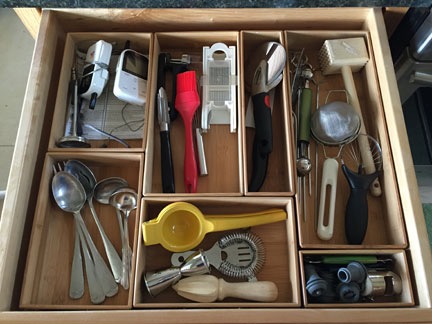
Drawer Organizer
I love keeping kitchen drawer contents neatly organized and these bamboo dividers were perfect for the job.

I bought bamboo drawer organizers at the local Bed Bath and Beyond to organize silverware and kitchen gadgets in the drawers. I really like being able to keep the drawers organized and prevent gadgets from shifting around when I open and close the drawers.

I did a few more trips to California for frost work. I was enjoying the ability to commute down there when needed so I could spend the rest of my time working on my home.

Dishwasher
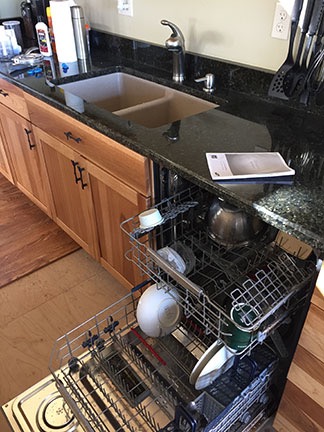
My dishwasher, right after installation.

The plumbers came back at March month-end to finish all the plumbing work. That included hooking up the sink and dishwasher. I celebrated by loading the dishwasher. That night, I slept in my new home for the first time.

I installed my over-cabinet lighting. I’d bought two adhesive LED lighting kits — one for over the cabinets and one for under the cabinets. Since the over-the-cabinet lighting was a straight run, I ran the tape, fastened it down temporarily with masking tape, and plugged it in. It was great indirect lighting. But I put off installing the under cabinet lighting since it would take three separate runs and I hadn’t quite figured out how I’d do it.

Wine Fridge in Closet
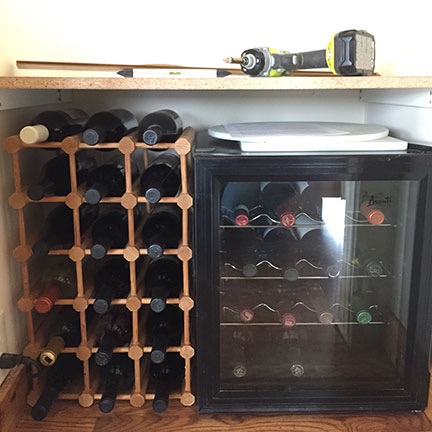
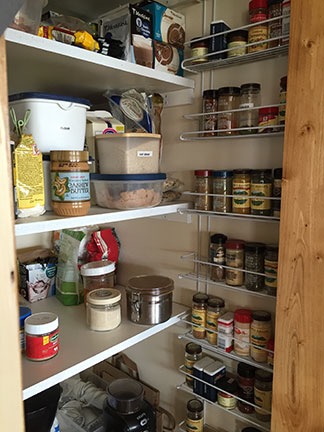
I have my priorities straight; I built my pantry shelving to accommodate my wine fridge.

I built shelves in the pantry out of white Melamine board. (I detest those crappy white wire shelves you can buy in kits.) That gave me plenty of space to store food and countertop appliances. (I’d already decided that this kitchen would not have cluttered countertops.) I’d put an outlet in the pantry specifically for my wine fridge, so I designed the lowest shelf high enough to fit the wine fridge under it. (The wine rack shown beside the fridge in this photo was subsequently moved out of the pantry and into a dedicated “bar” area I set up months later.)

I bought three bar stools designed for countertop height surfaces. Although a lot of my friends had been telling me to buy comfortable stools with cushions and backs, I decided to go with a simpler and cheaper solution until I could find the “right” stools. But after using them for the past eight months, I’ve decided that they are the right stools for me. No need to get super comfortable at the breakfast bar; I have a dining room table and sofa in the same room. These are light, easy to move around, and they stack when I set my Roomba loose to vacuum for me.

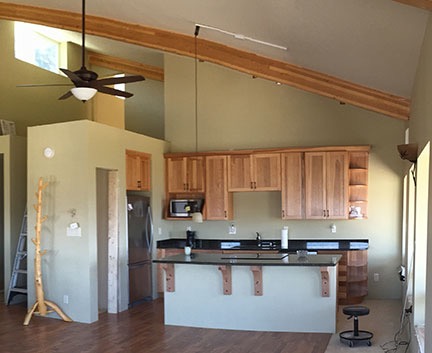
I finally finished the floor, although I didn’t even start doing the trim. That’s when I felt ready to share a progress report on my blog. On April 7, I posted my first kitchen video tour.

Kitchen on April 7, 2015
Here’s what my kitchen looked like on April 7, 2015. I made a video that day to show it off.

After that, it was mostly trim and finish that needed to be done. I worked on it between more trips to California, including one in late April to retrieve my helicopter, and a lot of work I had begun doing outside in my garden and on my deck.

Pendant Lighting
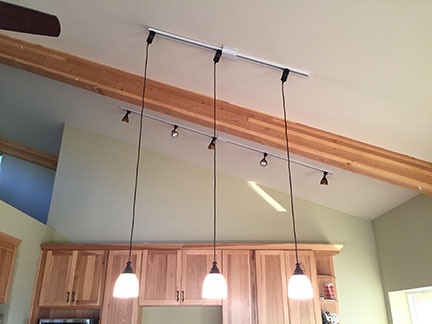
I finally hung the pendant lighting with a friend in mid April.

Another friend helped me hang the three pendant lights over the breakfast bar. I’d hung one with Jim and Cy but had to wait until two more like it were in stock at Home Depot.The trick was getting them lined up when the ceiling they hung from sloped. The job was nearly impossible with one person but relatively quick and easy with two.

I hung a painting by a friend that happened to fit perfectly in the area over my sink. I later replaced it with a very large clock. I also moved the utensil rack I’d hung under one cabinet to the other side of the sink and packed up my canisters for sale on Craig’s List.

Spice Shelves
These spice shelves fit nicely onto one wall of my pantry.

I added spice shelves to one wall of my pantry so I can keep all my spices handy and organized. I find that it’s a lot easier to put things away when they have a specific place — and a lot easier to find them when you need them. I blogged about some of the organization features I’ve incorporated into my new home.

Kitchen Window Sill
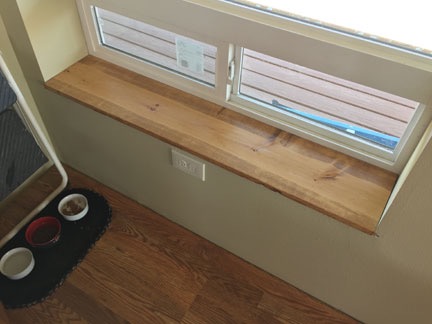
My kitchen windowsill was one of the first I installed.

I installed a windowsill on the kitchen window. That window would see a parade of radios ranging from a small boom box to a big boom box to a small iHome — all of which I already had. (I might not watch much TV, but the radio is nearly always on here.) I’ve recently gotten some cedar planking with bark edges to replace all my windowsills, but I suspect I’ll tackle that huge project in the summer months.

Pantry Door
The pantry doorway got a curtain instead of a door.

I trimmed out the doorway for the pantry when I realized that I just wasn’t interested in spending a lot of money on a custom door for its narrow doorway. I used a spring rod and a curtain to close off the area. That was probably the best solution, considering that my wine fridge generated a bit of heat; a door would have turned that space into a warm room. The curtain introduces leaves to the design, which, of course, goes great with the twigs.

I didn’t do much over the summer. I was busy with life and doing things outdoors. The kitchen was nearly done and was in full use. I don’t have any pictures of newly completed tasks — just lots of pictures of food, especially baked goods.

Last week I got back to work on the kitchen. I unpacked the silk plants and baskets I’d had over the cabinets in my Arizona kitchen and put some of them in place over my kitchen cabinets. Although the jury is still out among my Facebook friends, I like the way they add depth to the otherwise empty space up there.

Fire Extinguisher
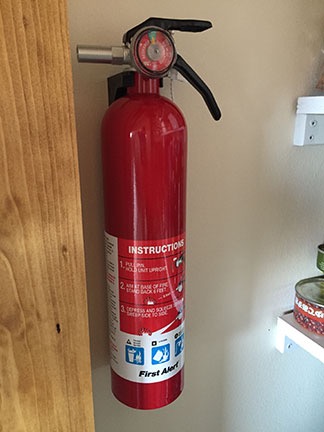
Here’s something I hope I never have to use.

I also bought and installed a good-sized fire extinguisher inside the pantry door. I have one downstairs in the RV garage, but I thought it was a good idea to have one handy in the kitchen, too.

The Finishing Touch

I considered my kitchen “finished” the other day when I finally installed the under-cabinet lighting.

I honestly don’t know why I put it off so long. All I needed to do was figure out how to run the light tape under the cabinets and buy some 20 gauge wire and electrical connectors. Once I had the parts I needed, I had to cut the tape, temporarily put it in place with masking tape, and run that 20 gauge wire between the cabinets. That turned out to be the hardest part; one of the cabinet pairs had a very tight fit. Then I connected everything together, plugged in the power supply, and flipped the switch.

And there was light!

I was glad I’d used masking tape for a temporary mount. I’d placed the light strip on the bottom of the cabinets, facing down. As a result, when they were turned on, they reflected in my absurdly shiny granite countertops. I didn’t want to see those tiny points of light, even as reflections. So I mounted the lights on the bottom trim of the cabinets, facing the wall. Much better.

I then climbed on top of the countertops, dusted off the top of the cabinets, and used the tape’s adhesive backing to permanently secure the over-cabinet lighting to the top of the cabinets. I rearranged the silk plants and baskets, climbed down, and flipped on all the switches to admire my handiwork.

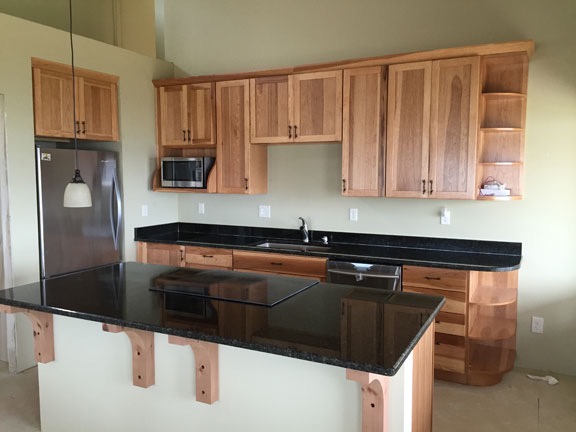
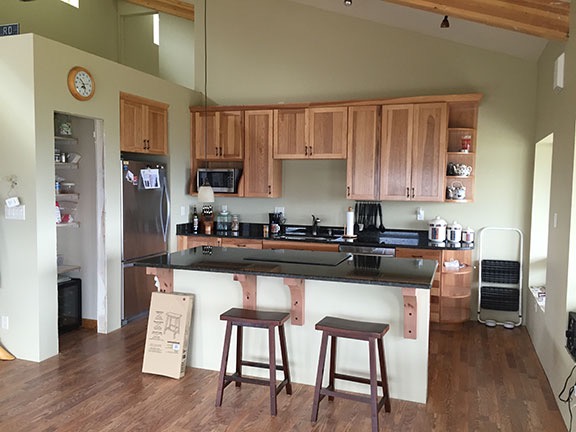
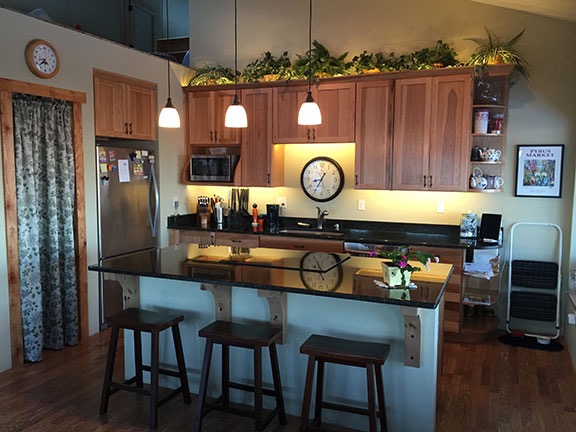
My Finished Kitchen
Shot before dawn on a cloudy day, this photo shows my kitchen with all lights turned on. Can you believe how reflective my countertops and stovetop are?

I should mention here that when I wired the kitchen for this lighting, I placed a 2-socket outlet over the top cabinets and wired each outlet to a separate switch beneath the top cabinets. Doing this made it possible to use two separate power supplies and turn on each light string independent of the other. So I could have upper lights on, lower lights on, or both sets of lights on. The power supplies are hidden in plain sight eight feet off the ground, behind the upper cabinet trim and under the silk plants.

I’ll do another video tour one of these days. I actually shot one but didn’t like the way it turned out.

Practical Use: The Verdict

No blog post about a finished kitchen would be complete without a quick summary of how practical it is. Remember, I designed this whole thing, from its size and the placement of walls, to the selection and location of cabinets, appliances, and countertops.

I’m not a kid anymore and I’ve lived in enough homes with kitchens to know what works and what doesn’t work. While many people seem satisfied to hand over kitchen design to an architect or kitchen planner, I wasn’t that interested in their ideas of what would work. So I take full responsibility for everything that’s in my kitchen today.

For the most part, I got it right. The placement of the refrigerator, sink, and stove is in the classic triangle that most kitchen designers recommend. I set up the kitchen so that the left side was for food prep and the right side was for serving. So everything I need to make a meal is on the left and everything I need to serve a meal is on the right. With access around both sides of the island, I can be cooking while a companion sets the table. Or fetches himself a glass and something to drink.

In late June, when I started dating a guy who liked to cook, I was very pleased to see that my kitchen was spacious enough for two without getting in each other’s way. Plenty of room to get past each other behind the island, too.

With counter space right by the open refrigerator door, there’s always someplace to put the items going into or coming out of the refrigerator. The trash is also nearby, making it easy to clean out the fridge when something in there is looking funky.

Dishwasher next to the sink is a no-brainer, of course. I put it on the right side mostly because my dishes are stored on the right side. But it’s also the location of the dishwasher in my last four homes. Maybe that’s standard?

I didn’t get a disposal for the sink and I halfway regret that. I can always add it; there’s a free outlet under the sink just for that purpose. I do a lot of composting and feed salad scraps to my chickens, so I don’t really need it. It does come in handy, however, when rinsing plates after a meal. Like I said, I can always add it later.

Although I thought I’d be using my countertop appliances — think Instant Pot, mixer, food processor, blender, bread machine, ice cream maker, dehydrator, vacuum sealer, toaster — on my main countertop, it turns out that the island countertop makes a much better surface. It’s right next to the pantry where most of these items are stored, so it’s very convenient for the heavier appliances, such as my mixer. Using the appliances there also keeps the rest of my countertop clear for other use, such as staging food to be prepped or stored.

The island has also become the go-to place for meals either alone or with one or two friends. I sit there with my morning coffee and journal, gazing out the window as I plan my day. Friends sit there to keep me company while I cook or clean up after a meal.

So I definitely got the island right, even if it was by accident.

Storage is good, too — although I honestly wish I could have made the pantry larger. I have plenty of room for my pots, pans, plates, utensils, and gadgets. I love the fact that there are no food items in any cabinet — everything edible is either in the refrigerator or the pantry. The pantry can fit all of the food on hand and most — but not all — of my countertop appliances. I store the appliances I use least — my bread machine and ice cream maker — downstairs on shelves in my shop area. I might set up some new shelves just inside the RV garage door for these items — I’m getting an upright freezer next week for that area and shelves beside it might be a good idea to keep these things handy. We’ll see.

So other than wishing the pantry could be larger — which is not possible at this point — and not having a disposal in the sink — which can be added later — I’m very pleased with the way the kitchen turned out. It might be small, but it’s extremely functional and easy to use.

Certainly something to be proud of.

The New Chicken Coop

Third time is the charm?

I like having chickens. There’s nothing quite like fresh eggs laid by chickens in your own yard. Chickens that get to walk around all day and eat bugs and scrap veggies. Chickens that you feed and talk to and watch. I had chickens for much of the time that I lived in Arizona and really enjoyed not only the eggs, but the experience.

So it made sense that I should have chickens here at my new home. I got them as chicks in April 2014 and waited five months for them to start laying eggs. I started with eight of them, lost two early on, and lost a third when I got my rooster.

The First Chicken Yard and Coop

When the chicks grew to a size where they were ready for a chicken yard, my friend Mike and I built one out of 6-foot T-posts and 5-foot horse fencing. I blogged about the whole prep thing here.

A few weeks later, I built a coop — a building with roosting and nesting areas — for the chickens. I go into a lot of detail about that process here.

Chicken Coop
The finished chicken coop.

The coop was ugly, but the chickens didn’t seem to care. They roosted and nested and made eggs. I never did get around to putting shingles or any kind of protective material on the roof. It was just painted an ugly dark green and nearly flat so water soaked into it when it rained or snowed.
Meanwhile, the chicken yard was functional — it kept the chickens safe — but to keep out birds of prey I had to run bird netting over the top. I’m 5’6″ tall. The bird netting dipped down below 5 feet. Needless to say, going into the chicken yard was a bit of a nuisance. And since that’s where the eggs were, I had to go in daily to collect them.

The Second Chicken Yard

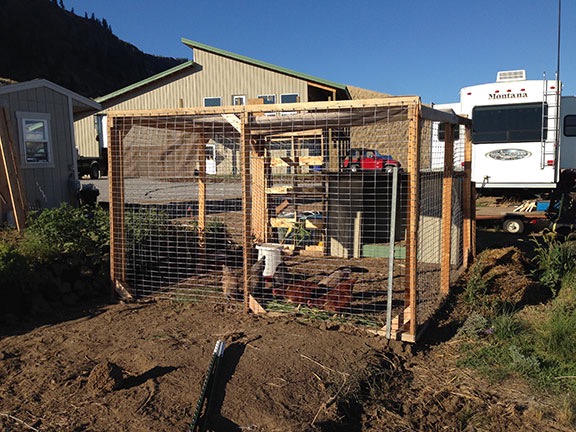
A friend of mine was creating much nicer chicken yards by building a frame and then fastening chicken wire on it. I had some 20-foot long palette wood that my building’s metal sheets had arrived on. In September, I cut them in half and, with some 6-foot 2x4s, built three frames. I used the same horse fencing inside each frame, running it vertically in 5×6 sections. Then, with the help of a friend and his mom, I assembled the three walls in place of the existing yard fencing with the coop on the outside of the yard. I built a door, added bird netting and some shade fabric I’d brought from Arizona on top, and had a new chicken yard. One I could stand up straight in.

Chicken Yard 2
Here’s the second chicken yard. The coop is outside the yard but the opening is inside. It didn’t look bad right after I built it.

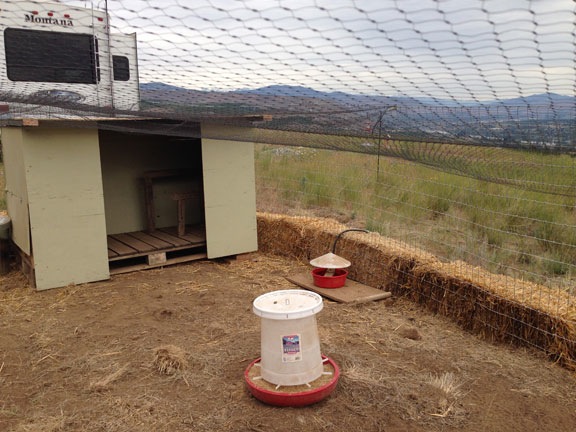
As winter approached, I worried about my chickens keeping warm. Their coop’s doorway was very large and wouldn’t offer much shelter from a wind coming out of the east. If it snowed, their food would get wet and there wouldn’t be any place for them to walk without snow. I put some metal panels leftover from my building on top. This protected them and gave them shelter from rain. I fastened wood and metal panels around the north side and stacked up hay bales on the east. It was functional and the chickens seemed to be fine all winter, but by spring I couldn’t deny one simple fact: from the road, it looked trashy. And if there’s one word I don’t want applied to my property, it’s “trashy.”

Trashy Coop
My chicken setup looked trashy — there’s no other way to describe it.

The Hoop Yard

My next door neighbor, Michelle, got chickens in the spring. She built a chicken yard out of “hog panel” fencing hooped up and over into a rounded top. It looked great. Although she started out with a large coop inside the hoop, she later cut the coop in half and positioned it on one end of the yard, giving the chickens a lot more room inside and making it possible for her to walk around in there when she needed to. I started thinking about doing the same thing. But I’d also need a new coop; the nest boxes and perches in the one I’d originally built were falling apart.

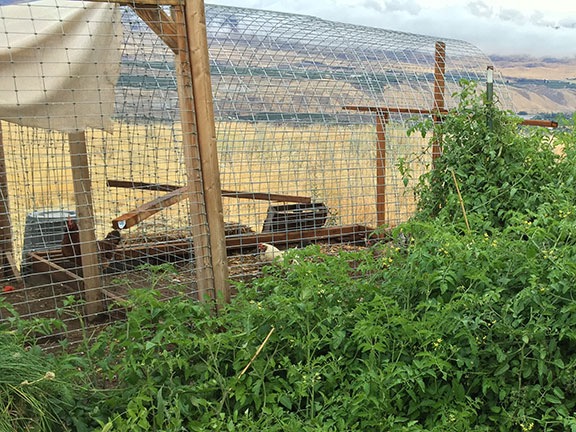
Over the next few months, I bought some panels and started to plan. I was busy with other things — mostly finishing up my home — and it was brutally hot for most of the summer so I really didn’t want to work outside. But about four months ago, I got to work on the new yard, extending the chickens’ existing yard another 10 feet out the back side with the hoops. I liked the way the frameless design made the extended yard blend into the scenery. But it was too hot and I was too busy with other things to finish the job so I put it on the back burner.

Chicken Yard Extension
I added two 16 x 5 foot hog panels, hooped and fastened at the bottom between two 2x4s. This design is framed at the bottom and ends so it really blends into the scenery.

The New Coop

Getting Started
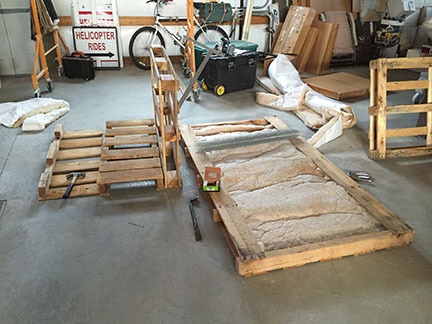
The entire coop is built on a series of pallets.

Nest Box
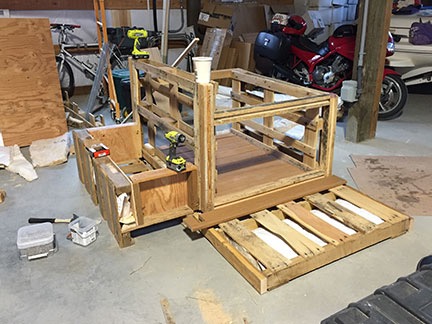
The coop begins to take shape with a roosting area, nest boxes, and porch.

Progress
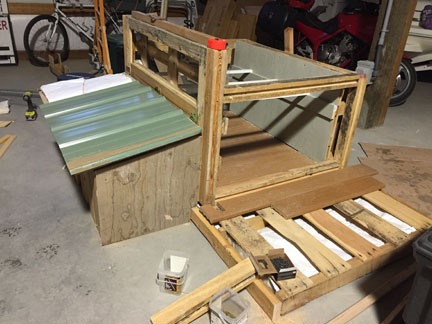
The nest box roof is on a hinge so I can lift it up from outside to gather eggs.

Here’s the video I shot of the kittens playing in the coop I built.

Wheels
I added wheels to move it. The back wheels in this shot are my helicopter’s ground handling wheels which worked out okay on concrete but probably wouldn’t cut it on gravel.

About a month ago, I started making the new coop. I decided to build it with scrap material and to design it so it resembled my building. I’d even use the same metal for the walls and roof.
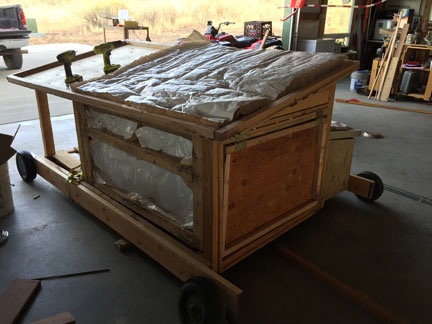
I had a lot of building materials, including lots of pallets in really good condition, lumber in all lengths and sizes, insulation leftover from my RV garage, Pergo flooring leftover from my home, Trex-style decking, leftover from my deck, and metal panels leftover from my building’s skin. Not only would I build a solid structure, but I’d insulate it to keep the chickens warm in winter and have a removable panel for ventilation in summer.
I got to work on the RV garage floor. I worked on it for a few hours a few times a week. Slowly but surely, it began to take shape.

At the same time, I was raising three kittens as a foster home for them and their mom. As the kittens grew and become more adventurous, they started playing in the coop as I worked on it. I captured some video one day. They’re gone now — a friend of mine adopted the whole family as barn cats — but they sure were cute.

At some point, I realized that the thing I was building weighed a ton. Well, not literally a ton, but a lot. A lot more than I could lift. I started thinking about how I was going to get it out of the garage and into place on the other side of my gravel driveway. My RV was parked out there at the time and that really restricted how much space I had to maneuver in.

I started by buying wheels for it and fastening some scrap 2×6 lumber to mount the wheels on. The hardest part was getting the damn thing off the ground so I could put the wheels on. I had to use my winch, mounted in my pickup truck’s bed. That made it possible to move it to the front of the garage. I got it to the point where the only thing left was to put on the metal skin and Trex porch floor. That would probably add another 50 pounds of weight — better to do that when it was in position. But I wasn’t ready to bring it outside yet. I still had work to do in the yard.

Putting It All Together

It’s all about the challenge

Over the past three years, I’ve done more new and difficult things than I’d ever had in my life. From wiring my home to moving heavy things by myself to laying down my floor and deck — it’s been one challenge after another.

I’ve found that I really enjoy the challenges I face getting my home set up the way I want it. Each difficult task is a puzzle that requires serious thought, planning, knowledge, skills, tools, or a combination of these things. But what it requires most is patience.

In the old days, I used to get frustrated when a task didn’t go as easily as I’d hoped. That feeling of frustration was magnified if I tried to do something with my wasband and he got all pissed off when it didn’t go smoothly.

But now I don’t get frustrated at all. I just plan ahead, make sure I have everything I need to get the job done, and go to it slowly and carefully. It’s perseverance that makes it all come together in the end.

And when a difficult job is done, I get a huge feeling of satisfaction knowing that I did it all myself.

I had a party last week. A little get-together with friends and neighbors to show off my home and sit around the fire pit on what could be the last warm night of autumn. I showed off the chicken coop as part of the tour — everyone wants to see my garage. My friend Alyse said I should get everyone there to help me drag the coop out. But it was dark and I was tired of getting visitors to help me with the few tasks I couldn’t do on my own. Besides, I was almost looking forward to the challenge of getting it out there on my own.

Before I could get the coop into position, I had to disassemble the old chicken yard and add one last hog panel hoop. That was the big job. I tackled it on Tuesday, the only day this week forecasted to have good weather all day.

I started by pushing the coop out onto my concrete driveway apron. By this time, I’d replaced the wheels in the back with another set I’d bought. I didn’t want to spend a lot on them because they were temporary and they turned out to be pretty cheesy. But they worked, so I’m not complaining.

Coop on Driveway
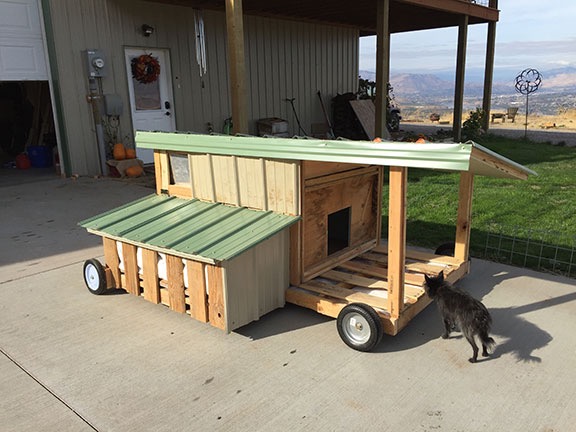
Penny inspected the chicken coop once I got it out on the driveway. I had to move it about 80 feet on gravel to get it into position — and none of the wheels steered.

Then I got to work on deconstruction. I set up my GoPro and did a time-lapse. It’s kind of funny to watch, especially once the chickens get loose. I started by removing the panels I’d put in the top of the yard and then disassembling the panels. I didn’t want to spend time removing the wire fencing; I figured I’d do that later. I used my ATV to drag away anything too heavy to lift. (It’s a 600cc Yamaha Grizzly that I bought new in 1999 and it’s up to any task.) Once the panels were all out of the way, I added a third hoop and used wire-ties to fasten it to the one beside it. I completed the bottom frame so the entire yard was free-standing and quite sturdy.

Next I had to move the coop into position. None of the wheels steered so I had to roll it in one direction, then use the ATV to pull the front wheels one way or the other on the gravel, and then roll it again. The whole time, I was worried that one of the wheels would pop off. The rear wheels, which were not nearly as good as the ones I’d bought for the front, were really taking a beating. I had to reposition the ATV and the strap I was using to pull with quite a few times. It was slow-going but I wasn’t in a rush. It was important to get it into position before nightfall so the chickens would have a place to sleep.


Here’s the video. I tried to keep the chickens penned up, but they kept getting out. In the end, I just gave up.

Coop in Place

Coop in Place

Coop in Place
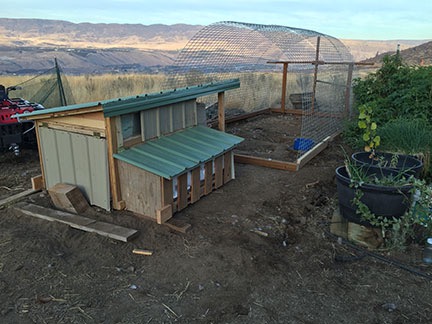
Three views of the chicken coop as I left it on Tuesday evening.

Once I had the coop in place, I removed the wheels and set them aside. I’ll store them for use on another project. If there’s one thing I’ve learned over the past three years, it’s that wheels make it a lot easier to move things.

I did a little work with chicken wire to fence in the far side of the porch. I also laid in most of the porch floor. But I didn’t have enough pressure-treated lumber to get the end framing and yard door done.

By that time, it was about 5 PM and I was completely exhausted. There was no way I’d be able to get the chickens in the yard and keep them there without a door. So I let them be. They wound up spending the night in their old coop. One of them even laid an egg in there.

Finishing Up

On Wednesday, it was cold and kind of nasty. I spent half a day writing blog posts while I waited for an inspector. I spent some time disassembling the old coop so the chickens couldn’t spend the night in it. When the inspector left, I ran out to do some errands. When I got back, the irrigation guy arrived to fix the water line, which had burst because of my outrageously high water pressure. While he worked on that, I set up my weather station. Then it started raining. Hard. That day was shot.

On Thursday, I went for a hike up in Leavenworth, ran a few errands on my way home — including getting the lumber I needed — and then went out again to help some friends with a catering job. It was dark when I got home, so that day was shot.

The chickens, during all this time, were free-range, scratching around the garden and under the bushes and in their new chicken yard. One of them started laying eggs under a sagebrush beside the driveway. At night, they went into their new coop. The first night they were in there, the rooster slept in the doorway with his head sticking out. I have no idea what that was all about.

On Friday afternoon, I was ready to finish up. My main goal was to get the yard fully enclosed so that the chickens could be secured. I framed out the doorway beside the coop. I closed the other side of the porch with chicken wire. And then I went inside to build the door. The old door had been a pallet and it was misshapen and falling apart. I wanted the new door to be sturdy and a perfect fit. I cut some of the wire fencing from the old chicken yard and nailed it into the door. But by that time it was raining and getting dark and I’d had enough for the day. I coaxed the chickens into their yard and used a scrap piece of plywood to close it up.

On Saturday, I did the job I’d been dreading: putting the metal sides on. Why did I dread it? Because I had to cut the metal. Corrugated metal is a real bitch to cut. After trying several methods, I’ve finally found one that works for me: a metal cutting blade in my jigsaw. The only drawback is that cutting it makes a gawdawful noise. Fortunately, I bought a set of ANC ear protectors. I pretty much wore them all day on Saturday.

Bit by bit, I got the metal cut. It was an odd day with a lot of moisture in the air and a series of rainbows, one after the other, appeared to the northwest and north throughout the day.

Rainbow
I don’t think I’ve ever seen so many rainbows in one day. And yeah, this one is a double.

I screwed each piece into place, feeling myself getting closer and closer to being done. Finally, the last piece was in place. I was done.

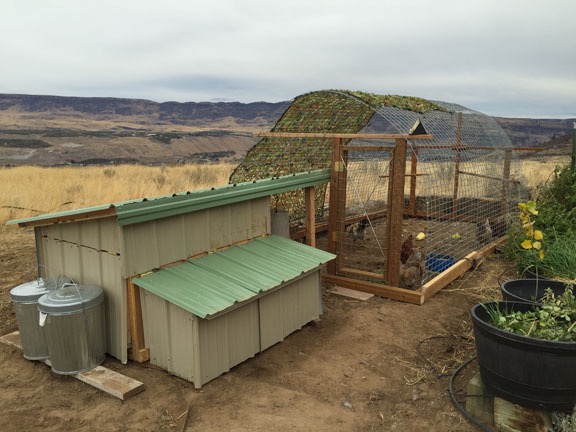
Finished Coop
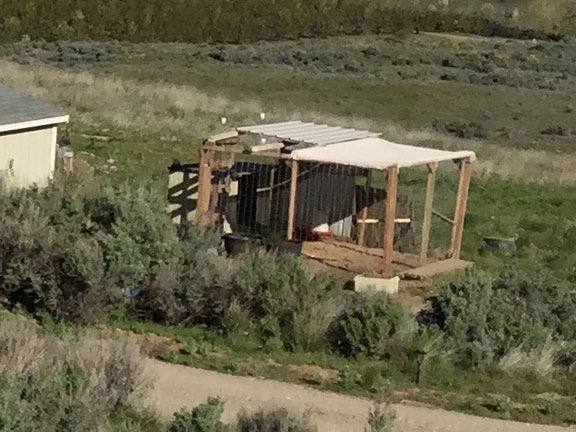
Here’s how the coop looked when I finished up on Saturday. I draped some camouflage netting over one side to help provide some protection from the wind.

Or at least done enough for now. I’m still thinking of painting the exposed wood. But not this week.

The finished yard is 8 x 15 feet and tall enough for me to walk inside standing straight up. The eggs are accessible from the outside. The chicken’s food is under the porch roof where it’ll stay dry. There are enough perches inside for all six chickens — and hopefully for a few more next spring. The coop is solid, insulated, and protected from the elements.

I think I’d call this a win. It only took me three tries to get it right.

My New Weather Station

Getting the hyper-local weather information I crave.

I’ve always been interested in weather. Yes, I’m the kind of person who’d leave The Weather Channel on all day as background noise — in the days when they actually broadcast live weather information all day. And always know the most up-to-date weather sources. And have multiple weather apps on my mobile devices so I could check one against the other.

My Thirst for Weather Data

Not long after moving into my Arizona home in the late 1990s, I bought a solar powered wireless weather station. My future wasband mounted it on the roof of the shed near the horse corral and it beamed back weather information to a panel at my desk. For a while, I had it connected to a Windows PC I had — the software wasn’t Mac compatible in those days — and put live weather information on a Wickenburg website I ran. In 2003, when I got the fuel manager contract at Wickenburg airport, we moved the weather station there — it was far more reliable than the ancient setup in use. (Wickenburg now — finally — has an AWOS.) When I sold the contract, I included the weather station among the assets of the business. For all I know, it’s still there.

Although I didn’t miss the weather station much as life dragged on in Wickenburg, I definitely wished I had weather stations in Washington where I spent my summers starting in 2008. I get seriously tuned into the weather during cherry season, checking radar throughout the day and always knowing the forecast — from multiple sources — for the next three days. I dreamed of having portable, Internet-connected weather stations with accurate rain gauges and webcams so I could place them at each orchard when it was under contract. You see, I fly when it rains and knowing exactly when and how hard it was raining would benefit not only me, but also my clients. Trouble is, orchards aren’t usually in places where Internet access is available and the cost of a 3G/4G/LTE connection for each station was prohibitive.

Fast-forward to the late summer of 2013. I moved to a 10-acre lot I’d bought at the base of the basalt cliffs in Malaga, WA — a place I like to call Malaga Heights. From my aerie, I could see the weather coming and going from the southwest to northeast. With a new home base, I started thinking seriously about a weather station again.

Weather Station Options

Technology had moved forward in the ten years since I last owned a weather station. The main thing I wanted was the ability to monitor weather from anywhere in the world on my cell phone. I had some practical applications for this, but it was mostly just a desire to get hyperlocal weather information, live, anytime, from anywhere.

I did some research. I discovered that weather stations fell into four categories:

  • Basic home weather stations. These are the ones that put a panel in your house and one or more sensors outside that can broadcast data to the panel. I already had one of these — heck, I’ve had these forever. In 2013, when I was still living in my RV, it became extremely valuable for me to monitor temperatures during the winter at my water source and RV basement. But systems like these are extremely limited, not only in range but also in the available instruments. It’s usually just temperature, humidity, and barometric pressure.
  • Weather stations with limited connectivity. These are weather stations that have a full set of instruments for temperature, humidity, wind speed/direction, and rainfall, but they just send that information to nearby information panel. That’s what I had back in the early 2000s.
  • Weather stations with Internet connectivity. These are weather stations that have a full set of instruments for temperature, humidity, wind speed/direction, and rainfall, and they transmit data via the Internet, through wifi or a direct connection to a router. They often also transmit to a panel where the user can view data locally.
  • Weather stations with Internet connectivity and direct smartphone access. These are weather stations that have a full set of instruments for temperature, humidity, wind speed/direction, and rainfall, and can transmit data directly to the Internet as well as to a smartphone app. Again, they also often transmit to a panel where the user can view data locally.

My main goal was to be able to view current weather conditions for my home on my iPhone. This would make it possible for me to assess conditions for landing my helicopter, which lives in my garage. When I fly home and put it away, I need to land on a 9×9 platform parked on my driveway on the east side of my home. With very strong winds in the area, landing there is difficult — so difficult that I prefer to land at a secondary landing zone on the north side of my home. I can then wait until the wind dies down, fire the helicopter back up, and move it to the platform. I don’t have to do this often — I think I did it just twice in all of 2015 — but it’s nice to know what to expect at home before I arrive. What’s interesting is that when the wind is howling at the airport across the river, it’s often quite calm at my driveway. This is likely because of my home being sheltered on two sides by terrain. That’s one of the reasons I built it where I did.

So at first it looked as if I’d need that last type of weather station — the kind with an app to get the data on my phone. Unfortunately, the stations I found that met that criteria were quite expensive — in the $250+ range. And I really couldn’t justify the expense, especially when I seldom have a real need for that weather data. After all, I only take the helicopter out about 50 times a year and the streamers on poles on my deck offer a decent indication of wind conditions when I get here. (I also have an airport-style windsock, but I positioned it too far from my landing zone to be of any real use to me. Long story there.) Maybe I was just trying to use flying as excuse for a new weather station? Probably.

More research showed me that Internet-compatible weather stations could usually be set up with The Weather Underground website. I started exploring stations already online there. I found one down at Crescent Bar, not far from one of the orchards I provide cherry drying services to. I clicked a link to get more information about the Weather station there and learned that it was an Ambient Weather WS-1400-IP.

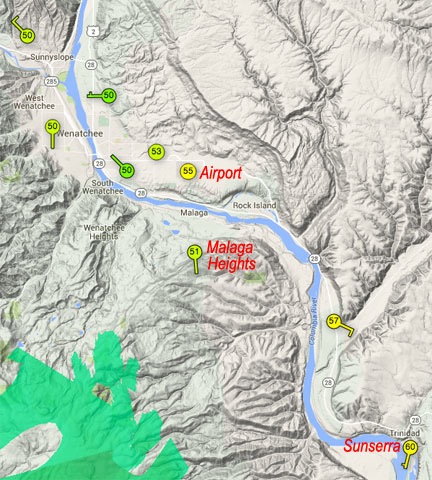
WunderMap of my area
The WunderMap of my area shows the personal weather stations (PWSs) in the area. I’ve marked the one in Quincy and mine as well as the official weather station at the airport.

I did some more research and found that two Ambient Weather stations would meet my needs if I went with the Weather Underground: that one and the Ambient Weather WS-1001-WIFI. The difference: the more expensive ($299) WS-1001 had a panel to monitor the weather inside the house and did not require an ethernet connection to my router while the less expensive WE-1400-IP ($159) could only be viewed from a Web page or app and required an ethernet connection to my router. Both had the same basic set of instruments and were equally easy to mount. Both also had a solar panel to keep the station’s batteries charged.

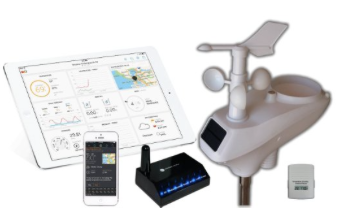
WS-1400-IP
The Ambient Weather WS-1400-IP includes outdoor weather instruments mounted together in one cluster; an indoor temperature, humidity, and pressure sensor; and an ObserverIP receiver that must be connected to a router. The iPad and iPhone in this marketing photo apparently indicate that data can be seen on mobile devices after registering the station with the Weather Underground.

I was fortunate in that I planned to mount the station at my shed, which was about 100 feet from my building. The line-of-sight receiver would go in the window overlooking the shed by my desk, which was less than two feet from my router. So as far as the connection went, requiring an ethernet cable was not an inconvenience. So the question was: Is the viewing panel worth the extra $140? My answer was no. I bought the WS-1400-IP.

Setting It Up

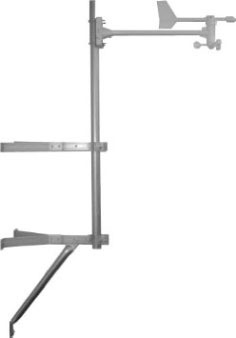
Mast Kit
This mounting kit is perfect for mounting on the side of a building.

I wanted to mount the weather station on the side of my shed, preferably with all instruments above the sprinkler head I’d put up there for fire season protection. That meant I needed some mounting hardware. Rather than trying to rig up my own mount — and likely being frustrated every step of the way — I spent another $44 (with shipping) on the Ambient Weather EZ-30-12 Mounting Kit with Mast.

Assembling the weather station was pretty easy. All I had to do was attach the wind vane at the top and one of the two short mounting poles on the bottom. The crimped pole fit snugly into the top of the mast that came with the mounting kit. I added two batteries to the indoor sensor and set it on a shelf near my desk. I then connected the receiver’s DC adapter to an outlet and ethernet cable to one of the four LAN ports on my router. Done.

The next step was to register my PWS on the Weather Underground. The weather station’s manual provides the URL. I had to create an account and then provide some information about my location and the weather station. At the end of the process, I received a weather station identifier.

Next, I had to use the IPTOOL application on my Mac (a Windows version is also available, of course) to locate the weather station’s receiver on my network and connect. That opened a configuration page in my Web browser. I used that to enter the station ID provided by the Weather Underground, as well as my password on that system. I could use other settings pages to provide the station model number, time zone settings, and units of measure. The Live Data page showed a rather user-unfriendly table of data collected from the station.

Configuration
The Weather Network configuration screen for my weather station lets me put in my Weather Underground ID.

Of course, since the weather station was still inside as I did all this, it registered inside temperatures and wacky wind readings as I moved it around. It was time to install it. I certainly didn’t want bad data going out on the network.

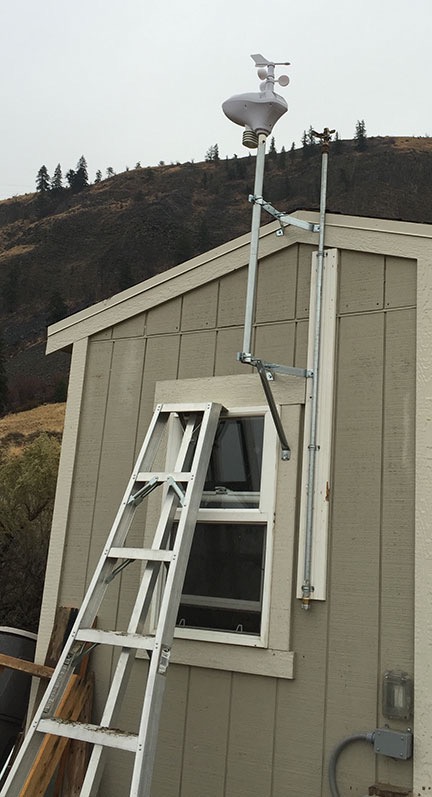
Installed Weather Station
The weather station is positioned just slightly above my fire season sprinkler head. I’ll need to raise it (or lower the sprinkler head) before next fire season.

My timing was good and bad: it had turned kind of nasty and was about to rain. That was good if I wanted to record rain information (which I did) but bad if I didn’t want to be on a ladder in the rain (which I didn’t). Still, I went out to the shed and climbed on the orchard ladder with a drill and impact driver and all the parts I needed. Within 15 minutes it was installed, level and pointed the right way. It’s not quite as tall as I’d hoped; in the future, I’ll likely add a second mast pole to raise it another three feet.

The rain started before I was done. I admit I was tickled to see it registering in the Live Data screen when I got inside. (I am such a weather geek.)

There was one more thing I needed to do — although I didn’t realize it until the next day. I thought the weather station would automatically adjust the pressure reading for my elevation of approximately 1550 feet above sea level. But when I realized that the readings were significantly lower than what they should have been, I did some additional research to see how I could fix it. The answer was to enter a relative pressure offset amount in the Calibration page of the weather stations settings. To do this, I needed an accurate pressure reading. I waited until the automated weather observation system at the airport just three miles away across the river updated and calculated the amount of offset to enter. I plugged that figure into the right box, updated the settings, and was good to go.

Viewing Weather Data

Weather Station Data
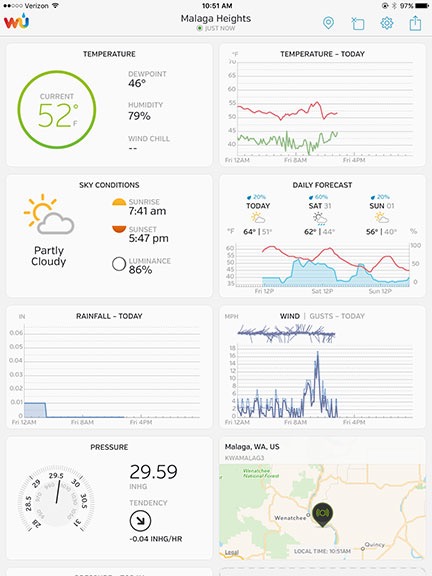
Here’s a snapshot of the display for my weather station as I wrote this blog post.

Although the Weather Underground claims it can take up to 24 hours to display a PWS on its site, mine was visible within an hour. It’s got its own page, which can be viewed by anyone at any time; I called it Malaga Heights. Here’s a screenshot of what you might see if you go to that link.

As you can see, there’s a lot of data, including current conditions pulled right from my PWS, sunrise and sunset times, moon information, and a radar map of my area. The current conditions are updated regularly; if you keep watching, you’ll see it change, especially if the wind is variable.

The weather history section summaries and graphs weather information for the day or a period you choose. As you can see, the temperature has been pretty steady on this overcast day, the wind really kicked up a few hours ago, and the pressure is falling. Solar radiation is likely measured for the solar cells on the station; it always rises after sunrise and drops back to zero by sunset.

WunderStation App on iPad
The WunderStation app on my iPad.

All of this information is also available in the various Weather Underground apps you can install on smartphones and tablets. For example, the WunderStation app on my iPad displays rearrangeable tiles of data that update automatically. I can even set up multiple PWSes in the app and switch from one to another with a swipe. Similarly, the Wunderground app on my iPhone displays information about any PWS, including my own. Both apps are free, and if you’re a Weather Underground member — a bargain at only $10/year — they’re also ad-free. (I hate ads).

But wait! There’s more! You can also install a “sticker” or widget on your website or blog. You can see the style I prefer at the top of this blog post; one that fits better in the sidebar appears at the bottom of the sidebar on every page.

What’s Next

Of course, all this is not enough for a true weather geek like me. The Weather Underground supports a PWS webcam.

I’ve had webcams on and off for years and would really like to have one here. After all, not only do I have an amazing view to share, but my view of the sky would clearly show weather conditions that would interest other weather geeks.

AmbientCamHD
There’s always something new to add to a system, isn’t there?

The one that I know will be compatible with the system is the AmbientCamHD Outdoor WiFi WeatherCam. It has a few features I think I could use to create time-lapses. I’ve added it to my Amazon wish list, but I suspect I’ll likely break down and just buy it for myself before Christmas.

Some things I just can’t resist.

The Flying M Aerie on Google

Finally!

Yesterday, I was looking up something on Google Maps and was thrilled to discover that they’d finally updated the satellite image in for my area to include my home. I can’t be sure of the exact date, but I estimate that this shot was from sometime in the spring, before things had really greened up and gardens had begun to grow.

I cropped the image to my exact property lines — on the east, north, and west, anyway. The southern boundary of my property is the road, so everything above (north) of the road is mine. It’s 10 acres.

My property, annotated
Here’s an annotated satellite view of my property; everything above (north of) the road is mine.

A few notes:

  • When giving people directions to my home, I tell them it’s two miles down the gravel road, on the left with the big green roof. Most people can’t miss it — unless they use Google Maps, which either directs them to the airport (for reasons I can’t quite understand) or to the house across the street two doors back from me. Yes, Google got the address wrong.
  • Lookout Point is where I’ve put a bench for looking out over the valley. My property drops off quite steeply just north of that. It offers sweeping views from the Mission Ridge Ski Resort southwest to the mouth of Rock Island Creek to the northeast.
  • Chicken coop is where my chickens live. I’ve just redone it for the third (and hopefully last) time. I have five hens and a rooster but hope to expand my flock in the spring.
  • I’m going to be planting a few more fruit trees near my home. So far, I have two struggling cherry trees, which were given to me by one of my clients. I think the grasshoppers took a real toll on them. I have enough room in that cleared out spot for about five fruit trees: cherry, apple, pear, and apricot. I’ll plant in the spring. Irrigation is already there.
  • The bee yard is on the far east end of my property where the property lines make it very narrow. Although they used to be much closer to my home, the east end is more convenient for road access. But the real reason I chose that spot is because it gets the most sun; with the cliffs to the south, direct sunlight is scarce in winter. The farther north you go, the more sunlight there is. This is a perfect spot.

I had an irrigation system installed earlier this month. It runs in two zones down my entire 1100 feet of road frontage. Last week, workers planted 25 Scouler’s Willow trees to the west of my driveway. This will give me privacy from the road and help keep the dust down. Because they are native willows, they require less water than the Austian willows so popular here. They’re only about 2-3 feet tall now, but they should grow to 30 feet or more, likely within 5 years.

On the east road frontage, I’ll be planting Ponderosa pine (which grow naturally in the cliffs) and aspen (which many of my neighbors have planted) in grove-like bunches. These trees, also on irrigation, will grow very tall very fast. I’m hoping they’ll help teach my black-hearted neighbors, whose house appears in the lower right of the satellite image above, how to mind their business. They should probably take lots of photos of their view now, before those native trees block it.

(On a side note, I never realized how close my neighbor’s house is to the talus basalt rocks at the base of the cliffs to the south. Hell, one good rock slide and their backyard will be full of boulders. Who would build so close to such a hazard, especially with all the talk of earthquakes possible in the Pacific Northwest? City slickers, I guess.)

One of the nice things about having so much undeveloped land is how much can be done with it. My five-year plan calls for planting either a small vineyard or orchard in the area between the bee yard and my driveway. I’m thinking of devoting 2-3 acres to it. There are a few hurdles I have to jump first, though. No rush — I have plenty of time to move forward — and it’s a hell of a lot easier to do when I don’t have to compromise with a cheap, risk-adverse “partner” every step of the way.

Old Satellite Image
Bing Maps still has an old satellite image of the area. This is the same crop shown above; you can barely see my driveway. Based on the construction status of my neighbor’s home, I think this one might be about three years old.

And on that note, isn’t it amazing to see what I’ve accomplished since buying this lot back in late July 2013? Back then, the only thing I had was a partial driveway. Now I’ve got a home. It took a lot of hard work and money to make it happen, but it’s been worth it.

Construction: My Almost Finished Living Room

A video tour of my living room, which is now almost done.

Yesterday morning, I made a video of my living room setup. Thought I’d share it with folks who want to take the tour:

On May 20, 2014, I began blogging about the construction of my new home in Malaga, WA. You can read all of these posts — and see the time-lapse and walkthrough movies that go with many them — by clicking the new home construction tag.

I admit that I sometimes refer to this as my “trophy room.” That’s because the red leather sofa, TV, and stereo surround-sound system came from the condo my wasband bought as a place to live during the week when he worked in Phoenix. To this day, I’m not sure why he agreed to let me have them. The only reason I included them on the list of personal property I wanted was so I could give them up in the bargaining process. But he agreed to the whole damn list — after stewing on it for months — in exchange for me moving out of the house. Joke’s on him: I had to leave anyway for my summer work and my RV and helicopter were already onsite in Washington.

My Living Room
My almost-finished living room; a very pleasant place to hang out.

The leather sofa is very comfortable and has a sofa bed tucked into it. My ex-sister-in-law, who I’m still in contact with occasionally, gave me two of the four pillows on it as a housewarming gift. The rug, storage “bar” behind the sofa, and black leather cushions on the chair are new from IKEA. The lamps are heirloom items — more on those in a future blog post. The rest of what’s in this video are a mix of new items I bought over the past three years and items moved to Washington from my old home in Arizona.

The room is almost done. I just need two things:

  • Windowsills. I have temporary window sills in place under most windows. I was going to make them out of 1×12 lumber and actually finished a few of them, but my friend Don offered me slabs of wood that match the tables he made for me. I can then make windowsills out of that. Trouble is, Don needs to get his friend with the bandsaw on the program to get me the slabs. Then I need to cut, stain, and finish them. It’s a big project and I don’t expect to have it done anytime soon. So I have trimmed 1×10 and 1×12 planks for temporary use. I probably won’t bother staining them, so I can use them for something else in the future.
  • Coffee table. Don made me custom TV table and end tables. They were cut from power poles that survived a fire back in 2010 or 2011 near the Rocky Reach Dam, upriver from Wenatchee. They have a lot of personality, with actual scorch marks on the live edges. I like them so much I’ve asked Don to make me a matching coffee table. We discussed it in some detail yesterday. I hope to get it within a month or so.

The jury is still out on the rug. I bought another one at Pier 1 that I’d like to try. This one might be okay with a coffee table over it.

And yes, I know I should get a universal remote. But honestly: I don’t watch very much television. The view out the windows is much more enjoyable.

The place is coming together. It’s already a far more pleasant home than the one I left behind in Arizona.