Construction: Wiring My Shop

I expand the circuit in my shop area to include more outlets and an arc lamp.

On May 20, 2014, I began blogging about the construction of my new home in Malaga, WA. You can read all of these posts — and see the time-lapse movies that go with them — by clicking the new home construction tag.

Back in early September, I finally had the ground work done to bring electrical power, water, fiber optic cable, and a septic system line into my building. I got all the required inspections done, including the one with Washington State Labor & Industries (L&I). That required, in part, to set up a circuit that included an outlet, a light, and a light switch. Although I wanted to do more than just that, I decided to keep it simple to pass the inspection.

Of course, once the initial inspection was done and the power was turned on, I was free to wire my building however I liked — as long as it was within the requirements of the local electrical code. An inspection would be made before the walls were closed up — likely sometime in the spring. I didn’t have to keep the original circuit as it was on inspection day. I could expand the circuit to include more devices: outlets, lamps, switches.

So that’s what I did. I finished the wiring of my shop/RV garage area — the 36 x 48 foot space on the left side of my building.

More Outlets

One double outlet was clearly not enough — although I was making it work through the use of extension cords and outlet strips. I’d plugged in my Internet router and chest freezer on one side of the big garage door, with an empty outlet for the drill I’d need to get through the studs to run more wire. On the other side of the big garage door, I’d plugged in my mini fridge, wine cooler, radio, and four battery chargers (for power tools). There were spare outlets for my tile saw and kiln, which I use for my glass projects. To get the power from the outlet on one side of the garage door to the other side, I’d run a heavy-duty extension cord across the garage floor at the door. Not the best solution for long term.

So I started laying in outlet boxes. One by the fridge, one by my work desk, and one on the other side of the post in my storage area. I had to do some creative work with scrap lumber to hammer the outlet boxes on the underside of the girts — the L&I inspector had warned me that outlet boxes in unfinished walls could not be above a girt. And then I had to run the wire around the two windows in my shop area and behind two posts to connect them. Wiring them together wasn’t much of a problem at all.

What was a problem was getting the wire from the first outlet on the circuit over the garage door and back down to the next outlet near the fridge. The garage door is 14 feet tall and 20 feet wide.

Scaffolding
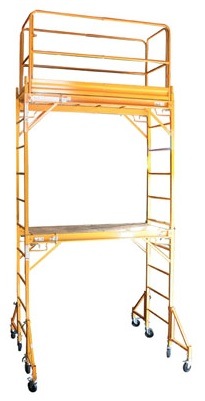
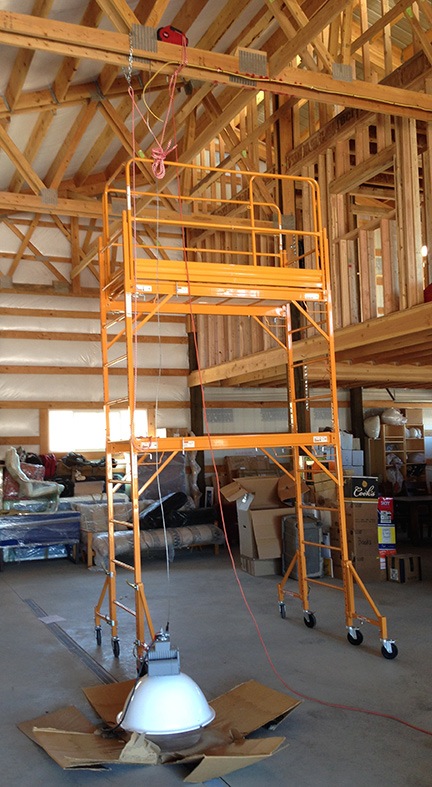
The nearly $500 I spent for this set of scaffolding is probably the best money I’ve spent so far on building equipment. I’ve used it dozens of times — this post just lists a few.

I’d bought scaffolding on Amazon a few weeks before and a friend had helped me assemble it. (It’s simply not possible to put together a 12-foot scaffold by myself.) The scaffolding consists of two 6-foot scaffolds stacked one atop the other with outriggers to prevent the whole thing from toppling over. A guardrail around the top scaffold platform gives me the illusion of safety — I’m not fooling myself: if I fall sideways while standing up there, that flimsy rail is not going to prevent me from falling over the edge.

It took some time getting used to climbing up and down the side of the scaffold, but after doing it a dozen times, I became quite proficient. Not only did all those trips up and down make me more comfortable about climbing the scaffolding, but it was great exercise that really wiped me out by the end of the day.

I brought the coil of wire upstairs and set it down on the floor. I fed it through the framing toward the post at one side of the garage door. Then I went downstairs, positioned the scaffolding, and climbed up. I fed the end of the wire between the post and metal wall — remember, the metal is fastened to the girts, not the posts — and into the space atop the garage door. I pushed it as far as I could, then climbed down the scaffold, repositioned it, and climbed back up to pull. I got about halfway across the top of the garage door when the wire got hung up on something at the other end. Back down, climb the stairs, free up the wire, push some forward, down the stairs, up the scaffold, pull the wire. It was clearly not a one-person job, but I was making headway.

That is until I got to the far end of the garage door and needed to pull the wire down to the outlet. Several trips up and down the stairs and scaffolding got me only a few inches. At that rate, it would take the rest of the day. I needed help.

Fortunately, a friend was coming by to help me move my heavier furniture — the red sofa bed, my bedroom set, a desk — to the back of the building to make room for the helicopter and possibly the RV later in the season. When he and his son were finished with the furniture, I asked him to climb the stairs and push the wire while I pulled it at the other end. Within 5 minutes, we were done.

I suspect that a lot of my friends would be helping me feed wire during visits over the next few months.

Once the wire was run over the garage door and stapled to the posts as required by code, I got back to work wiring the outlets. I did them in a sequence, then covered them up with the cheap covers I’d bought for the garage. (I’d use nicer ones for the living space.)

That part of the wiring was done.

The Arc Lamp

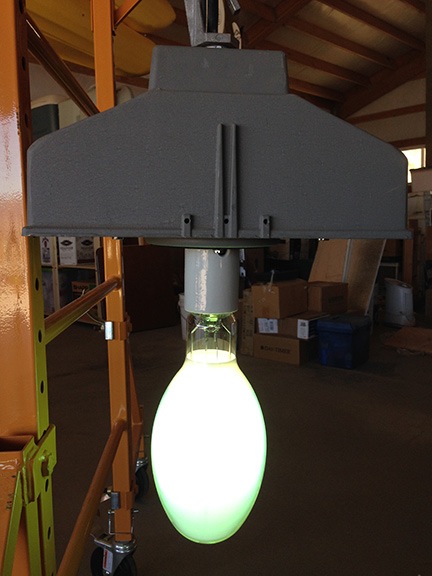
Is it really an “arc lamp”? I don’t know. Donn called it an arc lamp and Tom didn’t correct me when I called it an arc lamp. All I know is that it’s huge, has a big 500 watt bulb, takes a good 3-5 minutes to warm up, and is almost as bright as the sun. I suspect it might get hot.

My friends Donn and Kathryn had built a cherry packing shed on their orchard earlier in the year. They’d lighted the place with arc lamps that Donn had obtained used from some source. Donn had hired an electrician to do all the wiring. When he was finished, he had a few lamps left over. On the day I came to admire the shed, he offered me one. I thought it would make a good light for my RV garage so I took it.

That was months ago. For months, it sat in a big box in the upstairs of my building, out of the way of builders and movers. Four big pieces: transformer, light bulb, reflector, and lens. My job was to make sure the thing actually worked, fasten it securely to the rafters 16 feet off the ground in the center of the RV garage, and wire it to a light switch near the door.

The wire coming out of the transformer was simply cut about 3 feet from the fixture. I had two options to test it. I could hard wire it into a circuit and switch or I could put a plug on it and plug it into an extension cord. I went with the second option.

I also went to Home Depot and bought a two-foot length of chain with a screw-closure carabiner. The transformer, which weighted at least 30 pounds, had a heavy duty hook for mounting. I used the chain to hang the transformer to my scaffolding, screwed in the lightbulb — which is about 16 inches long — and plugged it in. The transformer hummed, but no light.

I wasn’t really surprised. I knew it couldn’t be that easy.

I examined the label on the transformer. It listed four different voltages, including the 120 volts I was using. Maybe the lamp was wired for a different voltage?

I (carefully) put the lamp in my Jeep and drove it down to Platt, the local electric supply store. I brought it inside. No one there could help me. They directed me to a lamp repair shop on Mission Street. I drove over. It was located in what used to be a house. I went in and described the lamp. The guy there said he couldn’t help.

Back in the Jeep, I called Donn and asked him. He said he didn’t know because he hadn’t done the wiring. He gave me the number of the man who had, Tom. I called Tom. We tried to get together that day, but weren’t able to connect. Instead, he came up to my place the next day.

Lamp Works
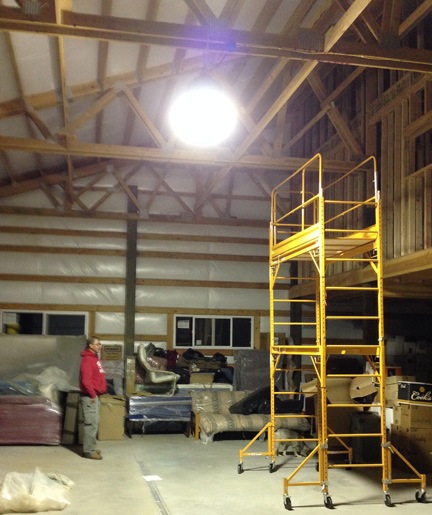
These lamps come to life slowly. Within minutes, it was very bright.

He brought tools. We chatted a bit. He admired my “man cave” and then made the now familiar comment about me having a “great setup.” Then he opened the transformer and fiddled around with the wires. Apparently, it had been wired for 277 volts. He rewired it for 120. He closed it back up and we put the bulb back in. I rehung it on the chain and plugged it in. It immediately came to life with a hum. In about 3 minutes, it was at its full brightness, like a second sun inside my shop.

Whoa.

When he left he gave me a spare bulb. He wouldn’t take my money.

Of course, testing the lamp and making sure it worked was only the first part of installation. I still had to get the wire and the lamp up into the rafters.

The wire wasn’t that difficult. The route I chose was pretty much clear of obstacles, so the wire was easy to run. I did, of course, need to stand on the scaffolding. Up, run wire, staple wire, down, reposition scaffolding, up, run wire — you get the idea.

It was about this time that I got sick and tired of hammering in the wire staples, which were required a maximum of every four feet. There had to be a better way. I took a break for the day and headed out to Home Depot. I came back with a good stapler designed to drive in those damn wire staples. Not perfect — I still needed to tap them a bit with a hammer — but a hell of a lot better than what I’d been doing.

(Any job is easy when you have the right tools, eh, honey?)

Back to work the next morning, I finished running the wire between where the light switch would go and where the lamp would go. Easy peasy.

Next, I had to lift the lamp into place. I fully assembled it with the transformer, bulb, reflector, and lens. Then I tied a rope to it at the bottom of the scaffold, climbed up, and pulled. I lifted it about 2 feet off the ground when I realized that I would probably not be able to lift it 16 feet off the ground. Again, there had to be a better way.

Warn Winch
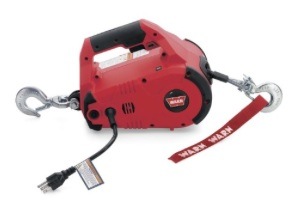
Wow! Is this ever handy for general use around my shop and garage. It makes it possible for me to lift or move up to 1,000 pounds with the touch of a button.

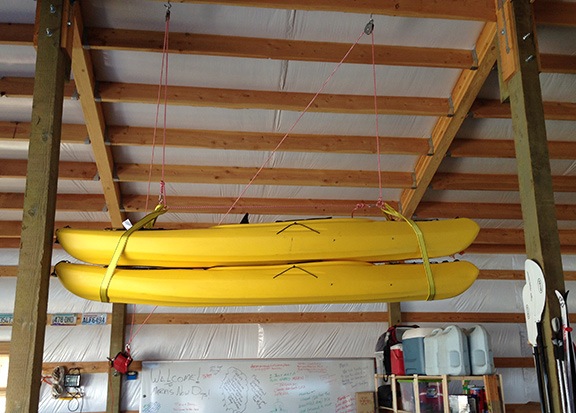
The better way was with a winch that I already had. You see, I’d cooked up a solution to lift my kayaks off the floor of the shop. I was tired of walking around them, so I’d put pulleys in the rafters between two posts and run line down and around them. Because I couldn’t manually lift them, I’d bought a small electric winch on Amazon. I’d fastened the winch to a hook on a post and had fastened the ropes to the winch. Squeezing a trigger lifted the kayaks high enough to walk under them.

Hung Kayaks
Hanging my kayaks was another little project I did this summer. You can see the winch hanging from a post. (If I blogged about all my projects, I wouldn’t have time to do any projects.)

Winching the Arc Lamp
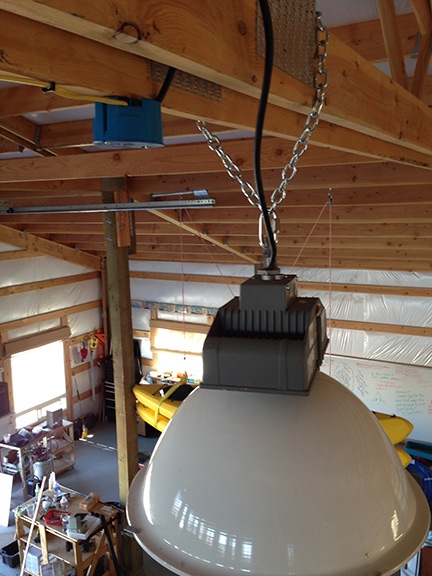
In this shot, you can see the winch attached to the rafters with the cable running down to the arc lamp. If you look closely, you can see the wire I’d run along the bottom of the rafters.

The winch was still holding up the kayaks, but I rigged up a rope on the same hook to do the job, freeing up the winch for other duties. I carried the winch up the scaffolding and secured it with a rope atop some rafters near where I’d hung the chain for the arc lamp. I ran an extension cord to the winch. Then I dropped the winch cable down to the floor — it’s 15 feet long — went down, and hooked up the lamp. Then back up to run the winch. I brought the lamp up slowly until it was high enough to fasten to the hook. That was probably the hardest part: disconnecting the lamp from the winch and connecting it to the chain without dropping it. I was mighty relieved when I was done and the lamp hung securely from the rafters.

Hung Lamp
I left the wire long in case I wanted to move it someday and needed a longer wire. Rather than leave it hanging, I draped it around the rafter. I hope L&I doesn’t mind.

Next, I had to mount one of those blue plastic boxes to the rafter to connect the wire from the lamp to the wire from the switch. Not a big deal. I hammered the box in place, ran the wires in, and connected them with wire screws. Then I fastened a cap over the blue box. I stepped back on the scaffold to admire my work — and take a picture, of course.

I brought all my tools and the winch back down the scaffold. I had one step left.

Tying It All Together

So far, I had three new double outlets and an arc lamp wired. But none of them were wired to a circuit. That was the last step.

I’d already set up a light switch and outlet beside the circuit panel near the door to my RV garage. I decided to tear that apart and replace it with a box that would house two light switches and an outlet.

I should mention here that L&I, on its inspection, had told me that the outlet needed to be GFCI protected because it was the first one on a garage circuit. Although they passed me, it was contingent on me replacing that outlet. Doing the rewiring to add outlets and the arc lamp seemed to be a good time to make the fix.

Switches
The final outlet box after rewiring the outlet to a GFCI and wiring the two light switches. Note that the power comes from this box and crosses over the garage door to the other side of the room.

I shut off the circuit in the panel, rolled over my cart full of electrical tools, and got to work. The wiring wasn’t difficult — I had done it all before. When I was all done, I put one of the cheap plates over it, crossed my fingers for luck, and turned on the circuit breaker.

No explosions, fires, or even smoke. Always a good sign.

I tried the light switch for the existing fixture beside the panel. It worked fine. Then I tried the light switch for the arc lamp. It came to life immediately, sputtering a little as it warmed up. Then I crossed the room and tried the outlets. They worked.

Success!

Second Sun
I’d originally thought I’d need more than one light in the RV garage and that this one would be a good start. But I soon realized that I wouldn’t need any other overhead light in this space. It’s that bright!

Later, I’d ditch the extension cord across the garage doorway and plug everything in to the closest outlets. (Still needed a power strip for all those darn battery chargers.)

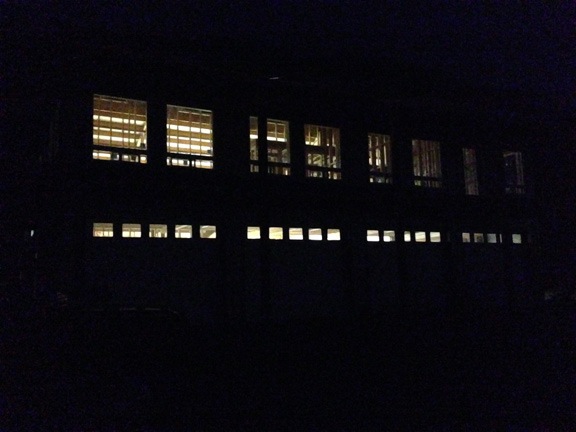
That night, my friend Bob stopped by for dinner. After watching a beautiful sunset from my Lookout Point bench, we went into the garage and I flicked the switch for the arc lamp. The light started off dim but warmed and brightened as it usually does. It lighted the entire space. Not only that, but the light shined through every single window in my place, making it glow from outside.

Lighted from Outside
This was the first time my building had been lighted at night since the night before the concrete was poured.

As far as I’m concerned, my shop/RV garage is now wired. Whether I add another circuit in the future is something I’ll deal with when I find a need. It’s good to go now and extremely functional.

Up Next

My next circuit will include my entrance lighting, entrance hall lighting, one outside outlet (near the front door), a light (with a switch) for just inside the first bay of the garage, outlets inside the first two garage bays (including for garage door openers), and light fixtures for outside the first two garage bays. The entrancee hall lighting will be interesting because it requires a three-way switch that makes it possible to turn the light on or off from the top or bottom of the stairs.

And don’t worry: if the job has any unusual challenges, I’ll blog it.

Home is Where the Helicopter Is

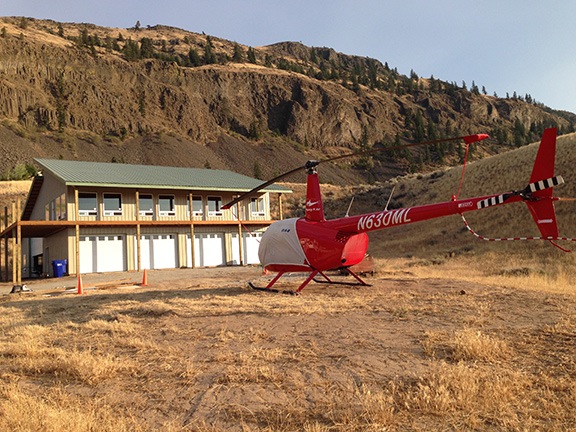
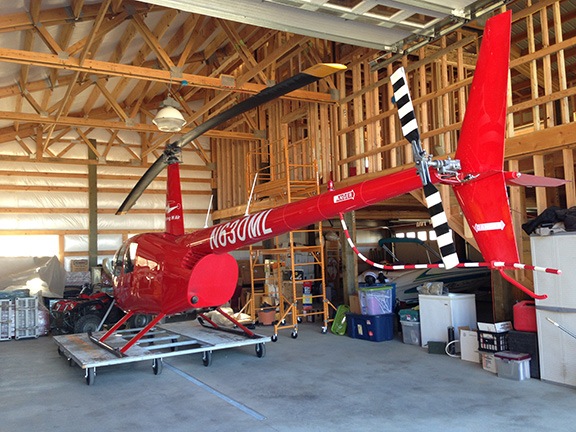
Zero-Mike-Lima moves into its new home.

A lot of folks who’ve seen my building plans or listened to me tell them about its design can’t quite understand why I need so much garage space. Like an old motorcycling friend who sadly passed away from an illness some years ago, I’m building a “garage with a home attached.”

New Home Plans
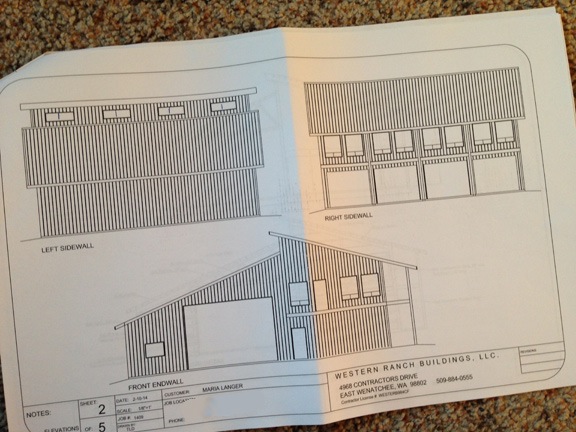
Garage, man cave, man trap. Call it what you will, but it has almost 3,000 square feet of garage and shop space.

Moving Forward with the Plan

I decided two and a half years ago, when I started looking for property in Washington, that I wanted to keep my helicopter at home with me. Not only would it be extremely convenient for the few times a month I fly, but it would save me hundreds of dollars a month on hangar costs — not to mention time and truck gas, wear, and tear.

Hangar
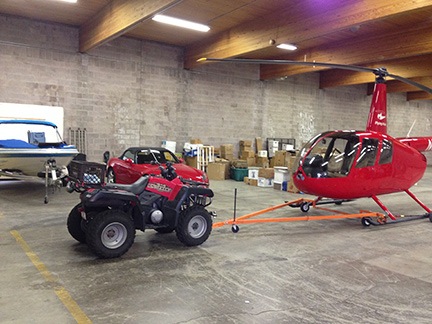
Here’s a partial view of the hangar the helicopter lived in for about eight months. The building was huge and technically I leased only half of it, paying only half rent.

The hangar the helicopter was in last winter, along with my furniture and boxes of possessions from Arizona, was costing $850/month — that’s nearly double my mortgage! I couldn’t wait to get out of that place and was thrilled at the end of June when my building had reached a state of completion where my possessions could be moved into it and I could end the lease on the hangar.

I moved the helicopter to my future home at the end of May, right after the start of cherry season. I had an early contract in Quincy and needed to respond quickly to calls that sometimes came in without warning. From that point forward, it sat outside on a leveled piece of earth in my side (back?) yard — a sort of lawn ornament that I’d fire up when I wanted (or needed) to fly.

Lawn Ornament
I kept the helicopter parked on a nice flat spot near my RV throughout the construction period.

The landing zone was good, despite the dust. I was able to approach from below, actually climbing to reach the spot. This minimized noise. In fact, a few neighbors asked if I were still flying from my home. When I told them I was, they responded, with some surprise, that they never heard me come and go. I’d actually chosen the building location, in part, because of its position between two hills. The idea was to focus the helicopter’s engine sound back out into the valley. A more attractive building location might have been where the helicopter was parked — it certainly would have given me better views. But in the interest of being neighborly — and to reserve that spot for the next property owner’s home — I tucked my building back up against the hillsides.

The building’s shell was finished — walls, roof, floor, doors, and windows — in mid July. The big garage door — 20 feet wide by 14 feet tall — was the last component to be installed. With the help of a friend and his son, I rearranged the furniture I’d stowed in the back of the RV garage space to make room for the helicopter and RV to be parked side by side, as I’d planned.

The Landing Platform

Ground handling a 1500+ pound helicopter by myself had always been a bit of a pain in the ass. It was impossible for me to move it without equipment, so I purchased a tow bar from Brackett Aviation in Kingman and a golf cart to tow it with. I’d had a similar tow bar for my old R22, but the R44 was a bit too beefy for the aluminum model they’d custom made for me (to keep it light). The steel replacement was heavy but manageable. It made it possible to tow the helicopter in Wickenburg from my hangar to the fuel pumps or helicopter pads, despite the hilly ramps.

But what I longed for was a helicopter dolly — a platform I could land on and tow into the hangar. I priced them up everywhere I could find them, new or used, but could never justify the huge expense.

In the winter of 2013, as I packed up my Arizona life and began liquidating possessions I no longer needed, a solution stumbled into my lap. My friend Mike’s friend Jan had bought Mike’s helicopter dolly. Mike had designed it for his Hiller and it had been made to his specifications. He’d used it a few times and, after a scare from a skid sticking to tacky paint in the hot Arizona sun, had sold it to Jan. Jan never used it. I had a very nice golf cart I wanted to unload. Would he take a trade?
He would and did. My friend Janet and I loaded the golf cart onto my flatbed trailer and towed it down to Falcon Field in Mesa. Jan and Mike and a few others drove the golf cart off the trailer and manhandled the dolly, broken down into three pieces, onto my trailer. We strapped everything down and drove back to Wickenburg.

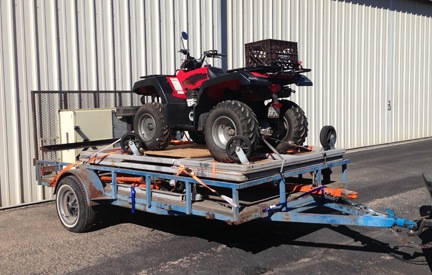
Trailer Packed for Move
Do I know how to pack a trailer? I replaced the trailer tires and had the bearings repacked before the trip north, just to minimize the likelihood of wheel trouble for my friend on the 1200-mile drive.

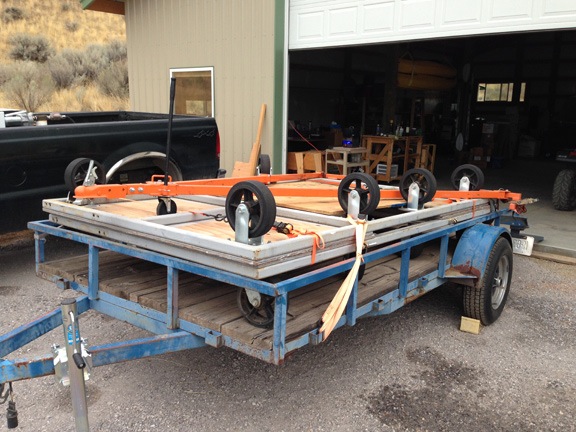
Due to the nature of my never-ending divorce, the trailer and dolly just sat in my Wickenburg hangar for months. In September 2013, I loaded a few more things onto the trailer and sent it north on the back of my truck, with a friend who offered to drive it for me while I drove my Honda and movers took everything else. The trailer and dolly then sat in my East Wenatchee hangar for another eight months. In July 2014, it moved from there to my property, where it sat out in the sun for another few months.

Tow Platform
Here’s the trailer outside my building last month, waiting to be unloaded. The orange thing is my old tow bar, which I used in my East Wenatchee hangar.

Putting It All Together

Assembled Helicopter Dolly
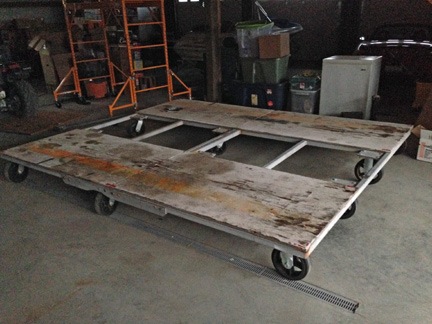
What amazed me most is how small the platform looked in my building.

Finally, at the end of September, I asked my friend and his son to stop by and help me unload the dolly. It rolled down the trailer ramp onto the floor of my building. The hard part was pulling the top half off the bottom — I think one more set of muscles might have made that easier. But we did it, lined the pieces up, and bolted them together. The roughly 9 x 9 platform was ready for use. (The flatbed trailer was almost immediately put to work hauling apples to Seattle for a friend. It’s now parked, empty, out of the way behind my building — the only thing I own that’ll likely never be stored inside.)

The only problem was, I couldn’t get the helicopter inside until I had a concrete apron outside the big door. Not only was there a 4-inch drop from the doorway to the ground outside, but the ground was not something the dolly’s 12 hard rubber wheels could easily roll on.

I had the ground work and the concrete work done in September. The concrete guy said I needed to wait five days for the concrete to cure enough to be driven on. Sunday was the fifth day.

I happened to have a charter flight on Sunday and expected to be home by around 3 PM. That morning, before taking off, I positioned the helicopter dolly on my big new pad with my 600cc 1999 Yamaha Grizzly — did I ever mention how glad I am that I bought that thing and brought it to Washington with me? I locked the Grizzly’s brakes and put a wooden block behind one of the dolly’s 12 wheels. (Hard rubber chocks should arrive from Amazon.com today.)

Dolly Ready for Landing
Nothing like a little challenge to get the blood going, no?

Then I got out my extra long measuring tape and started measuring. I measured the helicopter’s skid length and spread. I measured the point from the front of one skid to the end of the front blade. I measured the back of the skids to the end of the tail. I measured the dolly’s width and the distance between the faded and mostly worn off orange painted lines Mike had stuck to years ago. I measured from an arrow on the dolly out the pilot side door to the post in the corner of my future deck.

And then I measured everything again.

And one more time.

It was doable — the measuring tape doesn’t lie — but with the RV parked where it was, I’d best make my approach down the driveway. It was important to come in slowly and not overshoot the platform. If I landed where I should on the platform, everything would be fine.

Yes, it would. I had to tell myself several times. It sure looked close. But then again, every time I land at the fuel island at Wenatchee airport, it’s a lot closer than this.

I shut the big garage door and locked up the building.

The Moment of Truth

I left at 10:30 AM to do my flight. I stopped at Pangborn Airport, fueled up, and met my passengers. We went on a scenic flight up the Methow to view the fire damage, then cut over the mountains to Chelan where we landed in front of Tsillan Cellars Winery. Bob, the owner, walked down with a glass of wine to greet us. My passengers treated me to lunch at the restaurant there before I flew us back to Wenatchee.

Then they were gone and the moment of truth had arrived.

It was right about then that I realized that I’d never landed on this platform before. In fact, the only time I’d ever landed on anything resembling a raised platform was back in 2002 when I landed my old R22 on the back of a trailer.

Well, there’s a first time for everything, huh?

I started up the helicopter — now very light with only about 15 gallons of fuel on board — and headed home. It’s a 3-minute flight.

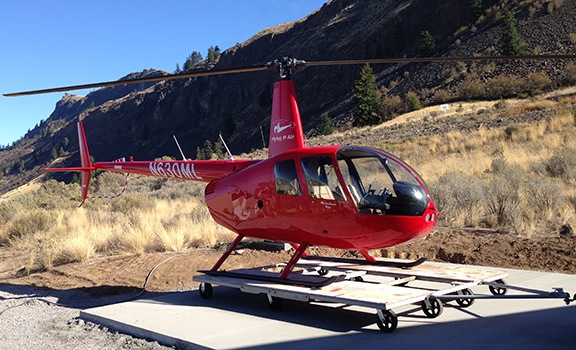
Instead of approaching from below over my Lookout Point bench, I came in slightly above my landing zone, a bit more to the east. I slowed down to a walking pace before I reached my driveway just behind my shed and chicken coop. Then I moved forward slowly, got myself over the landing pad, and lowered the helicopter down onto it. I had a moment of doubt when I worried that my left skid might be over the gap between the dolly’s two landing platforms and that made me double-think my landing. I wiggled a bit, inched higher, shifted to the left a little, and set it down. The rear of the skids landed first, as they usually do when I’m alone. Then the front. Nice and solid. No movement on the platform.

Helicopter on Platform
Success!

Needless to say, I was thrilled.

I went into my RV to let Penny out while the blades slowed to a stop. I took a bunch of photos. I opened the big garage door all the way and locked it in the up position. Then I locked the helicopter’s blades into a front/back position, got on the ATV, started it up, and began rolling it backwards into the building.

The door was supposed to be 14 feet tall. The helicopter’s mast is 10’9″ tall. The platform was 18 inches tall. It should fit, right? Of course it did! But it wasn’t until I actually rolled it in that I believed it.

Not Perfect
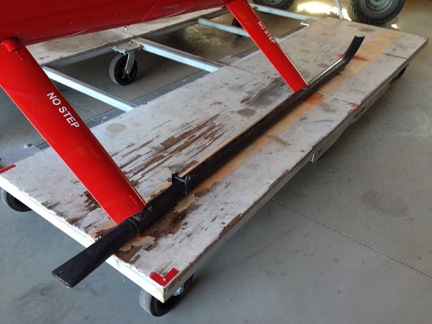
My landing wasn’t perfect. I could have been forward 6-10 inches and left about 6 inches. When I get a chance, I’ll repaint the surface with better markers. And next time, with the hard rubber chocks handy, I’ll move the platform a bit closer to the edge of the pavement.

The only trouble I had was the fact that my furniture was pushed up against that back wall. With the ATV in front and the helicopter not quite as far forward as it could be, I didn’t have enough room to pull in all the way with the ATV. So I unhooked it, moved it out of the way, and pushed the dolly in the rest of the way. It was remarkably easy to push on the level ground, considering it weighed at least 1800 pounds with the helicopter on it. It was in far enough to close the garage door.

In the Garage
Good thing I didn’t put that arc lamp on a longer chain! It clears the rotor hub by about a foot and a half. In the future, I’ll be parking to one side or another anyway.

A while later, after walking around and taking photos and being thrilled that I could so easily walk under the tailcone to get around the garage even with the helicopter in there, I rolled the door closed and locked it.

My helicopter was in its new home.

On Milestones

This was yet another milestone in my rebooted life — another goal reached without a risk-adverse, fearful, sad-sack old man holding me back. I was moving forward, I was making it happen.

(I feel another divorce-related rant coming on. Stop reading now if you’d prefer not to read it.)

I try not to think about all the years lost waiting for the man I loved to get his act together and take control of his life, to stop being a 9 to 5 slave to possessions he bought for reasons I’ll never understand: a plane he never flew; an expensive, cave-like condo in a dismal city; a luxury sedan not suited for the unpaved road we lived on. I try not to think about what might have possessed him to live beyond his means, year after year.

I try not to think of his broken promises — promises I banked on to build a financially secure future in which we’d both be able to achieve life-long goals.

I try not to think about how hard he tried those last few years to pull me down into the rut he’d dug for himself and how he plied me with guilt and attacked my self-esteem when I resisted.

I try not to think about how miserable I’d be if we’d stuck together and I had to continue a stagnant existence in a dead place with a man who just never seemed to be happy.

But when I see how easily I rebuilt my life here in a better place, how easily I made good friends, how easily I designed and arranged for the building of my dream home, how easily I’ve learned to take care everything that needed to be done — I realize that no matter what he said to put me down, I was not the problem. He was.

I would never be here in this happy place with him holding me back. The divorce freed me to move forward with my life, a life so much better than I had with the sorry excuse for a man that he’d become.

The sad part of it is the way he chose to do this: the deceptions, the betrayals, the legal battle to steal what I’d worked hard for my whole life. The lies in court documents and under oath in court.

He told me two years ago when he asked for a divorce that he wanted to remain friends and I was open to that. But then he did everything in his power to fuck me over emotionally and financially. What’s up with that?

And yes, the battle still rages on, two years after it started. Delays, delays, delays. He’s doing everything in his power to delay my happiness — and he’s failing miserably, at his own expense.

He burned his bridge to any possible future friendship. And in doing so, he threw away the best part of his sorry life.

What an asshole.

As for me — well, I haven’t been this happy in years.

Construction: The Concrete Driveway Apron

The last important part of my building to be finished this year.

On May 20, 2014, I began blogging about the construction of my new home in Malaga, WA. You can read all of these posts — and see the time-lapse movies that go with them — by clicking the new home construction tag.

Back in September, I hired my favorite earth-moving guy, Jeff, to level a space in front of my building’s big garage door. As part of that job, he also dug and later buried the trenches for conduit that brought power, water, fiber optic cable, and telephone lines to my building and water and power to my garden shed. I blogged about that three-day project here.

Although I don’t expect to live in my building this year, it was vital that the ground work be done before winter so that I could get a concrete apron laid in front of the door. The apron was necessary for me to park my helicopter’s landing cart so I could land out front and pull the helicopter into the building. I didn’t want it outdoors any longer than necessary and certainly not over the winter.

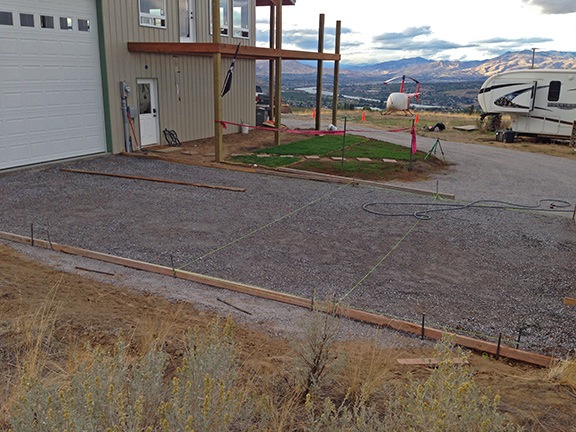
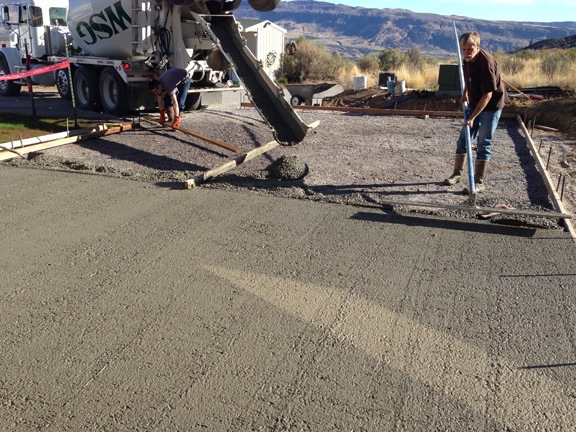
I got the concrete work done at September month-end. Bill, whose company had laid the concrete inside my building, came by on Monday at around midday to lay out the forms. The apron would be 22 feet wide (in front of my 20 foot wide door) and about 30 feet deep. He made quick work of laying out the area with strings and stakes, triangulating or whatever it is these guys do to get things square.

There was some confusion, at first, about the slope to the concrete. He expected a constant angle slope while I expected it to be nearly level close to the building with a steeper slope on the half farther away. I don’t think Bill liked the idea, but that’s the way I had Jeff prep it. Still, we had to go at the gravel substrate with a rake and shovel in one area to ensure that the concrete was at least 4 inches deep. When he was finished, we confirmed our order for 14 yards of 6 sack concrete and got a delivery time of 9 AM the next day. I drove a pair of t-posts and put ribbon on them to keep the workers off my just-planted grass seed.

Concrete Prepped
The apron framed out and ready to be poured.

Bill and a helper showed up the next day a little after 8 AM. The did a bit more framing and got out a bunch of tools. Then they waited. No one else showed up. It was going to be just two of them.

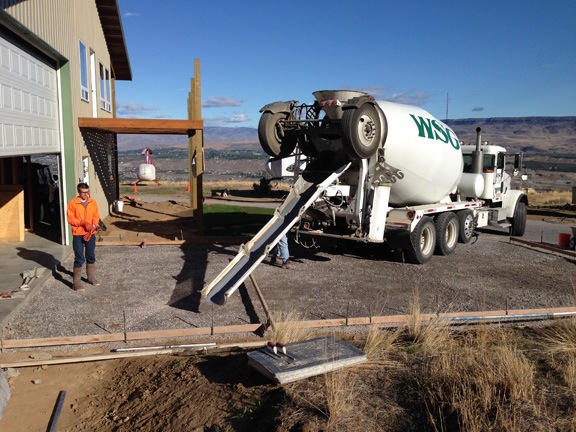
The first concrete truck showed up at about 9:45. It backed into position and the driver got out to assemble the chute. And then they started pouring.

Pouring Concrete
They began pouring concrete at about 9:45 AM.

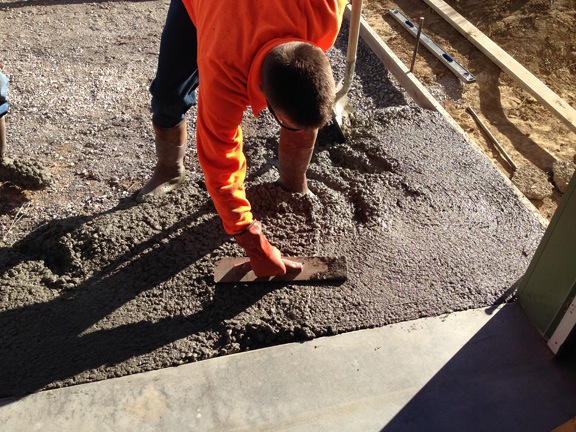
Smoothing Concrete
Bill’s helper spread the concrete at the edge of my garage.

The work went quickly. I stayed out of the way. Penny stayed inside. The first truck delivered about 2/3 of the concrete we needed.

From the first truck
The first truck poured most of the concrete we needed.

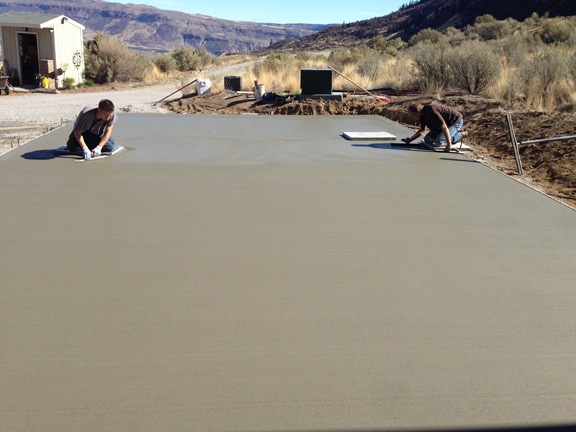
The second truck arrived just as the first one was ready to pull out. They poured the rest of the concrete. Bill and his helper worked it.

Finishing the Concrete
Finishing concrete properly takes a lot of work and expertise. Bill and his helper definitely know what they’re doing.

Concrete Blocks
A closeup of the concrete “blocks” I made with extra concrete and a mold I’d bought. This was an experiment; I expect to do a better job when I need to.

I got a wheelbarrow full of concrete and used it to experiment with the concrete block mold I’d bought. Within about a half hour, I had a 2 x 6 “block” pad in front of my shed. It wasn’t pretty, but by the third 2 x 2 section, I had the hang of it. With the right concrete — without big rocks in it — it might actually look nice.

Intials in Concrete
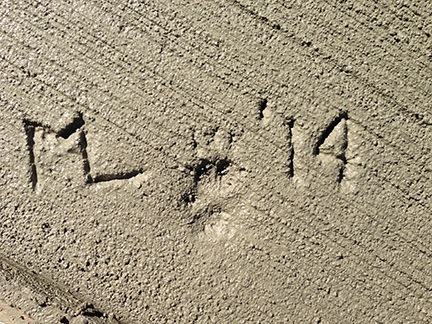
The last time I carved my initials into concrete at a home was in 1997. Although that was a milestone in my life, this one was much more meaningful and rewarding.

When the guys were done — but before they left — I brought Penny outside on a leash. I carved my initials and the year into the wet concrete and pressed one of Penny’s paws into it.

The concrete work was done by noon on Tuesday, September 30. According to Bill, I’d have to wait until Sunday, October 5 to drive on it.

Coincidentally, I had a flight scheduled for that day. I realized that if I got everything set up properly in advance, I’d be able to put the helicopter inside my building before nightfall on Sunday.

Construction: Wiring the Shed

The biggest challenge was getting the damn wire out there.

On May 20, 2014, I began blogging about the construction of my new home in Malaga, WA. You can read all of these posts — and see the time-lapse movies that go with them — by clicking the new home construction tag.

If you’ve been following these posts, you know that in late August, I finally got permanent power run to my building under construction and that I had taken on the task of doing all the electrical wiring in that building. You might also realize that when the Chelan PUD workers left, the only access to electricity that I had was from a single outlet inside the building.

I’d lost my 30 amp RV connection the previous day when I took down the temporary power pole I’d been plugged into. I was living in the RV but had no easy access to AC power. Instead, I was relying on the RV’s two batteries and the solar panel on the roof to keep them charged. While this is a very workable short-term solution, it did mean that I’d have to rely on propane for my refrigerator and hot water and that I wouldn’t have access to some conveniences, such as my microwave and coffee maker. Yes, I do have a 2 KW Honda generator that I could have pulled out and fired up, but who really wants to listen to that noise?

The Task at Hand

My task was clear: get the 30 amp RV outlet set up at the shed, which was on the opposite side of the driveway from my building, about 25 feet from my RV.

I’d run the 2 inch schedule 40 conduit under the driveway to the shed earlier in the week and it had been approved by Labor and Industries (L&I). All I needed to do was run a set of 10 gauge wires through the conduit and set up the appropriate sealed boxes on the other end for the outlet. While I was at it, I’d run a set of 12 gauge wires through the same conduit for a 20 amp circuit so I could put a 115v outlet on the outside of the building as well as an outlet and light inside the shed.

Running the Wire

Although the shed was only about 80 feet from my building, the conduit did not run in a straight line. Jeff, my earth-moving guy, had run it with the 3 inch conduit toward the transformer box, then turned left and ran it with the water line to the shed. Near the shed, it turned right to get to the north side of the shed where I wanted the utilities. (The frost free valve for the water was already installed there and running well, supplying my RV, chickens, and garden with water.) I’d walked the trench with my long measuring tape: 96 feet.

It was the bends in the conduit that could pose a problem: 90° at the building, 90° where it met the water line, 45° in front of the shed, and 90° where it came up out of the ground at the side of the shed.

The first job was getting a wire pull line — sometimes referred to as a fishing line — through the conduit. This was remarkably easy. I tied a bunched up plastic shopping bag to the end of some garden twine I had and tied the other end to the water valve near the conduit opening at the shed. I stuffed the bag into the conduit, then went into my building, plugged in my Shop Vac, and put the Shop Vac’s business end to to other end of the conduit. I fired it up and it sucked.

The shopping bag didn’t quite make it. The garden twine wasn’t long enough. No problem. I attached one end of the pull line the PUD guys had given me the day before to the end of the twine, went back to the Shop Vac, and sucked some more. Whoosh! The shopping bag stuck to the Shop Vac hose. I turned it back off and pulled the twine to bring the pull line all the way through.

Pulling Wires
Necessity is the mother of invention and I can get pretty inventive.

For each circuit, I needed 3 wires: black, white, and green. That meant six wires. I’d bought them on 100-foot spools a few days before. I carefully grouped the ends together, wrapped the strap around them, and used duct tape to make a smooth, somewhat pointed end on the pull line. I pushed it into the conduit. Then I rigged up my old copper grounding rod (from the temporary power pole) on two saw horses near the opening of the conduit, went back to the shed, and started to pull.

It was easy at first. Hand over hand, I pulled the wire, watching the spools turn by my building. Then I hit a snag. I pulled hard but didn’t get anywhere. I went back to the building, pulled back, then went back to the shed and pulled again. The wire started to move again.

This went on for a while. The wire got harder and harder to pull. So I did what any machine-loving woman would do: I hooked up the pull line to my ATV and used that to pull. That got me another 20 or so feet, but it was pulling sideways and damaging the top of the conduit. I needed a better solution.

Dowel Rig
My friends tease me about having so much “stuff,” but every once in a while, some of that stuff comes in handy.

I went into my shop and fetched one of the dowels that had been a curtain rod at my Arizona home. (There’s a funny story about these “curtain rods” and why I took them, but I’ll save that for another post.) I cut it to about 2 feet in length and then rigged it up to the side of the shed with some scrap wood and nails. Then I moved the ATV into position. Now I could use the ATV to pull straight up.

Pulling wires with ATV
It seemed like a good idea at the time.

That got me another 5 or so feet. That’s all. The wires were stuck hard. Repeated attempts simply pulled the dowel off the shed. (So much for that idea, huh?)

I could tell by the amount of wire left on the spools that I was almost all the way to the shed. The thought of pulling it all back and starting over was too much to bear. My arms already ached from the effort I’d expended. I called it quits to think about it some more.

I called my friend Bob. He told me to pull the wires out and check the connection between the wires and the pull line. He said the connection was probably getting hung up on one of the bends in the conduit. He said I should then bunch the wires together every 3 feet or so and wrap them with electrical tape. Then feed them through again.

I really didn’t want to do it. I knew that once I got the wire out, it would be a two-person job to feed it back in.

So I invited him for dinner. (Did I mention that there are no free meals here?) I grilled sausages and made a nice salad with fresh mozzarella and tomatoes from my garden. We ate outside as the sun was setting. It was very pleasant and relaxing.

After dinner, we pulled the wires out and bunched them with tape as he’d suggested. He reconnected the wire to the pull line using a different technique and we worked together to pull the line through.

And that’s when I got the really bad news: the wire wasn’t long enough.

You see, although I’d measured the trench distance, I failed to account for the sweep down from the building and the sweep up to the shed. The trench was 96 feet long and 3 feet deep. That added at least 8 feet to the length of the conduit, which stuck out at least a foot on either end. The wire was about 4 feet short of what I needed.

And no, splicing additional wires on was not an option.

So now I had about $150 worth of wire I couldn’t use.

Loose Wire
The wire guy at Home Depot gave me two bunches of wire: one set of 10 gauge and one set of 12 gauge.

The next day, I went back to Home Depot and bought 120 feet of each type of wire. I had to buy it off the bulk reels because the next size reels were 250 feet and I already had 100 feet of wire I didn’t need. When I talked to the wire measuring guy about my situation, he told me I could return the unused wire. All I had to do was get it back on the reels. (Talk about a job for a rainy day.) They’d just resell it from the bulk wire area.

Of course, now I had six loose strands of wire — not on reels — to feed into the conduit. Another two-person job. I prepped as well as I could and called my neighbor, Kathy, to come give me a hand. She promised to come later in the day, after work.

Wind Chimes
I hung my big wind chimes from the bottom of my front deck, just outside my front door. This spot is relatively sheltered from the wind so they don’t get tossed around much. I love the sound of these chimes and am so glad I didn’t leave them behind.

I busied myself with other odd jobs while I waited. I’d begun unpacking boxes with flower pots and other outdoor items in them. I was using the shed for anything garden or bee related. One of the boxes included my wind chimes. I hung the big, deep-toned ones by the building and the smaller ones by the shed. Later, when I heard them chiming, it brought back bittersweet memories of my home in Arizona, where they’d hung together at the front door for so many years.

This was the Friday before labor day. I was also expecting the Chelan PUD fiber optic guys to come by to re-run my fiber optic cable through the new conduit I’d laid to my building. (I’d cut the old fiber optic line when I took down the temporary power pole on Tuesday and didn’t have Internet either.) That afternoon, a PUD truck rolled up and a guy stepped out with some disappointing news: they wouldn’t be able to run the cable until Monday. No, Tuesday because Monday was a holiday.

Another three days without Internet. Ugh.

The PUD guy and I chatted for a while. Like everyone who comes by my place to do work, he commented on the view and what a “nice setup” I have. (Everyone uses that phrase: nice setup.) I told him I was doing all the electrical work myself and mentioned my current challenge: getting the wire run to the shed. I told him I was waiting for a friend to come help me.

That’s when he offered to help me.

I’m not an idiot. I said yes.

Wires Pulled
I sent this photo to my friend Bob to show him the hard part of the job was done.

He pulled at the shed, I fed the wire at the building. It took five minutes. I thanked him, still rather shocked at how easily it had been done. Then we wished each other a good weekend and he left.

I called Kathy and told her not to bother coming. Then I took a picture of the wire coming out of the conduit and the shed and texted it to Bob.

Wiring the RV Outlet

Before I could wire the RV outlet, I needed to finish work on the conduit at the shed. This meant adding a junction box and fittings and mounting the RV outlet panel.

It should come as no surprise that I needed another trip to Home Depot to get the fittings. The most challenging part was getting the fittings to downsize the 2 inch conduit to 1 inch conduit. That required a trip to Lowes because Home Depot didn’t have all the adapters I needed.

Conduit Done
In this shot, the conduit to the RV outlet is complete; the wire hanging outside the junction box is for the other circuit.

Because all this has to pass L&I inspection one day, it was important to do it right the first time. I used some scrap wood behind the conduit so I could clamp it to a solid surface. Then I cut the conduit to remove the damaged edges, assembled the fittings, and glued them all together. I used the junction box to separate the 10 gauge wires for the RV outlet from the 12 gauge wires for the other circuit I’d set up in the building.

Once the box was mounted, I wired the RV outlet. This wasn’t difficult at all; I’d already done one of these on my temporary power pole.

Then I went back to the building side of the setup. I had to drill a hole in my building (!) and fix up the conduit there. Again, I needed a good, weathertight seal that would pass L&I inspection. I also needed another trip to Lowes. (Of course.)

Once the wire was in the building, I ran it up to the service panel above it. I flipped off the main breaker and used my multi-meter to confirm that there was no power going to the board. Then I wired the white and green wires to the grounding bus and the black wire to the 30 amp circuit I’d bought. I snapped the circuit breaker into the board.

Or at least I tried to. The damn thing wouldn’t go in.

It took a while to figure out that the breaker I’d bought wasn’t compatible with the service panel. The breakers that came with the panel had an extra cutout that was necessary for a piece of metal to fit in. My repeated attempts to push the thing in was only scratching the plastic where that cutout should be.

I did not want to go back to Home Depot that day. I’d already been there twice and it’s at least an hour round trip drive.

Fortunately, I still had a 30 amp breaker in the temporary power pole now lying on the ground beside my driveway. I went out and pulled it off. I can’t tell you how relieved I was to see that it was compatible with my panel.

I attached the black wire to the circuit and snapped it in. Then I popped out the metal tabs on the board cover and put it on the panel. Finally, I turned on the main breaker and the 30 amp breaker I’d just installed. No breakers popped. So far, so good.

Plugged In
Plugged into my brand spanking new 30 amp RV outlet.

I went outside and swapped out the 100-foot 30 amp RV cord I’d been using for the temporary power pole with the 25-foot 30 amp cord stored in the RV basement. Then I plugged it in.

I went into the RV and looked at the microwave. The clock was lit up: 0:00. I had power. Success!

I can’t tell you how good it was to use my coffee maker the next morning.

Wiring the Rest of the Shed

After all this — hell, I’m tired from just writing about it — wiring the rest of the shed was pretty straightforward. I started it the next day after another trip to Home Depot.

First, I had to put a rectangular hole in the wall of the shed for the outside outlet. I marked where the outlet would go on the inside of the building and drilled holes in two opposite corners. Then I used my reciprocating saw with the wood blade on it to connect the holes along the lines I’d drawn. The resulting hole wasn’t neat, but it was the right size. I mounted the blue outlet box inside the shed facing out.

Then I mounted blue boxes for the inside outlet, light switch, and overhead light. I ran 12/2 wire from the outdoor outlet box to the indoor outlet box to the light switch box to the light box and tacked everything down with wiring staples.

Outdoor Outlets
Here’s what the outdoor wiring looks like on the side of my shed after wiring the 115v outlet.

Next, I had to put a round hole in the building for the wires to come inside. I fed the wires through various conduit and connectors and into the building. I glued and caulked where necessary to seal everything off neatly. From there, I ran the wires into the outdoor box.

Inside Wiring
The inside wiring, completed.

Then came the fun part: wiring the outlets and lights. The outdoor outlet had to be GFCI protected and I did that one first. Then the indoor outlet. Then the light switch.

Shed Light Fixture
This light fixture was originally mounted on the wall inside my building; it’s much better in the shed.

Finally, the light itself. I’d taken the fixture from the inside of my building after replacing it with a different style that I’d bought during one of my many trips to Home Depot. (Yes, I’m already replacing fixtures.)

When I was done with all the wiring and had checked it over to make sure it was right, I went back into my building to set up the 20 amp circuit. At the same time, I wanted to replace the 30 amp 2-pole circuit breaker I’d installed the day before with a single pole circuit breaker I’d bought to replace the incompatible one.

Completed Panel
When I was finished, I had three completed circuits: the small one for the panel area and two for the shed.

So, once again, I turned off the main breaker, tested the board to make sure power wasn’t flowing through it, and did some wiring work. The breakers snapped into place easily. I covered up the panel, turned everything back on, and went out to shed to test my work.

The GFCI had to be reset and tested; I followed the instructions to do that. I used a fan to test the outlets and flicked the light switch. Success!

Lessons Learned

I learned a lot during this project. First and foremost, the most difficult task ahead of me is probably going to be to run the wires. While it isn’t always physically demanding, it often requires two people. I suspect I’ll be making a lot of lunches and dinners for friends in the coming weeks.

I also learned that no matter how many times you go to Home Depot or Lowes to get the things you think you need for a project, you simply won’t get it all. There’s always another trip ahead of you. The solution is to always buy more than you need, including some things you might not need at all. Home Depot has a excellent return policy; each trip I make there starts with a stop at the return counter to bring back things I didn’t need. It all goes right back on my Home Depot credit card. I don’t even need to bring a receipt; they scan my card at the beginning of the transaction and can see exactly when I bought an item. No rush, either. I’ve returned things months after buying them.

I have a lot of electrical projects ahead of me. My goal is to complete one circuit each week, starting in my shop and garage before moving upstairs. I hope to have 90% of the wiring done before Thanksgiving. I’ll blog about the more interesting projects, like the arc lamp project I finished this past week.

Questions? Comments? Suggestions? Want to volunteer to help me pull wire? Use the comments form for this post. I’d love to heard your construction and wiring stories, too!

Construction: Setting Up the Power

I bring electrical power into my building.

On May 20, 2014, I began blogging about the construction of my new home in Malaga, WA. You can read all of these posts — and see the time-lapse movies that go with them — by clicking the new home construction tag.

I don’t know if it’s a state or county law, but for new construction, a home owner has two options for setting up electrical power in their home: hire a licensed electrician to do all the work or do all the work herself. Because of my tight budget constraints, I elected to do all the electrical wiring myself.

Don’t get the idea that I’ve done electrical wiring work before. I haven’t. Any time something needed to be wired, I let my wasband do it. After all, he knew how and I didn’t. It wasn’t until he was out of the picture that I did my first wiring job: replacing a thermostat in my Arizona home. That was nothing compared to what I had ahead of me to wire a 2880 square foot garage and 1152 square foot living space. And a 6×8 foot shed 80+ feet away from the power source.

My Job

Meter Requirements
The Chelan PUD provides this illustration to show requirements for the conduit connection to the meter base.

The first challenge was installing the meter base and service panel. The meter base is the component that the power company — in this case, the Chelan County PUD — attaches the electric meter to. The wires come out of the ground, through a conduit I’d have to provide into a metal box on the outside of my building. The conduit had all kinds of size and component requirements and would have to be sealed to the meter base. On the other side of the wall I’d have to install a service panel with the circuit breakers that would connect to all of my electrical circuits. I had to not only mount both devices, but connect them with extremely heavy duty wires. In addition to all that, I also needed to run a copper wire from the service panel back outside the building and connect it to 2 8-foot copper rods driven all the way into the ground at least 6 feet apart.

(These requirements weren’t exactly new to me. After all, I’d installed my temporary power pole back in September 2013. But that was already partially cobbled together when I got it and I had an advisor to help me make the connections. The only part I knew how to do well was to drive in those grounding rods.)

In addition to all this, I’d also have to have at least one circuit installed in the panel. That circuit would have to run to an outlet and light, presumably with a light switch.

My work would be inspected by a government entity called Labor and Industries, which also sold me a permit before I started work. L&I, as it’s locally called, is responsible for all wiring inside a building; the PUD is responsible for wiring outside. L&I had to approve the installation of the meter base and service panel before PUD could connect power.

The Timing Issue

Coordinating visits by the PUD and L&I workers and inspectors was crucial and tricky. I had to know when each bit of work would be done so I could request services and inspections I needed.

Once the PUD turned off power to my temporary pole so we could finish the earth work in that area, I would not have power restored until I passed L&I’s inspection. I couldn’t pass that inspection until I installed the conduit, which had to be done as part of the earth work. PUD couldn’t reconnect my power until I passed the L&I inspection. Not only did all the work need to be done timely in a certain order, but the PUD and L&I work had to be scheduled properly.

That’s how I spent Thursday while I was on vacation out at Lopez Island. I excused myself from my host, sat down with a calendar and note paper, and made a bunch of phone calls. The result:

  • Monday morning: Jeff the earth-moving guy and I would dig and install as much conduit as we could.
  • Monday afternoon or Tuesday morning: L&I would inspect the meter base and service panel. I should have enough of the conduit installed to satisfy them.
  • Tuesday morning: PUD would turn off temporary power.
  • Tuesday afternoon: Jeff and I would dig and install the remaining conduit to the transformer box.
  • Wednesday morning: PUD would connect permanent power to my building.

That was the plan, anyway.

The Meter Base and Service Panel

I bought everything I needed to mount the meter base and service panel. At least I thought I did. The funny thing about working on building projects is that no matter how many things you buy at Home Depot or Lowes, you always forget something. Or get a wrong thing. My primary destination these days is Home Depot, which is a 40-minute drive from my home. I’m there at least five times a week. (Maybe I should get a job there.)

On Sunday, my first full day home after vacation, I tried to start work. The trouble is, I couldn’t figure out how to mount the meter box on my building and I absolutely dreaded the thought of cutting a hole in the metal.

Bob Drills a Big Hole
Bob drilled a hole in my building while I looked on, cringing. Since then, I’ve drilled more than a few holes in my building.

My friend Bob came to the rescue. He came by with tools and experience and advice. While his dog Skip and my dog Penny played together in the yard, he helped me decide on a location for the boxes — height was the primary issue that needed determination — and has the dubious honor of being the first person to drill a hole in my building. Of course, we didn’t have everything we needed to finish up, so we made the trip down to Home Depot together in my Jeep, stopping for tacos at the Plaza on the way back. (Have I ever mentioned the abundance of excellent, authentic Mexican food in this area? Whodathunkit, huh?)

Meter Base Installed
Here’s the meter base right after mounting. I connected wires to the lower contacts, ran them through the hole, and connected them to contacts on the service panel on the other side of the wall.

By the time he left, the meter base was securely fastened outside the building with a “nipple” connecting it to the service panel securely fastened inside the building. I ran the three cables between the two panels and fastened them securely.

The First Circuit

Before leaving for vacation the week before, I had already wired my first circuit.

Light switch and outlet
The outlet and light switch for my first circuit.

Although I’d wanted to set up the entry hall light with a 3-way switch to make accessible from both upstairs and downstairs, Bob had convinced me to keep it simple. So I wired up a 2-gang box with an outlet and single pole switch that ran to a fixture mounted nearby. The fixture was designed for the ceiling, but I mounted it on the wall, which meant the shade wouldn’t stay on it. I hoped the bare bulb wouldn’t bother the inspector.

First Circuit
Here’s my circuit board with my first circuit installed. I’ve decided to use 20 amp circuits throughout the building except for circuits that require higher amperage.

With the service panel in place, all I had to do was run the wires from the outlet into the service panel and attach them to the neutral bar and circuit. This was remarkably simple. It was also the only time I’d be able to work on the panel without worries about electrocution since there was no power running to it at all.

The Conduit and Grounding Rods

Sweep
Here’s the 3-in conduit where it approaches my building. My job was to connect it to the meter base mounted on the wall above it.

I began running the required 3-in schedule 40 conduit the next day when we started the earth work.

Measuring and cutting the conduit to piece together required components to connect the sweep to the meter base was a bit of a challenge. My reciprocating saw made a mess of the plastic pipe when I cut it so I had to use my hacksaw. I got the measurements wrong once — fortunately, I hadn’t applied any glue yet — and had to recut a piece. But in the end, it came together well. I glued everything together, feeling relieved that the hardest part was done.

Although everyone had warned me that driving the two grounding rods into the ground would be difficult, I knew otherwise. I’d already done it once on my property — for the temporary power pole — and with a T-post driver the work had gone remarkably well. My building site is pretty much free of large rocks, as the builders discovered when they dug the holes for my building’s posts. Besides, with a 4-foot trench in the area, I only had to drive them 4 feet into the ground. As I expected, the work went quickly. I drilled a small hole through the building’s metal near the ground, ran an 8-gauge copper wire I’d bought as a remnant from Home Depot the day before from my panel to the two poles, and considered the job done.

I was now ready for inspection.

The First Inspection

The inspector showed up very late that evening. It might have been around 7 PM. He’d spent the day up in Chelan and I think the only reason he came that evening at all was because he lived nearby and had more jobs to do farther away the next day. Knocking off my inspection would leave him free to get to those other jobs first thing in the morning.

He checked the wiring of my outlet and light switch and seemed satisfied. Then he looked at the service panel. He disconnected the grounding wire, which I’d put in the wrong place. He was about to move it to the correct place when he realized it was 8-gauge wire. It was supposed to be 6-gauge.

Oops.

He said he couldn’t pass me until I replaced the grounding wire. He told me either he or another inspector would come back the next morning. I told him I’d have it taken care of.

Replacing the Grounding Wire

I absolutely dreaded the thought of driving all the way down to Home Depot that night or the next morning to buy more wire. As I was going to sleep, however, I remembered that I’d never cut the grounding wire on my temporary service pole. Instead, I’d left the extra wire coiled up beside the pole.

The next morning, I took my bolt cutters and cut the wire as close to the rod as I could. Then I went back to my building, disconnected the other wire, and ran the old wire through the hole. It was a stretch, but the wire was just long enough to go from the panel, down the wall, through the hole, and attach to the tops of both copper rods. Yes, I’d saved some money, but I’d also saved myself a trip to Home Depot.

The Second Inspection

A different inspector came to look at my work later that morning. He had a long beard like the guys in ZZ Top. He pointed out that the first outlet on a garage circuit needed to be a GFCI — a fact the previous inspector had neglected to mention. He also pointed out that I needed to clamp the conduit to the building in at least one place. But he passed me for PUD connection purposes, with the requirement that I make the two changes before final inspection.

I asked him whether I needed him to inspect the conduit that ran from the building to the shed where I planned to install power. He told me that L&I was responsible for inspecting anything on the inside of the circuit panel. Since the two circuits I planned ran from the panel back outside, he did need to inspect the conduit. Even though it wasn’t 100% complete — I still needed to bring the conduit into the building and shed on either end — he approved it. If he didn’t approve it, Jeff wouldn’t be able to bury it and that would hold up the entire project.

PUD Disconnects and then Connects

The PUD workers arrived a while later to turn off the temporary power. That enabled us to do the earth work needed to get the conduit right up to the transformer box.

From that point forward, I had no power at all. Fortunately, my RV has a solar panel on the roof that keeps its batteries — which I replaced just last year — fully charged. I could go without the microwave and coffee maker for a while. Later that day, I’d move the few items I had in the chest freezer into my RV’s freezer, which would operate on propane.

A while later that same day, a PUD engineer, who’d come primarily to consult with me about the possibility of moving the transformer, approved the conduit from the transformer to the meter base.

Jeff finished the earth work and buried the conduits, pipes, and telephone cable I’d run. (My property had a telephone line running to it and a huge roll of cable sitting beside it on the ground. Even though I don’t want a land line, the next owner might so I ran the cable in the trench. Not sure if I’ll bother to run it inside the walls, though.)

On Wednesday morning, the PUD guys came back. A crew of six ran the cable from the meter base to the transformer and installed the meter. When they were done, I had power in the building.

Success!

Working Circuit
It worked!

I was alone when I flipped the main breaker in the service panel. Then I turned on my only circuit breaker. I reached over and flicked the switch for the light. The bulb lit up.

It may seem silly, but I consider the lighting of that bulb another major breakthrough in the construction of my new home. Like the day I held the keys in my hand for the first time, it’s a milestone — something that registered inside me as a sign that I was moving forward.

But what’s more important is that having electricity inside the building meant that I could begin the task of wiring the building. That means planning and adding outlets and lights and switches throughout the garage and living space above. It’s a huge task made more difficult by having to do it alone — try running wire long distances when there’s no one to feed it while you pull. But like everything else I’ve been dealing with for the past two years and much of my adult life, it’s just another challenge.

And I’ve come to realize that I live for challenges.