First Impressions of Making Cabochons with the CabKing 6

As a ghost from my past used to say, any job is easy when you have the right tools.

One of the things that has been frustrating me lately in my jewelry-making endeavors is my inability to fine-tune the stones I acquire so they better meet my standards. For example, I bought a bunch of cabochons from a dealer in India and they all arrived with unpolished backs. While that’s acceptable if you plan to set the stones with something behind them, I don’t. I want the entire stone polished.

So I tracked down a local lapidary, Gary, who does it as a sort of retirement hobby. He polished the backs of the stones and charged me a nominal fee. It was neat to watch him do it on his cab making machine. But when I got another set of stones from another dealer and realized how much work they’d need to be usable, I realized that I’d soon become a nuisance to Gary.

Add to that a load of local petrified wood and obsidian that an orchard-owning friend of mine, Donn, was trying to unload. As is, no one would touch them — and I must have asked a half-dozen rock people. But with a little cutting and polishing, they might be salable — or at least usable in the jewelry I make.

And, of course, I was making fused glass cabochons in my kiln from repurposed wine bottles and they needed polishing to make them usable.

So it made sense to buy a cab machine.

At least that’s what I told myself.

It was a big expenditure and I sat on the fence for a few weeks before pulling the trigger. I needed a birthday present, I reasoned. There were only two things in the running: an inflatable Hobie pedal kayak that could accept a sail kit — yes, they do make things like that these days — or the CabKing 6 cabbing machine. Believe it or not, the CabKing was about $1,000 cheaper. I reasoned that I could use it for my jewelry business and, thus, write it off. That would reduce the cost by my current year tax rate — as if that really mattered. The fact that I needed a birthday present was enough to get me to buy it. (Maybe I’ll get that kayak next year.)

CabKing 6
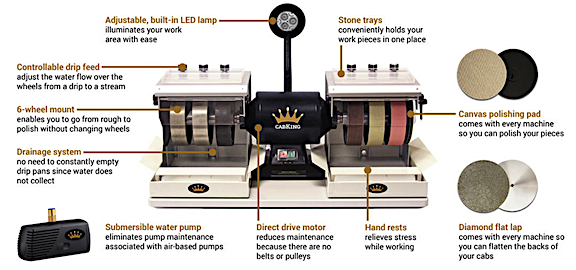
The CabKing has 6 grinding/polishing wheels and other features that make it a great tool for making cabochons.

I should mention here that a lapidary friend of mine that I know from Quartzsite, AZ, John, told me not to buy the CabKing. He’s a Diamond Pacific dealer and that’s what he uses. He told me he could get me a deal on a comparable Diamond Pacific machine that had only been used about 10 hours in one of the stone-cutting classes he leads. But even with the discount, the machine would cost about $500 more. And I really liked the way the CabKing handled the water used to cool the stones as you grind and polish: it always puts fresh water on the wheels so there’s no chance of contamination from earlier stages in the grinding/polishing process.

Gary said the CabKing was a good machine but it had a tendency to splash a lot of water.

It came last week. So did some stones for tumbling and polishing. I played around with it. I was surprised about how easy it was to use to shape stones.

I had some trouble getting fine scratches out of my finished stones. I attended YouTube University for about an hour or two and watched a bunch of cab-making videos, including this good one. I soon realized that the scratches had to come out very early in the process — on my machine, by the time I’d run the stone through the third wheel, a 280-grit diamond resin pre-polish wheel. I took the stones back down to my shop and reworked them. The results were very satisfactory.

First Batch of Stones
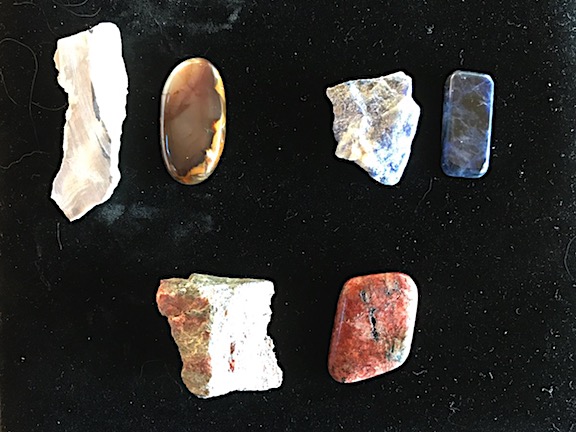
This is the first batch of stones I polished: petrified wood, sodalite, and a mystery stone I got from a friend’s garden.

I found that the petrified wood I’d gotten from Donn polished up beautifully.

Yesterday evening, I gave it another go with five pieces of stone: rose quartz, hawk’s eye, local obsidian, local petrified wood, fused wine bottle glass. In the afternoon, the driveway in front of my shop is in the shade and, with a nice little breeze blowing, it can be quite cool, even if it’s hot in the sun. So I wheeled the machine out — I installed it on one of the many wheeled carts I have accumulated — put a stool in front of it, and got to work. Two hours later, I had five decent cabochons.

To show them off better, I made a little video this morning. Check it out:

I’m learning a lot about stones and how the hardness affects how easy they are to cut and polish. The hawk’s eye is a mix of soft (tan) and hard (dark gray) stone and I have to be careful not to press too hard on the soft side. It doesn’t polish very well. The rose quartz and petrified wood polish very nicely. The obsidian had imperfections that turned into pits in the finished surface. And the glass polishes nicely, although fuse lines in the glass appear almost as cracks in the finished piece.

I’m starting to wonder what basalt, which we have no shortage of here, would look like polished. (You can bet I’m going to try it.)

I bought some slabs of outback jasper, bumble bee jasper, and moss agate to work with. I figure that each of these small slabs should yield 2 to 3 cabochons. The bumble bee jasper, which is a soft stone, is pitted and I’ll likely try stabilizing it before cutting and polishing it. I’m hoping that process fills the pits with a clear epoxy that’ll make it possible to get a good polish. We’ll see.

Slabs
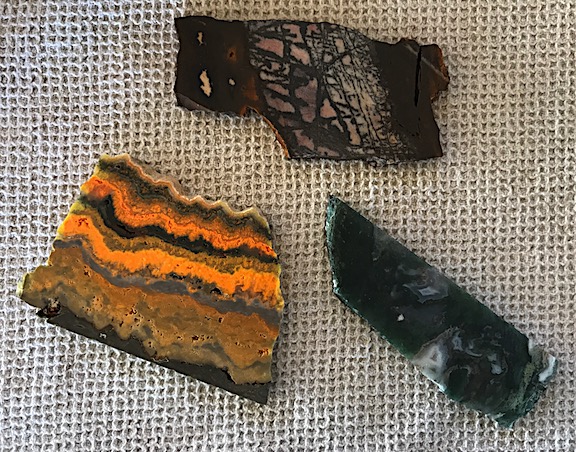
I bought these three slabs to try to make cabochons. I’m just hoping that my tile cutter can cut them into pieces without breaking them.

I think what I like most about this is how much I’ve learned about stones and lapidary work since January. (Yes, it’s just been since January that this became my latest hobby-gone-wild.) I love being creative in ways other than with words. I love being able to share nature’s beauty in a way that people can appreciate. And it’s nice getting paid to make the things I make.

R44 iPhone and iPad Power and Mount

What you need to get the job done — and how I did it.

One of the great things about the R44 is the DC power port located rather conveniently between the two front seats facing backwards. At first glance, it seems as if it would be the perfect accessory for charging any number of devices.

Well, it is — but not without jumping through a few hoops. The trouble is, on a Raven II, that port is connected to the 28v DC power system and puts out 24v to 28v of power. Plug the wrong kind of DC accessory into it and you can fry your device.

Seven Years of Struggle

Like most pilots, I can certainly use that power port to charge any number of devices: cameras, phones, and, most recently, an iPad. And since buying my helicopter more than seven years ago — has it really been that long? — I’ve tried numerous devices to make it work.

I should state right here that I’ve had passengers simply plug car chargers for their phones into that port. They did it without asking me — you know how passengers can be — and I never heard about any harm coming to those phones or the chargers. But not only does the label on the port assure me that it’s 28v, but a call to the Robinson factory confirmed it. I was not about to plug any 12v charger or power cable I owned into it without stepping down the power.

To that end, I purchased a little box that supposedly made any conversion I wanted. I dialed in 24v (which is apparently close enough to 28v to make everyone happy) to 12v, plugged in my devices, and it worked.

Until the day I was warming up the engine with two photographers on board and began to smell burning electronics. (I have a very good sense of smell. I once woke up in the middle of the night smelling smoke. In the morning, I learned that a building about a mile away had burned down overnight. But I digress.) I reached back and felt for the box. It was melting. I pulled the plug, glad that I was still on the ground, and later threw it away.

When I got my Moitek Mount, which has three Kenyon KS-8 gyros, I bought Kenyon’s 28v dual inverter to power two of them. (The third is powered by a battery pack.) To date, that’s the only device-specific power supply I’ve found that accepts 28v input.

Bestek MR-C21A
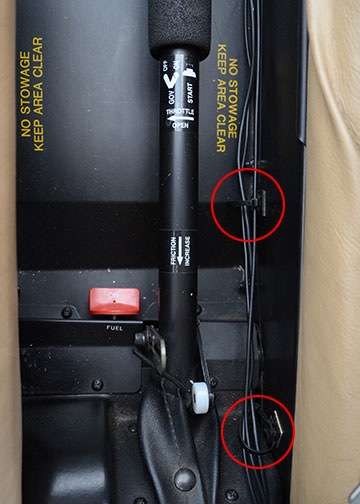
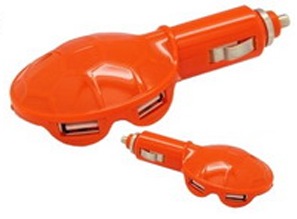
Next came “the turtle.” My friend Don recommended it to me and that’s what he called it. It’s actually a Bestek USB Charger, model C21A. It’s a DC to USB charger that has 4 USB ports. It accepts input of 10v to 30v and supposedly outputs up to 2.1 amps. By that time, that’s what I needed — I had an iPad 2 and was beginning to use it for Foreflight. As the manufacturer advised, however, you should only use one port when charging an iPad. What I discovered is that if I used the iPad in flight, even with just one USB device plugged in, I could not maintain a charge on the iPad. Although it said it was charging, the power was still trickling away. Yes, I was able to stretch the iPad’s use out to 12 hours on a very long cross-country flight, but that’s because I kept shutting it off when I didn’t need to consult it. And it irked me that I couldn’t charge my phone at the same time.

I should mention here that I tried a variety of other solutions for DC to USB. I must have more of these damn devices than anyone on the planet. The turtle worked best — but it didn’t work good enough to make me happy. The others mostly didn’t work at all.

When I bought a new iPad, the problem came to a head. The turtle couldn’t provide enough power to even indicate that the iPad was charging. On a recent day-long charter with several off-airport stops and long waits, my iPad went completely dead. Not acceptable.

Mediabridge to the Rescue!

With another very long cross-country flight ahead of me, I decided to stop screwing around and find a solution that worked flawlessly. So I began a search for a DC to USB charger that could charge both my iPad and my iPhone at the same time.

Mediabridge USB ChargerI found the solution on Amazon.com: the Mediabridge High Output Dual USB Car Charger for iPad and iPhone. [Sorry, but as of 30-August-20 this product is no longer listed on Amazon.] This device takes input from 12v to 24v and outputs a total of 3.1 amps: 1 amp on one USB port and 2.1 amps on the other USB port.

Long iPhone/iPad CablesI coupled that with a pair of KHOMO Extra Long USB Sync Cables for iPhone/iPad. These cables are 6 feet long. I needed the length to safely run the cables from the middle of the aircraft to the place I’d mounted my devices. More on that in a moment.

This afternoon, I went out to the helicopter, plugged everything in, and flicked the Master Battery switch. Sure enough, my iPhone and iPad both indicated that they were charging.

Total cost of this power solution: $12.99 + $9.99 = $22.98.

Cockpit Management

Empty Mounts
Here are the two RAM mounts, empty, mounted on the Robinson GPS bar. You can see the tray behind the iPad mount.

Mount with iPad & iPhone
Here are the mounts with the iPhone and iPad installed and turned on. No, the glare isn’t much of an issue in flight. (Overheating in direct sunlight is another story, though.) As you can see, the bar does not interfere with my use of the pedals. Remember, the bar is a Robinson component; not something I whipped up and installed myself.

cable ties
Here are the wire tie pieces I use to keep the wires tidy.

Tidy Wires
I attached the wire ties to the side of the instrument panel with the adhesive pieces. I looped the ties wide enough to pass the end of a USB plug through.

more tidy wires
I did the same along the side of the pilot seat. This keeps the wires from getting tangled in the collective, which would be a serious problem.

Of course, my solution isn’t limited to just the power accessories discussed above. I’m a strong believer in having a tidy cockpit — especially when flying solo or flying long distances. I already have mounts for my iPhone and iPad that keep them within reach without blocking my view of any instrument or what’s outside the cockpit bubble.

My solution has multiple components:

  • A customized version of the GPS mounting bar Robinson offers. Mine was installed by the folks at Helicopters Northwest at Boeing Field in Seattle. It includes the bar and a semi-useful tray that I clip duty sheets onto when I fly. (Before I got the iPad and Foreflight, I used it to display charts or lists of airport frequencies.)
  • A RAM mount for iPad with glare shield clamp. I clamp it to the base of the tray on the bar.
  • A RAM mount for iPhone with U-Bolt Rail mount. A friend of mine customized the U-Bolt mount to remove the U-Bolt and add a plate he made in his shop. A pair of straight bolts attaches it to the bar.
  • A number of adhesive wire tie holders with wire ties. I found these gems in a great little hardware store in Chelan, WA and bought a ton of them.

Let me take a moment to talk about RAM mounts. I love RAM mounts. It’s a component system, so you can mix and match parts. What works for you today might not work for you tomorrow in a different aircraft or with a different device. But RAM has you covered. You just get the pieces you need and use them with other pieces you already have. For example, I already had the custom U-bolt thing for another purpose; I just repurposed it with the iPhone mount. Ditto for the iPad mount; it came with a kneeboard. Mix and match. Well made stuff, too.

So if you think you need to enlighten me on how RAM mounts suck and how what you’re using is so much better, save it. I have a sizable investment in RAM equipment and will not switch now or anytime in the foreseeable future.

At the same time, I’m not saying that my solution, as outlined here, is “the best.” It’s the best (so far) for me. But it all hinges on the availability of that Robinson GPS bar. It’s not easy to get; for a long time, Robinson wouldn’t sell them. I’m not sure if they’re selling them now. But it’s a great add-on for any Robinson. Rock solid, bolts onto the frame, great platform for any equipment you need handy but out of the way.

I do, however recommend mounting your devices with sturdy but easily removable mounting components affixed to something that won’t vibrate like crazy, is within arm’s reach, and doesn’t block your view of anything.

I ran the wires — including an audio cable so I could listen to music in flight — through the loops I made in the wire ties and made sure they were tight. (I’m thinking of braiding them to keep them all together but haven’t decided if that’s a good idea yet.) I wrapped any excess around the bar over my feet. I can then plug in the devices on both ends.

It’s a temporary solution that is extremely effective in keeping everything neat without any modification to the aircraft.

Works for me.