Construction: Wiring the Shed

The biggest challenge was getting the damn wire out there.

On May 20, 2014, I began blogging about the construction of my new home in Malaga, WA. You can read all of these posts — and see the time-lapse movies that go with them — by clicking the new home construction tag.

If you’ve been following these posts, you know that in late August, I finally got permanent power run to my building under construction and that I had taken on the task of doing all the electrical wiring in that building. You might also realize that when the Chelan PUD workers left, the only access to electricity that I had was from a single outlet inside the building.

I’d lost my 30 amp RV connection the previous day when I took down the temporary power pole I’d been plugged into. I was living in the RV but had no easy access to AC power. Instead, I was relying on the RV’s two batteries and the solar panel on the roof to keep them charged. While this is a very workable short-term solution, it did mean that I’d have to rely on propane for my refrigerator and hot water and that I wouldn’t have access to some conveniences, such as my microwave and coffee maker. Yes, I do have a 2 KW Honda generator that I could have pulled out and fired up, but who really wants to listen to that noise?

The Task at Hand

My task was clear: get the 30 amp RV outlet set up at the shed, which was on the opposite side of the driveway from my building, about 25 feet from my RV.

I’d run the 2 inch schedule 40 conduit under the driveway to the shed earlier in the week and it had been approved by Labor and Industries (L&I). All I needed to do was run a set of 10 gauge wires through the conduit and set up the appropriate sealed boxes on the other end for the outlet. While I was at it, I’d run a set of 12 gauge wires through the same conduit for a 20 amp circuit so I could put a 115v outlet on the outside of the building as well as an outlet and light inside the shed.

Running the Wire

Although the shed was only about 80 feet from my building, the conduit did not run in a straight line. Jeff, my earth-moving guy, had run it with the 3 inch conduit toward the transformer box, then turned left and ran it with the water line to the shed. Near the shed, it turned right to get to the north side of the shed where I wanted the utilities. (The frost free valve for the water was already installed there and running well, supplying my RV, chickens, and garden with water.) I’d walked the trench with my long measuring tape: 96 feet.

It was the bends in the conduit that could pose a problem: 90° at the building, 90° where it met the water line, 45° in front of the shed, and 90° where it came up out of the ground at the side of the shed.

The first job was getting a wire pull line — sometimes referred to as a fishing line — through the conduit. This was remarkably easy. I tied a bunched up plastic shopping bag to the end of some garden twine I had and tied the other end to the water valve near the conduit opening at the shed. I stuffed the bag into the conduit, then went into my building, plugged in my Shop Vac, and put the Shop Vac’s business end to to other end of the conduit. I fired it up and it sucked.

The shopping bag didn’t quite make it. The garden twine wasn’t long enough. No problem. I attached one end of the pull line the PUD guys had given me the day before to the end of the twine, went back to the Shop Vac, and sucked some more. Whoosh! The shopping bag stuck to the Shop Vac hose. I turned it back off and pulled the twine to bring the pull line all the way through.
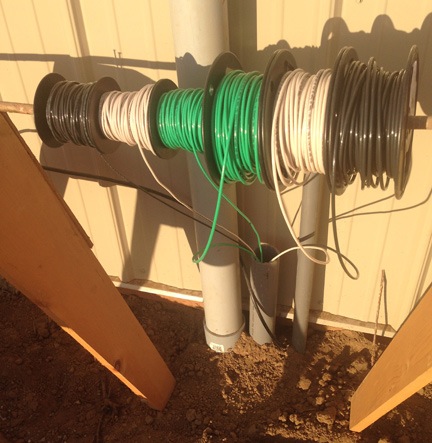
Pulling Wires
Necessity is the mother of invention and I can get pretty inventive.

For each circuit, I needed 3 wires: black, white, and green. That meant six wires. I’d bought them on 100-foot spools a few days before. I carefully grouped the ends together, wrapped the strap around them, and used duct tape to make a smooth, somewhat pointed end on the pull line. I pushed it into the conduit. Then I rigged up my old copper grounding rod (from the temporary power pole) on two saw horses near the opening of the conduit, went back to the shed, and started to pull.

It was easy at first. Hand over hand, I pulled the wire, watching the spools turn by my building. Then I hit a snag. I pulled hard but didn’t get anywhere. I went back to the building, pulled back, then went back to the shed and pulled again. The wire started to move again.

This went on for a while. The wire got harder and harder to pull. So I did what any machine-loving woman would do: I hooked up the pull line to my ATV and used that to pull. That got me another 20 or so feet, but it was pulling sideways and damaging the top of the conduit. I needed a better solution.
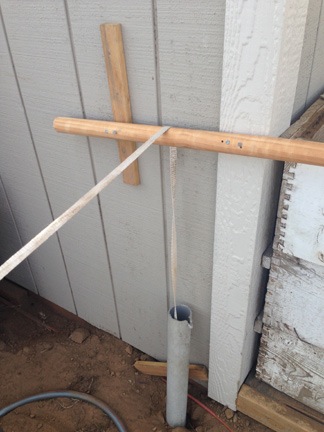
Dowel Rig
My friends tease me about having so much “stuff,” but every once in a while, some of that stuff comes in handy.

I went into my shop and fetched one of the dowels that had been a curtain rod at my Arizona home. (There’s a funny story about these “curtain rods” and why I took them, but I’ll save that for another post.) I cut it to about 2 feet in length and then rigged it up to the side of the shed with some scrap wood and nails. Then I moved the ATV into position. Now I could use the ATV to pull straight up.
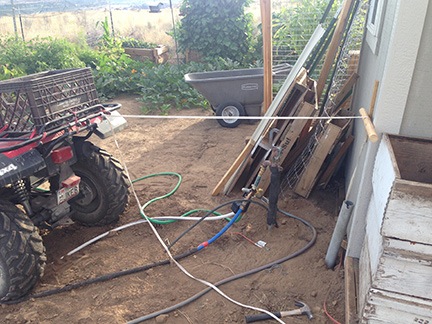
Pulling wires with ATV
It seemed like a good idea at the time.

That got me another 5 or so feet. That’s all. The wires were stuck hard. Repeated attempts simply pulled the dowel off the shed. (So much for that idea, huh?)

I could tell by the amount of wire left on the spools that I was almost all the way to the shed. The thought of pulling it all back and starting over was too much to bear. My arms already ached from the effort I’d expended. I called it quits to think about it some more.

I called my friend Bob. He told me to pull the wires out and check the connection between the wires and the pull line. He said the connection was probably getting hung up on one of the bends in the conduit. He said I should then bunch the wires together every 3 feet or so and wrap them with electrical tape. Then feed them through again.

I really didn’t want to do it. I knew that once I got the wire out, it would be a two-person job to feed it back in.

So I invited him for dinner. (Did I mention that there are no free meals here?) I grilled sausages and made a nice salad with fresh mozzarella and tomatoes from my garden. We ate outside as the sun was setting. It was very pleasant and relaxing.

After dinner, we pulled the wires out and bunched them with tape as he’d suggested. He reconnected the wire to the pull line using a different technique and we worked together to pull the line through.

And that’s when I got the really bad news: the wire wasn’t long enough.

You see, although I’d measured the trench distance, I failed to account for the sweep down from the building and the sweep up to the shed. The trench was 96 feet long and 3 feet deep. That added at least 8 feet to the length of the conduit, which stuck out at least a foot on either end. The wire was about 4 feet short of what I needed.

And no, splicing additional wires on was not an option.

So now I had about $150 worth of wire I couldn’t use.
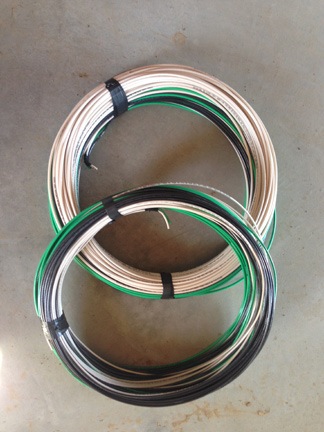
Loose Wire
The wire guy at Home Depot gave me two bunches of wire: one set of 10 gauge and one set of 12 gauge.

The next day, I went back to Home Depot and bought 120 feet of each type of wire. I had to buy it off the bulk reels because the next size reels were 250 feet and I already had 100 feet of wire I didn’t need. When I talked to the wire measuring guy about my situation, he told me I could return the unused wire. All I had to do was get it back on the reels. (Talk about a job for a rainy day.) They’d just resell it from the bulk wire area.

Of course, now I had six loose strands of wire — not on reels — to feed into the conduit. Another two-person job. I prepped as well as I could and called my neighbor, Kathy, to come give me a hand. She promised to come later in the day, after work.
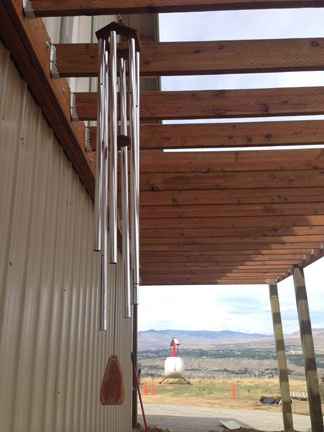
Wind Chimes
I hung my big wind chimes from the bottom of my front deck, just outside my front door. This spot is relatively sheltered from the wind so they don’t get tossed around much. I love the sound of these chimes and am so glad I didn’t leave them behind.

I busied myself with other odd jobs while I waited. I’d begun unpacking boxes with flower pots and other outdoor items in them. I was using the shed for anything garden or bee related. One of the boxes included my wind chimes. I hung the big, deep-toned ones by the building and the smaller ones by the shed. Later, when I heard them chiming, it brought back bittersweet memories of my home in Arizona, where they’d hung together at the front door for so many years.

This was the Friday before labor day. I was also expecting the Chelan PUD fiber optic guys to come by to re-run my fiber optic cable through the new conduit I’d laid to my building. (I’d cut the old fiber optic line when I took down the temporary power pole on Tuesday and didn’t have Internet either.) That afternoon, a PUD truck rolled up and a guy stepped out with some disappointing news: they wouldn’t be able to run the cable until Monday. No, Tuesday because Monday was a holiday.

Another three days without Internet. Ugh.

The PUD guy and I chatted for a while. Like everyone who comes by my place to do work, he commented on the view and what a “nice setup” I have. (Everyone uses that phrase: nice setup.) I told him I was doing all the electrical work myself and mentioned my current challenge: getting the wire run to the shed. I told him I was waiting for a friend to come help me.

That’s when he offered to help me.

I’m not an idiot. I said yes.
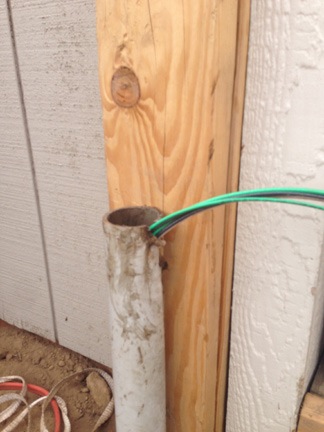
Wires Pulled
I sent this photo to my friend Bob to show him the hard part of the job was done.

He pulled at the shed, I fed the wire at the building. It took five minutes. I thanked him, still rather shocked at how easily it had been done. Then we wished each other a good weekend and he left.

I called Kathy and told her not to bother coming. Then I took a picture of the wire coming out of the conduit and the shed and texted it to Bob.

Wiring the RV Outlet

Before I could wire the RV outlet, I needed to finish work on the conduit at the shed. This meant adding a junction box and fittings and mounting the RV outlet panel.

It should come as no surprise that I needed another trip to Home Depot to get the fittings. The most challenging part was getting the fittings to downsize the 2 inch conduit to 1 inch conduit. That required a trip to Lowes because Home Depot didn’t have all the adapters I needed.

Conduit Done
In this shot, the conduit to the RV outlet is complete; the wire hanging outside the junction box is for the other circuit.

Because all this has to pass L&I inspection one day, it was important to do it right the first time. I used some scrap wood behind the conduit so I could clamp it to a solid surface. Then I cut the conduit to remove the damaged edges, assembled the fittings, and glued them all together. I used the junction box to separate the 10 gauge wires for the RV outlet from the 12 gauge wires for the other circuit I’d set up in the building.

Once the box was mounted, I wired the RV outlet. This wasn’t difficult at all; I’d already done one of these on my temporary power pole.

Then I went back to the building side of the setup. I had to drill a hole in my building (!) and fix up the conduit there. Again, I needed a good, weathertight seal that would pass L&I inspection. I also needed another trip to Lowes. (Of course.)

Once the wire was in the building, I ran it up to the service panel above it. I flipped off the main breaker and used my multi-meter to confirm that there was no power going to the board. Then I wired the white and green wires to the grounding bus and the black wire to the 30 amp circuit I’d bought. I snapped the circuit breaker into the board.

Or at least I tried to. The damn thing wouldn’t go in.

It took a while to figure out that the breaker I’d bought wasn’t compatible with the service panel. The breakers that came with the panel had an extra cutout that was necessary for a piece of metal to fit in. My repeated attempts to push the thing in was only scratching the plastic where that cutout should be.

I did not want to go back to Home Depot that day. I’d already been there twice and it’s at least an hour round trip drive.

Fortunately, I still had a 30 amp breaker in the temporary power pole now lying on the ground beside my driveway. I went out and pulled it off. I can’t tell you how relieved I was to see that it was compatible with my panel.

I attached the black wire to the circuit and snapped it in. Then I popped out the metal tabs on the board cover and put it on the panel. Finally, I turned on the main breaker and the 30 amp breaker I’d just installed. No breakers popped. So far, so good.

Plugged In
Plugged into my brand spanking new 30 amp RV outlet.

I went outside and swapped out the 100-foot 30 amp RV cord I’d been using for the temporary power pole with the 25-foot 30 amp cord stored in the RV basement. Then I plugged it in.

I went into the RV and looked at the microwave. The clock was lit up: 0:00. I had power. Success!

I can’t tell you how good it was to use my coffee maker the next morning.

Wiring the Rest of the Shed

After all this — hell, I’m tired from just writing about it — wiring the rest of the shed was pretty straightforward. I started it the next day after another trip to Home Depot.

First, I had to put a rectangular hole in the wall of the shed for the outside outlet. I marked where the outlet would go on the inside of the building and drilled holes in two opposite corners. Then I used my reciprocating saw with the wood blade on it to connect the holes along the lines I’d drawn. The resulting hole wasn’t neat, but it was the right size. I mounted the blue outlet box inside the shed facing out.

Then I mounted blue boxes for the inside outlet, light switch, and overhead light. I ran 12/2 wire from the outdoor outlet box to the indoor outlet box to the light switch box to the light box and tacked everything down with wiring staples.

Outdoor Outlets
Here’s what the outdoor wiring looks like on the side of my shed after wiring the 115v outlet.

Next, I had to put a round hole in the building for the wires to come inside. I fed the wires through various conduit and connectors and into the building. I glued and caulked where necessary to seal everything off neatly. From there, I ran the wires into the outdoor box.

Inside Wiring
The inside wiring, completed.

Then came the fun part: wiring the outlets and lights. The outdoor outlet had to be GFCI protected and I did that one first. Then the indoor outlet. Then the light switch.
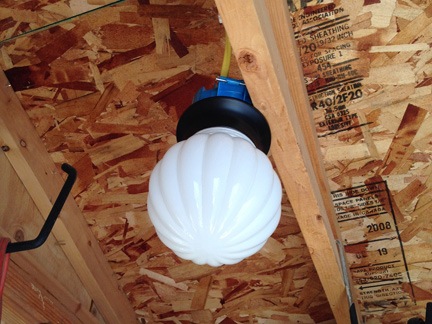
Shed Light Fixture
This light fixture was originally mounted on the wall inside my building; it’s much better in the shed.

Finally, the light itself. I’d taken the fixture from the inside of my building after replacing it with a different style that I’d bought during one of my many trips to Home Depot. (Yes, I’m already replacing fixtures.)

When I was done with all the wiring and had checked it over to make sure it was right, I went back into my building to set up the 20 amp circuit. At the same time, I wanted to replace the 30 amp 2-pole circuit breaker I’d installed the day before with a single pole circuit breaker I’d bought to replace the incompatible one.
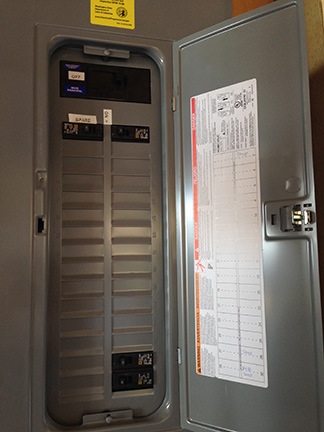
Completed Panel
When I was finished, I had three completed circuits: the small one for the panel area and two for the shed.

So, once again, I turned off the main breaker, tested the board to make sure power wasn’t flowing through it, and did some wiring work. The breakers snapped into place easily. I covered up the panel, turned everything back on, and went out to shed to test my work.

The GFCI had to be reset and tested; I followed the instructions to do that. I used a fan to test the outlets and flicked the light switch. Success!

Lessons Learned

I learned a lot during this project. First and foremost, the most difficult task ahead of me is probably going to be to run the wires. While it isn’t always physically demanding, it often requires two people. I suspect I’ll be making a lot of lunches and dinners for friends in the coming weeks.

I also learned that no matter how many times you go to Home Depot or Lowes to get the things you think you need for a project, you simply won’t get it all. There’s always another trip ahead of you. The solution is to always buy more than you need, including some things you might not need at all. Home Depot has a excellent return policy; each trip I make there starts with a stop at the return counter to bring back things I didn’t need. It all goes right back on my Home Depot credit card. I don’t even need to bring a receipt; they scan my card at the beginning of the transaction and can see exactly when I bought an item. No rush, either. I’ve returned things months after buying them.

I have a lot of electrical projects ahead of me. My goal is to complete one circuit each week, starting in my shop and garage before moving upstairs. I hope to have 90% of the wiring done before Thanksgiving. I’ll blog about the more interesting projects, like the arc lamp project I finished this past week.

Questions? Comments? Suggestions? Want to volunteer to help me pull wire? Use the comments form for this post. I’d love to heard your construction and wiring stories, too!

The Pallet Planter

Reusing is better than recycling.

One of the things I wanted at my new home was a nice, neat garden. And there’s nothing that keeps a garden neater than raised beds for the plants.

But what to make them out of? A friend offered me railroad ties stacked up in his backyard, but they’re ugly and dirty and I was worried about tar or other nasty stuff they could have been treated with.

And then I thought of pallets.

I’ve got this thing about pallets. There’s something about a nice, clean, well-designed pallet that just makes me very happy. Come to think of it, it gives me almost the same feeling I get from unused paper. Is it the wood?

As I wrote the other day, my chicken coop was made, in part, with three pallets. My beehives are kept off the ground on pallets. And, in the past, I’ve made a “porch” for my RV with pallets and a deck for my poor man’s hot tub with pallets. To me, pallets are the ultimate free building material and I’m always on the lookout for good ones.

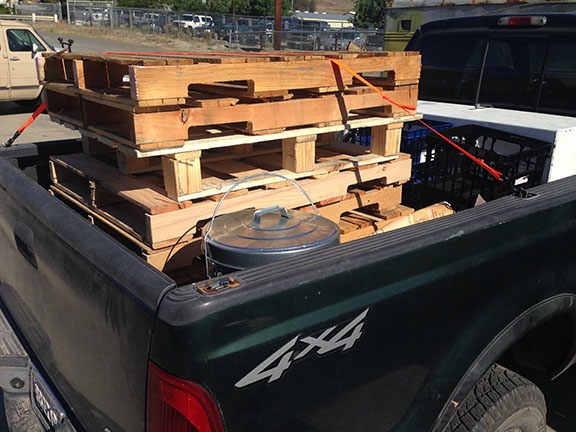
I hit the jackpot yesterday morning when I attended a “surplus sale” at the local school. Not only did I score two really nice media carts that’ll be perfect for my shop ($15 each), but I also bought a 4×10 foot magnetic white board in mint condition ($20) and a Sony boom box with AM/FM/CD/dual cassette ($5). And stacked outside were about 2 dozen of the nicest pallets I’d ever seen. I picked 7 of those and took them home for free.

Pallets in a Truck
I have a truck for a reason: I haul stuff.

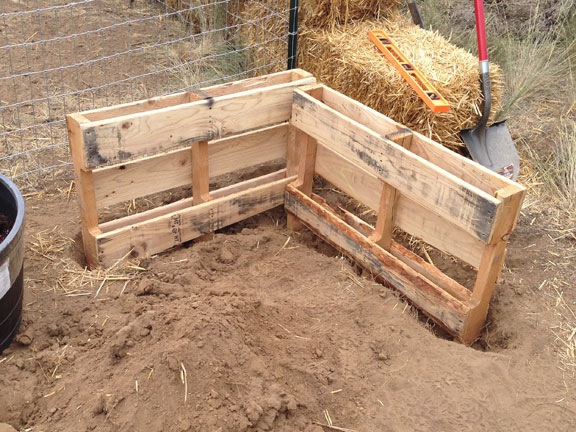
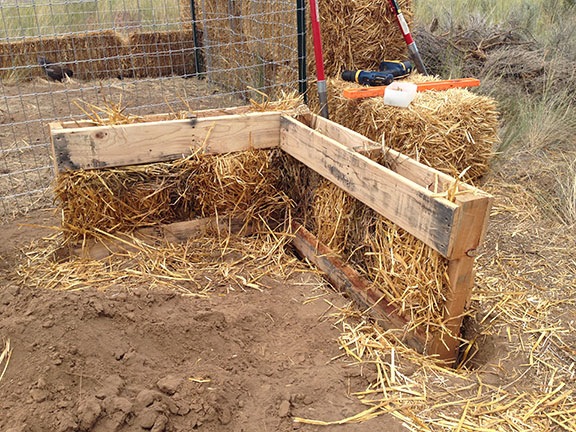
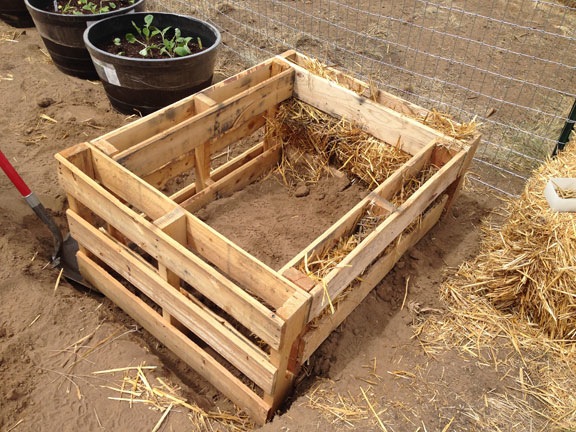
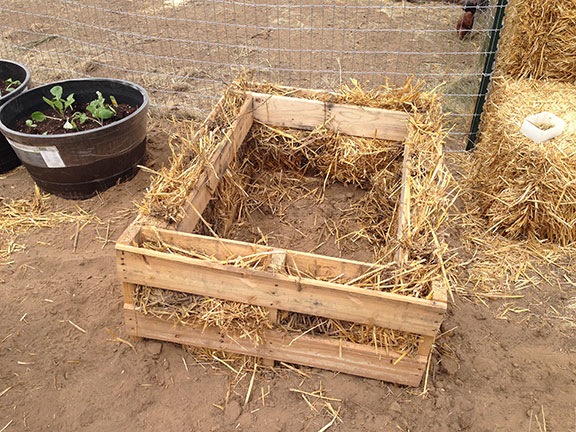
Figuring out how to use them to create raised garden beds was a bit of a challenge until I took the time to see how they were configured. Then it was just a matter of cutting them in half and standing the pieces up in a square, partially buried in my garden. These photos and captions pretty much tell the story.

Pallet Garden
I started by digging a trench just wide enough to stand up the pallet halves. I used a level to keep them relatively level on sloped ground.

Pallet Garden
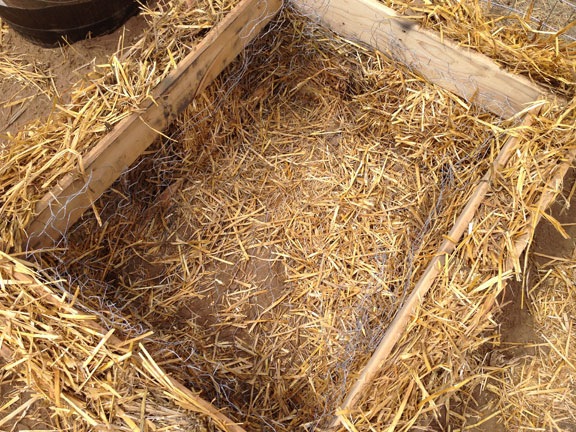
I needed something to prevent the dirt from coming out through between the slats. Because I have no shortage of straw, it was the logical choice. I really packed it in.

Pallet Garden
Because the dirt at the base (inside and out) would do most of the work holding the pallet halves together, I only needed four screws — one in each corner — at the top.

Pallet Garden
I filled in the straw all around.

Pallet Garden
Then I lined the inside with chicken wire to “discourage” moles (or voles or gophers or whatever the hell keeps digging on my property) from coming up through the bottom.

Pallet Garden
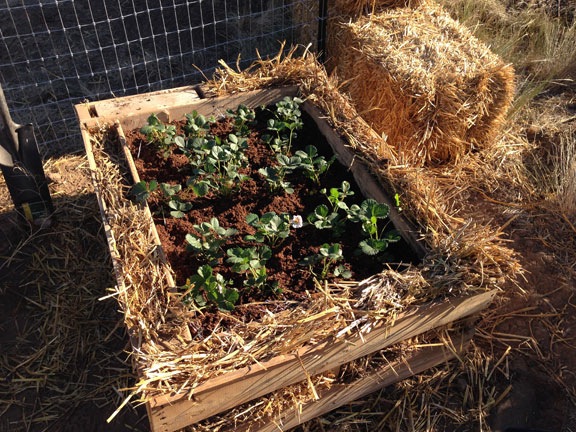
I filled the inside with the dirt from the trenches, some leftover compost, some leftover topsoil, and a big bag of Miracle Gro potting soil. before planting 18 strawberry plants.

Pallet Garden
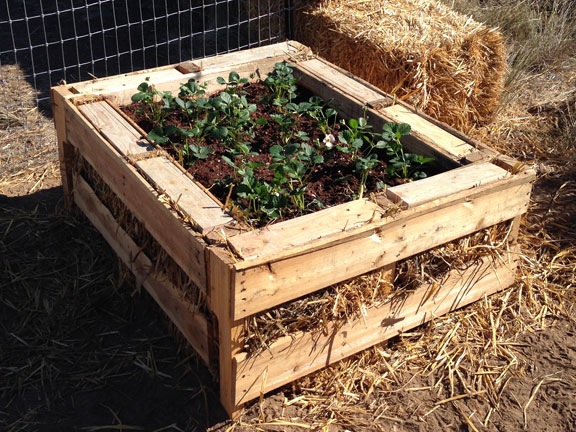
For a finishing touch, I cut some scrap 2×4 lengths and set them into the groove at the top of the planter, hiding most of that messy straw.

Someone mentioned rabbits — they’d have to be pretty tall to reach these planters. And they’d have to get past my faithful garden watchdog, Penny. I’m more worried about birds. I’ll be making a chicken wire cover to keep the birds out before the plants begin to show fruit.

I’m very happy with the way this turned out. It took about 2 hours to build. The hardest part was digging the trench — which was actually quite easy because there are few rocks in my garden. The most costly part was filling the planter with dirt; I probably put about $15 worth of store-bought materials in there.

I’ll be building more of these. My goal is to eventually have three rows of six of them in my garden area.

What do you think?

Home Repair 101: Replacing a Thermostat

Not nearly as difficult as I expected it to be.

In hindsight, I should have realized that the upstairs thermostat was on its way out. What else could explain the way it cycled on and off so frequently? But I didn’t really think about it. Sure, it was annoying, but it wasn’t my problem.

Until it became my problem.

Thermostat
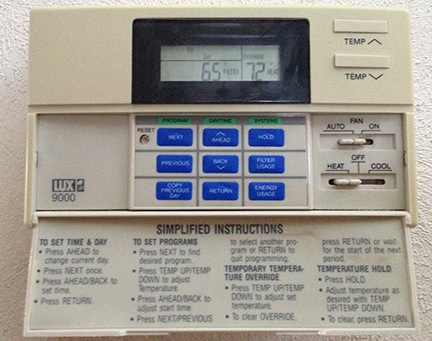
The programmable thermostat in my bedroom. Setting it to 72° in a 65° room should have triggered it to go on.

I turned the heat down to 60°F in both zones when I went to Parker on Friday afternoon. I’d be gone overnight and couldn’t see heating the house while I was away. But when I got home on Saturday and turned the heat back up to 70°, only the downstairs heat pump turned on. Upstairs remained stubbornly off, despite the fact the room temperature was a chilly 65 in the afternoon sun.

I tried the on/off switch. No joy. I tried switching the Fan from Auto to Manual. The fan came on but it soon became apparent that it wasn’t blowing heat. I flicked the Electric Heat switch on the side (not visible in the photo) that I’m pretty sure kicks in some sort of electric heating element. Still no heat.

Clearly, something was broken. Was it the thermostat or the heat pump?

Logic says to repair/replace the cheapest thing first. So as I put an extra blanket on the bed that night, I planned to replace the thermostat the next day.

In the morning, the bedroom was 59°F. It was tough getting out of my cozy bed. Meanwhile, the heat downstairs was working overtime, sending warm air up while the cool air dropped down. I figured that if I couldn’t get the heat going that day, I’d get a fire going to help warm the house. (I still have quite a bit of firewood to burn.)

I took Penny with me to Wickenburg Airport for the Sunday morning coffee and donuts gathering. I’d started the ritual back when I managed the fuel concession at the airport in 2002-2004 and was very happy to see that more than 10 years later others were carrying on the tradition for me. It was great to meet up and chat with the other pilots.

I pulled Jason aside and queried him on the thermostat replacement. He assured me that I’d have no trouble doing it. He recommended that I take a photo of the wiring setup before pulling everything apart — just in case I had to put it all together again.

After picking up my toolbox from my hangar, Penny and I went to the hardware store. They didn’t offer many options. I wasn’t interested in making a big investment in this home repair since I didn’t expect to be living in the house much longer. But I did want a unit that was compatible with my system. A Honeywell device looked about right at $35, so I bought it.

I should mention here that several of my Twitter and Facebook friends were following my dilemma and were recommending that I buy a Nest thermostat. I’d heard all kinds of good things about Nest and really wanted one. But I certainly was not going to buy a $250 thermostat for a house I hoped to be out of by June. Instead, I’d buy one for my new home when it was built. Besides, I needed a solution quickly and I wouldn’t be able to get my hands on anything as nice as a Nest in Wickenburg. And there was always the chance that the problem wasn’t the thermostat at all — it could be the 15-year-old heat pump unit.

Inside the old Thermostat
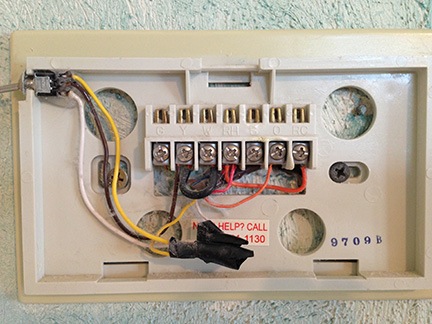
Inside the old thermostat were cobwebs and a tangle of wires.

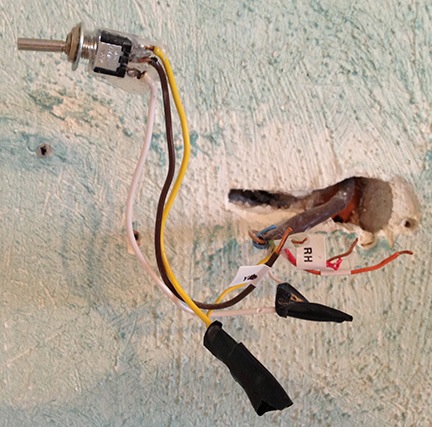
I went home, made myself a cup of hot cocoa, and got to work. The instructions that came with the Honeywell unit were extremely easy to follow, with a full page in the little booklet for every step. I discovered when I removed the main plate for the thermostat that the wires were not color-coded but letter-coded: each wire went into a different lettered slot. There were also two jumper wires. And, of course, the switch that had been added for the electric heat. The Honeywell unit had come with a little sheet full of lettered stickers. The instructions said to label each wire as I removed it. So that’s what I did. I found that I also had to customize one of the labels for one of the jumper wires since one letter was used twice.

The Wires
I admit that I began to have doubts about my ability to complete this little project when I was faced with this mess.

That done, I removed the back plate of the old thermostat, leaving the wires hanging out of the wall.

I should mention here that the Honeywell unit had no way to hook up that little switch. The old thermostat had been cut and customized to accommodate it. I was not prepared to do that. Or interested in taking the extra effort to try. This was a temporary fix that might not even work. So I decided to ignore it — except for the one labeled wire that I knew I’d have to connect to the new thermostat.

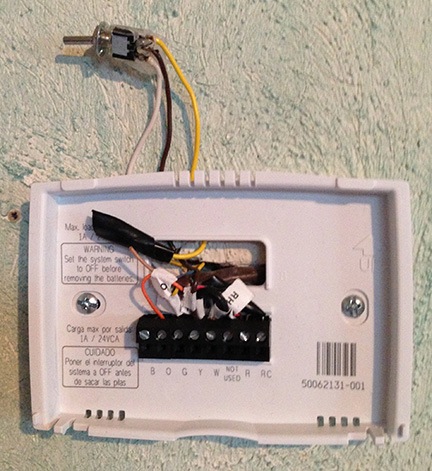
I screwed the back plate of the new thermostat on the wall and pulled the wires through it, leaving that silly little switch behind the plate. I then began matching the wires to the labeled slots.

And that’s when I realized I had a problem: one wire was labeled RH but there was no slot labeled RH.

Understand that I have never done anything like this before in my life. I had no idea what might happen if I did it wrong. I certainly didn’t want to short out an otherwise functioning heat pump. Or cause a fire.

So I paged through the instruction manual and found the toll-free help number. It was midday on a Sunday and I didn’t have much hope of reaching a real person to help me, but I picked up the phone and dialed anyway. After navigating through a brief menu system, a man answered. I gave him my name and phone number per his request and read the model number off the thermostat’s packaging. I then told him about the RH wire. He asked if there was a wire labeled R. When I told him there wasn’t, he told me to put the RH wire in the R slot. Easy as that.

While I had him on the phone, I confirmed something that I had already suspected: that there was a jumper wire running between the R and RC slots in the Honeywell unit. He confirmed that there was. I told him that my old thermostat had a jumper wire in the same slots and asked him to confirm that I wouldn’t need to insert them in the new thermostat. He told me I was correct. He then assured me that I’d have no problem completing the installation, but if I did, I should call back.

Great customer service from Honeywell!

Thermostat installation
It wasn’t easy, but I got all the wires tightly fastened in the right slots.

With some effort, I managed to get all the wires into the right places. I have medium sized hands and struggled with the tight space — I can’t imagine how a man with large hands could do this at all. Maybe with tiny needle-nosed pliers? I got the wires in place and screwed them in tightly.

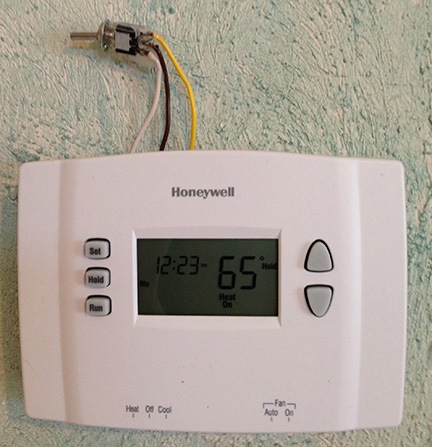
Then I pulled the batteries out of the old thermostat and put them in the new one’s control box. I fastened the box onto the wall plate. It lit up with the temperature.

Finished!
The completed installation.

I flicked the switch to Heat and left the Fan switch set to Auto. I tapped the temperature up button a few times to set it to 70°. The heat came on immediately.

Looking good so far!

I cleaned up my workspace and finished my cocoa.

It didn’t take long to realize that the heat was now working. The temperature crept up, one degree at a time, over the next hour or so. Soon the upstairs was as toasty as downstairs.

I pulled the extra blanket off the bed. I wouldn’t be needing it that night.

One final note: The guys reading this might be thinking that I’m making a big deal out of nothing. After all, you guys probably replace thermostats or do similar tasks all the time. But while this might be nothing to you, to me, its a real achievement — more proof that I can take care of myself. I’ve done all kinds of minor home repairs in my house, the rental properties I used to own, my camping cabin in Williams, and even my RVs. Everything from drywall and toilet repair to installation of hardware cloth to keep mice out. These are things that most women are never taught to do and never even attempt to do. But women living alone have two choices: they can either ask a man for help — and possibly have to pay for his services — or they can do it themselves. Which do you think is better for us in the long run?

Creating a Photo Calendar with InDesign

An overview of how I did it and the results.

This year, I decided that I needed an affordable yet memorable holiday gift to send out to all my customers and the folks I do business with. I wanted this gift to be an in-your-face-all-year-long item. That means it had to be something the recipients would want to keep and refer to.

A calendar seemed to fit the bill.

Now every year, I get sample calendars with my company name on it from various printers who print promotional items. They’re usually pretty boring; certainly not the kind of calendar you’d want to use all year long. Clearly, I had to do better than that.

The solution was a custom calendar using the photos I’ve taken over the years to show off the places I fly to and my helicopter. The challenge was to make a professional-looking, attractive calendar that was cost-effective to print.

iPhoto’s calendar printing option was the obvious choice for creating the calendar. It offers several different formats, many of which would meet my needs. What did not meet my needs, however, was the price: $19.99 per calendar. Since I figured I’d need at least 50 of them, that was far more than I wanted to spend.

My husband suggested MagCloud, which I’ve been using for other print-on-demand needs. At first, I didn’t think it would work out. After all, MagCloud produces stapled magazines sized just under 8-1/2 x 11. But then I held a sheet of paper up to the Robinson Helicopter calendar on my wall. And guess what? It was the same size.

So I decided to go with MagCloud for printing.

At that point, it looked as if I’d be creating a 28-page calendar from scratch. Not something I looked forward to. But I did a Google search for 2010 InDesign Calendar Template, which directed me to the 2010 InDesign Calendar Template by Juliana Halvorson on the Adobe Web site.

I downloaded it and discovered that it was almost what I needed. The template assumed a landscape orientation. I wasn’t sure if MagCloud would accept the document created that way. So I modified the template to make it portrait orientation and rotated all the calendar grids. A few adjustments to the margins and bleeds (which I initially got wrong) and it was a good starting point for my own project.

First up was reviewing the holidays. Juliana had included several extra religious and “Hallmark” holidays that just weren’t appropriate for a general use calendar. I removed them. I also changed the wording of some holidays — for example, changing Thanksgiving Day to just plain Thanksgiving.

Then I needed to redo the thumbnail calendars for the previous and next month that appear on each calendar page. The type was just too small. That turned out to be a time-consuming chore, as I had to basically reformat each little calendar individually. But it was worth the effort; the numbers are now far more readable.

Here’s a little movie of the calendar’s pages. You’ll need QuickTime to view it.

Then the big task: finding the images I needed in my calendar — 12 full-page images and about 16 smaller ones — cropping them for the right proportions, saving them as TIFFs, and dragging them into my working file. It took me two full days to get the job done. In the end, it was very tedious and I just couldn’t wait to finish it.

Since the calendar’s pages had to be in multiples of 4, I had to stretch my 26 page document to 28 pages. That also meant filling in 2 more pages with something. I decided to put information about Flying M Air’s services, along with thumbnail images from the big pictures.

Once completed, I created the PDF MagCloud needed to print my calendar. The first upload (which took 4 tries on my miserably slow Internet connection here in Wickenburg) resulted in an error. I’d gotten the bleed measurements wrong. I fixed them and (fortunately) did not need to adjust the layout. Two hours later, after about 8 upload attempts, the file was online. The preview looked good.

I ordered the free proof and am now waiting for it to arrive. If it passes muster — and I’m about 95% sure it will — I’ll order about 50 copies to give as holiday gifts to clients and friends.

In the meantime, I’ve “published” the calendar so others can preview and (hopefully) buy their own copies. There is one caveat, however. Because MagCloud publishes magazines and not calendars, if you buy from MagCloud, you’ll have to punch your own hole in the top of the calendar.

I’ll be doing a lot of hole-punching next week.

Creamed Spinach

My way.

SpinachMike and I love creamed spinach. Although we can buy it frozen in a microwaveable bag, we both prefer it fresh. Here’s my microwave-friendly recipe.

Ingredients:

  • 2 Tablespoons Butter (or margarine)
  • 1/4 cup chopped onions or scallions
  • 12 ounces fresh or frozen spinach (fresh is better, of course), prepared for cooking. When using fresh spinach, I usually use the bagged spinach. (I can’t be bothered washing, cutting, etc.)
  • 2 Tablespoons flour
  • 1 cup milk (skim is okay)
  • salt and pepper to taste

Cooking Instructions:

  1. In a saucepan or microwave-safe, covered bowl, melt the butter.
  2. Add the onions or scallions and saute until done, stirring occasionally.
  3. Meanwhile, lightly cook the spinach. I use the microwave, without added water, but you could steam it if you prefer. If you added water, drain when done. Keep warm.
  4. Sprinkle the flour in the butter/onion mixture and stir in. Cook for about two minutes.
  5. Add the milk slowly, stirring and cooking until thickened.
  6. Add the cooked spinach and blend well.
  7. Add salt and pepper to taste.
  8. Serve hot.

If you use a microwave to prepare the sauce, cover until the flour has been added to prevent splattering. Zap the mixture for one minute at a time, stirring after each minute.

This recipe can be multiplied.