
What I’m seeing, liking, and not liking — so far.
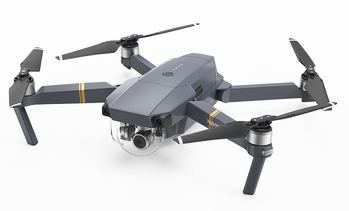
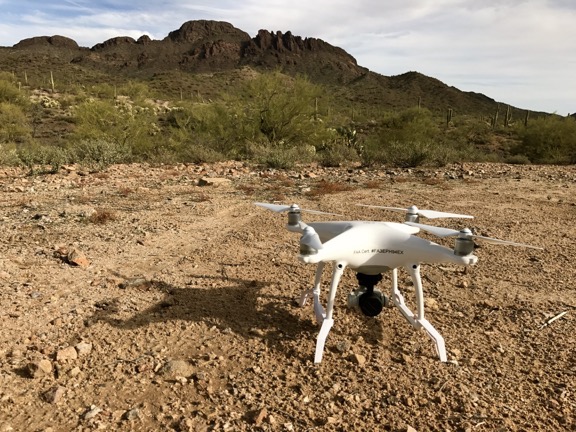
The Mavic Pro, unfolded for flight. Although the manual says to remove the clear protective cover over the gimbal, I suspect it might be usable during flight — if it doesn’t fall off. I remove it.
I’ve had my new DJI Mavic Pro drone in my hot little hands for about four days now and have taken it on a total of five missions so far. (More on my use of the word “mission” shortly.) I’ve developed some definite thoughts about it, from the perspective of a pilot, photographer, videographer, and new drone pilot. I thought I’d take a moment to share them with readers who might be considering the purchase of a drone for photography.
And that’s a big part of what this drone is to me: it’s a tool for making photos and videos. While some people buy drones for the flying aspect of them and actually race them around obstacles, etc., I have no intention of doing that. (At least not yet.) And if you’re thinking of buying a drone for that purpose, I don’t recommend a Mavic, despite what the DJI website shows it capable of doing. I’m sure you can buy a less expensive drone that’ll be better for racing (and crashing). Do your homework. See what the other guys (mostly) and gals are racing and what they have to say about their equipment.
Portability
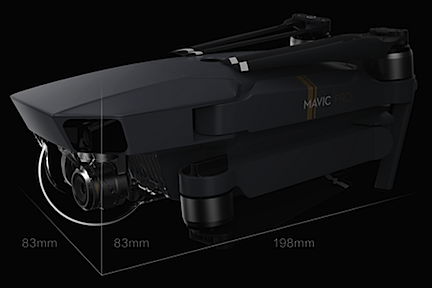
It folds up small.
The most obvious benefit to having a drone that folds up into the size of a one-liter bottle of coke is portability — and that’s the main reason I bought the Mavic. Its folded size is less than 4 x 4 x 8 inches.
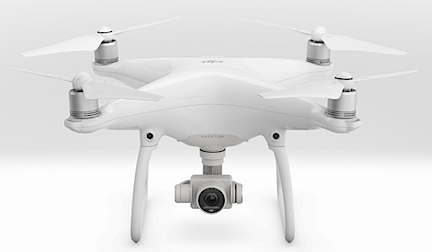
The truth of the matter is, my friend Jim offered me a smoking deal on his DJI Phantom 4 because he was upgrading to a Phantom 4 Pro. Buying his gently used drone would have saved me a bunch of money. But the reality is that I travel a lot, often without a lot of space for baggage. The Phantom 4 does not fold up at all and although there are carrying cases available for them, they’re not easily brought on a four-month trip in a truck camper or with gear in the back of a helicopter or on a motorcycle. And don’t even think about taking a hike with one.
Although I bought the Mavic package that included a carry bag smaller than a shoebox that can fit the drone, the controller, at least two spare batteries, and a battery charger, I stopped using the bag on Day Three, switching instead to a very small backpack I’d bought around Christmas time for hiking. The DJI bag was a snug fit for the drone and I worried about damaging it as I crammed it in and dragged it out. The bag is surprisingly bad design for a drone that has an amazingly good design. If you are considering the purchase of this bag, I recommend you skip it. If you want a padded bag, look for a small camera bag. (Or buy mine. It’ll likely go on eBay next week.)
With portability comes the question of durability. A Twitter friend asked me if it was durable. Are any of these things durable? I said no. But I also said it isn’t fragile. Later, in my mind, I equated it with the difference between those standard green David Clark aviation headsets (durable but kind of clunky) and Bose ANR headsets (not durable but lighter and sleeker). Neither will break if you handle them with care, but the Bose headsets are more likely to break if you don’t. The Mavic, of course, would be the Bose in this analogy.
And yes, it’s light. The drone, onboard battery, controller, and two spare batteries weigh in at under 2-1/2 pounds.
Design
I am completely blown away by the drone’s design. The way it folds up so neatly, the way the blades fold to make it even smaller, the way the micro SD card fits into the side, the way the battery is so well integrated with the drone’s body, the way the tiny camera lens and gimbal hang from the front — it’s all extremely well thought out and executed.
That’s the design for portability and flight. The design for actual use is a bit less rosy.
As a regular commenter on this blog pointed out in comments for a previous post this week, the Mavic sits very close to the ground. It only has two legs (on the front) and two little stubs on the back. That puts the gimbal mounted camera just inches off the ground. If you’re flying it from grass or from rocky terrain, that camera is going to be in the grass or bumped by rocks. And if there’s dust, that dust is going to fly on landing and take off (just like with a helicopter) and possibly get into rotor heads or gimbal parts. I had the foresight to order a foldable landing pad to operate from — this helps ensure a safe, clean environment for operations. But I also have to take care on landing to make sure it lands on the pad. Later, I picked up a 3 x 4 rubber-backed mat that I’ll likely wind up using in my garage when I get home. Until then, it’s an expanded landing zone when I travel with my truck.
The only real complaint I have about the design is related to the plastic clamp that holds the gimbal immobile during transport: I have a heck of a time getting that damn thing on. I assume I’ll better at it one of these days; I sure hope it’s soon.
Controller
The Mavic’s controller also folds up into a smaller package. It has a screen with general information about the drone’s status and the usual buttons and joysticks to control it. But it has no video monitor. Instead, you affix a smart phone running the DJI Go app (or another app; more on that later), to the controller. It has a moveable plug preconfigured for iPhone users, but also comes with other plugs for other smartphones. You plug in your phone and then clamp it into the controller. The clamp is tight and, miraculously, lets me keep the bumper cover I have for my phone on the phone. The phone is definitely not going to fall out. My only complaint, which is minor, is that I have difficulty tapping the home button since it’s partially covered by the clamp. I think that if I fiddle with it enough and experiment with different positions, I might be able to make that problem go away.
The controller and a smart phone work together to control the drone. I’m pretty sure you can control it without a smart phone, but I suspect it would be a lot more difficult, especially since you would not be able to see what the camera sees without the camera as a monitor.
There is a lot to learn about the controller and the DJI Go app. Yes, you can pick it up and fly it almost immediately with just a few pointers from a friend or a quick glance through the manual, but you will never master either flying or photography — which really do need to be considered separately — without reading the manual and trying various features until you learn what works for you.
My only gripe about the controller setup is age related: my older eyes simply can’t see the video feed on my phone as well as I’d like them to. Yes, I wear readers. And yes, I stand with my back to the sun to shield the screen from direct sunlight. But still, in monotonous terrain — like the desert where I’ve been flying lately — it’s sometimes hard to figure out what the camera is looking at. More than a few times, I sent the drone forward only to discover that it was pointing in a different direction than I thought it was. Oops.
User Guides
The User Manual — which is only available online as a PDF — sucks, plain and simple.
At 59 pages long, which includes the cover and a lot of pages that simply don’t provide any real instructions, it provides just enough information for someone knowledgeable about flying or photography to figure out what they need to do to fly and shoot photos/video. But if you’re a complete newcomer to either one and think you’re going to race around trees in a forest while filming exciting video sequences on Day One, you’re only fooling yourself. I’m constantly going back to it, looking up features I think should be available, finding bits and pieces of information, and then putting it all together to learn a new task. I’m thinking I might write up some task-based tutorials for myself and others who might need them.
The Quick Start Guide, which comes in a tiny booklet, has only 10 pages of information between front and back covers. The printed version has multiple languages in it, which makes it seem a lot larger than it is. It’s also available as a PDF with just one language. Again, if this isn’t your first drone, it’ll definitely have enough information to get you started. Otherwise, good luck.
Flight
Okay, this is where I’m completely blown away: the automatic features for flight are amazing.
While it is possible to manually take off using the joysticks — and my friend Jim taught me how to do this on his Phantom 4 — it also has an automatic takeoff feature. Tap a button and slide your finger across a confirmation screen, and the Mavic powers up and climbs to a four-foot, rock solid hover. It’s just amazing to watch, especially if you’re a helicopter pilot and understand what it takes to make such a smooth, solid takeoff in a helicopter. And yes, I understand that the aerodynamics of a four-rotor drone is different from that of a single main rotor helicopter.
Push the left (pitch/yaw) stick forward and the drone can climb straight up like a rocket at a maximum speed of 16.4 feet per second — that’s 984 feet per minute for us pilot types. Push the left stick right or left and the drone rotates. Pull the left stick backwards, and the drone descends at up to 9.8 fps (588 fpm). Helicopter pilots can equate the operation of the left stick to the collective (forward/back = pitch) and tail rotor pedals (left/right = yaw) on a helicopter, even though the stick controls different mechanical operations on the drone.
Push the right stick in any direction and the drone flies in that direction without changing the direction in which the nose (camera) is pointing. This is like a helicopter’s cyclic, although again, it controls different mechanical operations on a drone.
As you might expect, the farther you push a stick, the faster the drone moves.
Getting it airborne and actually flying it is remarkably easy — to a point. It’s precision flying that takes a lot of effort and practice. The drone acts immediately and rather abruptly to most control inputs, so if the video camera is turned on while rotating it or adjusting the angle of the gimbal, you can clearly see a sort of jerky response. Like learning to hover a helicopter, you need gentle control inputs. And that takes practice.
The Mavic has three modes for flying: Positioning (P), Sport (S), and Tripod. Most regular flying is done in P mode, which also has obstacle avoiding features enabled. If you want to fly faster and aren’t worried about obstacles, S mode is available with the flick of a switch on the controller. The difference in speed is about 20 miles per hour for P mode vs. 40 miles per hour in S mode. Tripod mode, which I hope to explore today if the wind isn’t as bad as forecasted, slows everything down, making it easier to get smooth video shots.
DJI Go app options make it easy to keep the drone from wandering off where it shouldn’t be. The very first thing I set was the maximum altitude — in the U.S. drones are limited to 400 feet AGL unless an FAA waiver is obtained. I also limited its distance, at least at first. While the Mavic’s dark color makes it easy to spot in the sky, it’s easy to lose sight of it if you take your eyes off of it while it’s moving. I recommend operating with a spotter whenever possible. I usually hear it better than I see it, unless I’m in a noisy environment. I do believe, however, that it’s a little quieter than Jim’s Phantom 4. They both sound like angry bees — and believe me, as a beekeeper I know exactly what angry bees sound like — but Jim’s drone sounds like more angry bees than mine.
I believe there are limitations built into the software that prevent operation near airports, but I haven’t been close enough to an airport yet to test that. If so, it’s a good feature that pilots should be happy about. (Now if only they’d limit climb to 400 in the software instead of making it an option. Out of the box, the Mavic has an operating ceiling of more than 18,000 feet, which is absurd.)
Landing the Mavic couldn’t be easier. Really. I use the automatic landing feature almost all the time. It eliminates the need to navigate back to the home base. Just tap a button and use a slider to confirm you want the drone to return to home. It immediately turns back to its starting point, climbs if necessary, and heads back at top speed (for its mode). You can watch the distance change on the controller. When it’s overhead, it might look as if it has passed the landing zone, but it hasn’t. It turns to the direction it was facing when it took off, then descends straight down. When it’s less than 10 feet from the ground, it might make some adjustments. At about three feet up, it pauses and then comes right down to the ground and shuts its engines. The whole time it’s doing this, the controller is letting out an annoying beep-beep-beep, displaying an option that enables you to take over. That’s because obstacle avoidance is disabled while landing and you might need to stop the auto land feature. I’ve found, however, that in good conditions with precision landing enabled, the Mavic lands exactly where it took off from. To me, that’s the coolest thing of all.
Photography
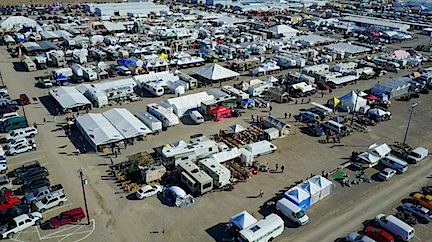
A view of Tyson Wells from the air, looking southeast.
The thing that changed my mind about drones, as I discuss in a blog post from December, is the quality of photographs and video — especially video — from drones. I’d seen videos from my friend Jim’s and I was hooked. They were, by far, clearer and steadier than most video shot from my helicopter. It was no wonder videographers were turning to drones. They could get better results for less money.
(I do need to point out again here that for aerial photo jobs covering a large area, you’ll definitely get the job done faster in a helicopter. As I mentioned in my December 23 blog post:
But another client needed aerial video and still images all along the Columbia River from Wenatchee to Chelan, then up the Wenatchee River to Leavenworth and up Lake Chelan to Stehekin. This was well over a hundred miles to cover and some of it was inaccessible by car. We got all of the shots in less than three hours of flight time. It would have taken weeks to get that footage with a drone — and even then, some of it would have been impossible to get.
So don’t give up completely on helicopters. Think about the mission before deciding on the tool.)
I’ll admit that it sort of broke my heart when I realized that the GoPro “nosecam” videos I’d been sharing were absolute crap compared to what I could get with a drone. If you can’t beat them…
So here I am with my own aerial camera — which is what the Mavic really is. It can do video with resolutions up to 4K, which is the default setting. I actually thought there was a problem with the camera when I tried to play back the video on my 5-year-old MacBook Air. The reality was that the computer simply couldn’t handle the amount of data in the video file. I’ve since set it down to 1090p, which is all I need, at least for now. The video is amazing: smooth and clear. I’ll let you see for yourself; if you can, view these in full screen at the highest resolution YouTube offers:
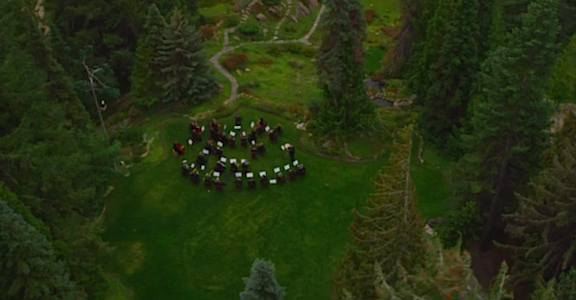
In this example, I’ve put the Mavic into a 200-foot hover at the edge of an outdoor sale event in Quartzsite, AZ. Hands off on the controls and it’s rock steady. I couldn’t do that in a helicopter.
I shot this video yesterday morning. I flew out at 150 feet and back at 200 feet. This is the return flight, which seemed to have a better angle, using Return-to-Home mode. At the end, you’ll see me standing with a retired guy I met who used to program robots for airplane manufacturing. Keep in mind that this is only a small portion of the thousands of people camped out in the BLM land around Quartzsite right now.
I have not experimented much with still photos. I get so caught up in the flying and video that I forget to snap photos once in a while. It can save JPEGs at 12 megapixel resolutions. I’m not sure if it can save photos while it’s shooting video.
The camera is completely adjustable for automatic and manual settings. Again, I haven’t experimented much with this yet. Just getting it to fly where I want has been enough of a challenge for the first three days of flying. And the manual leaves out too many details; it’s hard enough just to find the settings.
Missions

Want to become a commercial drone pilot? Start by learning all about the FAA’s Part 107. This book will help. Buy the ebook edition on Amazon or from Apple. Or buy the paperback edition on Amazon.
I’m teaching myself how to use the Mavic by creating “missions” for myself. A mission is a task I need/want to complete. Yesterday’s mission was to get video footage of the long stretch of desert near where I’m camped where so many other people are camped (see second video above). I wanted a nice record of the sheer volume of people dry camping here. I can repeat this mission in about a half dozen other places to get an even bigger picture of the weird situation in Quartzsite during the big RV show, but time is running out. The forecast calls for high winds today and the campers will start rolling out of here on Sunday.
Another mission is to video the activity around the RV show. That would entail setting up a point of interest in the middle of the show area and then flying the drone around it at a safe distance from participants with the camera continuously focused on the middle of the action. I’m hoping to do that on Saturday when the show is busiest. I might practice on a smaller scale with some of the camps around here first.
My goal is to understand what controls and settings to use to accomplish missions like these. I can then call upon what I’ve learned to complete missions for paying clients once I finish getting my commercial UAS pilot rating. I see drone photography as a component of the services Flying M Air can offer.
Ready to Buy a Drone?
My interest in drones seems to have sparked an interest in other people. I hope this blog posts helps them decide, one way or the other. In any case, I’m sure this isn’t the last you’ve heard from me about my Mavic Pro.
I do have a favor to ask, though. If you do decide to buy a drone and you want to buy from Amazon — which offers great prices and free shipping — please use one of my links. I get a tiny commission from sales that originate with a link from this site and I sure would appreciate the income to help cover my hosting fees.
How many mostly ad-free sites have you visited lately? Very few, I’ll bet. I guarantee that the folks who build and maintain them would similarly appreciate your support.
And if you’re interested in buying a gently used DJI Phantom 4, my friend Jim has one for sale — as soon as his Phantom 4 Pro arrives, anyway. I can put you in touch with him — but please, only if you’re serious. It’ll be a good deal, but he isn’t giving it away.


 The FAA, which, like most government agencies, operates so slowly it often seems as if it’s moving backwards, finally woke up and published an update on its website that clears up any “myths” surrounding the use of unmanned aircraft or UAS. Titled “