Chickens Again, Part II: The Coop

The challenge was building with scrap wood I already had.

About six weeks ago, I bought eight baby chicks. I was raising them in a stock tank in my shed. You can read more about them and the chicken yard I built for them with a friend here.

The chicken yard was working well. The large feeder and automatic waterer got them through my six day absence when I went to California on a business trip in mid-May. They’d accepted the tipped over stock tank with plywood lean-to as a shelter. But I wasn’t fooling myself. They’d need a real coop — someplace they could roost at night that also had nest boxes for laying eggs.

Buying a coop was out of the question. A coop big enough for them would cost hundreds of dollars that I simply wasn’t willing to spend on chickens when I was facing monster construction bills for my new home. Besides, I had all kinds of scrap lumber and pallets lying around. Couldn’t I come up with a design that utilized them?

I spent a lot of time thinking about it. Probably a lot more time than I needed to. Finally, I just gathered up one long pallet, two matching shorter ones, and all the plywood I’d used to build my bee shelter the previous autumn. I borrowed a pair of saw horses from the builders and, on Memorial Day Weekend, I went to work.
Coop Construction
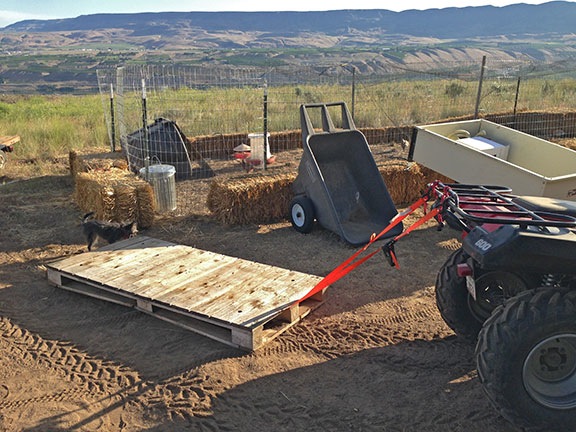
I used my ATV to drag the 36×76-inch floor pallet from the bee area to the chicken yard. The damn thing is heavy.
Coop Construction
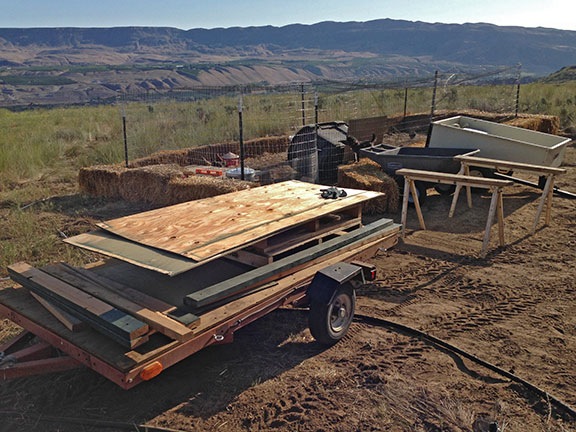
I used my Craig’s List Special flat bed trailer to move all the other pallets and wood into my work area. It also made an excellent work surface. (I’m really looking forward to having a real shop.)
Coop construction
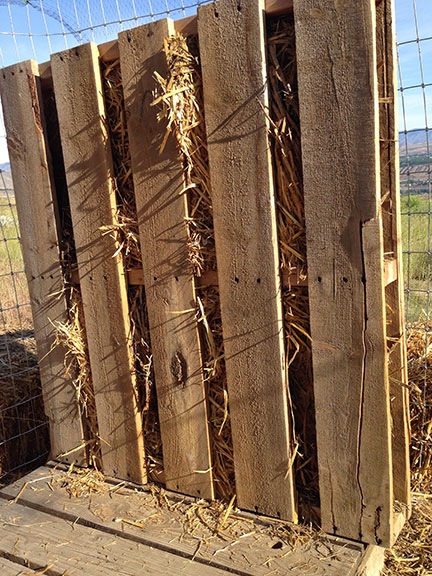
I stuffed the wall with straw, facing the side with more wood planks in toward the chickens. The outside would get a plywood skin.

The design is simple: the big pallet at the bottom for a floor and the two smaller pallets on the sides as walls. I stuffed the walls with straw — which I have absolutely no shortage of — for insulation; this was something I’d seen on the web. Then I used plywood sheets and 2x4s to make the back and roof and to cover the outside of the walls.
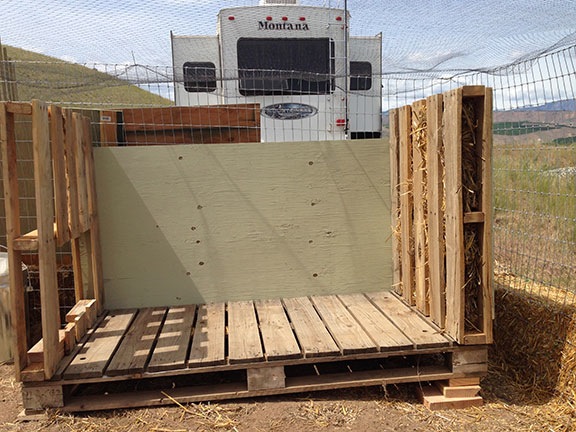
Coop Construction
Leveling the coop floor took quite a few blocks. I painted the plywood sections before putting them in place. The paint, by the way, was a high quality, no primer needed exterior paint I bought for just $10/gallon because it was a coloring mistake.

The tricky part was the nests, which I wanted to set into one of the walls with a hinged back for collecting the eggs. I’d never built anything so complex before and I had to give it extra thought to do it without screwing up. They came out remarkably good.
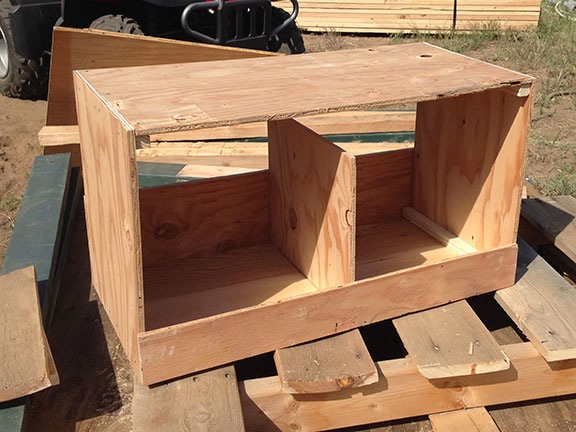
Coop Construction
The nests were a challenge — at least at first. They came out good. I painted them before installation in the side wall.

I got to use my new circular saw for the job. I’d never used a circular saw before so I was learning by doing. My first few cuts were satisfactory, but not much better. But by the end of the day, I was making rip cuts in 1x 2s to make the 1x1s I needed for the next boxes.

While I worked, one of my chickens died. She’d been acting kind of sluggish all day long and had even let me pet her. Later on, I found her keeled over in the temporary shelter. I buried her on the far east end of my property.

I ran out of steam around 7 PM, right after putting the roof on. It had been a long, hot day. I’d get back to it in the morning.

The next day, I designed and built two perches out of one of the dozen or so 2×2 posts a friend had given me. Originally, I was going to make two tall ones but I started wondering if the young chickens would be able to jump that high. So I wound up with a tall one and a short one.
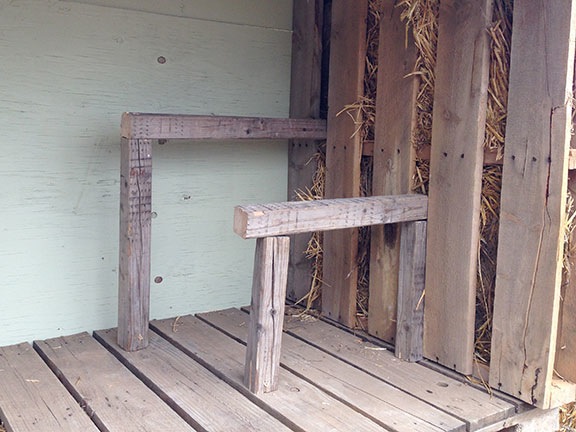
Coop Construction
The two perches should provide enough space for seven full-grown chickens.
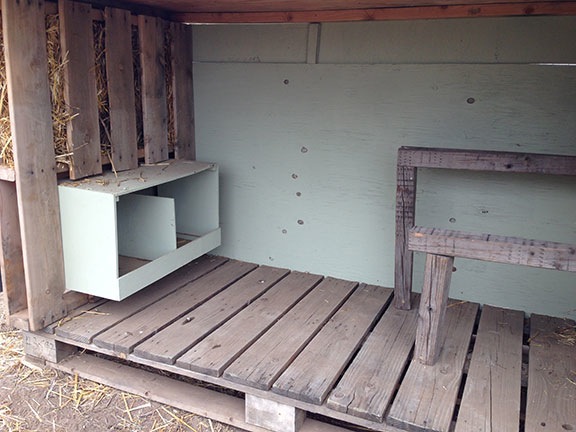
Coop Construction
The nest boxes fit snugly into the side wall. The outer wall is hinged to provide access to the eggs from the outside.

I had just enough plywood left to put two outer panels on the front of the coop. This would provide shade in the morning and shelter from the wind on the rare instances when it blew from the east.
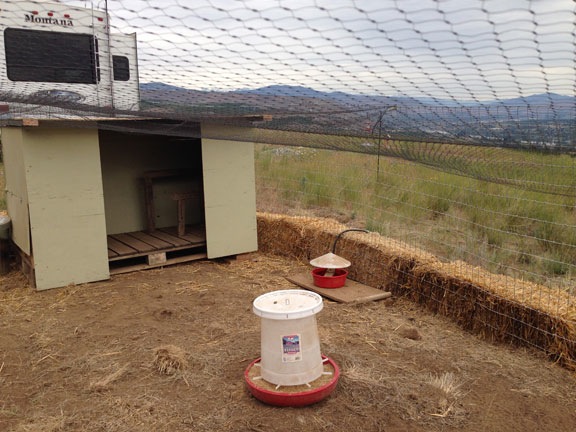
Chicken Coop
The finished chicken coop.

Although the coop is pretty much finished, I do have one more thing to do: I want to put roof shingles on the top piece of plywood. I bought the shingles and the nails; I just need to get around to it — hopefully, before the next heavy rain.

This was an ambitious project for me, requiring me to make use of a limited amount of lumber and tools that were brand new to me. I can’t tell you how rewarding it is for me to dream up a plan for a project like this and then complete it by myself. Every time I reach beyond what I think are my limitations and succeed, I prove that I’m capable of doing everything I need to do.

Too many women rely on men for even the most basic things. I’m very proud that I’m not one of them.
Bees: Rebuilding a Screened Bottom Board

A minor adjustment that required a bit of effort.

I started my beekeeping hobby in June 2013 and have been blogging about it periodically. If you’re interested in reading the other posts in this series, follow the Adventures in Beekeeping tag. Keep in mind that the most recent posts always appear first on this blog.

I use screened bottom boards for my beehives. It’s a mite control measure; when the mites fall off the bees, they fall through the screen and can’t climb back into the hive.

My surviving hive had very few mites when I bundled it up for the winter. My other two hives — both now dead — had more than average mites. Coincidence? I don’t think so. It’s in my best interest to minimize the mite population in my hives and I’d like to do that as much as possible without resorting to chemical solutions.

I bought one screened bottom board — also called a varroa trap — from Mann Lake. I like it a lot, but it wasn’t exactly cheap: $28.95. Buying one of these for each of my hives would get costly quickly.

Fortunately, my friend Jim builds his own hive equipment. He built a screened bottom board. It was simpler — it didn’t have the fancy drawer that I really didn’t need — and I couldn’t beat the price: $15. I bought two.

Bees
It’s important to keep the bees inside the hive while transporting them.

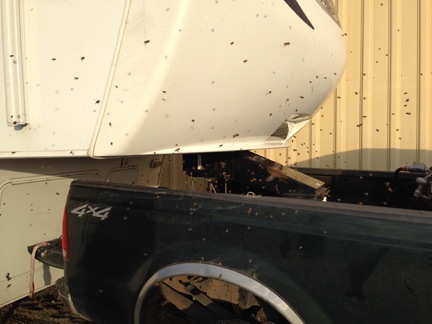
Trouble is, Jim built his bottom boards using 1/4 inch screen. That means the wires of the screen are 1/4 inch apart. While this will keep mice out of the hive — as it kept mice out of my RV when I used the same stuff there — it doesn’t prevent the bees from getting out of the bottom of the hive. This turned out to be very important on my trip south when the bees, feeling the warmth of California’s spring, decided to go flying while I was driving. I don’t know how many bees I lost in transit, but I do know that there were hundreds of them flying around my truck when I parked.

I put the hive in its temporary apiary. I soon discovered that the bees were regularly using the bottom screen to enter and exit the hive. This would not do. I wanted my bees to use the doors I provided — namely the front door. This would be easier for the bees to protect from robbers, too. Clearly, I had to make a change.

Fortunately (or, in reality, unfortunately), the hive that the Mann Lake bottom board had been sitting on was dead. Yesterday, while inspecting the hive, I swapped out the bottoms.

But I still had two bottoms with 1/4 inch screen when they should have 1/8 inch screen.

The solution was simple. I’d disassemble the two bottoms and replace the existing screen with more screen.

I needed a few things:

  • 1/8 inch screen. I bought 6 square feet of the stuff.
  • A small pry bar to pry off the wood strips holding the screen in place.
  • A cutting tool that would cut through the screen. I already had one, but I’d left it home when I traveled south.
  • 1-1/2 inch wire nails. I’d need to reattach the wood strips.

Fortunately, I already had a hammer in the RV toolkit.

The job went surprisingly quickly. The small pry bar I’d bought easily fit in the crack between the wood strips and the main piece of the hive bottom. Jim had used thin wire nails, probably from a nail gun. On one bottom, the nails stayed in the strips and I could reuse most of them; on the other, the nails stayed in the bottoms and I had to remove them with the claw end of my hammer.

Bottom stripped
Here’s the second of the two bottoms I disassembled. I’d painted this one before use.

Once the wood strips were out, I had to use the pry bar to separate the screen from the main part of the bottom. Jim had used U-shaped tacks for this. As I pried, the screen broke, leaving most of the tacks behind. But I was able to salvage about 10 of them — this turned out to be a good thing because I hadn’t bought any.

I cut pieces of screen and laid it into place. Then I replaced the wood strips, nailing them down firmly. There was enough screen overhang that I know the nails caught the screen. But because there was nothing holding the front of the screen in place at the entrance, I used the salvaged tacks.

Completed Bottom
Here’s the completed screened bottom with the new screen in place. The holes are half as wide so I’m sure they’ll keep the bees from getting through while allowing the mites to fall through to the ground.

It took me about an hour, working out in the sunshine of a very nice day with just a bit of wind. My truck tailgate made a good work surface, although I did use the pavement nearby as a base when it came time to use the hammer.

I now have all the parts I need to build another two hives. All I need are the bees.

Temporary Power: Cleaning the Box

Prepping my hand-me-down temporary power box.

As I wrote yesterday, I decided to do the installation of the temporary power at my building site in Malaga. This would not only teach me more about how electrical wiring is done, but it would save me about $300.

The decision was made easy, in part, by a friend’s offer of his old temporary power pole which was about 80% wired for my needs. He’d built a home in Wenatchee Heights and had the permanent power turned on last summer. He didn’t need the box and offered it to me in trade for a few trees he wanted to plant on his property. He also offered to supervise my wiring of the box and took me shopping at Home Depot and an electrical supply store to get the few parts I needed to make it work for my purposes.

Yesterday, I went to examine the pole and electric panel, which he’d dug out and laid on the ground. I tried to move it but couldn’t — the post is an 8-foot long 8×8 piece of lumber further weighted down with the electrical box and some heavy wires and conduit. (I should point out that if I had to move it, I know I could — probably by fastening it to my Jeep’s bumper and dragging it to a new position. And when it comes time to bring it to my future home, I know my friend will help me get it in my truck and wrestle it into place in the 36″ deep hole I dug on Saturday.) But even in its current location, I could open it up and check it out.

Electric Box Before
The electrical box was full of twigs, left behind by an industrious bird.

Sometime during the past few years, a bird had built a nest in the box. The meter side was absolutely full of twigs, feathers, and dirt. It would all need to be cleaned out before I could do any wiring. So I donned a pair of latex gloves and got to work.

While a lot of the twigs were easy to get to and remove, others weren’t. I had to get a tool — a flat-head screwdriver, in this case — to partially disassemble the box where the meter would go so I could reach the twigs. I also used a needle-nose pliers to reach and grab where my fingers wouldn’t.

I got a phone call from a friend while I was working and took a break. While we were chatting — about, among other things, the latest crazy talk from Arizona, if you can believe that — I went into my friend’s house to track down a ShopVac. I have one, but it’s in storage, and I know my little battery-powered DustBuster wouldn’t be able to do the job. I found a big ShopVac with an extension cord and carried down to the back door.

Power Box After
This is as clean as this box is going to be.

When my conversation was over, I plugged the vacuum in and ran the cord out to the backyard where the power pole lay open. Five minutes later the electrical box was as clean as it would get.

I reattached the panel over the area where the meter would go and closed the box back up. Then I returned the ShopVac to its place in the house and put away all my tools.

Taking care of the box must have put me in the mood to clean because I spent the rest of the afternoon clearing out the miscellaneous stuff that had accumulated under the helicopter’s seats, washing the helicopter bubble cover, and cleaning out the RV basement.

(Now if only I could get through this stack of paperwork that never seems to go away.)

My friend returns later today. With luck, we’ll get that electrical box wired this afternoon — and maybe even bring it to my future home and position it in its post hole. There’s a good chance I’ll have electricity there by the end of the week.

The Little Dig

Hard work, but not a difficult task.

This past week, I made a radical decision: I decided to install my own temporary power box at my future homesite.

Chelan County Electric GuideTemporary power is what’s commonly installed at a construction site to provide power to the builders for their tools. It consists of a 4×4 post with a circuit box, meter, and outlets. Chelan County is very specific about how the box should be installed. It’s all detailed in their 74-page book, Residential Electrical Services Connection and General Information,” which is available as a PDF from the Chelan County PUD website.
I’d spoken to two electricians about doing the work. One wanted $500, which included “renting” me the post for six months. He never did say what it would cost if I still needed it after that. The other promised to come look at the site but never showed. I called him to follow up and left a message. But by the time he called back, I’d already made my decision.

A friend of mine had a power post he no longer needed. All I needed to do was buy some more outlets and wire and some conduit and a grounding rod. He went with me to Home Depot and an electrical supply place. I spent $120 for the items I needed, along with a electrical how-to book.

The biggest challenge, he told me, would be to get the hole dug and drive in the copper grounding rod. The rod was about seven feet long. It had to be driven all the way into the ground. He said that driving in that damn rod would be the hardest part of all.

I went out to the property the next day. I wanted to scout out where I’d put the pole. I also wanted to measure the distance from the pole to where I planned to park my RV during construction. I was hoping to run 30 amp power to the RV. I needed 75 feet of cable. I think I had 50. I began rethinking the parking space.

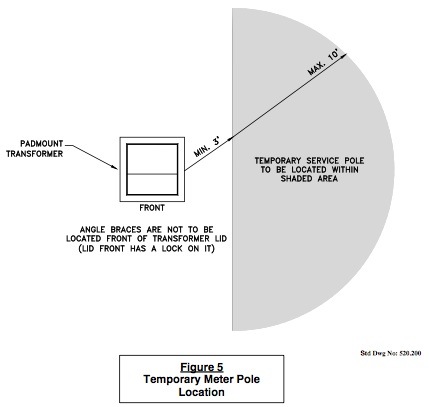
Pole PlacementYou see, the power pole has to be 3 to 10 feet from the transformer, which is already on the property. So I’m limited as to where I can put the pole. Fortunately, the transformer and pole location will be quite close to the building site. That’s good because the building must be within 100 feet of the transformer. So I’m all set for that.
While I was there, I took a shovel and thrust it into the dirt, expecting to hit rocks. After all, I’d had a hell of a time driving the T-post for my name/address sign three weeks before. But the shovel went in smoothly. I dumped a shovelful of dirt to the side. Easy. The next one wouldn’t be that easy, though.

I dug again. It was.

I got out my tape measure and measured about 7 feet from the transformer, in a line almost abeam my city water spigot. And I dug.

I dug for a good 15 minutes, always expecting to hit rock. I didn’t encounter a single stone.

Start of my Hole
I got pretty far the first day, just looking for rocks I never found.

By that time, I had a good trench going but I was sweating hard. It was afternoon on a sunny day. I wasn’t dressed for digging. My foot, which I’d sprained more than two weeks before, ached. I’d have to come back earlier in the day, before it got warm out.

That day was yesterday. I showed up at 8 AM. After a little weed whacking to clear the area, I got to it.

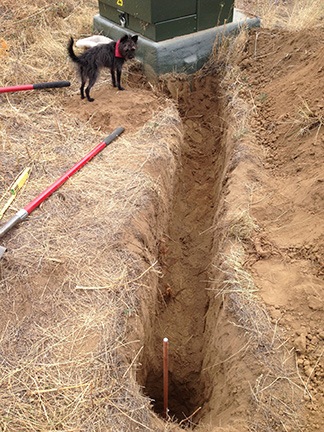
The trench needed to be 24 inches deep. The hole for the pole needed to be 36 inches deep. Unless you’ve actually dug a trench and hole that deep you have no idea how deep it really is. It’s deep.

But there were no rocks. The dirt came up easily, shovel after shovel. I had no trouble getting down to 20 inches on the trench and 30 on the hole. Then it started to get a little harder — the dirt was packed solid.

I drove down the street to where my friend Kathy lives. She’s an avid gardener. She was outside with her husband, talking about plans to add a new tasting room to their winery. I asked her if she had a “digging stick.” I described it as a long, pointed pole that was heavy. I had one back in Wickenburg but had left it behind. No problem. Kathy had one. And a post hole digger. We loaded both into my truck and I drove back.

I pounded with the digging stick to loosen up the soil. The post hole digger worked great to pull the dirt out of the trench and hole — after all, they weren’t much wider than my shovel — but was too heavy for me to work over and over. I went back to the shovel.

By 11 AM, after several breaks, I was done.

But there was one more thing: the copper rod.

I brought it over to the hole and lowered down onto one side. Then I got the post driver I’d bought to put in my name/address sign and put it over the rod. I rammed it down hard. The hit made a gawdawful clanging sound, but the rod must have gone in 6 inches.

I put on a pair of earplugs and got back to it. Soon I was kneeling beside the hole, banging away with the fence post driver. When the rod was about 4 inches out of the ground, I stopped. I could always finish it off later.

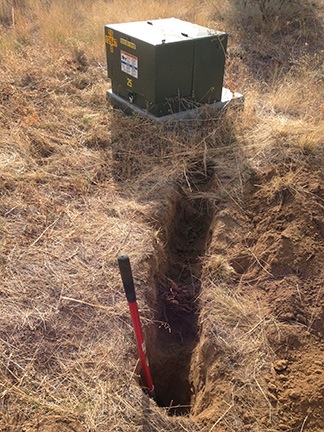
The Finished TrenchHere’s the finished trench and hole, approved by my tiny inspector.

I stopped and took a photo. When I put it on Facebook, my friends joked about using it to bury my wasband. We pretty much agreed that the ditch was so narrow he’d have to go in sideways. I told them I’d rather use it for its intended purpose since it was unlikely that I’d be able to cram his mommy in there with him.

On the way home, I stopped to chat with my next door neighbors whose home, the subject of my wasband’s investigation back in April, is nearly done. (I still giggle about that every time I drive by and see their RV parked there.) They were cleaning up after the builders — their way of saving some money. They’d loaded up their little flatbed trailer (another giggle) with scrap wood while their three sons played in the dirt. We exchanged phone numbers and talked about road maintenance.

Then I continued home, stopping just long enough to drop off the digging tools I’d borrowed.

Digging had been hard work, but it was surprisingly easy. As someone on Facebook mentioned, the lack of rocks was like some kind of good omen — it was meant to be. Still, you can bet I took plenty of ibuprofen last night.