Getting a Closer Connection to My Food

Gardening, foraging, gleaning, making things from scratch.

Frittata
This morning’s breakast: a frittata with home grown onions and broccoli, homemade cheese, and eggs from my neighbor’s chickens.

This morning, for breakfast, I had a frittata I made with onions and broccoli from my garden, eggs from my neighbor’s chickens, and Chaource cheese I made myself three weeks ago. (The only reason the eggs came from neighbors is because my 17 chickens aren’t laying yet.) I could have added chanterelle or gypsy mushrooms I foraged for and froze last autumn or morel mushrooms I forged for on Friday. (That would have been a waste of the morels.) Or I could have made blueberry muffins from scratch, using blueberries I picked and froze last summer and sweetened with honey from my bees. Or a smoothie made with those same blueberries, two strawberries from my garden (only two are ready right now), and yogurt I made myself.

It’s only recently that I’ve realized how much of my food comes from my own sources or resources. Last night, I made a batch of pickled broccoli stems with more of that garden broccoli and dill from my garden. The tomato sauce and pickled green beans I canned last winter are still forming the basis of pasta meals or snacks and hors d’oeuvres for dinner guests. The cherries I gleaned last summer are still in the fridge in the form of cherry chutney that goes very well with roast or grilled pork, turkey, or chicken. I’ve got five kinds of homemade cheese in various stages of ripening in my wine-fridge-turned-cheese-cave or refrigerator. I’ve got mead made from honey from my bees fermenting in my pantry closet. In my garden, the broccoli and onions are ready for harvest and I pick them right before I eat them. Soon I’ll also have tomatoes, peppers, green beans, brussels sprouts, cucumbers, corn, melons, zucchini, and potatoes, not to mention marion berries, ligon berries, and black-capped raspberries. And it I get back into the forest for a hike at just the right time, I can pick thimbleberries right off the bushes.

Chickens Eat Weeds
My chickens love to eat weeds. They’ll be making eggs in about 2-3 months.

I’ve discovered that I can turn weeds into eggs by feeding them to chickens and coffee filters into vegetables by composting them into a rich garden soil.

I spent literally hours traipsing through forest floors tangled with the debris of fires a year or more ago, looking for the morel mushrooms only found this time of year. Although I found a few — enough for a small side dish or pizza topping — I was competing with people who had a lot more experience than me and consider myself lucky to find ones they obviously missed.

It also takes a long time and makes a big kitchen mess to make cheese from scratch.

And gleaning cherries after harvest? Do you know how frustrating it is to see a perfect one just out of reach up in a tree and not be able to close your fingers around its stem?

Which is why people ask me why I bother. Why not just go to the supermarket and buy whatever’s there?

The only thing I can come up with is the feeling of satisfaction I get from knowing where my food comes from or what’s in it, and having a very active role in obtaining it, putting it on the table, and serving it to my guests.

Foraging for mushrooms, which I hope to blog about later in the week, is especially rewarding. When I say I spent hours searching, I’m not exaggerating. I went out into three different forest areas on four different days and came back with just five mushrooms, one of which is tiny. Yet the excitement I felt when I saw the biggest one cannot be overstated.

There’s something about having this closer connection to my food that I really like.

Next spring’s challenge: tracking down the wild asparagus that supposedly grows in the Chelan area.

What do you think? How involved are you in obtaining and preparing the food you eat?

The Last Chicken Coop

The last one I’ll build here, anyway.

I just built my third (and final) chicken coop.

The first coop was really more of a chicken lean-to. It was mostly open on one side, had two nice nests and two very rickety perches. I made it mostly out of pallets and scrap wood — and it showed.
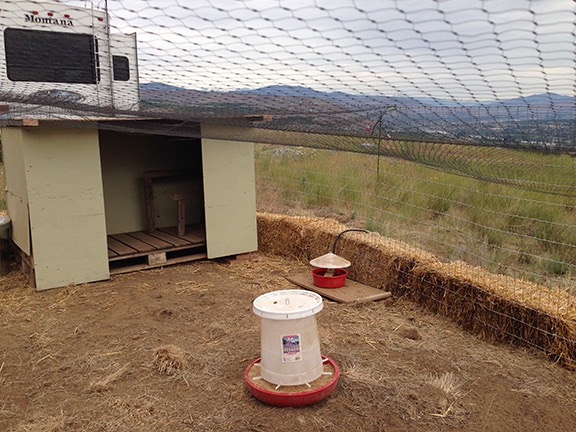
Chicken Coop 1
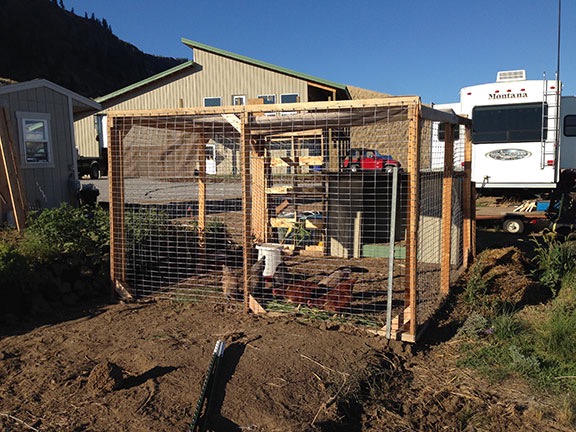
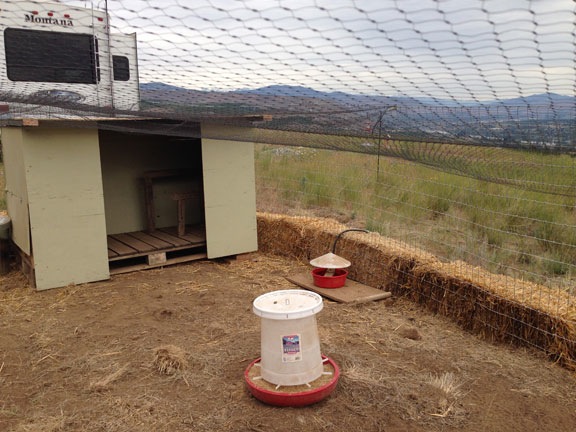
My original chicken coop and chicken yard. The coop lasted from mid 2014 through October 2015; the yard was rebuilt with better fencing early 2015. This photo was shot in early 2014, when I was still living in my “mobile mansion” fifth wheel.

The second coop was way more ambitious. Also built with pallets as its base, it was designed to match the appearance of my home with an exterior finish using the same exact metal. It had three nests under a hinged lid and three sturdier perches. It was also insulated and had a covered porch so I could keep the chicken food out of the rain. It weighed a ton, though, and I had to drag it into place with my ATV. You can learn more about this project and my other efforts in this blog post from 2015.
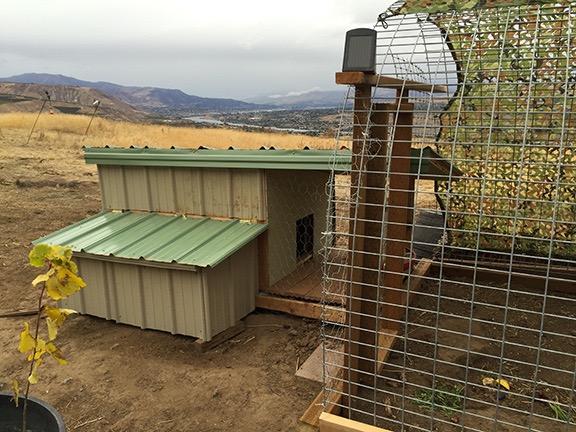
Coop 2
The second coop scored high on durability and insulation values, but low on practicality. I don’t think there was enough room inside for more than the 8 chickens I had at the time. This photo also shows part of my third chicken yard, a hoop affair made of 5×16 foot “hog wire” panels. I like the design and still use it.

What I wanted was a coop that was big enough to hold a lot of birds laying a lot of eggs. But I wanted one I could actually walk into, one that was easy to clean and had plenty of light and ventilation. Although I’d bought a small coop the year before, it was unsuitable for more than two or three adult birds. I wanted to raise chicks into laying hens and sell them when they started laying. To get started, I bought 18 chicks when I got home from my winter travel in March and set them up in a brooder in my garage. That gave me a time limit — I needed the new coop done before they outgrew the brooder.

I almost converted my existing shed into a coop. With a little interior modification, it would have done the job. But then I would have lost my garden storage area. And what about the controls for the irrigation? Did I really want my chickens crapping on it?

I looked into shed kits at Home Depot. They were not cheap and they were a lot of work to build. I could build a custom solution for a fraction of the price.

But no more pallets! I was going to build from scratch.

I sketched out a design. The footprint would be 4 x 8 feet. The roof would be 7 feet sloping down to 6 feet. I began disassembling the old coop. I think that was harder than assembling it. I managed to salvage the framed plywood roof and one of the trim panels. I wanted more overhang on the metal, so I scrapped what I had. I burned pretty much everything else, although I did have to throw away the Trex decking I’d used inside. (I did say it was heavy.)

I started at the bottom, building the floor on 4x4s with 2×4 studs 16 inches on center. I used a heavy OBS sheet as the base and gave it two coats of oil based porch paint.
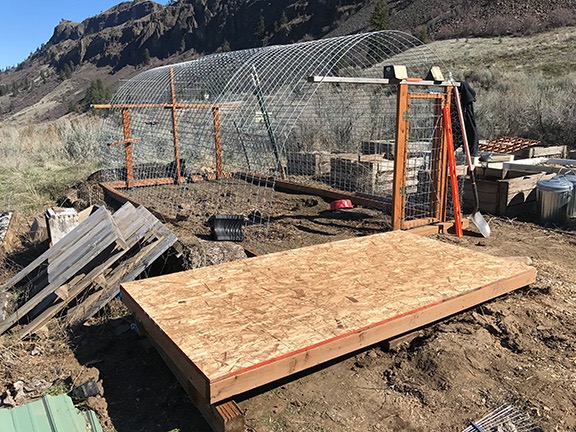
Chicken Coop Floor
I started with a floor on 4x4s, leveled in place.

Next, I framed out the four walls. But instead of framing them on the floor, I built the frames on my concrete driveway apron. It was easier for me to work on level ground. I framed them with 2x4s 16 inches on center. Every time I finished a wall, I stood it up against a deck post. I knew that it would be impossible for me to carry the two long walls over to the coop and fasten them into place by myself, so I did as much as I could before prepping the building area with two ladders and a bunch of wood screws and my impact driver. Then I called my neighbor Elizabeth and made an appointment for her to come help me get the walls in place. I promised it would take less than an hour and it did. And not only did we get the walls in place, but we even lifted the roof into position and fastened that down.
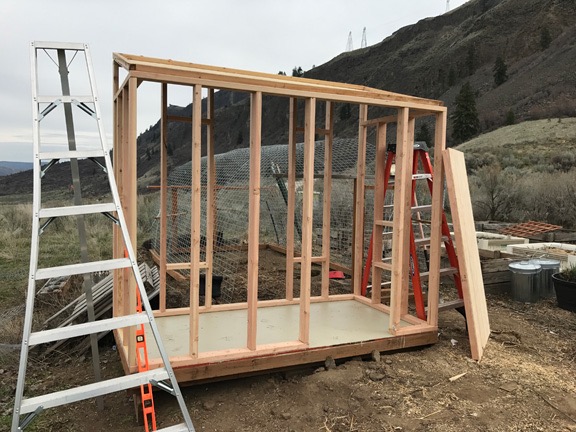
Framed Chicken Coop
I shot this photo right after Elizabeth left. The ladders were still in place; the one on the left is an orchard ladder, which are pretty common here. The wood thing leaning against the building is the door, which I’d made while I was waiting to put the walls in place.

The coop design had a 32-inch wide door, three ventilation windows, and two chicken doors. I framed them as needed. The trick then was to cut the T1-11 wood — it’s like plywood paneling — so the openings would match up right. Measure twice, cut once. I think I must have told myself that a dozen times a day during construction. But it sunk in. I fitted the north side short wall and half the west side wall without any problems.

Weather came. We had an unusually rainy spring this year. I had some large tarps and fastened one over the coop’s roof and two wall panels. I hadn’t painted anything yet and I didn’t want the wood to get soaked or ruined. My camper, the Turtleback, was parked on the driveway near the coop, blocking it from view from my home. So I was very surprised to find the coop lying on its side when the weather cleared and I was ready to get back to work. Apparently, strong winds had come though and knocked it over as if it were a sail.
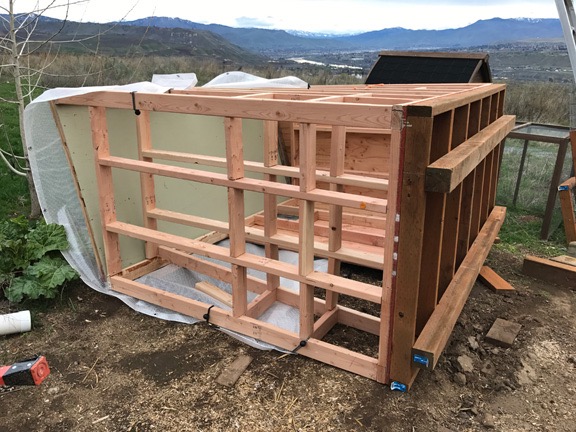
Coop on its side
Oops. Did I mention that it gets windy here? The tarp acted as a sail on the top-heavy coop and it went right over.

Neighbors to the rescue. I had three of them meet me the next morning to right the coop. Damage was minimal. When they left, I got right to work.

I used 1/4 inch wire that I already had between the frame and the T1-11 for the windows. Later, I’d put sliding panels to close them off. I had two doors to the outside but planned on using only one for now; the other one was for expanding the chicken yard with another hoop enclosure. (It’s important to cover the chickens here to protect them from birds of prey.)

The original designed called for nests just inside the door that were accessible through hinged panels from the outside. I decided to do away with the outside access, mostly because I figured a single T1-11 panel would add to the structural integrity of the building. And after all, the building was big enough for me to walk into.
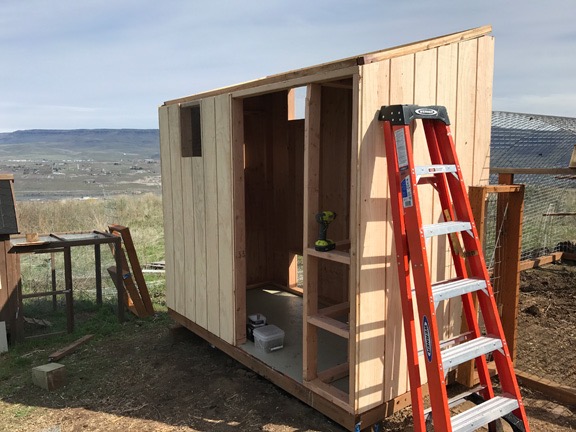
Coop Under Construction
In this shot, only one wall and the door are left to install. The nests are just inside the door to the right.

Once the walls were in place and the door was hung, it was time to paint it all. I used the rest of that oil-based porch paint and even bought a second can. The paint guy had warned me that it would absorb into the wood and he wasn’t kidding. I’m going to need a second coat. But for now, the wood is sealed tough against the elements. A second coat before winter and it’ll be ready for any weather.
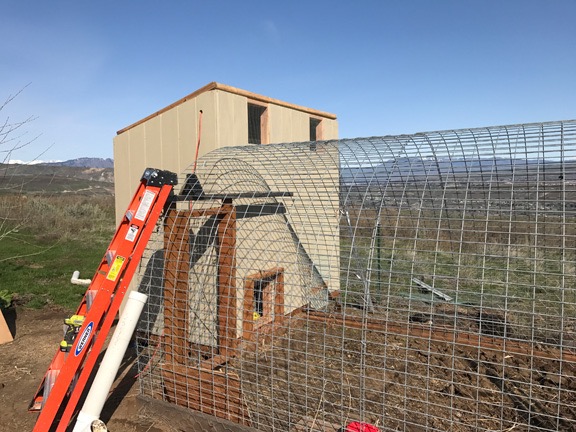
Painted Coop
Here’s the coop right after painting it. By this point, the chicks were living inside. I drilled a hole in the wall and ran an extension cord so I could hang their heat lamp. I blocked off the exit to the chicken yard with a framed bit of fencing I already had. The two upper windows have 1/4 inch screen that doesn’t show in the photo.

I still had to finish the roof. I wanted so badly to get metal panels that match my home — after all, the walls of the coop match the walls of my home — but Home Depot had a limited selection of colors. So I chose the dark green. I dreaded cutting the metal — it’s no picnic, believe me — but it went a lot more smoothly than I expected it to. I had insulation leftover from the old coop and I put it into place. Then I painstakingly lifted the metal panels into place and screwed them down. Not perfect by any means, but functional.
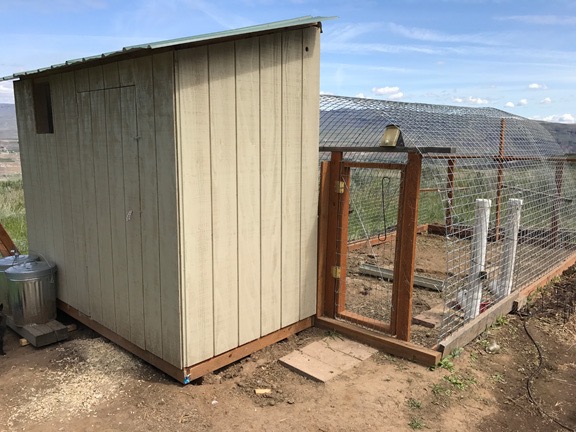
Outside Finished
Here’s a photo of the outside of the coop and yard that I took just the other day. The door really blends in; I use a piece of rope as a “doorknob” and a hook to keep the door closed. The long white pipes are chicken feeders I made last year; they each hold about 10 pounds of chicken food.
Coop Perches
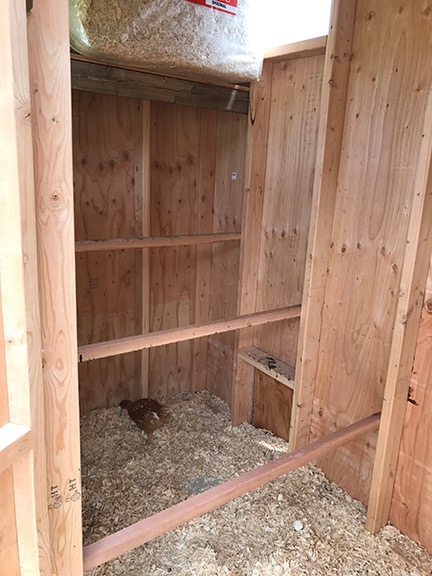
I used 2x2s with rounded edges for the perches. I also added a shelf on the north side, far above the highest perch, to store odds and ends like the pine shavings I use on the floor and in the nests.

By this time, the chickens were installed and able to come and go freely between the coop and their yard. I had put in some perches for them, but as they grew, I knew I could raise them and add more. So I did; they have a total of three perches now, each about 4 feet long. With 8 inches per bird, my 18 chickens (now 17 since one died) have plenty of space to roost. I could easily add 2-3 more if I had to since they’re spaced 16 inches apart.
Coop Nest Area
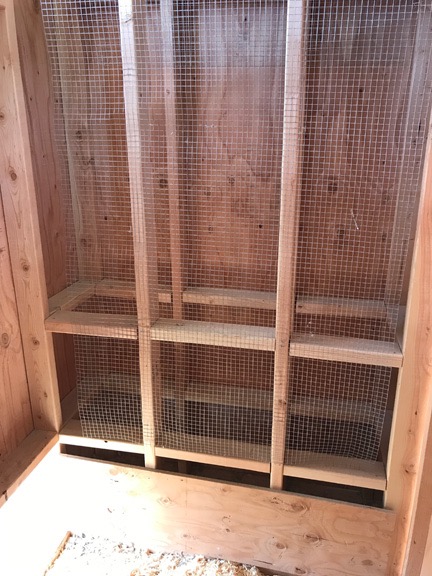
I had to block off the nest area with wood and wire mesh to keep the chickens out.

I still needed to do the nest boxes. The first thing I did was close off the nest area; the chicks were sleeping on the floor in there when they were still very young and I wanted to break them of that habit. They wouldn’t need the nests until they started laying, which probably won’t be until August.
Coop Nest and Brooding
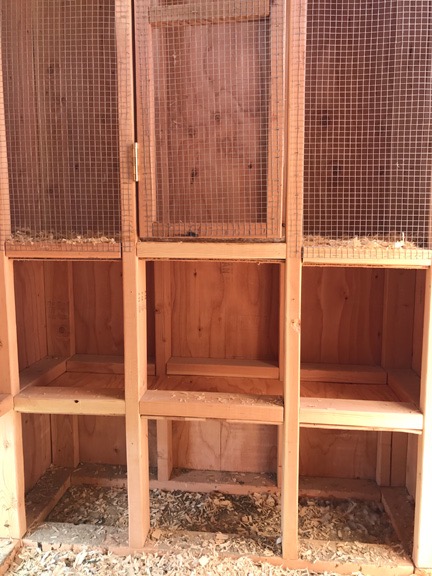
Here are the finished nests on the bottom with the bottom half of the brooding area on top.

Still, I wanted to get them done and create a brooding area above them. My design called for six nests — three on each level — so I had to build a floor for one level and then the brooding area level above it. This required me to take careful measurements of the 2×4 framing because I’d have to cut plywood around it. Then I’d have to lift it into place from below and screw it into the 2x4s I’d put in to hold them. It’s hard to describe and was hard to do, although my little jig saw did make the job easier than I expected. In the end, I had to cut each floor into two pieces to get them into the tight-fitting space.

Once that was done, I used a staple gun to securely fasten 1/4 inch screen to either side of the top brooding area. I framed a door with 2x2s and stapled more screen onto that. Then I put the door on hinges and added a hook to hold it closed. I’d be able to hang a heat lamp over the area if I needed to to keep chicks warm. I figure I can brood up to 6 chicks for up to a month in the space. Keeping them with the other chickens should allow them to get to know each other while they grow, hopefully preventing fights when they’re released into the flock.

When it was all done, I had to block off the nests again. The chickens really like snuggling up in corners when they’re indoors. I wouldn’t mind so much, but they crap where they hang out and it’s a pain in the butt to clean out the nests.

At this point, the chicken coop is mostly done. In July, I’ll pull the covers off the nests and put a fake egg — I usually use an egg-shaped rock — into one or two of the nests. With luck, they’ll get the idea and start laying in there when the time comes.

Although I’d originally wanted to add sliding panels over each of the windows, I think I’ll skip it. The ventilation is good. In the winter, I’ll fasten some heavy plastic over each window to prevent drafts. I’ll leave the door to the yard open for them.

Because this coop is not insulated — neither was the original one — I might buy a chicken coop heater for it. I already have a Thermo Cube that will turn power on when the temperature gets down to 35 and turn it off when it gets up to 45. Attaching that to the heater will run it only when needed during the winter. It’ll never get warm in there, but it’ll stay warm enough to prevent frostbite. You might think that’s nuts, but power is cheap here and from renewable energy (hydro and wind) so I have no qualms about using it to keep my chickens from freezing in the winter.

In the meantime, I’m just happy to have this project done. And even happier that I can’t find anything wrong with this design so I won’t have to build yet another one.

The New Chicken Coop

Third time is the charm?

I like having chickens. There’s nothing quite like fresh eggs laid by chickens in your own yard. Chickens that get to walk around all day and eat bugs and scrap veggies. Chickens that you feed and talk to and watch. I had chickens for much of the time that I lived in Arizona and really enjoyed not only the eggs, but the experience.

So it made sense that I should have chickens here at my new home. I got them as chicks in April 2014 and waited five months for them to start laying eggs. I started with eight of them, lost two early on, and lost a third when I got my rooster.

The First Chicken Yard and Coop

When the chicks grew to a size where they were ready for a chicken yard, my friend Mike and I built one out of 6-foot T-posts and 5-foot horse fencing. I blogged about the whole prep thing here.

A few weeks later, I built a coop — a building with roosting and nesting areas — for the chickens. I go into a lot of detail about that process here.

Chicken Coop
The finished chicken coop.

The coop was ugly, but the chickens didn’t seem to care. They roosted and nested and made eggs. I never did get around to putting shingles or any kind of protective material on the roof. It was just painted an ugly dark green and nearly flat so water soaked into it when it rained or snowed.

Meanwhile, the chicken yard was functional — it kept the chickens safe — but to keep out birds of prey I had to run bird netting over the top. I’m 5’6″ tall. The bird netting dipped down below 5 feet. Needless to say, going into the chicken yard was a bit of a nuisance. And since that’s where the eggs were, I had to go in daily to collect them.

The Second Chicken Yard

A friend of mine was creating much nicer chicken yards by building a frame and then fastening chicken wire on it. I had some 20-foot long palette wood that my building’s metal sheets had arrived on. In September, I cut them in half and, with some 6-foot 2x4s, built three frames. I used the same horse fencing inside each frame, running it vertically in 5×6 sections. Then, with the help of a friend and his mom, I assembled the three walls in place of the existing yard fencing with the coop on the outside of the yard. I built a door, added bird netting and some shade fabric I’d brought from Arizona on top, and had a new chicken yard. One I could stand up straight in.

Chicken Yard 2
Here’s the second chicken yard. The coop is outside the yard but the opening is inside. It didn’t look bad right after I built it.

As winter approached, I worried about my chickens keeping warm. Their coop’s doorway was very large and wouldn’t offer much shelter from a wind coming out of the east. If it snowed, their food would get wet and there wouldn’t be any place for them to walk without snow. I put some metal panels leftover from my building on top. This protected them and gave them shelter from rain. I fastened wood and metal panels around the north side and stacked up hay bales on the east. It was functional and the chickens seemed to be fine all winter, but by spring I couldn’t deny one simple fact: from the road, it looked trashy. And if there’s one word I don’t want applied to my property, it’s “trashy.”

Trashy Coop
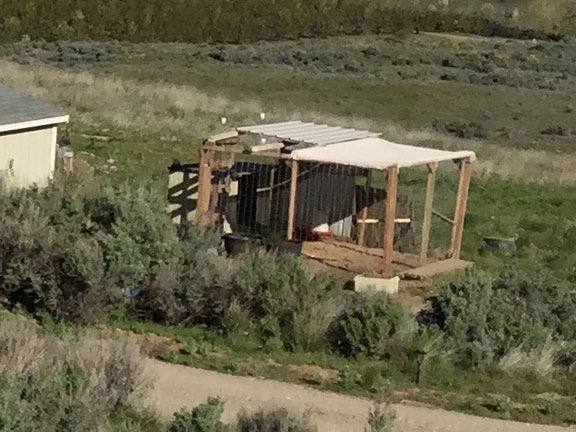
My chicken setup looked trashy — there’s no other way to describe it.

The Hoop Yard

My next door neighbor, Michelle, got chickens in the spring. She built a chicken yard out of “hog panel” fencing hooped up and over into a rounded top. It looked great. Although she started out with a large coop inside the hoop, she later cut the coop in half and positioned it on one end of the yard, giving the chickens a lot more room inside and making it possible for her to walk around in there when she needed to. I started thinking about doing the same thing. But I’d also need a new coop; the nest boxes and perches in the one I’d originally built were falling apart.

Over the next few months, I bought some panels and started to plan. I was busy with other things — mostly finishing up my home — and it was brutally hot for most of the summer so I really didn’t want to work outside. But about four months ago, I got to work on the new yard, extending the chickens’ existing yard another 10 feet out the back side with the hoops. I liked the way the frameless design made the extended yard blend into the scenery. But it was too hot and I was too busy with other things to finish the job so I put it on the back burner.

Chicken Yard Extension
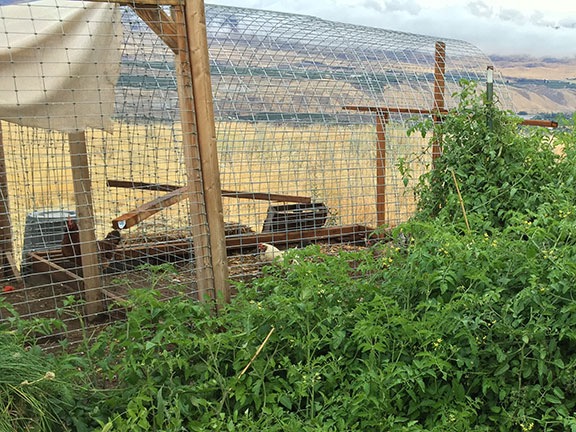
I added two 16 x 5 foot hog panels, hooped and fastened at the bottom between two 2x4s. This design is framed at the bottom and ends so it really blends into the scenery.

The New Coop

Getting Started
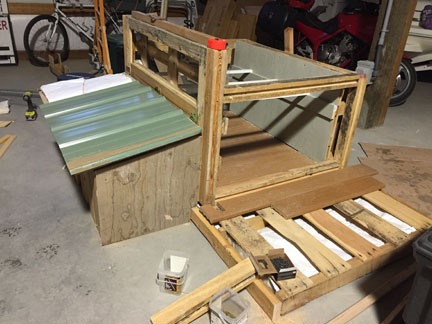
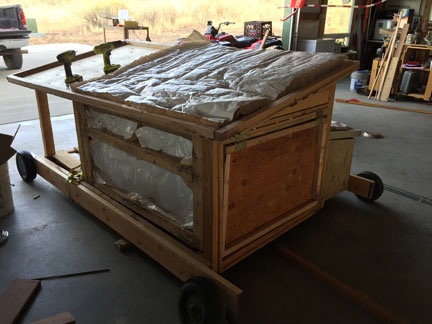
The entire coop is built on a series of pallets.

Nest Box
The coop begins to take shape with a roosting area, nest boxes, and porch.

Progress
The nest box roof is on a hinge so I can lift it up from outside to gather eggs.

Here’s the video I shot of the kittens playing in the coop I built.

Wheels
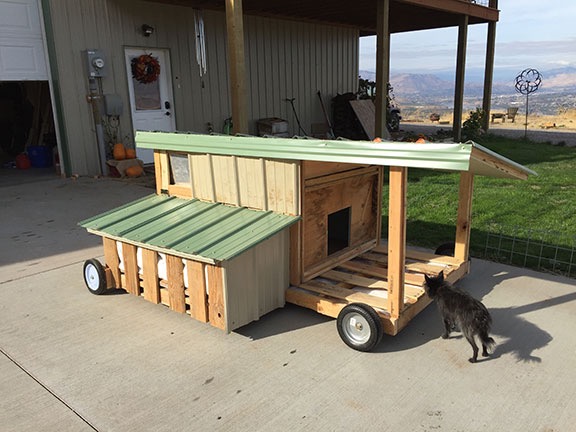
I added wheels to move it. The back wheels in this shot are my helicopter’s ground handling wheels which worked out okay on concrete but probably wouldn’t cut it on gravel.

About a month ago, I started making the new coop. I decided to build it with scrap material and to design it so it resembled my building. I’d even use the same metal for the walls and roof.

I had a lot of building materials, including lots of pallets in really good condition, lumber in all lengths and sizes, insulation leftover from my RV garage, Pergo flooring leftover from my home, Trex-style decking, leftover from my deck, and metal panels leftover from my building’s skin. Not only would I build a solid structure, but I’d insulate it to keep the chickens warm in winter and have a removable panel for ventilation in summer.

I got to work on the RV garage floor. I worked on it for a few hours a few times a week. Slowly but surely, it began to take shape.

At the same time, I was raising three kittens as a foster home for them and their mom. As the kittens grew and become more adventurous, they started playing in the coop as I worked on it. I captured some video one day. They’re gone now — a friend of mine adopted the whole family as barn cats — but they sure were cute.

At some point, I realized that the thing I was building weighed a ton. Well, not literally a ton, but a lot. A lot more than I could lift. I started thinking about how I was going to get it out of the garage and into place on the other side of my gravel driveway. My RV was parked out there at the time and that really restricted how much space I had to maneuver in.

I started by buying wheels for it and fastening some scrap 2×6 lumber to mount the wheels on. The hardest part was getting the damn thing off the ground so I could put the wheels on. I had to use my winch, mounted in my pickup truck’s bed. That made it possible to move it to the front of the garage. I got it to the point where the only thing left was to put on the metal skin and Trex porch floor. That would probably add another 50 pounds of weight — better to do that when it was in position. But I wasn’t ready to bring it outside yet. I still had work to do in the yard.

Putting It All Together

It’s all about the challenge

Over the past three years, I’ve done more new and difficult things than I’d ever had in my life. From wiring my home to moving heavy things by myself to laying down my floor and deck — it’s been one challenge after another.

I’ve found that I really enjoy the challenges I face getting my home set up the way I want it. Each difficult task is a puzzle that requires serious thought, planning, knowledge, skills, tools, or a combination of these things. But what it requires most is patience.

In the old days, I used to get frustrated when a task didn’t go as easily as I’d hoped. That feeling of frustration was magnified if I tried to do something with my wasband and he got all pissed off when it didn’t go smoothly.

But now I don’t get frustrated at all. I just plan ahead, make sure I have everything I need to get the job done, and go to it slowly and carefully. It’s perseverance that makes it all come together in the end.

And when a difficult job is done, I get a huge feeling of satisfaction knowing that I did it all myself.

I had a party last week. A little get-together with friends and neighbors to show off my home and sit around the fire pit on what could be the last warm night of autumn. I showed off the chicken coop as part of the tour — everyone wants to see my garage. My friend Alyse said I should get everyone there to help me drag the coop out. But it was dark and I was tired of getting visitors to help me with the few tasks I couldn’t do on my own. Besides, I was almost looking forward to the challenge of getting it out there on my own.

Before I could get the coop into position, I had to disassemble the old chicken yard and add one last hog panel hoop. That was the big job. I tackled it on Tuesday, the only day this week forecasted to have good weather all day.

I started by pushing the coop out onto my concrete driveway apron. By this time, I’d replaced the wheels in the back with another set I’d bought. I didn’t want to spend a lot on them because they were temporary and they turned out to be pretty cheesy. But they worked, so I’m not complaining.

Coop on Driveway
Penny inspected the chicken coop once I got it out on the driveway. I had to move it about 80 feet on gravel to get it into position — and none of the wheels steered.

Then I got to work on deconstruction. I set up my GoPro and did a time-lapse. It’s kind of funny to watch, especially once the chickens get loose. I started by removing the panels I’d put in the top of the yard and then disassembling the panels. I didn’t want to spend time removing the wire fencing; I figured I’d do that later. I used my ATV to drag away anything too heavy to lift. (It’s a 600cc Yamaha Grizzly that I bought new in 1999 and it’s up to any task.) Once the panels were all out of the way, I added a third hoop and used wire-ties to fasten it to the one beside it. I completed the bottom frame so the entire yard was free-standing and quite sturdy.

Next I had to move the coop into position. None of the wheels steered so I had to roll it in one direction, then use the ATV to pull the front wheels one way or the other on the gravel, and then roll it again. The whole time, I was worried that one of the wheels would pop off. The rear wheels, which were not nearly as good as the ones I’d bought for the front, were really taking a beating. I had to reposition the ATV and the strap I was using to pull with quite a few times. It was slow-going but I wasn’t in a rush. It was important to get it into position before nightfall so the chickens would have a place to sleep.


Here’s the video. I tried to keep the chickens penned up, but they kept getting out. In the end, I just gave up.

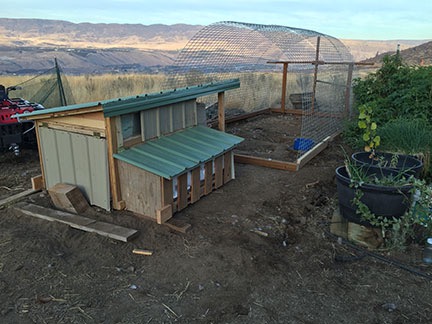
Coop in Place

Coop in Place

Coop in Place
Three views of the chicken coop as I left it on Tuesday evening.

Once I had the coop in place, I removed the wheels and set them aside. I’ll store them for use on another project. If there’s one thing I’ve learned over the past three years, it’s that wheels make it a lot easier to move things.

I did a little work with chicken wire to fence in the far side of the porch. I also laid in most of the porch floor. But I didn’t have enough pressure-treated lumber to get the end framing and yard door done.

By that time, it was about 5 PM and I was completely exhausted. There was no way I’d be able to get the chickens in the yard and keep them there without a door. So I let them be. They wound up spending the night in their old coop. One of them even laid an egg in there.

Finishing Up

On Wednesday, it was cold and kind of nasty. I spent half a day writing blog posts while I waited for an inspector. I spent some time disassembling the old coop so the chickens couldn’t spend the night in it. When the inspector left, I ran out to do some errands. When I got back, the irrigation guy arrived to fix the water line, which had burst because of my outrageously high water pressure. While he worked on that, I set up my weather station. Then it started raining. Hard. That day was shot.

On Thursday, I went for a hike up in Leavenworth, ran a few errands on my way home — including getting the lumber I needed — and then went out again to help some friends with a catering job. It was dark when I got home, so that day was shot.

The chickens, during all this time, were free-range, scratching around the garden and under the bushes and in their new chicken yard. One of them started laying eggs under a sagebrush beside the driveway. At night, they went into their new coop. The first night they were in there, the rooster slept in the doorway with his head sticking out. I have no idea what that was all about.

On Friday afternoon, I was ready to finish up. My main goal was to get the yard fully enclosed so that the chickens could be secured. I framed out the doorway beside the coop. I closed the other side of the porch with chicken wire. And then I went inside to build the door. The old door had been a pallet and it was misshapen and falling apart. I wanted the new door to be sturdy and a perfect fit. I cut some of the wire fencing from the old chicken yard and nailed it into the door. But by that time it was raining and getting dark and I’d had enough for the day. I coaxed the chickens into their yard and used a scrap piece of plywood to close it up.

On Saturday, I did the job I’d been dreading: putting the metal sides on. Why did I dread it? Because I had to cut the metal. Corrugated metal is a real bitch to cut. After trying several methods, I’ve finally found one that works for me: a metal cutting blade in my jigsaw. The only drawback is that cutting it makes a gawdawful noise. Fortunately, I bought a set of ANC ear protectors. I pretty much wore them all day on Saturday.

Bit by bit, I got the metal cut. It was an odd day with a lot of moisture in the air and a series of rainbows, one after the other, appeared to the northwest and north throughout the day.

Rainbow
I don’t think I’ve ever seen so many rainbows in one day. And yeah, this one is a double.

I screwed each piece into place, feeling myself getting closer and closer to being done. Finally, the last piece was in place. I was done.

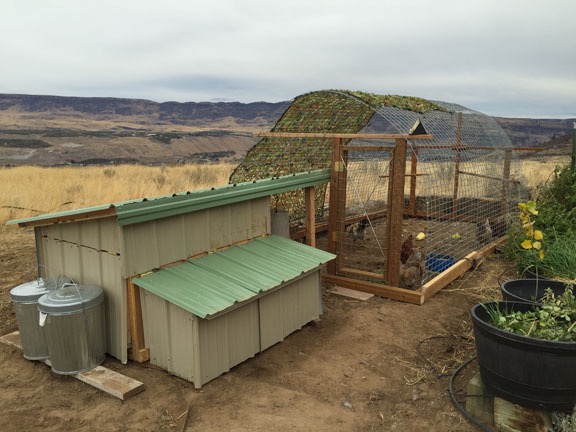
Finished Coop
Here’s how the coop looked when I finished up on Saturday. I draped some camouflage netting over one side to help provide some protection from the wind.

Or at least done enough for now. I’m still thinking of painting the exposed wood. But not this week.

The finished yard is 8 x 15 feet and tall enough for me to walk inside standing straight up. The eggs are accessible from the outside. The chicken’s food is under the porch roof where it’ll stay dry. There are enough perches inside for all six chickens — and hopefully for a few more next spring. The coop is solid, insulated, and protected from the elements.

I think I’d call this a win. It only took me three tries to get it right.