Construction: Interior Framing

My living space begins to take shape.

On May 20, 2014, I began blogging about the construction of my new home in Malaga, WA. You can read all of these posts — and see the time-lapse movies that go with them — by clicking the new home construction tag.

Although I plan to do a lot of the interior work on my living space myself, there are a few things I simply can’t do. Framing is one of them.

Framing — in case you’re not familiar with the term — refers to dividing a space into rooms with the use of lumber. It’s basically the skeleton of the home. Framing must be done before insulation, electrical wiring, plumbing, and HVAC systems can be installed.

Because I built a pole building and not a regular frame construction home, the framer had to frame the entire inside of my designated living space area. In effect, he had to build my home within that space.

Upstairs before Walls
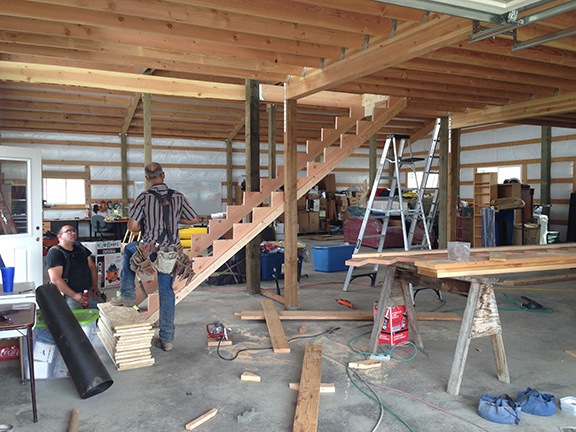
Here’s the upstairs right after the stairs were put in. The subfloor isn’t even finished yet in this July 7 shot.

My living space is only 1200 square feet. In that space, I needed walls to split it into a bedroom, closets, bathroom, laundry room, pantry, and great room (with kitchen).

I got three bids. Although I wanted very much to go with a framer who came highly recommended by my next door neighbor, I found his partner’s attitude condescending and simply didn’t want to deal with her. So I went with another framer that a friend of mine had used for his home in Wenatchee Heights, a guy named Mark.

The Broken Planter

Things got off to a bad start.

Rock Garden
Yes, I know it’s just a crappy little rock garden, but it had been there for months, unscathed by other truck drivers.

Mark keeps all of his supplies in a trailer — the kind that’s pulled by a semi truck. When he pulled in with the trailer, he ran over the corner of the little rock garden I’d built for my house number sign. It wouldn’t have been so bad if he’d admitted that he’d done it and apologized, but his assistant played it all down, assuring me that they’d “fixed” it. It wasn’t fixed. It looked like crap.

I didn’t let it go. I voiced my concern about carelessness — literally dozens of truckloads of materials had been delivered down the same driveway past the little rock garden by large trucks over the previous three months and he was the first to hit it. I wanted him to understand that I was paying attention and that I wasn’t interested in letting little things go. Yes, I might be a woman acting as a general contractor on a construction job, but I wasn’t the kind of woman who could be pushed around.

It took me an hour to fix the planter and replace the crushed plant.

Floor Plans

The next little problem reared its ugly head soon afterward. I’d come up with a simple design for a floor plan that took into consideration window placement and approximate room size. I handed this off to Mark. Although I was prepared to work with him to lay out the chalk marks for the rooms, he told me he’d do it with his assistant and I could review them that evening when they were gone. Assuming that he’d use my floor plan as a guideline, I let him get to work.

Floor Plan
The version of the floor plan that I gave Mark was a lot like this. The posts in this drawing are round.

I don’t remember why I came up to check on the progress a while later, but I’m very glad I did. He was using my floor plan as a blueprint for the walls. Unfortunately, my floor plan did not include exact measurements and did not take into consideration the thickness of walls: 5-1/2 inches. So when they marked the wall between the bedroom and bathroom, it extended past the post I’d used in my design to divide the rooms. When I came up to take a look, he was measuring the wall between the bathroom and kitchen, placing it right in the middle of the kitchen window.

When I pointed this out, his response was, “Well, they shouldn’t have put the window there.”

I told them to put the window there,” I said firmly. “This is my design.”

It wasn’t worth explaining the concept of symmetry to him. I thought he’d understand — I thought someone who built homes for a living would understand something about design aesthetics. Fortunately, I didn’t have to. My anger over the entrance planter incident was probably still fresh in his mind. And, like me, I’m sure he often recites the mantra, “The client is always right.”

Whatever.

I did explain that the measurements were rough estimates and that they didn’t take into consideration wall thicknesses. I explained that the walls needed to be set in relation to the windows. And then I spent the rest of the morning with him while he laid down the chalk marks. We had some difficulties with the pantry, which had crept into the living room — too many walls! — but we fixed that by making a much smaller pantry.

The Work Begins

They got to work the next day. Mark had a ton of experience and things went quickly. His assistant, however, seemed to need a lot of guidance and that was slowing things down. The speed of their work didn’t bother me — I was paying by the job, not by the hour — but I think it frustrated Mark.

Framing in Progress
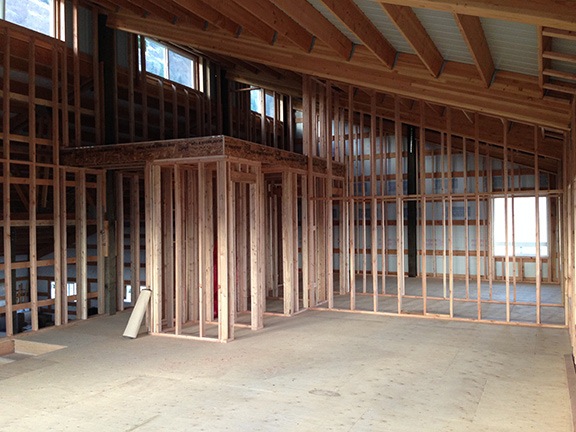
Framing in progress.

To save the $500 cleanup fee, I’d elected to do job site cleanup myself. (Frankly, I think it was dumb of him to put cleanup as a separate line item. If they’d just clean up as they went along, there wouldn’t be much to do. If the amount had been included in the cost of the framing, I would have paid it.) Each day, I’d go upstairs, sweep, collect nails and small scraps of wood, and throw away Gatorade and water bottles. That made me the daily inspector of their work, too.

One thing he did that wasn’t in my plans was to relocate my bedroom door. I’d wanted it a bit farther down the hall, closer to the bathroom door. He’d put it right next to the closet wall. I thought about making him change it, but then realized that his design would probably make it a lot easier to move furniture into the room. I left it as is.

George on Scafford
This terrible picture of George at work shows how fearless he is — he’s standing on a scaffold above my open stairway, at least 20 feet off the ground.

After a few days, the young assistant stopped coming and George, his more experienced assistant, showed up. I like George. He’s got a really upbeat personality and a good sense of humor. A real pleasure to deal with. And unlike Mark or his younger assistant, George didn’t seem afraid to climb the scaffolding to get to the high areas — at its highest point, my ceiling is 18 feet off the ground — even over the open stairwell.

Finishing Up

Mark had a deadline, which was determined by another job he needed to start right after mine. In the end, I think that’s what got them to finish up within two weeks.

Finished Framing
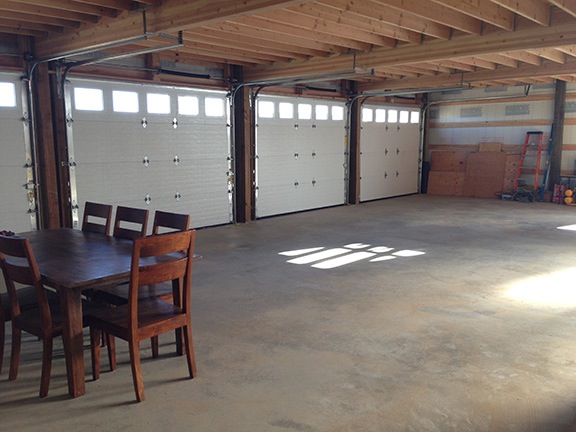
Here’s how the framing looks today with the area (mostly) cleaned up. This shot was taken from the northeast corner of the living space, in what will be the great room, looking toward the kitchen.

I think the job was a lot more work than Mark had expected. It certainly looked like it should cost more than what he’d bid. But when he gave me the final bill, it wasn’t any more than he’d told me it would be. I thanked him and wrote him a check.

Later, I went upstairs and measured everything. I updated my floor plan drawing to reflect actual measurements and then even began drawing in furniture to scale to make sure it’ll fit. (Admittedly, the bedroom will be tight with my king-size bed, two night tables, two dressers, and sofa. The sofa may wind up in the consignment shop in town.) Eventually, I’ll get around to drawing in the rest of the furniture. There doesn’t seem to be much of a rush — there’s still so much to do. In the meantime, this drawing is useful for estimating building materials and planning my kitchen cabinet layouts.

Final Floor Plan
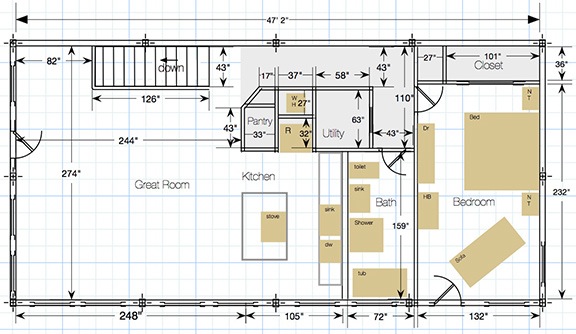
Here’s the final floor plan with wall widths taken into consideration. The gray shaded area is a loft 8 feet off the floor over the hallway and utility areas.

I will admit that I wasn’t sorry to see that ugly trailer pull out of my driveway.

Upcycling

Turning trash into useful items.

Over the past year or so, I’ve really embraced the idea of upcycling to make useful things around my home.

According to Wikipedia, coined in 1994, the term upcycling means

the process of converting waste materials or useless products into new materials or products of better quality or for better environmental value.

Why Upcycle?

I like the idea of upcycling for several reasons:

  • Upcycling really appeals to my scavenger instincts. For most of my life, I’ve wanted to gather discarded items that I think have some use. Hell, back in my college days, I furnished my dorm room with perfectly good items discarded by departing students, including an area rug, lamp, and table with chairs. You know what they say: One man’s trash is another man’s treasure.
  • Upcycling enables me to have more for less. With my recently limited budget, I have to make do with less money. While that often means doing without, it could also mean building my own solutions.
  • Upcycling reduces waste in landfills and recycling centers. Seriously, don’t we put enough crap in landfills and the ocean? Upcycling is better than recycling because it makes something useful without it first going through a waste stream. That means no transportation costs, no sorting costs, no remanufacturing costs, etc.

First Projects

Coop Construction
A look at my chicken coop under construction.

Pallet Garden
My first pallet planter makes an excellent strawberry patch.

I blogged about my first upcycling project before I even knew the word upcycling existed. In “Chickens Again, Part II: The Coop,” I wrote about the chicken coop I made, in part, from wooden pallets I’d scavenged. Two days later, I wrote “The Pallet Planter,” which showed off one of eventually three raised garden beds I’d built with more scavenged pallets.

Why Now?

All this is pretty new for me. In my old, half-dead life in Arizona, I wasn’t motivated to do much of anything — there just didn’t seem to be a point. And even if I did want to make or build something, I didn’t have tools or a useable workspace.

But here in Washington, things are different. I feel like I have a purpose in life, a reason to get up in the morning and make things happen. I also have a lot of free time on my hands that’s not filled with the need to try (and mostly fail) to make someone else happy.

I began acquiring decent power tools about a year ago — through purchases and hand-me-downs from friends — and have most of what I need to get projects done. And I have plenty of space; with my RV garage still mostly empty and my shop laid out to give me the best access to tools and workspace, I can tackle almost any sized project.

More Projects

As I work on my home to do all the wiring and plumbing — more on that in other blog posts — I take time out to get creative with “waste” materials.

Rolling Workbench
My first rolling workbench is a masterpiece of usefulness, built with a discarded crate and scrap lumber.

My favorite project to date is turning crates into rolling workbenches. There’s a business I pass when I go into town that gets engines and other parts on pallets and in crates. They discard the pallets and crates on a corner of their property near the road, under a sign that says “Free Wood.” If I’m driving by in my truck and there’s something worth taking, I pull over and load it up. (I actually keep work gloves in the truck just for this purpose.)

Small Rolling Workbench
I built this smaller rolling worktable yesterday. The only cost was the wheels, which I bought for about $10.

I picked up two large crates a few months back and turned one of them into a stand for my garden beehive. The other just sat in the dirt for a while, occasionally used as a work surface for cutting wood. When my building shell was finished, however, I got a brainstorm. Why not lay it on one side, add plywood shelves, and put wheels on the bottom? I had all the scrap wood and even the wheels that I needed. The resulting mobile workbench is perfect for woodworking projects and storing my power tools in a handy place. I even made a smaller version just yesterday.

Woodshed
Yes, I did mark the length of each piece on the end and sort them by size. That makes it extremely quick and easy to find just the piece I need.

Because I’m such a scavenger and because I told the builder to leave behind any scrap wood, I needed a place to store the useable pieces. That meant a sort of woodshed. I built one out of pallets (again), scrap lumber, and leftover metal from my building. The result is a 4 x 10 sort of lean-to with shelves that keeps the lumber out of the rain and snow. And yes, I filled it almost immediately — it’s extremely handy to be able to quickly find exactly the piece of lumber I need for other projects. Best of all, it matches my building so it isn’t an eyesore from the road (which it faces).

I’m also working on glass projects, although I don’t have any photos yet. I start with discarded wine bottles which, because of the sheer number of local wineries, I can get in any number I need. I’ll be melting down glass rings in a kiln for use in wind chimes. And I’ve also been cutting the bottles in half and finishing off the cut edges to make drinking glasses and vases. This is time-consuming, tedious work that I’m not exactly excited about doing. But the results are impressive. I expect to make an entire set of drinking glasses for my new home out of wine bottles. I’d also like to melt small glass pieces in a kiln to make jewelry; we’ll see where I go with that.

Creativity Can Be Rewarding

I can’t tell you how proud I am of these silly little projects. Seeing waste turned into something truly useful that makes my life better or easier is extremely rewarding. Knowing that I’m the one who thought up the design and executed it makes it even better.

What have you upcycled lately? Use the comments to brag about it!

Construction: The Oil/Water Separator

Another do-it-yourself project for my home.

On May 20, 2014, I began blogging about the construction of my new home in Malaga, WA. You can read all of these posts — and see the time-lapse movies that go with them — by clicking the new home construction tag.

I had a lot of time to design my new home. A lot of time. And not only did I have time to think about the building and how I would use it, but I also thought a lot about the land.

The Plan — or at least the relevant part of it

I decided that I’d try to plant a small vineyard. The rolling hills on the east end of my property are well-suited for wine grapes and, after all, there is a winery less than a half mile down the road. If I did everything right and could produce some good grapes, I could sell them for supplemental income. I don’t expect to get rich and I certainly don’t want to become a winemaker, but it would be a nice way to join the agricultural community beyond my short season cherry drying work. Of course, all this is a bit in the future — 2 to 3 years, I think — but it got me thinking about features I could incorporate into my building to make it more attractive for someone who might want to buy a vineyard and start making wine.

And that’s what got me thinking about the floor drain. If there’s one thing you need when you’re making wine, it’s a place to rack the wine. Wine racking involves pumping wine out of the barrels where they’re aging, cleaning the lees (dregs) out of the barrels, sterilizing the barrels, and pumping the wine back in. The process is time consuming and labor intensive and since you’re dumping the lees and rinsing the barrels, the runoff has to go somewhere. Being able to do this indoors, in the shade, in a possibly temperature-controlled space would be a big plus for a future winemaker, making my property a bit more attractive than it otherwise might be.

As if the view and the privacy and the giant garage and the wrap-around deck weren’t enough.

Besides, I reasoned, I’d like a drain in the floor, too. It would make it possible for me to wash a car or my RV indoors or simply hose off the floor.

The Drain

I talked to the builder and we decided on a 24-foot long drain with a grate on top and pipe leading the water out the back of the building. I already had a drainage channel dug back there to take rainwater off the roof away from the building. We’d tap into that.

I went to Home Depot and bought the parts: 2 10-foot lengths and 1 4-foot length of drain channel, 12 2-foot lengths of snap-in grating, 2 10-foot lengths of plastic pipe, 3 drain channel fittings, and 1 drain channel end cap. I spent just over $500.

When the workers prepped the floor for the concrete pour at June month-end, they installed the channel and the cap. It sat above the gravel grade; the concrete would be poured around it. They covered the grate with duct tape to prevent concrete from getting in. And then they poured.

Pouring Concrete around the Drain
In this shot, the drain channel divides the poured concrete from the unpoured gravel floor. The concrete is basically as thick as the drain channel is high.

Finishing around the Drain
You can barely see the drain in this shot; they used silver duct tape that really blends in with the concrete color.

Finishing took effort. The drain runs down the center of a 24 x 48 foot space. The front, back, and sides needed to slope down gently to the drain so if water got into that space, it would eventually end up in the drain. I was told that the slope would not be steep and that was fine with me. I didn’t expect to use it very often anyway.

The Drain in my Floor
Here’s the drain looks like today, although it’s actually longer than what you see here. The white “stain” is from me hosing off my tile saw; some of the water came back into the building and went where it’s supposed to go: into the drain. That’ll wash away the next time I use the hose.

Later, when the concrete was dry, I peeled off the duct tape. I even took out a hose and hosed down the floor to watch the water flow into the drain. I walked around the back of the building and watched the water move away. Cool.

The Oil/Water Separator

There was a bit more to the drain than just the drain itself. Because the drain was in the floor of a garage space, it needed an oil/water separator. That’s a contraption (for lack of a better word) that prevents oil that might wash away from vehicles from getting into the ground. Instead, it’s trapped and, when enough has accumulated, can be cleaned out.

Before buying the drain parts, I did some research. I found a very simple oil/water separator that I thought I could make myself. It was basically a container with a water inlet from the drain and outlet to the drainage ditch. Inside the container were two baffles or dividers. One was short but went to the bottom of the container; sludge would gather between the inlet and that first baffle. The other was short but went nearly to the top of the container with space beneath it. The water would move through there but the oil, which floats, would stay at the top. The water would then go through the discharge outlet, clean.

Oil/Water Separator
Here’s the design I found on the Web.

Box Diagram
Here’s a diagram of the box. I didn’t buy the grate, mostly because I wanted it completely covered; I don’t want to be fishing dead rodents out of oily sludge.

I sent this image to the plans inspector to see what he thought. He agreed that it would do the job. I suggested making it out of a heavy-duty plastic toolbox. He said that wasn’t heavy-duty enough.

It took a while to figure out what I could use as the container. It was Tanya who suggested that I go to H2 Pre-Cast near Wenatchee Airport. I sat down with the sales guy and showed him my drawing. He showed me concrete boxes on his computer screen. I spent $70 for a small one with a concrete lid.

The Concrete Box
They used a forklift to load the box onto my truck for a reason — it’s very heavy.

When I realized I how heavy it was, I rushed home to get there before the crew working on my building went home for the day. I let them use their forklift to get it off my truck. They stowed it in the building. Later, when they’d gone for the day, I used the forklift to move it to the back of the building so it would be out of the way.

When the concrete was poured, the box was waiting for the rest of the installation: digging a hole for the box, moving it in, and putting in the baffles. That was my job — and I had no idea how I was going to do it.

The Concrete Solution

I thought about how I would do this for almost a month. I talked to friends. My friend Bob suggested using the concrete pavers I already had to build the dividers. He had a masonry saw he thought could do the job. Because the interior of the box was smaller on the bottom than the top, if we cut the pavers just the right size they should slip into place. We could then use a cement paste to sort of “glue” them in.

It sounded good to me.

In the meantime, I had to get the box into the ground. That meant digging a hole in compacted earth. Fortunately the earth there has very few rocks and I have a very heavy digging stick. I made short work of the job one morning before it got hot and the spot was still in the shade.

Of course, I still needed to get the box in the hole. And I couldn’t budge the box.

The solution came on a motorcycle: my friend Mike. Looking for an early morning destination with his dirt bike, he showed up at 6 AM on Tuesday. After giving him hot coffee and a bacon and egg breakfast, I led him around to the back of the building to the little moving problem I’d discussed with him on the phone. Together, we knocked out the holes on either side of the box — guess who I was thinking of as I banged away with a heavy hammer on one of the punch outs? — and lowered it into the hole. Then we connected a cut length of pipe to the pipe coming out of the building to make the inlet and used the rest of the pipe as an outlet.

Now I was ready for Bob and his masonry saw.

But it was Tuesday and Bob works 10-hour days during the week. The soonest he’d be able to come would be Friday — if he didn’t have something else on his plate for his only weekday off. And I’d been thinking about other solutions.

Like concrete.

I figured I could make 2 concrete forms for the inside of the box, mix up some concrete — I already had portland cement and sand — and pour the concrete into the forms.

And that’s exactly what I did on Wednesday. I cut some 1-1/2 inch foam insulation sheets I had lying around into 4 dividers. I positioned the dividers for the pour, being sure to place more foam under the dividers on the outlet side to leave a space under the baffle. I used scrap lumber to hold everything in place. It looked extremely makeshift.

Dividers
Foam dividers are held in place by pieces of scrap lumber.

Then I mixed up some concrete in a big paint bucket. I tried 4 parts portland cement + 4 parts sand + 4 parts water but the mixture — once I got it mixed up enough — seemed too thin. So I added 2 more parts of cement. The resulting blend looked like it might be thick enough to stay within the forms.

So I poured it.

Concrete immediately began leaking from the first form. But only for a moment; it seemed to sort of clot itself, like blood on a wound. So I kept pouring. I poured both forms, stopping the inset side form about 2/3 of the way up and bringing the outlet side form (with the foam beneath it) within a few inches of the top of the box. Then I got down on my hands and knees, scooped up the leaked concrete and slapped it against the walls where the pipes came in and out. I did the best I could to use all the concrete in the baffle forms and around the pipes. It looked awful when I was done. So did my hands.

After the Pour
Here’s the big picture after the pour. You can see the box lid standing up against the side of the building as well as one of the pavers Bob wanted to cut for baffles.

I cleaned up and resisted the temptation, for the rest of the day, to pull off the forms. Instead, I used a level and a shovel to make sure the outlet pipe sloped down. I put the paver on top of it and closed up its mouth with some hardware cloth to keep the rodents out. (Around here, you don’t wonder if the mice will get in. You assume they will and take preventative measures to keep them out.) Then I buried both pipes and brought the dirt around the outside of the box.

On Thursday, I could resist no longer. In all honesty, I didn’t think it would work. I couldn’t imagine why freshly poured concrete would adhere to the concrete walls of the box. But it did. As I pulled the forms out, cracking and cutting them as I worked, I revealed the smooth walls of my new concrete baffles. With a little cleaning up, it would be all ready for inspection.

Finished Separator
Here’s my finished oil/water separator after cleaning it up a bit. The inlet from the drain in the building is on the right; the outlet is n the left. Although you can’t see it, there’s space beneath the left side baffle.

Inspection and Test

I was hoping I’d be around when the inspector stopped by so we could test it together, but I was on a charter flight at an orchard near Othello. He called me to get access to the building, which is secured by a keyless lock. He asked me to remind him what he was supposed to inspect.

“The oil/water separator and the framing,” I told him. “If you want to run the hose over to the drain in the building to test the oil/water separator, you can. Just don’t add oil unless you have to.”

“Oh, I already looked at that,” he told me. “It’s fine.”

And that’s that.

Of course, I wanted to test it. I wanted to make sure the water drained out properly.

Besides, who doesn’t like playing with flowing water?

So I ran a hose into my RV garage and laid it down by the drain. Then I turned on the water and ran around to the back of the building. I’d just managed to turn on my phone’s video camera when the water arrived.


Here’s the test. The water was only turned on partway — I have excellent water pressure. But the outlet drain kept up with the inflow of water and none of the water went over the top of the outlet side baffle.

Success!

What I like best about my solution for the oil/water separator is that other than the concrete box, I already had everything I needed to get the job done: foam for forms, scrap wood for supports, cement, sand, hardware cloth. So rather than spend over $1,000 for one of the many of the pre-made solutions out there, I got the job done for about $70. You gotta like that.

One More Thing

Of course, not everything could go perfectly smoothly.

Wrong Lid
Duh-oh! These two pieces were sitting around here for two months and I never noticed I had the wrong size lid.

When I was cleaning up the area after the test, I put the lid on the box. That’s when I discovered that I had the wrong size lid.

Well, at least I can lift it to return it for the right one.

Construction, Day 28: The Stairs are Built

And I get a front door lock.

On May 20, 2014, I began blogging about the construction of my new home in Malaga, WA. You can read all of these posts — and see the time-lapse movies that go with them — by clicking the new home construction tag.

Day 28 wasn’t a terribly busy day, at least from the outside. I wish I’d set up a camera indoors.

The main task was to build my stairs — something I really wanted them to finish as quickly as possible. The stairs would run from a vestibule just inside the front door straight up to the second floor. Without them, the only way up was on a ladder — they’d taken away the man lift on Sunday — and I just wasn’t comfortable climbing a 12-foot ladder.

They got started early enough and I went out to run an errand. While I was out, Corey called to tell me they needed to run up to Leavenworth to deal with an emergency situation on another project.

“Did you finish my stairs?” I asked hopefully.

He admitted they didn’t, then went on to tell me how important it was to handle this other project as soon as possible. I understood. I assumed that my project had gotten priority over someone else’s during the past six weeks. If I’d waited this long for stairs, I could wait a little longer.

In the meantime, I started setting up my new shop area in the front corner of the big RV garage side of the building. The shop side was 12 feet wide (when looking from the front) and 48 feet deep. I thought of it as having four sections separated by the posts that were spaced 12 feet apart. My boxes of packed items were taking up most of the two back sections. A few days before, some friends had helped me mount my 10 foot long white board — a school surplus equipment sale item I picked up for just $20! — in the second section. They’d also helped me move the three pieces of my old desk into the front corner that would be my shop. I’d toyed with the idea of listing the desk on Craig’s List or giving it to a client who had just set up a new office in town. But I realized that although the work surface — a Formica laminate — wasn’t suitable for working with tools, the tables were a good height and size. I could cover them with a more substantial surface material, like 3/4 inch plywood. It would certainly save the cost of buying or the bother of building a real workbench.

I dragged my rolling toolbox out of the shed and into the building. I placed the new top toolbox on top of it. And then I rearranged the desk components to make an L-shaped workspace. I was pleased with the results.

My Shop
I started to set up my shop on July 3.

As for the desk I’ll use for my computer work, that’ll be much smaller than this old setup. I have a desk and matching file cabinet I bought for the Phoenix condo I lived in part time with my wasband before our divorce. It’ll be perfect in the space I’ve set aside as a home office upstairs. Until then, it’ll wait with the rest of my furniture for the final move.

I should mention here how weird it was — at least at first — to start setting up a permanent workspace. I’ve been living in a number of temporary homes for the past two years: my RV in Washington, my house in Arizona, my RV in California, my house in Arizona, my RV in Washington in three separate locations, a house nearby, my RV in California again, and then back to my RV on my homesite. My worldly possessions have moved from my Wickenburg house and Phoenix condo to my Wickenburg hangar to a Wenatchee hangar and then finally to my building. This has been going on for almost two full years and the temporary nature of my living situation had become almost second nature. But now I had a permanent home, something that belonged to me now and in the future. I’d designed it to have storage space for my things, a shop, and living space. The shop area was ready to move into — why not make the move? This was an entirely novel idea to me, but one I warmed to quickly as I began drilling holes in the girts to hang power tools and cables. It was my space to do with as I pleased.

I think I might have been on Cloud 9 most of the day, despite the stalled stairs.

I was working on my shop when the builders came back. I was surprised. I thought they’d have to wait until the next day. But they showed up around 2 PM and got right to work on the stairs.

Stairs in Progress
Corey and one of his guys working on the stairs. The final staircase has four stringers, making them extremely solid.

While they worked on the stairs, I set about my next task: installing doorknobs and locks on my front door. I’d never installed a doorknob or lock before, but I couldn’t imagine it being very difficult, especially since the door and jamb were already cut to accept a doorknob and deadbolt. The project price included doorknobs and locks, but I didn’t want them to waste money on the typical Kwikset locks everyone seems to use. I wanted something more secure, so I bought a Schlage set with a door handle instead of a knob.

Keys
It was an emotional moment for me when I realized I was holding the keys to my new home. And yes, I know someone could theoretically cut a set of keys based in this photo. But I later added a keypad-activated deadbolt, and that’s what I use to lock up.

The set went in smoothly — except for the fact that I put it in the wrong hole and needed to move it (duh-oh!) — and worked well. Later, as I walked back to my shop area to put away my tools, I looked down at the keys in my hand and realized I was holding the keys to my new home.

Corey and his helper worked late. Some friends came for dinner; I had leftover chicken and pork tenderloin from the night before. When the builders left, my friends and I tried out the new stairs. I gave them my standard “tour” of the upstairs, knowing that the walls would be in place soon.

What was really nice was that the garage area was finally cleaned up — the builders had done a great job of picking up their stuff and sweeping before leaving that evening.

Clean Garage
My garage/temporary dining room, all cleaned out.

Much later, Mother Nature rewarded me with a sunset so amazing and huge that I needed to use the panoramic feature of my phone’s camera to capture it all. What a great day!

Sunset
An amazing sunset, shot from my front door.

Here’s the time-lapse for the day. Lots of coming and going, but not much in the way of exterior activity. Is it work watching? I don’t know. The movement of the clouds is kind of fun.

Construction, Day 27: Finishing the Front Wall, Framing the Deck

A lot done in one day.

On May 20, 2014, I began blogging about the construction of my new home in Malaga, WA. You can read all of these posts — and see the time-lapse movies that go with them — by clicking the new home construction tag.

I’m way behind on my construction project blogging. Part of reason for that is because construction really slowed down around the time they prepped to put in the concrete. As a result, there isn’t much to report.

But a lot of work was done on July 2.

The workers arrived bright and early and got right to work on the side deck. They’re framing the deck — not finishing it — but it’s still quite a task considering its 58-foot length.

Before lunch, they moved around to the front deck and got started on it. But they couldn’t really get into it until the missing metal pieces arrived. That happened around noon and they spent much of the afternoon removing the temporary pieces and putting in the correct ones.

The last thing they did was to close up the big RV garage doorway. With the help of a bunch of friends, I’d moved all of my worldly possessions into the building on June 28. At that time, the building had no garage doors. The four smaller garage doors were put up on Monday. But the big garage door was still on order and not expected until July 15. That meant I had absolutely no way to secure my home. Someone could drive up with a truck while I was running errands in town or on a cherry drying flight, back right into the big door, load up, and take off.

Yes, the chances of that happening were very slim. But there was still a chance.

The builders remedied the problem by building a solid (although not very attractive) wooden wall across the bottom of the doorway with heavy duty plastic sheeting across the top to keep out rain. That’s what occupied the crew at the end of Day 27. When they left, my building was pretty much secure.

Building Front on July 2
When the builders left on July 2, the metal on the front of my building matched and the big doorway was secured with a temporary wall.

Traegered Chicken
Another day, another meal from my Traeger. This was a locally raised and butchered free-range chicken that turned out very tasty indeed.

Later, when the builders had gone, the guy I hired to do the living space framing showed up with his bid. He made the fatal error of hanging around longer than he needed to — any strong pairs of arms that spend idle time at my place are soon put to work helping me move heavy items. He helped me move my dining table from where my friends had put it in the back of the RV garage into one of the garage bays. When he left, I set up chairs around it, opened the garage door, and hosted a dinner party for four friends on my dining table for the first time: smoked local chicken and grilled pork tenderloin.

Here’s the time-lapse from the day’s work.