Construction: Electrical Finish

It’s mostly in my hands.

On May 20, 2014, I began blogging about the construction of my new home in Malaga, WA. You can read all of these posts — and see the time-lapse and walkthrough movies that go with many them — by clicking the new home construction tag.

I don’t know about other parts of the country or world, but in Washington State, where I live, an owner/builder can get a permit to do all of her electrical work. In an effort to save money, take a hands-on approach to the construction of my new home, and keep myself out of trouble during slow winter months, I chose this option and became my own electrician. I’ve been blogging about this for the past few months; I have links to specific posts in this one.

Like the plumbing work, which I blogged about over the weekend, electrical work has multiple parts. Back in September, I brought the power into the building. I guess that would be considered ground work. The rough-in stage would be getting the wires into the device boxes throughout my home and bringing the home runs down to the circuit panel; I did that in December and January. The final stage, finish, consists of attaching the ends of the home runs to circuits in the circuit panel and then putting devices on every device box in the home.

When I say devices, I’m referring to the electrical components you interact with: outlet receptacles to plug things into, light switches to control lights and outlets, and fixtures such as lights and smoke detectors. Every device on a circuit needs to be wired property before you turn on the circuit. The more devices you have, the longer it takes.

I know I joked about the vast number of outlets I have in my home, saying “You can never have too many outlets.” Well, when I started wiring them myself, I realized that you can.

Prepping for the Job

My home consists of mostly 15 and 20 amp circuits. Although I wanted to use 20 amp throughout, I soon realized that working with the thicker 12 gauge (as opposed to 14 gauge) wire would destroy my girly fingers. The main drawback to having a mix of circuit types is the fact that the device rating must match the amperage. So I couldn’t use a 15 amp rated receptacle or switch on a 20 amp circuit. That meant buying a bunch of each type and carefully matching them as I worked my way from room to room, wiring devices.

Wring Cart
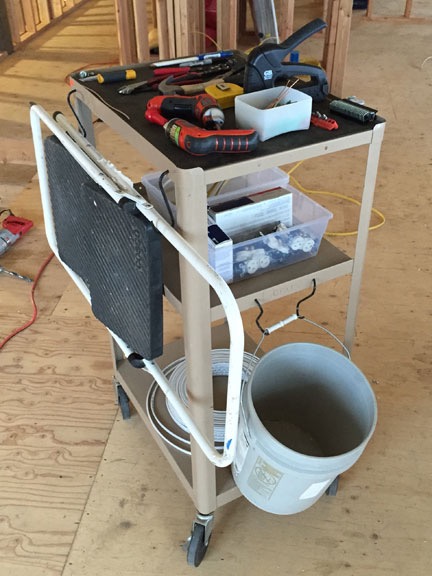
Here’s my wiring cart as it looked during the rough-in stage.

I set up a rolling cart to make the chore easier. The cart came from a school surplus sale I attended last year. It’s an old media cart with three shelves. On top, I laid out my electrical tools: pliers, wire cutters, wire strippers, screwdrivers, electric screwdrivers, bits, utility knife, hammer, drywall cutter (obtained near the end of the process), etc. Below that, in bins, I laid out 15 amp and 20 amp receptacles and switches, as well as a wide variety of switch plates and wire nuts. At the very bottom of the cart, I had a box of wire pieces I could use to create pigtails, as well as a small box for wire trimmings I could recycle. A garbage pail attached to the cart made it easy to keep my worksite neat and clean. I even had hooks I could use to attach my stepladder. I’d wheel the cart from room to room as I worked, keeping my tools nearby. I also wore kneepads and had a gardening pad to further cushion my knees when I did work near the floor.

I bought just about everything at Home Depot; not only did I get a 5% discount on every purchase, but they have an outstanding return policy that encourages people to buy far more than what they think they need and simply return the excess. In the beginning, I just bought huge quantities of everything I thought I might need. I was at Home Depot nearly every day and really got to know the staff. (It’s gotten to the point where they ask me how my project is going when they see me and I show off photos to them.) As the work progressed, I’d return some items and pick up others. Just the other day, I was so close to finishing that I took an inventory of what I still needed, compared it to what I had on hand, and made a “final” return/purchase trip. I have some spares left in case something needs to be replaced, but I don’t have bins full of devices anymore.

Getting the Job Done

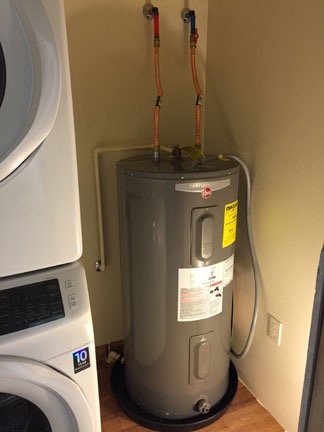
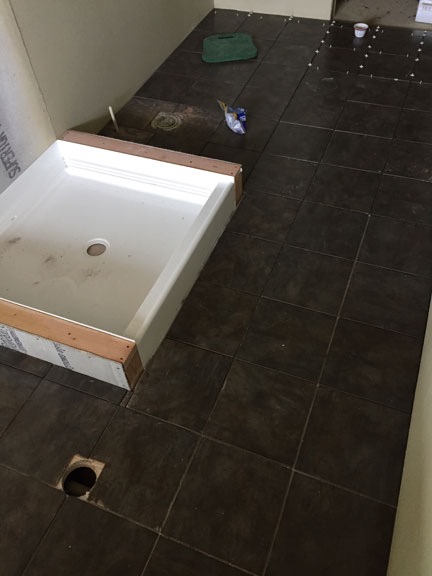
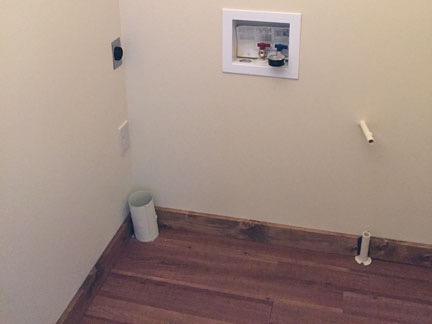
I went room by room, trying hard to do one full circuit at a time so I could power it up and test it. The first circuit I completed upstairs was for my living room lights. That was only six devices. I then did the circuit for outlets on the south side of my great room — another five devices, including one outside on the deck. After that, I wired devices as I needed to, completing both kitchen circuits, the range circuit, the dishwasher circuit, the laundry room circuit, and the dryer and water heater circuits.

Things slowed down after that. I had some traveling to do, including an unscheduled trip to California, and that broke my momentum. A friend helped me install my ceiling fans, which hang 13 feet above the floor. I waited for deck fixtures to arrive, realized they weren’t quite right, and had to return them. Then I waited for the replacements to arrive. I tried (and failed) to install the track lighting in the hallway by myself. (It really needs two people to hang.) I wired all the devices I could but still found myself waiting for missing devices or another pair of hands to finish off the circuits.

How It’s Done

The difficulty of the actual work varied depending on the device(s) that needed to be wired. The easiest were the single gang boxes for outlets and switches. One or two sets of wires come into the box and you attach their ends to a device, screw the device into the wall, and screw on a cover plate. Done. I averaged about 10 minutes per outlet throughout my home.

Before the Walls
Originally, the bathroom switch box had only three devices; I had to swap in a bigger box to accommodate the switch for the exhaust fan.

After Drywall
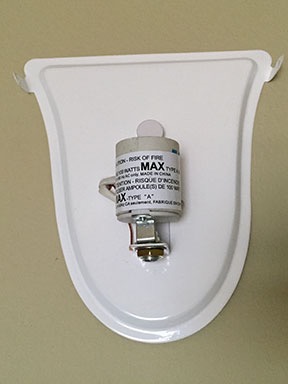
With the drywall in place, it’s hard to see where the wires go.

Connected Switches
The switches are connected and ready to screw back into the box. This can be difficult with a lot of thick wires in the box.

Finished switches
The finished box. Well, finished until I open it back up for a little rewiring.

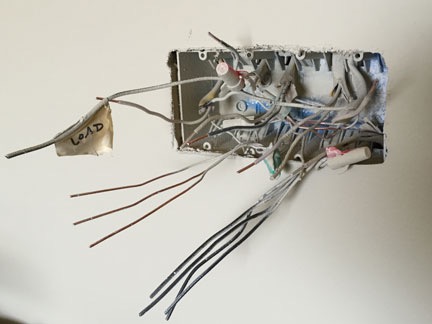
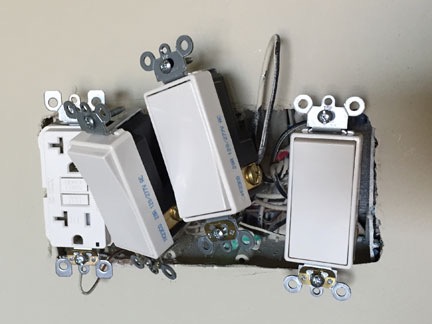
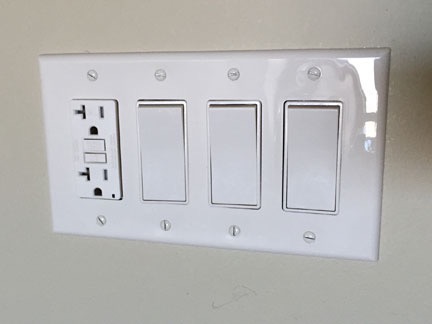
Other boxes were more complex. For example, the box shown here is for my bathroom. It has six sets of wires coming into it: source of power (home run), vanity light, exhaust fan, sconces, and two outlets. The box needed to be wired with one GFCI outlet that the other two outlets needed to be wired into for GFCI protection as well as three switches for the three other devices. Although it was pretty easy to see where the wires came from when there wasn’t any drywall (top image), it became a little tougher once the walls were on (second image). Fortunately, an electrician friend had advised me to mark wires as “load,” giving me a clue on how I needed to connect the wires. I wired the outlet and switches (third image), then screwed them into the box and put on a switch plate (bottom image).

Later, after I’d installed the light sconces and the circuit was done, I flipped the circuit breaker to test my work. I was disappointed to discover that it wasn’t quite right — I’d mismarked the “load” wires and had connected the sconces as a load and a switch to an outlet. The result: when the circuit was powered up, the sconces came on and could not be turned off; their switch powered the outlet on the west wall. Oops. I’ll be opening that box and rewiring the outlet and far right switch later today. So far, this is the only one I’ve messed up, so I think I’m doing okay.

Wiring light fixtures was a bit of a pain because it required not only doing the wiring, but installing a bracket that would hold the fixture in place. The bracket styles varied from one fixture type to another. The picture-based instructions were either incomplete or inaccurate almost every time, so there was a lot of guesswork and trial-and-error involved. Here’s an example using one of my bathroom sconces.

Sconce Installation Step 1 Sconce Installation Step 2
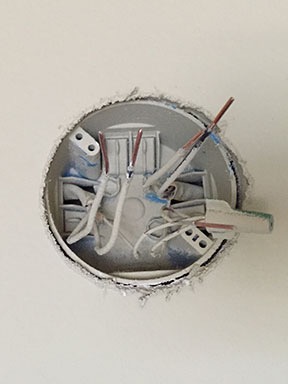
Installing a bathroom sconce. Start with a fixture box with wires (left). Connect the wires to the fixture support — in this case, a metal plate (right).

Sconce Installation Step 3 Sconce Installation Step 4
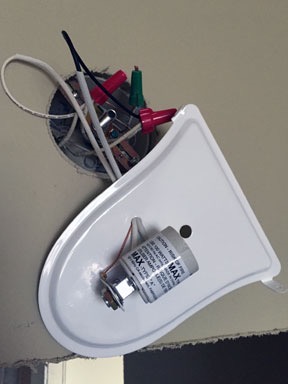
Fasten the plate to the wall (left) and then fasten the fixture cover — in this case, a glass shade — to the plate (right).

Although installation of the first six fixtures went remarkably well, I’ve since learned that not all fixtures come with the hardware you need to get the job done. The bathroom sconces, for example, came with duplicate parts but were missing vital screws — some idiot at the factory had packed the wrong parts. Fortunately, I had screws to do the job — 8-32 size. (I quickly learned what size screws are needed for different components of a device and began stocking up on extra parts.) This bit me again just yesterday when I tried to wire the motion-sensor lights outside each garage bay — they came with three pairs of screws that the designers apparently thought would do the job, but none of them were long enough. Another trip to the hardware store before I can finish.

Tools Make the Job Easier

SmartDriverWhen I couldn’t find a cheap replacement for the battery charger, I simply bought the same drill, which came with a new charger.

Having two battery operated screwdrivers really helped. I had bought one of them years ago but its charger was zapped in a power surge back in 2013. I realized that it was only a few dollars more to buy a replacement drill with a new charger than just the charger. But why throw out the old drill? They take turns getting charged. I keep a different bit in each drill and reach for the one I need as I work.

My electrician friend, Tom, also gave me a handy tool for tightening winged wire nuts. It fits onto my screwdriver like a drill bit and really does the job well. It’s all about tools.

Like a dearly departed wise man used to say, “Any job is easy if you have the right tools.” I can vouch for that.

What’s Left and Ladder Woes

At this point, I’m nearly done. Here’s my list of devices still needing wiring:

  • 3 garage entrance fixtures (need screws)
  • 4 garage ceiling outlets (need to man up and climb the ladder)
  • 1 outside entrance fixture (need to man up and climb the ladder)
  • 1 inside entrance ceiling fixture (need to man up and climb the ladder)
  • 1 deck outlet (no excuse; this should be done)
  • 6 deck fixtures (need 2 fixtures and need to man up and climb the ladder)
  • 1 smoke detector (need to man up and climb the ladder)
  • 3 sets of track lighting (help is coming on Friday for the cost of a rib dinner)

As you can see, I have a bit of an issue with ladders.

The problem isn’t having ladders. I have ladders out the wazoo. First of all, the drywall guys apparently took my 5-foot aluminum ladder, which is extremely easy for me to move around and left me their 6-foot fiberglas ladder, which is a better ladder but much heavier. And, of course, I already have a 6-foot fiberglas ladder, so now I have two. I also have an 8-foot aluminum ladder I bought for preflighting my helicopter. A friend loaned me his 10-foot fiberglas ladder, which is great except I can’t move it on my own. Another friend loaned me his extension ladder which was moved out to my deck by the drywall guys and will likely remain there until my friend comes to retrieve it — I can’t lift the damn thing. Oh, and for outdoor work, I have a 10-foot orchard ladder I bought two years ago.

Out on the deck, the 5-foot MIA ladder would be perfect — except I don’t have a deck yet and I’m working on 2 x 8 sheets of plywood 10 feet off the ground. It’s scary. I really have to work my way up to doing it. The key is to not look down. I worked on one of the more difficult-to-reach fixtures last week only to discover that the fixture wouldn’t fit in the damn box. After consulting my electrician friend, we decided that the best course of action was to buy a different fixture. That’s on my list of things to do.

In any case, the end of my electrical work is near. I expect to have it all done by this coming weekend. Then on to the next challenge — rails around my loft that are needed to pass inspection for my certificate of occupancy. You can bet I’ll blog about that soon, too.

Construction: Plumbing Finish, Part I

Three out of four bathroom fixtures up and running!

On May 20, 2014, I began blogging about the construction of my new home in Malaga, WA. You can read all of these posts — and see the time-lapse and walkthrough movies that go with many them — by clicking the new home construction tag.

Although I’d originally wanted to do my own plumbing here, I got a case of the smarts and decided that doing my own electrical work was enough for an amateur. I hired a plumber. On Thursday, March 12, they did most of the finish work in my home.

Plumbing and Construction

If you’ve never participated in the construction of a home, here’s some basic information you might find interesting.

There are three basic steps to putting the plumbing in a home:

Stub In

This is where they bring the pipes from the outside of the house into the house. For my home, there would be a concrete slab. The supply and waste pipes had to come in from outside, under the slab, so the pipes had to be laid before the concrete was poured. This was done back in June 2014, while my building shell was under construction. (Later, my earth-moving guy connected the supply and waste lines from the building to the water supply and septic system.)

Stub In
Because my building is a pole building and the slab was poured as one of the last steps, the building shell was almost done when the plumbers came to do the stub in.

Rough In

This is where they put pipes for water supply — including hot and cold — as well as waste and venting into the walls. They need to know where to run all these pipes and they need to have room to run them. Because I’d originally planned on doing this part myself, I made my home design very simple, with all the plumbing basically running along one wall between my kitchen and bathroom. That wall was framed with 2 x 6 lumber (at my request) so there was plenty of space. This was done back in January 2015, as I was working on the electrical system.

Rough In
Here’s one of the rough in plumbers working on a drain line in the wall between my kitchen and bathroom.

Finish

This is where they connect fixtures to the supply and waste pipes. When the finish is finished, the plumbing works. That’s what they started on Thursday.

The Fixtures

I’ll admit it straight out: I didn’t skimp when I bought plumbing fixtures. I bought exactly what I wanted.

After too many years of making decisions as part of a two-member committee, it was refreshing to be able to just get what I wanted without excessive research, debates, and delays. Everything from appliances to toilet to water heater to faucets — I looked at what was available, pointed to what I wanted, and had it delivered or loaded onto my cart. Done!

Some things I cared about — for example, my kitchen sink and faucet fixture. I wanted a specific style and look and took some time to browse the options before picking one. Other things I didn’t care much about — for example, my water heater. Any electric unit with a 50 gallon tank should be fine.

I should mention here that in addition to standard items normally connected to a plumbing system — kitchen and bathroom sinks, toilet, dishwasher, refrigerator (for ice maker), water heater — I had a few unusual items. The most unusual was my bathtub. And yes, that was something I labored over the decision-making process. The reason: I had to order online because there was no showroom where I could see options.

You see, I wanted a soaking tub. I’ve always wanted a soaking tub. Unfortunately, the tub I’d dreamed of having simply wouldn’t fit in my bathroom given the location of the window. So I had to find another tub that would fit the bill. I eventually decided on the 67-inch long Coley freestanding tub. I’d position it at the far end of my bathroom, right in front of my window, so I could take in the view while I soaked. (Sounds pretty good, huh?)

The reason this is unusual? Well, most folks don’t have a freestanding tub. Most folks have a tub that’s built into the wall or shower area. My freestanding tub required a freestanding faucet. It also required careful positioning to get the drain just right — no small task with the rafters under the floor. (As a matter of fact, we wound up installing the tub backwards with the drain opposite the faucet just so it would fit right.)

Tub Delivery
My tub came in a very large box.

The tub arrived in January, when my road was iced over and the delivery guy was afraid to drive to my home. I had to take my truck out to the main road where the tub was transferred from his truck to the back of mine. Then I utilized the services of a friend of mine who happened to stop by for lunch to get it off the truck. For months it sat in its box on a dolly under my 5th wheel RV’s hitch. It would be the first plumbing fixture to be installed.

My shower was also different. Rather than buying a manufactured shower stall, I would be building mine onsite with acrylic block walls. And I couldn’t build it until the tub was installed because they’d never get the tub past the constructed shower stall.

Because of that — and because the kitchen sink would be mounted with the countertops at March month-end — it would take two visits from the plumbers to finish my plumbing.

The Start of the Finish

I used the same plumbers for each step of my project construction. They’re good, reliable guys who do good work and have patience for someone like me — a homeowner in the role of inexperienced general contractor who is making things up as she goes along.

After a rush to get my bathroom floor done and last few plumbing fixtures purchased, Dave and his son arrived on Thursday at about 11 AM. They got right to work.

The tub was first. After securing the special faucet I’d bought for the tub, they carried the tub up the stairs. I was working on the electrical connection for the water heater in the laundry room when they wrestled it past the doorway. Within minutes, it was in position, snug at the end of the room.

Tub and Shower Pan
The tub and shower pan with drain installed.

Next was the drain for the shower stall. They drilled a hole though the floor to meet up with the drain pipe they’d installed at rough in. Back then, I didn’t have the shower pan so they’d estimated where the drain should be. They were off by about 8 inches, but would meet up with the P-trap. Before they put the shower pan back in place, I laid in some floor repair paste that would cement the shower pan to the floor.

Shower Drain Pipe
Oops! The shower drain and drain pipe were off by about 8 inches.

They went downstairs to connect the two drains to the pipes under the floor. I’d instructed the drywall guys to leave the drywall panels off the garage ceiling under those two drains — it took some measuring to figure out exactly where they needed to be once the insulation was in place. They pulled the insulation away and connected the pipes.

Water Heater
The water tank is shorter than the rough in guys anticipated.

Next was the water heater. Dave and his son carried it up the stairs and Dave left. I chatted with Dave’s son as he prepped it for installation. It was shorter than they’d anticipated. I’d wanted to put a shelf over it, but they’d run the rough-in plumbing for a much taller tank. The end result was a rather odd looking configuration with two long pipes coming out the top of the tank and going into the wall.

The toilet was next. I think he told me three times that I’d bought a very good toilet. I was just glad to see that its base completely covered the drain hole in the tile.

Meanwhile, my friend Tom had exchanged the cracked vanity top with sink at Lowe’s and returned with the replacement. I was supposed to have the top in place for the plumbers to install the sink fixture. But Tom couldn’t stick around to help me carry it upstairs. So, I opened the box down in my garage and waited.

Plumbing In
Here’s where the plumbing comes into the building. Everything under the 90° angle is mine: a main shutoff valve and a drain line with valve currently used to supply my RV with water and provide a hose spigot. The black thing after the angle is the pressure regulator. The black pipe coming out of the floor on the left will be used to supply water to a hose spigot on the front of the building; they’ll do that when they come back.

Next, Dave’s son got to work downstairs. After shutting off the water at the street, he had to clean up my Frankenstein’s monster of a pex plumbing job that I was currently using to get water into my RV. He shortened the source pipe, at my request, and bracketed the whole thing to a piece of plywood I’d fastened between the posts supporting the stairs. He then added a shutoff valve and a pressure regulator — I have extremely high water pressure here — and connected that line to the cold water pipe the rough in guys had dropped from upstairs. The resulting configuration looked funky but was functional and secure.

When that was done, I looked at him and said, “You know what’s next, right? The bathroom sink.” I pointed to the vanity top with sink sitting in its box on the garage floor. “I can’t carry it alone. Can you help me?”

He kindly agree to. I ran a bead of silicone sealant I had around the top of the vanity on three sides and we carried it upstairs. He helped me align it. And then I stepped aside and let him install the faucet I’d bought.

While he was working on that, I was finishing up the wiring for the water heater. I had a heck of a time with the grounding wire and will probably have an electrician friend check it to assure it meets code. In the meantime, I know it’s functional, even if it isn’t pretty.

Dave’s son went out and turned the water back on. Then he turned on the valve downstairs. Soon I could hear water coming into the water heater. A moment later, he was upstairs, testing the fixtures one by one.

I think I was too shocked that these things were working to really register what was happening. After all, only a week before the bathroom had been nothing more than a plywood floor with a shower pan and two stub walls. Now it was 75% done and everything installed was fully functional.

Once the water heater tank had filled, I flipped the circuit breaker switch to turn it on. Upstairs, I could hear a faint hum from inside the tank. I’d have hot water in less than 30 minutes.

Other appliances already connected to the plumbing — the refrigerator’s ice maker and washing machine — would work as soon as I turned them on.

I helped Dave’s son pack up his things, thanking him over and over again for getting so much working that day. I told him the kitchen sink would be installed by March 27 and that I’d do my best to get the shower ready for installation by then, too. It would be a quick job for them to hook up the shower head, kitchen faucet, and dishwasher. And then the plumbing would be finished.

When he left, I wired the last outlet in the laundry room, thus completing the circuit that the washing machine was connected to. I went downstairs and turned on the breaker.

And then I did something I’d been dreaming about doing since I left my Arizona home in May 2013: I did a load of wash in my own washing machine.

Construction: The Bathroom Floor

I did what I had to do.

On May 20, 2014, I began blogging about the construction of my new home in Malaga, WA. You can read all of these posts — and see the time-lapse and walkthrough movies that go with many them — by clicking the new home construction tag.

One of the things holding up the progress on my home was the fact that I hadn’t finished the bathroom floor yet. I couldn’t have the plumbers in to install the tub and other bathroom fixtures until the floor was done.

And it wasn’t going to do itself.

The Difficult Flooring Decision

Throughout my home, I’m using Pergo Max wood laminate flooring. This is a “floating floor” with snap together planks. Although it’s highly rated, durable, and attractive, it isn’t suitable for areas where large, heavy items will be placed. That’s why I had to prep for my kitchen appliance installation by putting vinyl adhesive flooring on 1/4 inch plywood under where my refrigerator, dishwasher, and range would go.

I used the same vinyl plank flooring in my laundry room. It was a test — I figured that if I liked it there, I’d use it in my bathroom. Although it went down easily enough, it certainly wasn’t the kind of quality flooring I wanted in my real living space. (My laundry room is a glorified closet.) So vinyl was not the answer.

And yes, I do realize that there are different levels of quality for vinyl flooring. I still wasn’t interested.

That meant tile.

I like tile. I really do. I had it in the kitchen and entry areas of my old house and, if it were up to me, I would have had it throughout the entire downstairs. (I wanted so badly to tear that dirty old carpet out of the living room and redo the whole room with tile. Not my problem anymore, thankfully.) Tile makes sense in a dry place like Arizona, especially on a ground floor with a concrete subfloor.

But I don’t like installing tile. It’s a lot of work.

I had some experience working with tile years ago in my Arizona house, back when I cared enough about it to want to make it different and special. It had a built-in shelf area in the den — built-ins were huge in Arizona in the 1990s — and I tiled two or three of the shelves. That’s when I learned what a pain grouting was. I lost interest in projects like that once I got a good taste of how tough they could be.

I figured that in my bathroom, I’d compromise. I’d put tile under the bathtub and do the rest of the room with Pergo. That would minimize the amount of tile work needed to be done. I could knock it off in two days.

With that in mind, I bought two sheets of 1/4 inch Durock cement board for underlayment and two boxes of 12-inch ceramic tile that I thought would work well with the oak colored Pergo.

Prepping the Floor, Changing My Mind

Cutting Durock
The first piece with cutouts for my tub’s faucet and drain.

I got to work on Friday, March 6. I had to cut the Durock sheets to fit into place on the floor. To minimize the trips up and down the stairs, I brought my saw horses and tools up and set them up in my future bedroom. Then I went at the first board with my circular saw and a 4-inch hole drill. I carried it into the bathroom and lowered it into position. A perfect fit!

Placed Durock
Measure twice, cut once. It really does work.

I screwed it into place using a bunch of cement board screws and got to work with the next piece. Within minutes, the far end of the bathroom floor was covered with Durock.

Floor Contrast
Side by side, the two floor colors didn’t look bad at all.

I decided to give myself a preview of what the finished floor might look like. I laid down two tiles and placed some spare pieces of that vinyl plank beside it. The plank was nearly the same color as my Pergo, which I hadn’t picked up yet. The tile was gray with streaks of brown in it and the two materials, side by side, really did bring out the brown streaks. But I started having doubts about the way the floor would look with two different materials. And I realized that I’d have to put tile under the toilet and probably under the vanity, which was open on the bottom. That was half the floor.

Oh, screw it, I thought to myself. I’ll just do the whole damn floor in tile.

That, of course, meant another trip to Home Depot for four more boxes of tile and two more sheets of Durock. While I was there, I also bought the mosaic tile I’d need for the inside of my shower stall.

Finished Subfloor?
I thought I was finished with the subfloor preparation on Saturday.

I spent Saturday morning cutting and laying out the sheets of Durock. It wasn’t difficult — there were few fixtures to cut around. When I was finished, I shared photos of my handiwork on Twitter and Facebook, as I often do.

The advice came quickly, as it often does. More screws, someone said. Did you place that over thin-set? someone asked. You need to tape and mud it.

This was not what I wanted to hear. I thought the floor was pretty secure.

A friend of mine stopped by on Sunday to help me install the fire doors at the bottom of my stairs. (Building codes require me to have 20-minute rated fire doors between my living space and garage.) He’d built his house and he’d tiled his bathroom. I asked him what he thought. It’s fine, he said.

Sunday afternoon, I fired up my web browser and went searching for tile how-to videos. I wanted a refresher before I got to work. I found this excellent series of how-to videos on the Home Depot website and watched all the videos for the type of installation I was doing. That, in turn, included to a link for another video about preparing the subfloor. I watched that video and realized that my Facebook friends were right: I needed thin-set under that Durock and more screws. Although I’d tape the seams, I drew the line at mudding them. After all, I’d be placing more thin-set on top when I laid the tile.

I used some premixed thin-set that I’d bought for the tile to get started that evening. The stuff was expensive and I went through it at an alarming rate, despite what the package said coverage should be. Clearly I needed to buy the less expensive powder and mix it myself.

So Monday morning, bright and early, I was at Stan’s Merry Mart buying a 50-pound bag of thin-set mortar mix. I spent the entire morning pulling up those sheets of Durock, smoothing thin-set under each sheet, and screwing them back down. I carefully covered the remaining thin-set with plastic and headed out to an appointment. I’d start laying tile when I got home that evening.

Buying Thin-set (Again and Again), Laying Tile

When I got home, I was very pleased to see how solid the floor now seemed. I was convinced that I’d done the right thing in taking this extra step. (Thank you, Facebook friends, for your advice.) Although it was after 6 PM, I thought I’d get a good start on the tiling.

Of course, the thin-set wasn’t thin anymore. It was basically garbage.

I reopened the plastic container of premixed thin-set I’d started the day before. I laid three rows of tile before the container was empty. (I wound up buying a 25-pound bag of the mix on Tuesday morning before getting back to work.)

First Three Rows
I was extremely fortunate with the size of the room and tile. Believe it or not, the room was exactly 6 tiles across. That really minimized the amount of tile cutting I needed to do.

I was actually very well prepared for all my tile work. When I’d packed up my belongings in Arizona, I eventually got into the garage where I’d stored all my painting and tile work tools in plastic bins. I went through it all and packed up the items I thought I might need in my new home — including all of my tile working tools. I even packed my manual tile cutter. The only extra equipment I needed to buy was a good rubber grout float and a set of tile nippers. I even had a tile saw with diamond blade that I’d been using for my glass work for the past year. So I was pretty much set for the job.

Tuesday’s work went quickly, laying tile after tile, pausing only long enough to make a tile cut with the cutter or saw. I would have finished the entire floor except for one problem: I ran out of thin-set. Again. With just six tiles left to lay. I’d have to pick up another bag that evening when I went out with friends and finish in the morning.

Laid Tiles
All tiles laid.

And that’s what I did. Rather than mix the entire bag of thin-set, I mixed up a batch just large enough to lay the last handful of tiles.

The Race to the Finish

In the meantime, I’d been trying to get the plumber to give me a date on when they’d come to hook up the water and do whatever else they could do. I’d promised them that the tile work in the bathroom would be done the previous Friday — yeah, the same day I started. The plumber, Dave, had told me it would be at least two weeks and I knew it was vital to get on his calendar. So we’d been playing telephone tag all week and he showed up to take a look at the job on Wednesday evening.

List
I use the 2Do app to keep a synchronized list on my iOS devices and Macs. Every time I think of something I need, I just add it to a list.

He listed all the things they could do and what I’d need on hand. I had some of it — the tub, tub faucet, vanity, bathroom countertop/sink. But I needed more: water heater, toilet, shower head, bathroom faucet, kitchen sink, kitchen faucet. I already had these things on my list.

“Yeah,” he said as he prepared to leave. “We’ll be by tomorrow. But it won’t be until after about 11 because we need to install a cast iron tub.”

I tried to hide my shock. Tomorrow morning? It was already after 5 PM. Items on my list had been shifted to the top and I still needed to grout the tile. But if I balked, I’d lose this date and I definitely didn’t want to get on the bottom of his list.

“Okay,” I said. “I’ll see you then.”

I was then faced with the problem of getting two pallets of Pergo, which I’d picked up on Saturday, out of the back of my truck so I had room to pick up a water heater, toilet, and other bulky items. I compromised. I offloaded just one pallet, leaving enough room for what I had to bring home, and headed out. By 9 PM, I was backing into the garage with the truck bed full again.

Although I wanted to wake up at 4 on Thursday morning and I had to wake up by 5, I actually woke up by 3. That’s how it is when I have lots of things on my mind. As I age, I seem to need less and less sleep. That’s a good thing because it seems to take longer to get things done.

I was on my hands and kneepads on the bathroom floor by 4:30 AM with a grout float, a plastic container filled with light brown grout, a paint bucket filled with clean water, and a sponge. This was the part that I hated. Grouting.


This video makes it look easy. While it’s not exactly difficult, it certainly isn’t any fun.

It’s not spreading the grout that’s a problem. That’s kind of relaxing, in a way. The trouble is, the grout gets all over the tops of the tiles, too, and it has to be removed before it dries. So you’re basically spreading grout on 4 to 8 tiles, then sponging them off. This video was extremely helpful because it gave me the key to doing it right: make the sponge as dry as you possibly can and keep rinsing it.

Grouting
By 6:10 AM, I was pretty close to being finished with the grout work. I still don’t have electricity finished in the bathroom, so I had to rely on my shop lamp for light.

I did nearly half the floor in the first hour or so. Then I took a break to get fresh water. I got right back to work. It was vital that the grout be set by the time the plumbers came because they’d be walking all over it. It would need at least three hours. I wanted to be done by 6 AM. I was actually done by 7 AM.

Finished Tile
Here’s a closeup of the finished tile. Was it worth all that work? Grudgingly, I’d have to say that it was.

And it looked great.

I’d chosen the brown grout for two reasons:

  • Dark grout doesn’t show dirt like white grout does. That was my only complaint about the tile in my old house — that freaking white grout. Who does that? It was impossible to keep clean. I remember cleaning the kitchen floor on my hands and knees, scrubbing grout for hours on end. I was never going to do that again.
  • I thought the brown grout would bring out the brown colors in the tile — and it does. It would also look good with the mosaic tile I’d bought for the shower stall.

The plumbers showed up on schedule, right around 11 AM. By that time, the grout was set and safe to walk on. They got a lot done in a short period of time. But that’s a subject for another blog post.

Construction: The Appliance Delivery

My new kitchen and laundry room appliances are delivered.

On May 20, 2014, I began blogging about the construction of my new home in Malaga, WA. You can read all of these posts — and see the time-lapse movies that go with many them — by clicking the new home construction tag.

All the way back in December 2014 — a full three months ago — I decided to take advantage of an excellent Black Friday sale at Home Depot to buy all the appliances for my new home. I had planned my home and my kitchen to be simple, but comfortable. My appliances would be brand new and fully modern, incorporating the features I’d always wanted but never seemed able to get in my old life.

When I ordered the appliances, I wasn’t sure when I’d be able to take delivery of them. I was still sitting on the fence about whether I should go away for the winter or stay in Malaga and get my home done in time for a spring move-in date. As a result, I set the delivery date as far into the future as Home Depot allowed: three months. The date, which I didn’t even bother putting on my calendar, was February 28, 2015.

I subsequently went full steam ahead on construction and stuck around most of the winter to oversee subcontractors and get a lot of the other work done myself. Winter is my slow season for flying and I didn’t have any other things to hold me back, so I got a lot done. By the morning of Friday, February 27, my kitchen was starting to take shape with the cabinet installation mostly finished. I started wondering when the appliances would come — Home Depot had not called.

I was at Home Depot that morning and asked at the appliance desk. She punched my name into the computer and told me the appliances would arrive the next day.

“Saturday?” I asked. “They deliver on Saturday?”

“If that’s what you asked for,” she replied.

I left her desk in a mini panic. Was I ready to get my appliances the next day? I wasn’t — but I thought that maybe I could be. I had a lot of work to do.

Last Minute Preparations

The work that needed to be done fell into three categories:

  • Electrical preparation. Although my home’s in-wall wiring had been run and hooked up to the circuit panel, I had not yet finished the outlets for the refrigerator, dishwasher, washer, or dryer. (The range was done.) I needed to get the right receptacle for the dryer — which used 10/3 wire — and then I needed to wire all the receptacles — especially those that would be behind heavy appliances that I didn’t want to have to move.
  • Floor preparation. Although I’d laid the floor in my laundry room using adhesive vinyl planks, I had not prepped the floor under the kitchen appliances. I could not lay the Pergo I’d bought for the rest of my home — appliances should not be set on top of so-called “floating floors.” I needed to put flooring under these appliances that was the approximate thickness of the Pergo. That meant 1/4 inch plywood with some more of that adhesive vinyl on it. I needed pieces for under the refrigerator, range, and dishwasher.
  • Laundry room molding. The space between the vinyl flooring and wall in the laundry room needed to be filled in with molding or trim. I’d planned to do the molding myself throughout the house using 1 x 4 planks that I’d stain. The laundry room would be a good place to experiment because it really didn’t matter how it looked. What was more important was that I got that molding in place before the washer and dryer were stacked there, since it was unlikely that I’d ever move them to lay the molding in later.

During the day, as the cabinet guys labored to get the over-the-fridge cabinet installed — heck, it was worth the installation cost just to get that one installed right — I worked on outlets in the kitchen and made a list of the things I needed at Home Depot. When they left, I was right behind them, list in hand, ready to exchange another bunch of money for more building materials: 4-prong 30 amp receptacles, plywood, 1 x 4 lumber, stain, 20 amp outlets, outlet covers, etc., etc. (I manage my lists with the 2Do app on my iOS devices and Mac so I always have them with me and can update them from anywhere. Yes, I’m a geek.) I had brought along the measurements for the flooring under the appliances, so I had the Home Depot guy cut the plywood to size for me. That would likely save me about an hour of time and, although they’re supposed to charge for cuts when there’s more than one per piece, they never seem to charge me a dime.

Miter Saw
I bought this miter saw earlier in the month but hadn’t used it yet. Yes, I know it’s not the best quality or the most heavy duty, but I’m confident it will satisfy my limited needs.

I also bought a table saw. I already had a miter saw that I’d bought the previous week, but the cabinet guy had advised me to get a table saw to handle the rip cuts when I laid in that Pergo. I have to say that I absolutely love having all these power tools on hand. Although my 12 x 48 shop area is half full with my furniture and packed boxes, I’m really looking forward to setting up a permanent shop area once those things are moved into my home.

Of course, by the time I got home it was nearly 8 PM. I am not an evening person. I do my best work in the morning. By then, an annoying Home Depot delivery recording had warned me that delivery would be sometime between 8 AM and 11 AM. That meant I’d be up early on Saturday to get things done.

And I was. I was out of bed by 3:30 and dressed and coffeed up by 4 AM. I had to do things in the right order to make use of my limited time. That’s why I was rolling adhesive floor primer on three pieces of 1/4 inch plywood at 4:15 AM. It might need a few hours to dry and it was vital that it would be ready for the vinyl later that morning. I set it on the cabinet tops to dry.

Miter Saw Setup
I’d set up my miter saw on one of my rolling tool carts. That makes it easy to move anywhere I need to work in my shop.

Next came the preparation for the laundry room molding. I’d never used a miter or “chop” saw before so I made a few test cuts in the wood before making the actual cuts I needed. It was a lot easier than I expected it to be. My main concern was getting the left side and back side walls done; I could do the rest later. Once the pieces were cut and tested — they fit! — I got out the stain and a rag, donned a pair of disposable gloves, and rubbed in the stain. It was a lot darker than I expected — probably not the color I’d want to use in the rest of my home. But this was the laundry room and I didn’t really care how it looked. That room was my “test bed” — more on that in a moment.

While that dried, I got to work on the few remaining outlets that needed to be done: refrigerator, dryer, washer. It went very smoothly. At this point, I’ve wired about three dozen outlets in my home, shop, and shed so I’m getting pretty good at it. I resisted the temptation to wire other outlets that didn’t need to be done — stay focused! — and went on to my next task.

Fridge Hole
Here’s the space for the refrigerator, with the plywood and vinyl floor laid down in it. My Pergo is almost the same color.

The plywood pieces were dry and ready for vinyl. I had bought an entire box of the stuff with the thought that it might be suitable for my bathroom. But after putting it down in my laundry room, I decided it was too cheap looking for my bathroom. I wanted something nicer. I’d planned to return the remaining planks, but now I had a better use for them. I laid them out on the plywood pieces, using as many of the trim pieces from the laundry room that I could. For a scary moment, I didn’t think I’d have enough to do all three pieces. But by some miracle, I did — with just two 36-inch planks to spare!

Dishwasher Space
Here’s the space for my dishwasher. The outlet for the dishwasher is under the sink; a hole will be drilled in the cabinet side to bring the plumbing and power to this area.

The finished pieces actually looked pretty good. I had to trim one — either I’d measured wrong or the Home Depot guy had cut wrong — but my circular saw made short work of that, despite its dulling blade. (Note to self: get new blade for circular saw.) I laid each piece into position and fastened them down with the drywall screws I’d been picking up off the floor for the past two weeks.

Laundry Room Floor
The finished washer/dryer corner of my laundry room floor. This was my first stab at doing molding and I’m rather pleased with the results.

By this time, it was about 8 AM. I still had one job to do: lay in that molding. I went down into the shop and was pleased to see that it had dried. I rubbed it with a clean rag. It looked okay, but really a lot darker than I wanted. Still, it would work for the laundry room. I brought it upstairs with some skinny nails and a hammer, laid the pieces in place, and banged them in. I admired the results. Not perfect, but certainly not bad.

The phone rang just after I took this photo. It was yet another Home Depot recording telling me that the appliances were just an hour away. Timing is everything. I went into my RV and made some breakfast. It was about 9 AM.

The Appliance Delivery

The delivery went very smoothly. The guys pulled into my driveway in a good-sized Mayflower moving truck. The driver got out and introduced himself and his partner. They were from Moses Lake, which is about 90 minutes from my home by car. I showed them where everything had to go, apologizing for the stairs. They didn’t seem to mind — I suspect they deal with stairs on a regular basis.

My New Stove
I absolutely love the look of my new stove. Can’t wait to start using it!

Twenty minutes later, they started bringing things up. The range was first. It’s a flat-topped electric range that fits into my kitchen island. It was a perfect fit. The countertop people will adjust its height so that it’s flush with the counters. They plugged it in and I ran downstairs to flip the circuit breaker. It worked. Not only did the burner shown turned on in the photo come to life, but when I touched the panel, it lit up with all kinds of digital buttons. (Understand that I didn’t choose this range from an in-store display so I had absolutely no idea what it would look like in real life. All I’d seen were a few photos.)

Range Display
My new range even has a bread proofing feature!

The rest of the appliances came up one at a time. The dishwasher was pushed into place, but since the plumbing was not ready for installation, it was not fully installed. I’ll have the plumbers do that when they come, possibly next week.

Washer and Dryer, Stacked
Even stacked, my washer and dryer seem to fill my 6 x 5 laundry room. My water heater will go to the right of them and I should have enough space for a hamper just inside the door to the right.

The dryer was stacked on top of the washer — I couldn’t see any reason to put them side by side when they could be stacked to save room. Although my tiny laundry room looked extremely crowded with the two appliances stacked in there, both delivery guys assured me that it was the largest space they’d stacked a washer and dryer in the past week. They fully connected the washer and dryer to the water supply and vent rough ins. I flipped the circuit breaker for the dryer and we turned it on. It worked fine. I couldn’t try the washer because the plumbing isn’t done yet. But you better believe that if I have to go to the laundromat before the washer is hooked up, I’ll be bringing wet clothes home for my own dryer.

Refrigerator Up the Stairs
Here are the delivery guys, bringing my refrigerator up the stairs.

The refrigerator was the last thing to be brought up. They hadn’t been told to make the door hinge switch, so they did that when they got it upstairs. While they worked on that, I pulled out the shelf packing material. Soon they rolled it into place beneath the cabinet that had been installed so painstakingly just the day before. Later, when the cabinet guys returned to finish up, they’d put a spacer to close up the space between the fridge and the cabinet.

Between each delivery, the guys would remove all of the packing materials, including plastic, foam, cardboard, and tape. They took all that garbage — and the boxes the appliances had come in — away with them. (This was a huge relief to me, since I still had to dispose of a ton of foam packing material from my living room lights, ceiling fans, and power tool purchases. They were extremely careful about dinging the walls — indeed, I didn’t see a single scratch or handprint. They were friendly, polite, and completely understanding of my excitement. Because they were sweating from the hard work, I offered them Gatorade, bottled water, and Coke to keep them hydrated and even turned off the heat in my home so it wouldn’t be so hot for them. I tried to stay out of their way, wiring outlets in the kitchen and living room as they prepped each appliance for the trip up the stairs. It was a very positive experience.

Kitchen in Progress
It’s beginning to look a lot like a kitchen.

When it was done and they’d gone, I walked around my home, admiring my appliances. Only two were currently functional: the range and the dryer. But the refrigerator’s circuit could be flipped on as soon as I was sure all the outlets on that circuit were complete; I’d do that in the morning. Of course, the ice maker wouldn’t work until the plumbing was complete. Neither would the washer or dishwasher.

That made it pretty clear what my next big task would be: prepping the bathroom so the plumbing could be finished.

In the meantime, I started planning for my next big party: “Ladies’ Night, Kitchen Box Unpacking Edition.” I figure that after the countertops are installed at the end of March, I’d have a bunch of friends over to keep me company while I unpack all the kitchen boxes I packed that last winter in my Arizona home. I was bored out of my mind at the time, frustrated to no end by my future wasband’s unreasonable attitude and stupidity, so I’d filled the time by packing up more and more of what I’d bought for that home over the years. I know I packed more than I probably want to keep and figure that some of the excess might make nice door prizes for my friends. Any excuse for a party, eh?

Construction: Cabinet Installation

A time-lapse movie tells most of the story.

On May 20, 2014, I began blogging about the construction of my new home in Malaga, WA. You can read all of these posts — and see the time-lapse movies that go with many them — by clicking the new home construction tag.

Last week, before heading out to California for a few days, my kitchen cabinets were delivered, unpacked, inspected, and moved upstairs to my living space. Yesterday, the installers came to put them in.

The cabinets are Kraftmaid and very good quality — certainly better quality than the cabinets in my old Arizona home. They feature soft-close drawers and doors. (Oddly, I had a problem remembering to close cabinets in Arizona. That won’t be a problem here because my cabinets are actually fun to close so I’m not likely to forget.)

Installing the Cabinets
The installer and his helper fine-tune the position of one of the cabinets.

The install went pretty smoothly, with most of the work done by the boss and an assistant while the boss’s wife looked on, spent a lot of time searching for the right size screws, and chatted with me. Two or three cabinet doors need to be replaced due to cracks; the installer will take care of ordering the replacements, which are free. In addition, the bottom end cabinet with rounded shelves appears to be the wrong wood — that’ll also be replaced for free.

Here’s the time-lapse:

I should mention that I went with a professional installation for a few reasons. First, they’d handle the replacement of any defective parts. Second, they’d get the installation done right the first time. And third, while I don’t mind learning how to wire my home, I certainly have no desire to learn how to install cabinets.

Cabinets
Here’s how my kitchen looked by the end of the day. The rustic hickory finish I chose is full of “imperfections” that add character to the kitchen. And yes, there will be a breakfast bar on the camera side of that kitchen island. My stove will go between the two cabinets there.

Today, they’ll install the cabinet for the area over the fridge and will likely install the crown molding and a spacer under the microwave shelf. They’ll put on drawer pulls and door handles when they return to replace the damaged pieces, probably in about two weeks.

In the meantime, everything is set up and ready for the next part of the kitchen installation: appliances. I expect them any day now. The countertop folks will come in about two weeks to measure for their “template”; the countertops will be installed two weeks after that. By then, I should have the rest of the kitchen done.

Things are certainly moving forward nicely!

And I know I didn’t blog about the insulation, drywall, and painting. I’ll do that shortly; there’s a lot to show and tell!