Chickens Again, Part II: The Coop

The challenge was building with scrap wood I already had.

About six weeks ago, I bought eight baby chicks. I was raising them in a stock tank in my shed. You can read more about them and the chicken yard I built for them with a friend here.

The chicken yard was working well. The large feeder and automatic waterer got them through my six day absence when I went to California on a business trip in mid-May. They’d accepted the tipped over stock tank with plywood lean-to as a shelter. But I wasn’t fooling myself. They’d need a real coop — someplace they could roost at night that also had nest boxes for laying eggs.

Buying a coop was out of the question. A coop big enough for them would cost hundreds of dollars that I simply wasn’t willing to spend on chickens when I was facing monster construction bills for my new home. Besides, I had all kinds of scrap lumber and pallets lying around. Couldn’t I come up with a design that utilized them?

I spent a lot of time thinking about it. Probably a lot more time than I needed to. Finally, I just gathered up one long pallet, two matching shorter ones, and all the plywood I’d used to build my bee shelter the previous autumn. I borrowed a pair of saw horses from the builders and, on Memorial Day Weekend, I went to work.

Coop Construction
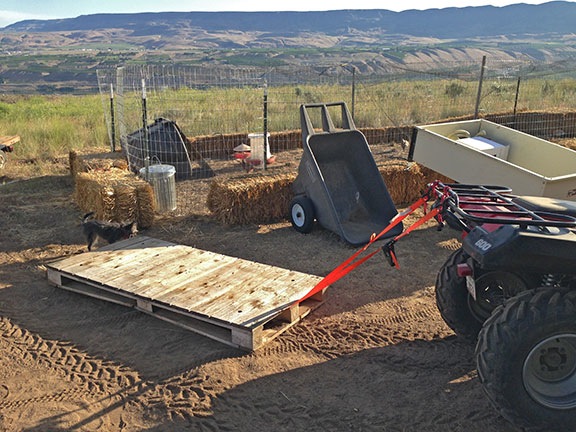
I used my ATV to drag the 36×76-inch floor pallet from the bee area to the chicken yard. The damn thing is heavy.

Coop Construction
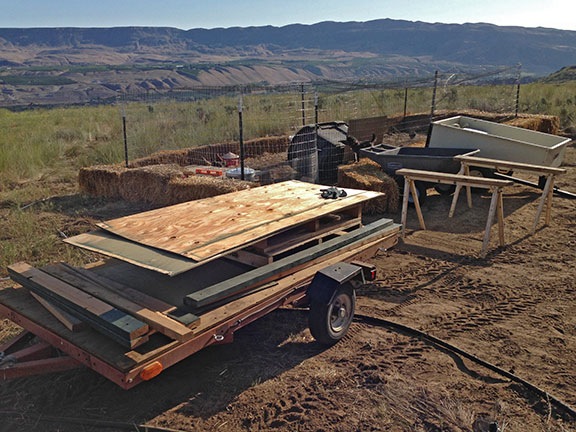
I used my Craig’s List Special flat bed trailer to move all the other pallets and wood into my work area. It also made an excellent work surface. (I’m really looking forward to having a real shop.)

Coop construction
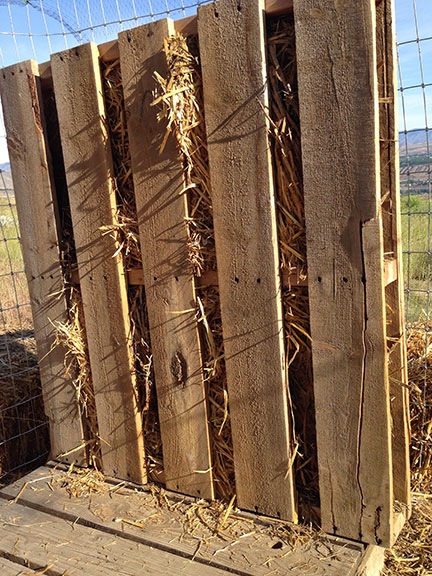
I stuffed the wall with straw, facing the side with more wood planks in toward the chickens. The outside would get a plywood skin.

The design is simple: the big pallet at the bottom for a floor and the two smaller pallets on the sides as walls. I stuffed the walls with straw — which I have absolutely no shortage of — for insulation; this was something I’d seen on the web. Then I used plywood sheets and 2x4s to make the back and roof and to cover the outside of the walls.

Coop Construction
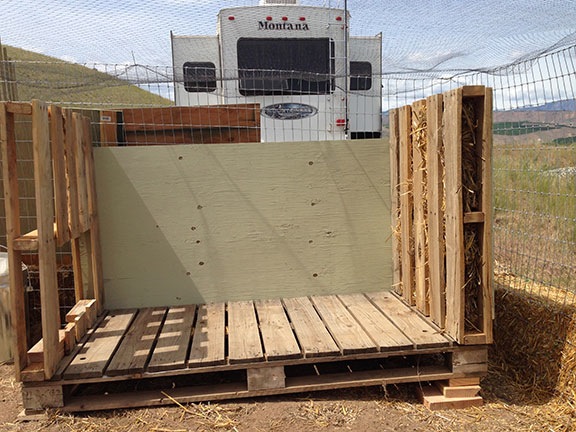
Leveling the coop floor took quite a few blocks. I painted the plywood sections before putting them in place. The paint, by the way, was a high quality, no primer needed exterior paint I bought for just $10/gallon because it was a coloring mistake.

The tricky part was the nests, which I wanted to set into one of the walls with a hinged back for collecting the eggs. I’d never built anything so complex before and I had to give it extra thought to do it without screwing up. They came out remarkably good.

Coop Construction
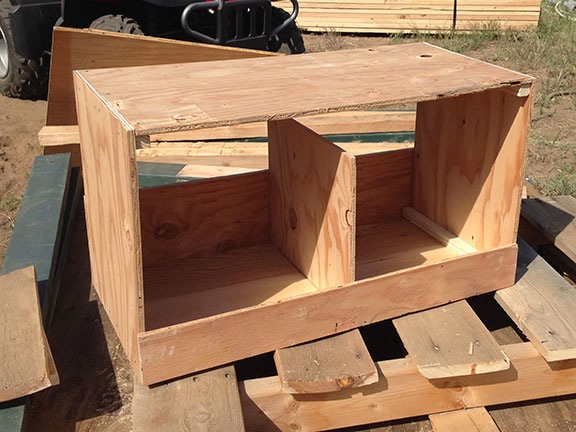
The nests were a challenge — at least at first. They came out good. I painted them before installation in the side wall.

I got to use my new circular saw for the job. I’d never used a circular saw before so I was learning by doing. My first few cuts were satisfactory, but not much better. But by the end of the day, I was making rip cuts in 1x 2s to make the 1x1s I needed for the next boxes.

While I worked, one of my chickens died. She’d been acting kind of sluggish all day long and had even let me pet her. Later on, I found her keeled over in the temporary shelter. I buried her on the far east end of my property.

I ran out of steam around 7 PM, right after putting the roof on. It had been a long, hot day. I’d get back to it in the morning.

The next day, I designed and built two perches out of one of the dozen or so 2×2 posts a friend had given me. Originally, I was going to make two tall ones but I started wondering if the young chickens would be able to jump that high. So I wound up with a tall one and a short one.

Coop Construction
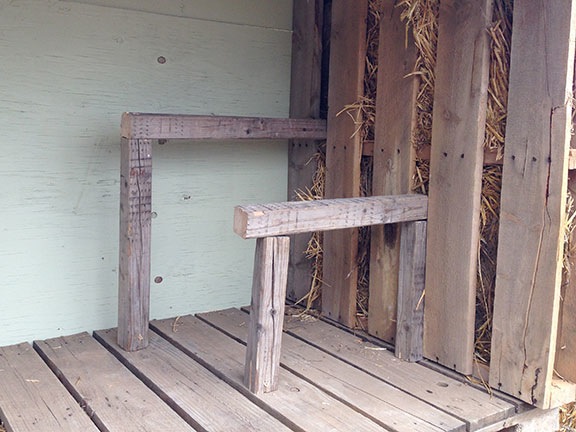
The two perches should provide enough space for seven full-grown chickens.

Coop Construction
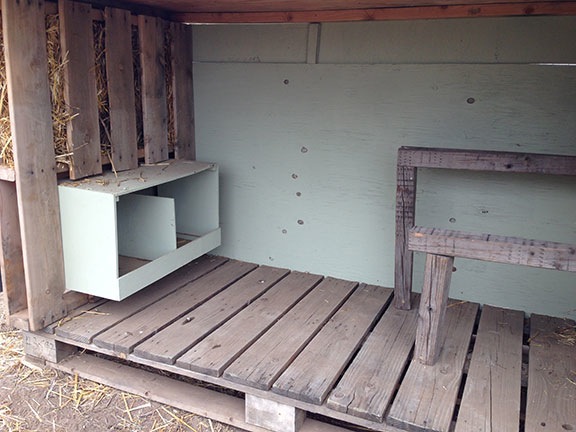
The nest boxes fit snugly into the side wall. The outer wall is hinged to provide access to the eggs from the outside.

I had just enough plywood left to put two outer panels on the front of the coop. This would provide shade in the morning and shelter from the wind on the rare instances when it blew from the east.

Chicken Coop
The finished chicken coop.

Although the coop is pretty much finished, I do have one more thing to do: I want to put roof shingles on the top piece of plywood. I bought the shingles and the nails; I just need to get around to it — hopefully, before the next heavy rain.

This was an ambitious project for me, requiring me to make use of a limited amount of lumber and tools that were brand new to me. I can’t tell you how rewarding it is for me to dream up a plan for a project like this and then complete it by myself. Every time I reach beyond what I think are my limitations and succeed, I prove that I’m capable of doing everything I need to do.

Too many women rely on men for even the most basic things. I’m very proud that I’m not one of them.

Construction Day 4: Raising a Roof

Only a half day, but a lot done.

Man Lift
They brought the man lift on a trailer first thing in the morning and put it right to work.

I was home on Thursday morning, mostly writing blog posts, when the workers put in about 4 hours of work.

They brought along a new piece of equipment — a man lift — and used that with a series of cables and pulleys to hoist each section of my RV garage roof into place. This isn’t the highest roof, but it’s likely the most cumbersome. It required hands-on participation from all four workers at once.

Raising a Roof
It took the man lift, four guys and a bunch of ladders to raise each roof section.

As one of my friends noted, the fully framed roof trusses looked a lot like bleachers when they sat on the ground. But once they were lifted into place over the building’s biggest open space — 24 x 48 feet — they started looking a lot more like a roof.

And the poles started looking a lot more like a building.

One Roof Up
The first part of the roof is up.

On May 20, 2014, I began blogging about the construction of my new home in Malaga, WA. You can read all of these posts — and see the time-lapse movies that go with them — by clicking the new home construction tag.

It took the guys less than 4 hours to lift all four truss sections and secure them to the poles. Then Angel told me that they were needed at a job in Chelan and would be back on Tuesday. I gave them the box of cookies I’d bought them and they drove off.

Later that day, I met with Tanya in the office. I told her about the progress and we both agreed it was a good thing they hadn’t hit any rocks when digging the post holes. She said that the building should be done in 4 weeks. I was so stunned that I didn’t think to ask her whether she meant 4 weeks from the start date or 4 weeks from that day. Either way, it means I can finally get my things out of storage — likely before the end of June.

And that’s something to celebrate.

Here’s Thursday’s time-lapse:

Construction, Day 3: Gravel Spread, One Roof Framed

More than just a bunch of poles now.

On May 20, 2014, I began blogging about the construction of my new home in Malaga, WA. You can read all of these posts — and see the time-lapse movies that go with them — by clicking the new home construction tag.

I was away from home yesterday for most of the day — I had an interesting charter to a mountaintop in the morning and dozens of errands to run in the afternoon — and missed the action here. Fortunately, my time-lapse camera caught it all. Of course, I could see what was done when I stopped in around lunchtime for an hour and then when I got home at around 6 PM that evening and I did manage to take a few photos from different angles than the time-lapse offers.

My building site is nestled between hills on the south and west sides. The road to my home winds down the hill on the south side, so when I drive down the hill, I get a perfect bird’s eye view of my site. I often stop there on my way in or out to get a photo of the site in progress. When I drove down at lunchtime, I had to do a double-take. It looked like they’d poured a concrete pad. But then I realized that one of the three loads of gravel Jeff, the earth-moving guy, had delivered was gone; the crew had spread the gravel inside the building’s footprint.

Trusses Laid Out
By lunchtime, the horizontal supports for the posts had been removed, gravel had been spread, and the roof trusses had been laid out.

I stopped to talk to the crew before going inside. I wanted to tell them that it was okay to spread some more gravel in the area to the north of the building which would eventually be the apron for my four-car garage. Dust was a real issue. The constant driving over the area had ground the soil into a very fine powder. I knew that kind of dirt. I knew that watering it down would turn it into a snotty muck. I had two more loads of gravel in a pile and they had a bobcat. We’d use some of that gravel to keep the dust down.

Angel, as usual, was cheerful and helpful. After agreeing to do that, he complemented me on the pad. Both he and Corey, the boss, had checked it for levelness. He said it was very good. From the way he spoke, I got the feeling that they didn’t often get to work with building pads so well prepared. But Jeff had done a great job. I sent him an email this morning to let him know.

I was out all afternoon and, when I got home, the crew was gone for the day. But they had kept busy. One of my building’s two roofs were fully framed and ready to be lifted.

Roof Framed
One roof had been framed by the end of the day.

To give you a better idea of what’s going on, check out the elevation sketches below. The building will have two roofs. The low roof, which is the one they framed out that day, was built with trusses — at least I think that’s what they’re called; someone will likely correct me if I’m wrong — and will go over the RV garage on the south side of the building. I don’t care about the wood beams showing in that area since it’s all storage and shop.

Elevation Sketches
Elevation sketches for my building show the two rooflines.

The other side of the building will have my living space on the second floor. I don’t want to look at trusses with naked wood beams and hanging hardware there. Instead, I want a vaulted ceiling that will be finished with sheetrock like any other ceiling. That means they need to build the roof completely onsite. I suspect that’s what yesterday’s lumber delivery was — the third lumber delivery so far.

Roof and Wood Delivery
I noticed the new stack of wood when I got home that evening. Judging from its size, it must be for my living space roof.

After being interviewed by Chuck Joiner for an upcoming MacVoices video podcast (link to come), I wandered around “inside” my home under construction with a bottle of hard cider made by a friend. I wish I could explain the way my emotions welled up inside me. After only three days, there was an amazing amount of progress on what would be my future home.

My. Future. Home.

I was finally moving forward again.

Those who know me think that my life has been stalled for only the two years that I’ve been dealing with my extremely ugly divorce. But that’s not true. I’ve come to realize that my life has been stalled for about ten years.

But now I’m moving forward again. Working hard to achieve my goals, no longer held back by a “partner” who makes excuses instead of plans.

As I walked through the site, between posts that would soon be connected by framing and walls, I realized something else: everything around me was mine. Like like other things I’d worked hard to get — my helicopter and my vehicles and my RV — I’d earned all of the money to make this dream a reality. I was walking through the beginning of my new home designed to my specifications to meet my personal needs.

And that’s what I was thinking about as I wandered around the site, imagining how I’d use the shop space and where I’d park my vehicles and where I’d place my furniture in the rooms upstairs.

And thinking again about sipping wine on the deck overlooking the Wenatchee Valley.

Here’s the Day 3 Time-lapse:

Construction, Day 2: The Poles Go In

I cannot believe how quickly this happened.

The workers arrived at 7 AM sharp yesterday morning and got right to work. Within 30 minutes, two poles had been placed.

First Posts Planted
These guys didn’t waste any time. Within 30 minutes, the first two posts had been planted.

On May 20, 2014, I began blogging about the construction of my new home in Malaga, WA. You can read all of these posts — and see the time-lapse movies that go with them — by clicking the new home construction tag.

I was writing yesterday’s blog post in my RV and happened to glance out my office window. What I saw blew me away. I couldn’t believe how quickly the poles went in. At one point, I think they were averaging 10-15 minutes per pole.

My building will be one story tall on one side and two stories on the other side. The two-story side has some seriously long poles — 32 feet, according to Angel (the worker foreman). Apparently, that’s among the tallest the company usually does.

Hoisting with a Crane
The long posts were hoisted with a crane.

Of course, the chances of four workers being able to hoist a 32-foot long 8×8 post are slim. I was just wondering how they’d lift the long poles when the boss, Corey, showed up. With a crane.

The pace slowed down a bit, but still moved along at a good clip. By 2 PM, they were almost done placing poles. That’s when the Chelan County building inspector showed up. (Yes, I had my first inspection on the second day of construction.) He chatted with me and Corey and went through the plans, asking a few questions. Then he looked into all the holes and at all the poles suspended over the hole bottoms. In the end, he signed off on something Corey gave him.

He was still in the driveway when another truckload of lumber arrived. I scooted him out and then rearranged my vehicles to make room for the lumber on the RV side of the driveway. The other side was getting very crowded.

More Lumber Delivered
More lumber arrived in early afternoon.

Pouring Concrete

They used a concrete caddy to shuttle loads of concrete to the post bases.

When he was finished, the first cement mixer arrived. Corey wasn’t too happy. He was done with the crane and had been hoping to get it out before they poured concrete around the pole bases. (My driveway is rather long and very narrow; just one vehicle at a time.) They used a concrete caddy on the bobcat to shuttle loads of concrete out to the poles on the south end.

Cement Mixer at Jobsite
The first cement mixer at the job site.

Concrete around Posts
A post with concrete at its base.

The second truckload was already waiting when the first finished. Corey chased the first truck out with the crane and the second truck came in. They filled in the rest of the holes and topped off the first ones.

By 4 PM, they’d erected all 40 posts and poured concrete around the post bases. I’m not sure whether they can start framing today or if they have to wait for the concrete to cure. I guess I’ll find out soon enough.

Want to see it for yourself? Here’s yesterday’s time-lapse. I slowed it down to 15 frames per second; each second of video corresponds to 15 minutes of time.

Next up: framing begins.

Construction, Day 1: Lumber Delivery, Post Hole Digging

Off to a good start.

On May 20, 2014, I began blogging about the construction of my new home in Malaga, WA. You can read all of these posts — and see the time-lapse movies that go with them — by clicking the new home construction tag.

The lumber delivery truck pulled into my driveway at 6:15 AM sharp. I was already up. In fact, I was setting up my time-lapse camera on the roof of my RV.

The truck was neatly stacked with lumber. A forklift clung to the back. It didn’t look like enough lumber for a 48 x 60 foot building, but the driver assured me it was. In fact, he told me it was a lot of lumber.

My Lumber
The lumber truck arrived at 6:15 AM. I was awake (of course).

Special Order for Langer
It must be mine. It has my name on it.

He didn’t waste any time offloading it and leaving it spread out on the building site. Then, without taking up my offer of coffee, he backed down the driveway the way he came and was gone.

I looked over the lumber he’d left behind — my lumber. The skeleton of my future home in a sort of kit.

Assembly Required
As one of my Twitter friends said about this photo, “Some assembly required.”

The builders showed up less than 20 minutes later. There were 3 hispanic guys who introduced themselves and shook my hand, the owner of the company, and a bobcat with two augers. They spent about an hour moving around the lumber. Then the boss left and the workers got down to work with the auger.

A pole building utilizes post-frame construction. From Wikipedia:

Pole framing or post-frame construction (pole building framing, pole building, pole barn), is a simplified building technique adapted from the labor-intensive traditional timber framing technique. It uses large poles or posts buried in the ground or on a foundation to provide the vertical structural support and girts to provide horizontal support. The method was developed and matured during the 1930s as changes in agricultural practices, including the shift toward engine-powered farm equipment and the demand for cheaper, larger barns and storage areas. Unlike competing building methods, once the poles, girts, and rafters are put in place, much of the construction work on a pole-built structure can be handled by a single individual over the course of a month or season.

My building required 40 holes roughly 3-4 feet in diameter and 4 feet deep. The builder estimated that construction could be completed in 6 to 8 weeks. Of course, that’s just the exterior of the building; I still needed to finish my living space.

Auger
Close-up view of one of the augers they used to dig holes for my building.

So that first day was all about digging holes. I was worried about rocks on the south side of the site. I’d been warned that although the pricing included some work with rocks, if there was a lot of rocks and they couldn’t do the digging, I’d have to pay extra for earth moving equipment to come back in and dig the holes. Extra could get into the thousands of dollars. Every extra dollar I spent on the building’s frame was a dollar that wouldn’t be available to finish the living space. Needless to say, I wanted those holes to be easy to dig.

They encountered a rock about three feet down on the first hole. The workers stopped and got tools out of their truck. I came over to watch. Angel, who seemed to be in charge of the workers, told me it didn’t seem to be a big rock. They banged away on it with a digging stick and then dug it out with shovels. And then they got the auger back in place and dug.

They had the same problem with the other south corner. Angel said it wasn’t bad, though.

Digging Holes
The workers deal with a rock on the second hole.

And when they moved north, they didn’t hit any rocks. At all.

In fact, of the 40 holes they dug, they only hit rocks on four of them — the four south side holes.

The digging went amazingly fast. I’d estimate about 10 minutes per hole. The auger went in and filled its grooves with earth. Angel moved aside and then rotate the auger in the opposite direction to dump the earth in a pile. He made two of these piles and later used the bobcat to move the earth into my future driveway apron. They took a break for lunch at 11:30 AM. By about 2 PM, they were done with the holes.

Sometime around the middle of the day I emailed Tanya, the woman I’d been working with at the builder, to let her know how it was going. I think she was just as happy as I was that the work was going smoothly.

I had to leave at 3 PM, so I didn’t get a chance to see them finish up. I did watch on the time-lapse, though. After finishing the holes and moving that dirt, they spent the rest of the day moving the posts around. By 4:15 PM, they were gone.

The project is definitely off to a good start. Even today, as I type this, I can’t believe how much they’ve gotten done in less than 90 minutes. A crane is pulling down my driveway right now. You can read about that tomorrow.

In the meantime, here’s yesterday’s time-lapse.