Bees: The Risky Hive Split

Let’s see if I regret this.

I started my beekeeping hobby in June 2013 and have been blogging about it periodically. If you’re interested in reading the other posts in this series, follow the Adventures in Beekeeping tag. Keep in mind that the most recent posts always appear first on this blog.

Last week, I blogged about a hive inspection and included a photo of a queen cell. Because of its position in the frame, I thought it was a supersedure cell — the kind of queen cell the bees produce if their queen is ill, dead, or missing. But when I showed it to my beekeeper friends at last week’s bee chat, they universally agreed that it was a swarm cell. That meant my bees were planning to swarm.

I didn’t want that to happen. I wanted to increase the number of bees and especially beehives that I had — not decrease the number of bees.

Queen Cell
The elongated cell is definitely a queen cell, but is it a swarm or supersedure cell? People more knowledgeable than me say swarm.

I thought of everything I knew so far about beekeeping — which is pretty much based on what I’d read and observed for the past few months. (In other words, a lot but not much.) I reasoned that if the brood frames that included the swarm cells were removed from the hive without the queen and they were put in another hive, the bees would raise a new queen and I’d have a new hive.

This is a hive split.

I did this on Friday. I took two brood frames plus one honey frame from my first hive and placed them in a nuc box with two empty frames. All three frames were covered with bees that would become the new hive’s starting population. I’d rely on those bees to complete the rearing of the queens in the queen cells on those brood frames.

I then replaced the brood and honey frames I’d removed from the hive with empty frames, giving the bees plenty of space for new brood and honey in the existing colony.

The only problem: I never saw the queen.

Although I’m pretty sure she was left behind in the original hive, I can’t be sure since I didn’t see her. After all, the hive had to have at least 20,000 bees in it — finding one among all that is not easy.

And that’s where the risk lies.

You see, if I took the queen along with the brood frames containing the swarm cells, not only would I leave the original hive queenless, but I run the risk of losing a viable queen to the new queens that hatch. Or having bees swarm from the nuc anyway. (Admittedly, this second scenario is not likely, given the limited number of bees in the nuc box.) Finally, as my beekeeping friend in Vermont, Tom, pointed out, if a hive suddenly becomes queenless, the workers might start laying eggs. Those will all be worthless drones.

Of course, I did leave behind brood frames that included queen cells just in case. That hive runs the same risks.

Do I know what will happen? No. But time will tell. I’ll check the nuc box later today — it’s right here at my RV parking space — and try to figure out what’s going on. I’ll also check the original hive (which is down in Wenatchee) later in the week to see what those bees are up to.

Worst case scenario: I screw up my original hive and don’t have a viable colony in the nuc box. Best case scenario: my risky hive split works.

Will report back when I know something.

Bees: Installing Drone Frames

Trying natural varroa mite control.

I started my beekeeping hobby in June 2013 and have been blogging about it periodically. If you’re interested in reading the other posts in this series, follow the Adventures in Beekeeping tag. Keep in mind that the most recent posts always appear first on this blog.

Varroa mites are a real problem for beekeepers in the U.S. (and likely abroad). They breed on bee larva, sucking the “blood” out of their hosts and spreading throughout the hive. It’s impossible to prevent them from infesting a hive. The only thing you can do is try to minimize them and their damage.

A drone frame is a special brood frame with larger cells on the foundation. It’s part of a varroa mite control program. Theoretically, when the bees see these large cells they realize that they’re perfect for raising drones. Drones have only one purpose — to fertilize the queen — but they’re really not needed once the queen has been fertilized and is laying eggs. They’re larger bees and need larger cells to develop. They also take longer to develop, which is why varroa mites prefer infesting drone cells. So the idea is to encourage the bees to put only drone cells on one frame which, hopefully, will attract many of the mites in the hive. Then, before the drones hatch but after the mites have infested the drone cells, you pull the frame out of the hive and freeze it. This kills the drones (which, again, you really don’t need) and the mites. You then remove the caps from the drone cells and put the frame back into the hive where, hopefully, the process starts all over again once the bees have cleaned out the cells.

That’s the idea. I figured I’d give it a try, so I ordered two drone frames — so I could always have one in my hive, even when one was in the freezer. After getting the frames, however, I caught a swarm and started a second hive. So I’ve got one frame in each hive and need to get another pair to swap them out.

The photo below shows me inserting a drone frame into the bottom box of my first beehive. I pulled out a frame that was virtually untouched by the bees and moved that into the upper box in place of another untouched frame.

Adding a Drone Frame to a Bee Hive

I just hope I can fit the darn things in my freezer. Right now, I’m still living in my RV; eventually I’ll have my chest freezer out of storage and set up where I’ll have plenty of space.

I should mention here that using drone frames is part of an integrated pest management (IPM) system. I’ll use other control methods — such as a bottom board screen — when I settle my bees into their permanent home later this season.

Bees: A Closer Look

A look inside my first hive.

I started my beekeeping hobby in June 2013 and have been blogging about it periodically. If you’re interested in reading the other posts in this series, follow the Adventures in Beekeeping tag. Keep in mind that the most recent posts always appear first on this blog.

I did my third hive inspection on my first beehive the other day. My primary goals were to check the overall health of the hive, make sure there was fresh brood (unhatched bees), verify that the queen was present and healthy, see how far along the bees had come in filling the 20 frames in the hive, and replace one of the frames in the lower hive box with a drone frame.

I accomplished all of these things except spotting the queen. The hive seems very healthy, though, and the bees seem to be multiplying nicely, so I can assume that the queen is in there somewhere. The presence of several supersedure cells, however, hinted that the queen may be aging or that the bees might not have confidence in her continued viability. I find this odd because the bees came in a nuc I bought locally and the man who sold it to me installed a new queen not long before I bought it. So I’m not sure what’s going on there.

You can see a supersedure cell, along with quite a few drone cells, in the photo below. The supersedure cell is the elongated cell near the center of the image. The drone cells are the cells with the domed caps. Also in the photo are cells of capped and uncapped brood and stored honey. It’s interesting to note that I shot this closeup with my iPhone’s camera; I’m pretty surprised it was able to focus so closely — I did not zoom in, although I did crop the image.

Closeup of Brood Comb

Eight of the upper hive box’s ten frames were full of partially capped honey. One frame was in progress and the other frame was completely untouched. The sheer quantity of stored honey and the speed at which these bees seem to produce convinced me to add the Ross Rounds frames I’d assembled on July 4. I returned the next morning and added it atop a queen excluder and spacer with exit. With luck, they’ll fill and cap those frames before the end of the season.

More on drone frames in another post.

Bees: Capturing My First Swarm

I lucked out. It was very easy.

I started my beekeeping hobby in June 2013 and have been blogging about it periodically. If you’re interested in reading the other posts in this series, follow the Adventures in Beekeeping tag. Keep in mind that the most recent posts always appear first on this blog.

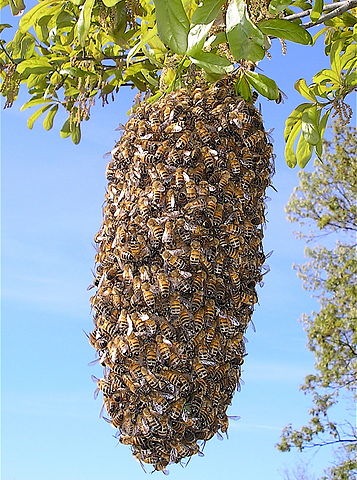
The call came while I was hovering over 35 acres of cherry trees in Monitor, WA. It was my friend Katie, who lives in Quincy. The bees that live in the wall inside the shop at their home had swarmed again. They were gathered in a bunch on the maple tree, about 8 feet off the ground. Did I want to catch them?

Of course I did!

My only problem was that I was working — with no end in sight. I spend my summers as a cherry drying pilot and I was into what would become a hellish week of rain and lots of hard work. I was hovering over one orchard when she called and another was already waiting for my attention. I told her I’d get there as soon as I could, thanked her for her patience, and hung up.

About Bee Swarms

Before I go into the story of this capture, let me take a moment to educate readers about bee swarms.

Honey bees live in hives. They could be manmade hives like the one I (and countless other beekeepers) have. Or they could be hives built inside of structures not intended to house bees, like hollow trees, rock overhangs, or building walls.

Most hives have a finite amount of space in which to build. Bees exist to reproduce and increase their numbers. Everything they do is to meet that end. (The honey they make is really for their consumption, not ours. They just make a heck of a lot more than they need.) So they’re constantly building inside their hive, making wax cells for brood (eggs laid by the queen and the larvae they turn into) and the storage of food like nectar (which turns to honey) and pollen.

As the hive population grows, the bees eventually start running out of space. They realize this and instinctively plan to split the colony. First, they create queen cells, which are special large brood cells for raising queens. The existing queen lays an egg in each of these cells, as she does for all the other brood cells. The workers, however, raise the larvae in these cells to be queens by feeding them royal jelly. (All larvae are started on a diet of royal jelly, but only future queens get it throughout their development.) Workers raise queens when they sense that the current queen is ready to die or already dead or when they know they need to swarm. The positioning of the queen cells helps beekeepers determine what’s going on; swarm cells normally appear at the bottom of the hive while supersedure cells appear near the top.

Bee Swarm
The swarm I caught looked a lot like this one. Wikipedia image by Mark Osgatharp.

Before the new queens emerge from their cells, the existing queen leaves the hive with at least half of the bees. They’ve already stuffed themselves with food so they’ve got enough energy to make a journey. This is the swarm. The bees stay close together, surrounding the queen to protect her. They leave the hive and often fly to a nearby location where they alight as tight mass on a branch or building eave or some other surface. They’ll remain there to rest and organize and get their bearings. Scout bees might fly off in different directions, looking for a new home. Eventually, the swarm will take off and fly in a bunch to a possible future homesite or another rest stop.

In general, when honey bees are swarming, they are least likely to sting. Why? Well, they don’t have a hive and food stores to protect. They’re on the go. Their only concern is protecting the queen and moving her into a new home so she can continue laying eggs and building their population.

Capturing a swarm is a win-win-win-win situation:

  • The property owner wins because she gets the bees removed for free.
  • Society wins because the bees are kept alive rather than killed — as an exterminator might do. Bees are vital to agriculture and the food chain.
  • The bees win because they’re not only kept alive, but they’re given a great new home all ready for them to move in — a manufactured hive, designed with their needs in mind.
  • The beekeeper wins because she gets a whole colony of bees, including a queen, for free.

Wikipedia, by the way, has an excellent article about honey bee swarming.

My Swarm Capture

I finally finished flying for the day at around 6 PM. I wasted no time loading up my beekeeping gear, which I keep in a rolling storage box, and the empty nuc box I’d gotten my first been colony in. My friend Cheryl climbed aboard the truck with me and we drove the 10 or so miles to Katie’s house.

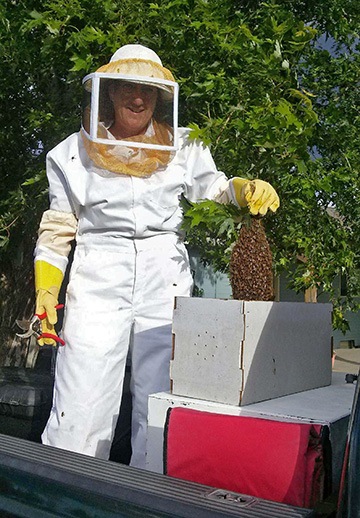
Katie, by this time, was gone. She had to take her son to a swimming meet (or ball game or something like that). Her other son was home. He came out when we pulled up with the truck. The swarm hung from a branch on a maple tree beside their driveway. It was about 10 feet off the ground. But because it was overhanging the driveway, I could back my pickup’s bed under it. Standing on the pickup bed didn’t get me close enough to reach it, but standing on that big plastic bee equipment box in the back of the pickup did. (I really don’t like climbing ladders.)

I suited up and took a closer look, climbing up until my face was less than a foot from the swarm. They clung to a pair of small branches. I knew from conversations with other beekeepers that capturing a swarm like this was often as simple as clipping the branch off the tree and putting the bees in the box. So that’s what I did.

Capturing a Swarm
Cheryl took this photo of me lowering the bulk of the swarm into the nuc box.

I removed three frames from the 5-frame nuc box. Katie’s son got me a pair of clippers (note to self: buy clippers and put in bee box) and I climbed back up atop my equipment box. I grasped the branches right above the top of the swarm and clipped them right above my fingers. I then lowered the branch into the box. That took care of about 80% of the bees. I repeated this process for another small branch. Unfortunately, a clump of bees fell off and landed in the bed of my pickup. I had to scoop them up manually with some cardboard to get them in the box. When I was done, I had about 98% of the bees. A few dozen were flying around.

Captured Swarm
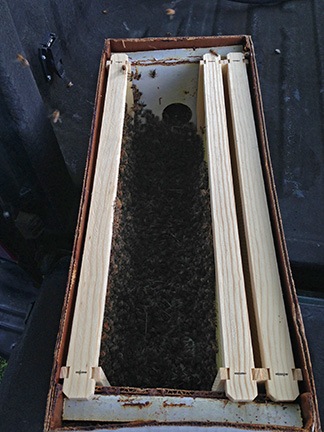
The captured bees wasted no time crawling up onto the frames in the nuc box I put them in.

I looked into the box. There was plenty of space in there to add a frame, so I gently lowered one in.

By that time, Katie’s husband had come out. He, his son, Cheryl, and I took a close look inside the box. We could clearly see “fanning” activity by a handful of bees on the top edge of the box. I’d seen this behavior before when watching another area beekeeper catch a swarm. The bees were trying to spread the queen’s scent outside the box to attract other colony members who hadn’t come into the box yet. That’s a great indication that the all-important queen was inside the box.

I took off my suit and stowed it in my equipment box, along with my smoker (which I hadn’t needed) and gloves. I waited as long as I could to cover the nuc box.Most of the bees were inside the box; the ones left behind might find their way back to the original hive in the shop wall less than 100 feet away. The plug for the hive entrance had already been put in place so the bees inside the box were trapped there. I wedged the box into a safe spot in the back of the truck, said goodbye to Katie’s family, and left.

Settling in the Swarm

Back at my RV, I offloaded the truck, leaving the nuc box on top of the bee equipment box under my fifth wheel hitch overhang. Then I took a quick shower, dressed, and went out with Cheryl to meet some friends in town.

The plan was to take the bees with me the next day when I moved my RV to Wenatchee Heights. Unfortunately, the weather didn’t cooperate. I had to fly most of the morning. If I left the bees closed up in the box, they could die from heat or lack of water. So I took the door plug off. Bees started coming and going like a regular hive. This meant that I would not be able to move the bees until that evening, when they returned for the night.

Although I did manage to move my RV that evening, I also had to fly. By the time I was done, it was too late to retrieve the bees. I asked Mike and Cheryl to close up the door, planning to retrieve them in the morning. But when morning came, I had to fly again. So they opened the door to let the bees out another day.

This turned out to be a tiny problem. Although I’d paid for my RV space through the next day, the campground people put a motorhome in that spot. The bees were coming and going from their box under the picnic table. The motorhome people were terrified of them and stayed locked up in their luxury box. The campground people called to ask when I’d get the bees. I was flying when they called. I assured them I’d be there later that evening and hoped (again) that the rain would stop.

Temporary Home
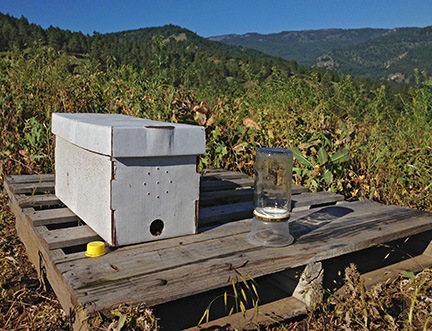
My new bees in their temporary home. I hope to have them moved into a real hive later this week.

Fortunately, the rain did stop and I did get back to Quincy to retrieve my bees and other possessions left behind. I brought everything back to Wenatchee Heights, where I’m currently camped out between two of the orchards I’m contracted to dry. In the morning, I opened the door to the hive. The bees began coming and going as usual, probably wondering what the heck was going on.

Several days have gone by. The bees seem happy enough. I’ve ordered a new hive to put them in; it should arrive sometime this week. I’ll set that up here, remove the frames from the nuc box and put them in the new hive, and get the nuc box ready for my next swarm capture. Details to come (of course).

Bees: My First Hive Inspection

I open my new hive for the first time to see what my bees are up to.

I started my beekeeping hobby in June 2013 and have been blogging about it periodically. If you’re interested in reading the other posts in this series, follow the Adventures in Beekeeping tag. Keep in mind that the most recent posts always appear first on this blog.

I set up my first beehive and loaded bees into it on Tuesday, June 4. On Tuesday, June 11, I went back to inspect the hive.

Hive inspections are something beekeepers should be doing about once every 1-2 weeks during the productive summer months. The idea is to check the health of the colony, remove things that shouldn’t be in there, and get a general idea of what the bees are doing in their box(es).

Preparing for the Inspection

To prepare, I looked up a few checklists online. I wanted a guideline that would help keep me focused on what I needed to do so I could minimize the amount of time the hive needed to be open. I found two good ones:

  • Hive Inspection Sheet is a great one-page checklist to record information from an inspection. This is the sheet I wound up using, even though it includes many items that I didn’t need for this inspection.
  • Hive Inspection Checklist comes with 7 pages of information to help you understand what you’re doing and how to do it. Although I didn’t like the actual checklist format, I found the accompanying explanations extremely valuable.

I also made notes in a looseleaf book I’ve been using to keep track of things I need to remember. (Seriously: the memory loss that goes with aging and having a very busy life sucks big time.) I divided it into two parts:

Prep:

  • Hive body. I needed to put the second hive body in the Jeep so I wouldn’t forget to bring it.
  • Smoker setup. I wanted the smoker all set up with ignition paper and fuel so all I had to do was light it.
  • Food. Didn’t want to forget the sugar syrup I’d prepared.
  • Camera charged. I was bringing along my GoPro to document the inspection and I needed to make sure it was fully charged.

Tasks:

  • Light smoker. Seriously, I even need to remind myself to do something like this.
  • Open hive. Duh-uh.
  • Remove frames one by one and check:
    • Brood development. Are there larvae? Capped brood cells? The health of the colony depends on a constant inflow of new bees via hatching.
    • Eggs. Is the queen laying eggs?
    • Honey / Pollen. Are the bees making honey? Storing pollen? They should be!
    • Queen Cells / Drone Cells. These are brood cells for queens or drones. They are larger than regular brood cells. I didn’t expect (or want) to see queen cells — one queen is enough and the presence of queen cells indicates either an unhealthy queen or the possibility of swarming. Drone cells should be present, but not in great numbers.
    • How many frames are full? The bees should have filled out their original five nuc frames and begun work building out comb and filling it on the additional five frames I provided in their hive.
  • Add hive box on top. Only if they’d made good progress on the five new frames.
  • Close hive. Duh-uh.
  • Feed bees. I needed to refill their feeder with the sugar syrup.

My notes were the bold text. I didn’t need the explanations. (Those were for you, dear reader.) Not a huge amount to do or remember. Just right for this first time.

I also printed out the checklist. I’d fill it out when I was finished.

The Inspection

I had a great day on Tuesday. Very relaxing. I blogged about it here. By the time I got to Jim and Kriss’s house in Wenatchee, I was feeling good. Very mellow and relaxed. In no hurry. And I stayed that way. That’s really important when you’re working with at least 10,000 live bees.

Hive Inspection PhotoI arrived around 4 PM, when the temperature was around 70°F. A nice warm afternoon when many of the bees would be out foraging. I brought my gear into what I’ve come to think of as the “bee yard” and was happy to see bees coming and going through the hive entrance. I saw Jim and Kriss and Jim came in to keep me company. I lighted the smoker and suited up. Jim remained in plainclothes, but stood back as I got to work.

Rather than give you a blow-by blow of the inspection, I’ll let you watch the video. It’s 9 minutes long, edited down from 30 minutes of raw footage. It was shot with a GoPro camera on a tripod. (I’ll do this again in the future and talk more directly to the camera.) Throughout the video, you’ll hear Jim and me talking about what we’re seeing.

Here’s the video:

The long and the short of it is that I have a healthy hive with friendly bees. Did you notice how Jim gets closer and closer throughout the video until at one point, he sticks his bare finger right next to the hive? My bees didn’t mind. They’re mellow. Mellow yellow bees. Jim says his bees aren’t that nice.

We saw drones and I actually spotted the queen, which surprised me very much. Jim and I seemed to see her at the same time.

We did find one swarm cell — a queen cell near the bottom of the hive. They likely built this before the frames were put into the hive, thinking they were running out of space in the nuc (which they were). I removed it.

We didn’t see any eggs, but we did see plenty of developing larvae and capped brood cells. And tons of honey and pollen.

I got to scrape clean honey comb off the top of the inner box. I munched on it later in the car. Next time, I’ll bring a container just for my spoils. I’ll be leaving most of the honey for the bees this year — they’ll need the stores for the winter.

Next Inspection

My next inspection will be about 10 days after this one — sometime next week. I’ll do pretty much the same thing, but this time I have the challenge of working with two boxes full of frames.

I’ve been giving my frame setup a lot of thought. I’m thinking that I want to reconfigure the hive to have just one deep frame on the bottom and then mediums above it. I’ll still allot two hive bodies for brood, but I think that having medium bodies/frames above the hive will give me more flexibility for honey production while making the hives lighter overall. And I’ll still have the deep boxes on bottom for installing or creating nucs. Of course now that I’ve already put the deep box on top, I can’t really make any change until I get a second hive setup and either split the colony or use the occupied frames from the top box in a new hive. Neither is possible right now.

I’m also thinking of putting in a frame with beeswax foundation might be a nice way to harvest a single frame of honeycomb before winter. I think the bees can spare that for me — especially given the amount of sugar I’ve been feeding them.

More video — but shorter and more pointed — with the next inspection. As usual, your comments and feedback here is always welcome.