The Gallery Exhibit

I submit 10 pieces of jewelry to a gallery’s “Gems and Geology Holiday Gift Show.”

I’ve come a long way since I started making jewelry — mostly wire-framed pendants — with rocks. Over time, I’ve stepped up my game by taking classes and trying new techniques. The results are promising. And encouraging.

My friend Cyndi told me about a special exhibit at a gallery we both sell our work at. (Cyndi makes metal art; you can find it on Etsy.) The theme was Gems and Geology, which is pretty much what my jewelry is all about. Although I’d missed the first deadline — intent to submit with digital samples — I wrote to them anyway. I got an enthusiastic response:

We’d love to have your work in our show! … This is just the type of work we were hoping for! I am so glad you reached out.

Whew!

I got to work making pieces that I thought would be appropriate for a real gallery show. I already knew that this particular gallery did not like my wire work, mostly because it simply doesn’t sell there. (Oddly, it sells remarkably well at another gallery in Ellensburg; go figure.) That meant prong and bezel settings, which I was just starting to get comfortable doing.

I made the mistake early on of sharing a photo of one of my pieces on Twitter. Someone wanted to buy it. While I love selling jewelry, I was really hoping to send that one to the gallery. Still, I had plenty of time to make a replacement and I did.

I finished making the 10 pieces two days ago. I spent this morning photographing them for publicity materials. I figured I may as well share the photos here, too.

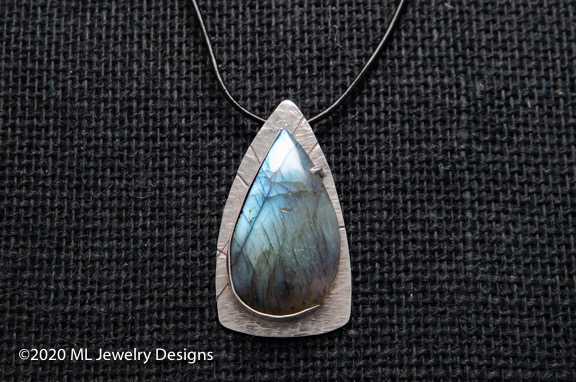
Labradorite Pendant
Labradorite bezel and prong set on textured, reclaimed silver. Black leather cord with sterling clasp. (Learn more about my reclaimed silver in this blog post.)

Kona Dolomite Pendant
Kona Dolomite prong set on polished Argentium silver. Sterling silver chain. (This was not made specifically for the show but meets the requirements.)

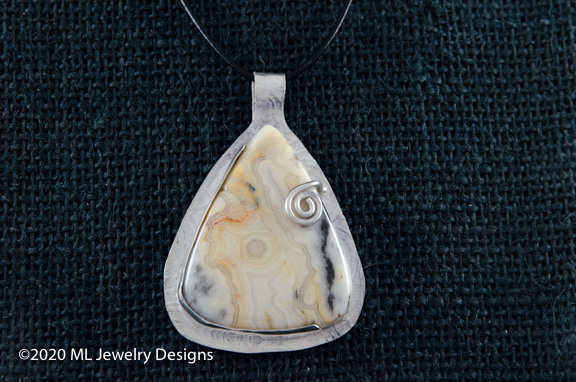
Crazy Lace Agate
Crazy Lace Agate bezel and prong set on textured Argentium silver. Black leather cord with sterling clasp. (This was not made specifically for the show but meets the requirements.)

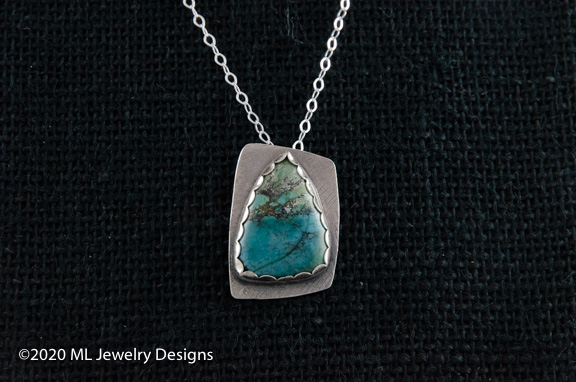
Azurite and Malachite Pendant
Azurite and Malachite bezel set on textured reclaimed silver. Sterling silver chain.

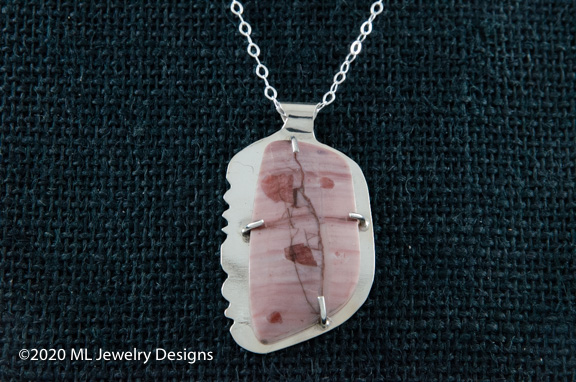
Brazilian Agate Pendant
Brazilian Agate prong set on textured reclaimed silver. Sterling silver chain.

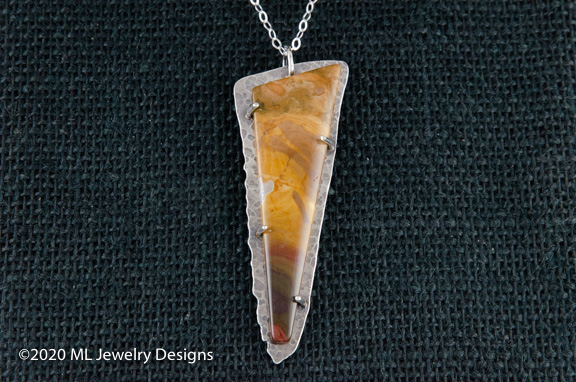
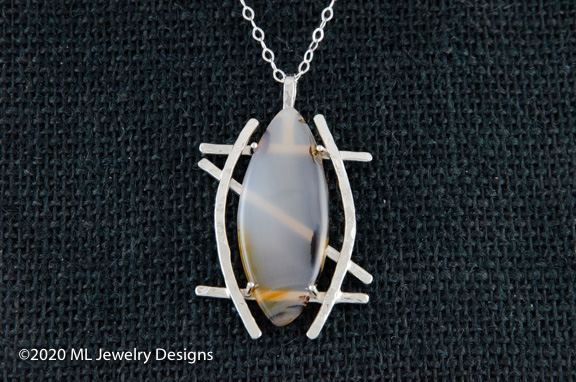
Montana Moss Agate Pendant
Montana Moss Agate prong set on a textured sterling silver frame. Sterling silver chain.

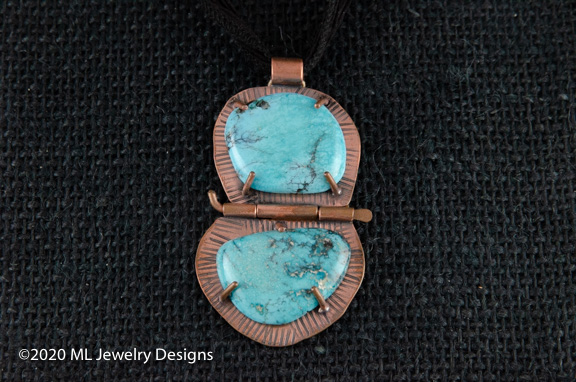
Turquoise Pendant
Two genuine turquoise cabochons prong set on textured and hinged copper. Black silk cord with hand-formed copper clasp. (This was not made specifically for the show but meets the requirements.)

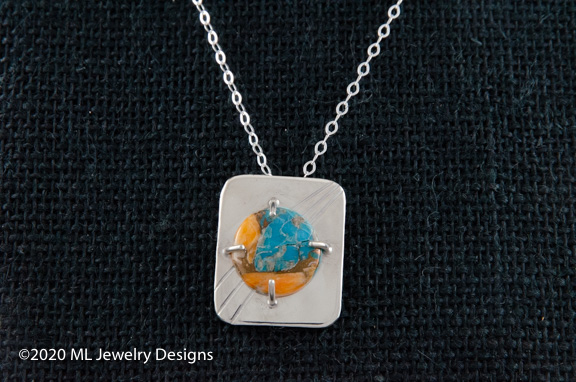
Kingman Turquoise with Spiny Oyster Shell Pendant
Kingman Turquoise and Orange Spiny Oyster Shell with bronze prong set in textured sterling silver. Sterling silver chain. (This was not made specifically for the show but meets the requirements.)

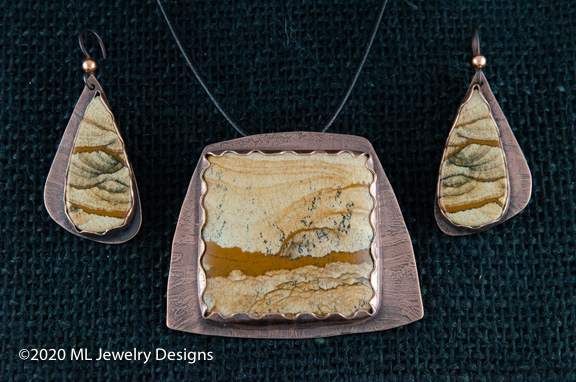
African Queen Jasper Set
African Queen Jasper bezel set in copper for earrings and a pendant. Black leather cord with sterling silver clasp for pendant; hypo-allergenic niobium ear wires for earrings. This is my current “masterpiece.”

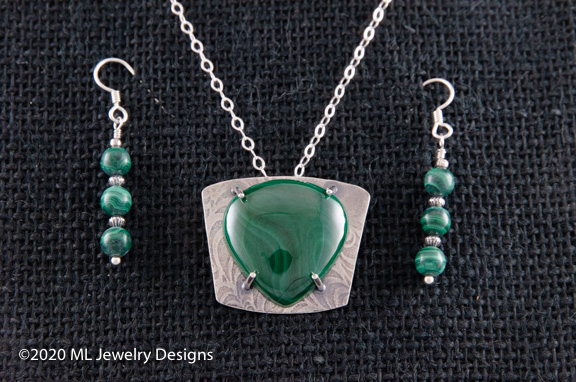
Malachite Set
Malachite prong set on textured reclaimed silver with malachite bead earrings. Sterling silver chain; sterling silver ear wires.

Keep in mind that none of these are currently available for sale. If you want them, you’ll need to go to Confluence Gallery in Twisp, WA between November 28 and January 9. (Twisp is actually a great destination in the winter, especially for cross-country skiing. The Methow Valley has hundreds of miles of well-groomed cross-country skiing and snowshoeing trails and was my Christmas destination before I started going south for the winter.)

If you like what you see here, you’ll probably like some of the jewelry in my Etsy store. Go check it out!

Helicopter Flight: McMinnville to Yakima, Part 2

Another video from the FlyingMAir YouTube channel.

Join me for the second part of my cross-country flight from McMinnville, OR back to my summer base in Malaga, WA. In this video, I descend down into the Columbia River Gorge to fly upriver below the clouds. As the clouds lift, the wind picks up. Along the way, there’s lots of rain on the windscreen, an airplane passing in the opposite direction, and waterfalls along the oregon cliffs. This part of the flight goes from Columbia River east of Troutdale and ends after a “left turn” into a valley across the river from Hood River. Audio is from direct connection to the intercom, so you can hear radio chatter and me narrate the flight and make radio calls, plus dialed down volume of the helicopter’s engine/rotor noise. I included a bit of “nosecam” video, too.

Here are the videos in this series. I’ve already published videos that cover the last part of this flight, which was done a few days later:

McMinnville to Yakima, Part 1: https://youtu.be/6x6XY3-uZjo
McMinnville to Yakima, Part 2: https://youtu.be/3mmyOMzN0Ls (this video)
McMinnville to Yakima, Part 3: to come
Yakima River Canyon: https://youtu.be/1HZi_UHjK0I
Kittitas to Malaga: https://youtu.be/cRuUhyCQWMA

I should mention here that “cross-country” in the world of aviation is any long flight where you land at a different place from where you started. For airplanes, it’s 50 miles or more; for helicopters, it’s 25 miles or more. This is only part of a 178 nautical mile trip.

Helicopter Flight: McMinnville to Yakima, Part 1

Another video from the Flying M Air YouTube channel.

Join me for the first part of my cross-country flight from McMinnville, OR back to my summer base in Malaga, WA.

In this video, I depart McMinnville, which is really rocking with pattern traffic, and head northeast into — you guessed it! — descending weather. (Seriously: just once I’d like to fly in that part of Oregon with good weather. How can people live there?) This time, I’m also dealing with a bit of wind that shakes the helicopter up every once in a while and makes me wonder whether my dogs in the back seat will puke. This part of the flight goes from McMinnville to the Columbia River and ends on a bit of a cliffhanger (pun intended).

Audio is from direct connection to the intercom, so you can hear radio chatter and me narrate the flight and make radio calls, plus dialed down volume of the helicopter’s engine/rotor noise.

Here are the videos in this series. I’ve already published videos that cover the last part of this flight, which was done a few days later:

McMinnville to Yakima, Part 1: https://youtu.be/6x6XY3-uZjo (this video)
McMinnville to Yakima, Part 2: https://youtu.be/3mmyOMzN0Ls
McMinnville to Yakima, Part 3: to come
Yakima River Canyon: https://youtu.be/1HZi_UHjK0I
Kittitas to Malaga: https://youtu.be/cRuUhyCQWMA
I should mention here that “cross-country” in the world of aviation is any long flight where you land at a different place from where you started. For airplanes, it’s 50 miles or more; for helicopters, it’s 25 miles or more. This is only part of a 178 nautical mile trip.

Saving Money by Recycling Your Own Scrap Silver

It’s like getting silver sheet for 1/3 off the price.

I use a lot of silver when I make jewelry: fine (100%) silver, sterling (92.5%) silver, and Argentium (93.5%) silver. Although I used to work primarily with silver wire, I’ve begun doing more with sheets of silver. I generally use 22 gauge sheet to make pendants and 26 gauge to make earrings.

The Cost of Metal

As I type this, I can buy 22 gauge sterling silver sheet for $4.36 per square inch. That price varies wildly — just a few months ago it was about 30% less. More recently, it was about 10% more. You can track precious metal prices online in a bunch of places, but I track it on the Rio Grande website, since that’s where I buy my metals.

Silver Prices
Here’s a chart of the silver prices, which went nuts back in June 2020. It looks like it’s settling down now. You can track metal prices at the Rio Grande website.

The price I pay is a combination of market price (as shown in the graph above) and the type of processing applied to the metal. Sheet metal will cost more per ounce than just plain old lumps of silver. After all, the folks doing the processing have to get paid for their work, no? That’s value added pricing.

The Value of Scrap

Rio Grande has a scrap metal program that will take my scrap silver and pay me 85% of market value for it. So if I send them an ounce of fine silver and the current market price is $24/ounce, they’ll pay me $20.40/ounce. The values are different, of course, for sterling and Argentium. They do gold and platinum, too, but I don’t use much gold or any platinum in my work (yet) because of the crazy high price.

I’ve taken advantage of the recycling program at least twice. I save every single scrap of silver and try hard to keep the fine silver separate from the alloys. When in doubt about a scrap, I throw it in with the alloys. The first time, I got about $50 back. The second time I had more scrap and got over $100 back. I take it as a credit on my account because I generally spend well over $1,000 on metals every year anyway.

Recycling My Own Scrap

The first step was to prep the crucible. I posted this video on Twitter to share the sound of the cooling crucible.

Recently, however, I watched a few “YouTube University” videos that showed jewelers making their own wire and sheet from scrap. To do this, I’d need a good, hot torch (which I already had), a small crucible, a mold, and some borax (which I already had). I decided to give it a try. Invested about $40 in the equipment I didn’t have and started melting silver.

Ingot
My second try at an ingot.

It wasn’t as easy as it looked in the video — what else is new, right? — but I did manage to get a decent little ingot on my second try. (I melted down the first try so no loss.)

Malachite Pendant
The backing for this malachite cabochon was made with silver I recycled.

I rolled it through my rolling mill, periodically annealing it to soften it back up, and got it down to a sheet roughly between 21 and 22 gauge. I textured the resulting piece, then cut out a shape for a backing plate for a cabochon pendant. I added prongs and a hole for a bail, cleaned and polished the piece, and set the stone. It looked great (if I do say so myself).

The interesting thing about my recycled silver is that it’s a higher percentage of fine silver than Sterling (92.5%), but not nearly as high as fine silver (100%). Because it also contains some Argentium (93.5%), it might have some of the tarnish resistance properties of that alloy. Legally, I can stamp it 925 because that’s the minimum purity of the piece.

Doing the Math

Yesterday, I made two more ingots. It took quite a while because I was aiming for larger ingots and, for the second one, was trying to melt larger pieces of scrap. I actually had to stop and refill my torch to get the job done.

Ingots
Here are the two ingots I made yesterday. They weigh at least an ounce each. The darker one has been through the rolling mill about 20 times and is dark because it’s freshly annealed in this photo. The larger ingot has not been rolled at all yet.

I started wondering whether it was really worth the effort. So this morning, I did the math.

Suppose I want 22 gauge sterling silver sheet. I looked up the price on Rio Grande, where I would buy it, and came up with the number $4.36/square inch or $31.14/ounce. (Remember the added value of turning silver into sheet.)

Now let’s look at how much I’d get back from Rio if I recycled an ounce of silver. With a current market price of $24/ounce and a rate of 85%, I’d get $20.40/ounce. Because a square inch of 22 gauge silver weighs .14 ounces, the refund would equate to $2.86/square inch.

In summary:

Descriptionper sq inper oz
Cost of of 22 gauge silver bought new$4.36$31.14
Value of equivalent amount of recycled silver$2.86$20.40
Amount I save by recycling my own silver$1.50$10.74

Of course, it’s even more cost effective to recycle my own silver now that Rio Grande has instituted a $50 recycling fee (beginning October 15, 2020). This makes it completely impractical to send my silver back to them — I’d never have enough silver to make this worthwhile. In hindsight, it’s a good thing that I learned how to make ingots before this fee came into effect. I’m ready for it.

Your Aircraft Engine Talks to You. Listen to it!

I realize I have a bad video clip by the sound of my helicopter’s engine.

An interesting thing happened to me Saturday as I was editing the video for my most recent YouTube upload, Part 5 of my all-too-long, bad weather flight to McMinnville this past May.

First, you need to understand what goes into editing these videos. The short version is this: I take clips from multiple cameras and place them in the editing timeline (see below). I then move one or more of the clips to sync them up. For example, if the front-facing camera shows my left hand in the air, fingers spread wide, the back-facing camera should show exactly the same thing. This way, when I move or speak, the two views show the same motions and my lip movements correspond to my speech.

The front-facing video, which is the preferred view for my cockpit POV videos, also has the voice track, synchronized by the camera (of course) and sourced from a special cable connection to the helicopter’s intercom system. Simply said, whatever I hear in my headsets is sent through that cable to the camera, whether it’s me speaking into my mic or someone on the radio talking. The rear-facing video picks up ambient sound inside the helicopter, which is mostly the sound of the engine and rotor system.

So if I sync these two camera feeds properly, the helicopter sound should correspond with the phase of flight. This latest video shows this quite well near the beginning; as you see me bend forward to start the helicopter, you hear the sound of the helicopter’s engine starting.

Timeline View
This is what my Part 5 video looks like in Davinci Resolve, the editing software I use. The top two tracks are for my logo watermark and some of the callouts that appear. The next track is for the rear-facing PIP video clips with a few more of those callouts. (Honestly, the callouts should probably all be on the same track, but I’m sloppy.) The next track is for the front-facing camera. Below that are the two audio tracks: intercom audio (my voice, radio calls, etc.) and the sound of the helicopter, dialed down by 10 decibels.

In cruise flight, the helicopter sound is a pretty consistent drone. So consistent, in fact, that I have learned that I can patch in that sound from an unrelated flight if, for some reason, the actual sound from a flight is not available. The only time it makes a different sound is if I’m maneuvering: slowing down, making a turn, coming in for landing, etc.

With me so far?

I’ve grown to realize that although I can do a picture-in-picture (PIP) video that shows the view out the cockpit bubble with a smaller view with me in a corner, no one really needs to see me for a whole flight. I like to show me when I’m talking before or after a flight or if I’m “lecturing” about something and my face gets expressive. So once the two video feeds are synced, I’ll usually cut the back-facing video (but not audio) to give viewers a better look out the window.

Now because my videos are so long, they normally have multiple video files from each camera. That’s easy enough to deal with: when one clip ends, I just insert the next one, being sure to butt it up against the previous one. I do this for both views, even if I don’t plan on showing the back-facing view. After all, I still need the corresponding helicopter engine audio, don’t I? I just separate the video from the audio on that back-facing video and put the video portion on a hidden track so it doesn’t appear. Later, when I know I don’t need that portion of video track, I just delete it from the timeline.

And that’s when something weird happened yesterday. I was constructing the edited video, watching and listening to it as I worked. It was near the end and I was getting close to my destination, but I was still at full cruise speed. Yet the engine sounded wrong. It sounded as if I’d reduced power.

What the hell? I asked myself. What’s going on with the engine? Why didn’t I notice that when I was flying?

And then I looked at the corresponding back-facing video. I saw that it was no longer aligned with the front facing video, despite me adding each clip properly to the end of the clip before it. Although I was in normal cruise flight in the front-facing camera, I was coming in for landing on the back-facing video. Turns out that the back-facing camera had shut off recording along the way and then turned itself back on. (If you’ve watched enough of my videos, you know I have a finicky camera.) As a result, I had a gap in the recording.

Of course, this required me to jump through a few hoops to “fix” the problem. I basically reused some cruise flight audio to fill the audio gap, then synched up the two views for landing so the engine sound would match the phase of flight. (It’s workable, but not perfect.) If you watch the video to the very end, you’ll see that I also brought the PIP image back in and got the synching just right. You probably wouldn’t even notice the problem if I didn’t just tell you about it.

But my point is this: when you fly the same aircraft so much, you become in tune with its sounds. I immediately noticed the problem when I watched the video and couldn’t understand, at first, why I hadn’t noticed the engine sound difference in flight. The reason, of course, is that it didn’t happen then, when I was in cruise flight. It happened later when it should have. There was nothing to notice in flight.

If you’re a pilot and you’ve been flying long enough in the same aircraft to to know it well, you should notice changes in the engine sound for different phases in flight. The engine is talking to you. It should be reacting to what you tell it to do. In a way, you’re communicating with each other.

But when your engine starts leading the conversation, you’d better be listening to it.