What I’ve found useful.
 Juvenile Robin captured at f/5.6, 1/30 second, ISO 400 with 300mm lens.
Let me start again with this disclaimer: I am not a professional photographer. I am a relatively serious amateur who happens to have a bit of extra cash now and then to invest in decent quality — but not professional grade — camera equipment.
Yet I made all three of the bird photos in this blog post and a bunch of others I’m pretty proud of.
I believe in simplicity when doing photography. I don’t like to carry around a lot of stuff. I feel that the more crap you carry around and have to juggle to get the shot, the less likely you are to capture the fleeting images that we see — and miss — every day. And there’s nothing more fleeting than wildlife, especially birds and insects.
After yesterday’s impromptu shoot from my camper — when I went outside barefoot in an attempt to photograph a killdeer mother and her three chicks — I realized that there are only three pieces of equipment a serious amateur wildlife photographer needs:
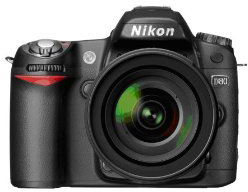
A decent quality digital SLR. Mine is a Nikon D80. It’s two years old and it does what I need it to do. My husband just got a D90 and it looks like another good option. Some folks like Canon equipment. That’s supposed to be very good, too. (My favorite point-and-shoots were always tiny Canon PowerShots — but they’re really not appropriate for serious photography.) The important thing is that it offers all the features of an SLR camera, including various modes so you can shoot with aperture or shutter speed priority, with manual settings, or using the camera’s built-in programming. And, of course, it needs to support interchangeable lenses.
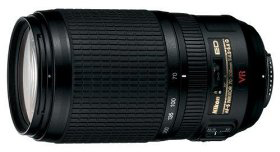
A good fixed focal length or zoom telephoto lens. I’m talking 300mm or better here. I have a Nikkor 70-300mm f4.5/5.6 ED-IF AF-S VR Zoom Lens. This is not a cheap lens; don’t get suckered in to buying the cheaper version of this — or any other lens — if you can afford the better lens. AF stands for autofocus, which I actually need, as my vision deteriorates. VR stands for vibration reduction. There’s some kind of a motor inside the lens that kicks in to steady the image when needed — usually when I zoom in to 300mm. If you’re an old film photographer, keep in mind that most digital cameras, for reasons I’m not 100% clear on, have different focal length equivalents from your old film camera. On my Nikon, it’s a 1.5 ratio. That means a 300mm lens on my Nikon D80 is equivalent to a 450mm lens on my old Nikon 6006. That’s a lot of magnification.
A good quality monopod. Yes, a tripod would be steadier, but I simply cannot capture those fleeting moments when I’m fiddling with a tripod head to get my camera set up right. I know because I tried my tripod first yesterday. I got fed up within 60 seconds and switched to the monopod. My monopod is a Manfrotto 679B with three sections. It has a foam grip and rubber foot and makes an excellent walking stick for hiking. I bought it over a year ago and didn’t use it for six months. I tried using it with video and it wasn’t steady enough for me. But it’s perfect for still photos using that big zoom lens.
Now put the lens on the camera and the camera on the monopod. Resist the urge to take along any other lenses or equipment. Go to a place where you know there will be wildlife. Extend the leg of your monopod so the camera is about level with your face. Be quiet. Wait. When the wildlife comes, point and shoot.
If you’ve been following this blog, you know I’m living in a trailer parked in the small RV park at a golf course. Every night they water the lawn between the sites. Every morning and evening the birds come out to pick in the grass for worms and other goodies.
There’s a family of killdeer that absolutely taunts me. I see them from my window every day: a mom and three chicks. The chicks are adorable; miniature versions of the mom. I’ve been trying to photograph them for days, but they’re extremely skittish and run off across the parking lot as soon as they see me.

Juvenile Robin, captured at f/5.6, 1/60 second, ISO 400 with a 300mm lens.
I tried again yesterday. When they ran off, I set my sights (and lens) on a number of baby robins. The photos in this blog post are the result. I used the equipment listed here. The camera was set to program mode. No flash (of course).
I shot 79 photos in the span of about 30 minutes. I never ventured farther away from my camper than 150 feet. I couldn’t; I was barefoot! (Next time I’ll remember to throw on a pair of shoes.) I was shooting two juvenile robins at the base of a tree when they suddenly flew up into the tree. They perched on low branches well within reach of my lens. I got many good shots of them but I think these are among the best. The other shot was taken a bit later when a mother bird came to drink and bathe at a puddle near her “baby.”

Mother robin showing her baby how to bathe, captured at f/5.6, 1/400 second, ISO 400 with a 300mm lens.
The two bird close-ups are full-frame photos — not cropped at all. The photo of the mom and her baby is cropped; I discovered that when you get too close to a robin and her young, the robin will fly off, leaving the baby behind. So I kept my distance for this shot to include both of them.
Anyway, the point of all this is to remind photographers that they don’t need a lot of fancy equipment to get good wildlife photos. What’s more important is having quality equipment, some kind of steadying platform for the camera, and patience. Go where the wildlife will be. Wait. If you can get into a kind of hidden position, great.
I’m sure I’ll be repeating this exercise again soon. I still need to capture those elusive killdeer.
 About a month ago, before I left home for the summer, I stumbled upon the Distributed Proofreaders Web site. The best way to describe the site is to echo the text on its home page under Site Concept:


