A guest post for WordCast.
About this Post
I wrote this post to complement my participation in a Blog Productivity panel podcast for WordCast. I was invited by Lorelle (of WordPress fame), and I really enjoyed participating. If you listen to the podcast, it’ll soon become clear that I’m the “odd man out” (so to speak) in that I do things a bit differently than the rest of the pack. The podcast is full of great tips from all panelists and definitely worth a listen if you’re serious about blogging. This post appeared on the WordCast site earlier in the week. I might not be the most influential blogger you’ve ever heard of — if you’ve heard of me at all. Or the most prolific. But I’m probably one of the most experienced: I’ve been blogging since October 15, 2003.
Still, I was extremely pleased to be asked to join a panel of expert bloggers for a recent WordCast podcast about blogging productivity. The folks at WordCast asked me to follow-up with a blog post sharing some of my tips. I can’t help thinking that my co-panelist’s tips were better, but here’s what I have to offer.
1. Create and Stick to a Blogging Schedule
One of the most important things about keeping a blog is adding new content regularly. “Regularly” is a tricky word. It doesn’t have to mean every day. It just means often enough to keep your readers checking in for more.
For example, suppose your life gives you enough free time that you can post once or twice a day for a few weeks or months. Suddenly, however, life takes as turn and that blogging time is gone — or you get bored with your blog and put it on the back burner. Go a week without posting something new and the folks who check in regularly for your words of wisdom may stop checking.
While I realize this is an extreme example, it does illustrate my point: regular readers will pick up on the rhythm on your posting and expect you to stick with it. When you don’t, they move on.
The way to prevent this from happening is to create a posting goal and schedule time to write. Perhaps you think twice a week is a good frequency. Pick two days a week — Tuesday and Friday? — pick a time that works for you — at breakfast with your morning coffee? — and blog on schedule. Make it part of your routine, part of your life.
I try to get a new blog post out at least five days a week. My schedule has me sitting in front of my laptop with my morning coffee every morning I can. Since I’m an early riser — usually up by 6 AM — I usually get my blog post done before I start my work day.
Got something coming up that’s likely to break your schedule? Vacation? Business trip? Family commitments? Write extra posts when you can and schedule them to appear in the future. This is particularly handy if your topic is not time-sensitive or you know you’ll be unable to blog on schedule in the future. Here are two suggestions:
- Long posts can often be cut it into multiple parts with each part scheduled to appear on a different day. Not only does this stretch a single work out to fill a posting schedule, but if done properly, your readers will make sure they come back for the subsequent parts.
- Do double-duty and write two posts at a sitting, scheduling one of them to appear in the future. If you’re able to write a lot very quickly, you can actually write a week’s worth of content at one sitting. No one has to know that each day’s new post was actually written some time ago.
2. Take Notes
How do you know what to blog about? One way is to take notes. As ideas and thoughts come to you — either from the workings of your own mind or from something you read online or heard in a conversation — jot them down. If you spend enough time thinking and reading and listening, you should be able to accumulate plenty of ideas.
Call me old-fashioned, but I don’t use software or web-based tools such as Evernote to organize notes and clippings. I use paper. I keep spiral-bound notebooks on my desk and in my computer bag and make notes as things come to me. When I’ve processed the note — blogged about it, made the call, tracked down the Web site, ordered the product, etc. — I recycle the paper. The huge file containing all my thoughts and ideas is my blog.
The point is, it doesn’t matter how you take notes. The important thing is to take them. Keep track of the little ideas that pop into your head when you’re in the shower or driving. Write down the key words of a conversation that’ll help you remember what you found so intriguing. Then, when you’re ready to compose a blog post, you’ll have most of the material you need to get it written.
Don’t get me wrong: I’m not knocking software tools. I just can’t be bothered climbing up the learning curve to use them effectively. Pen and paper works for me.
3. Automate!
There are lots of software tools and solutions out there to help automate tasks. After all, isn’t that what computers are for? To do the work and make our lives easier?
Here are three examples of tools I use to automate blogging-related tasks:
- Delicious with Postalicious. Delicious is a bookmarking Web site. You read a Web page, want to remember it, and create a Delicious bookmark with its URL and a description and tags you specify. I’ve been using Delicious for years, since it could be found only at http://del.icio.us. Postalicious is a WordPress plugin that creates a blog post based on your new Delicious entries and the descriptions you provide. It then automatically posts the links entry to your blog at a predetermined time. You can find plenty of examples on my blog. Postalicious also works with other services, such as ma.gnolia, Google Reader, Reddit, or Yahoo Pipes. I rely on this combination of tools to collect and share Web-based content that I found interesting and want to share with my readers. The format isn’t perfect, but it’s certainly good enough for my needs. Oh, and one more thing: I use the RSS feed for my Delicious bookmarks to generate a list of recently bookmarked pages in the sidebar of my blog.
- Twitterfeed with Twitter. Twitter is an incredible tool for communicating short snippets of information with other people all over the world. (If you haven’t heard of it or tried it, crawl out from under that rock, brush the dust and cobwebs off your clothes, and join the rest of the social networking community.) Twitterfeed is a Web-based service that scans your blog’s RSS feed and tweets links to your new posts. This is a great, automatic way to tell your Twitter followers about new content on your blog.
- Feedburner’s Email Subscriptions. Feedburner is a service that modifies your RSS feed to add features. Although it was started as an independent service, it’s now part of Google, so you need a free Google account to take advantage of its features. The Email Subscriptions feature creates e-mail messages based on your RSS feed and sends them out to subscribers. The subscription list is maintained inside Feedburner, so you don’t have to deal with it; users can add and remove themselves without bothering you. This is a great way for folks who want to read your content regularly to get it on a timely basis without using RSS readers. Best of all, once you set it up, it’s automatic.
Conclusion
When thinking about blog productivity, it all comes down to working smart. Make blogging part of your life schedule. Keep notes about the topics you find interesting so you have plenty of topics to write about when you’re ready to blog. And automate tasks whenever possible.
These are just three tips. Give it some thought — or read the blog posts of my co-panelists here — for more.
About the Author
Maria Langer is a freelance writer who has been writing about computers and the Internet since 1990. She’s the co-author of the first-ever book on WordPress and has since authored three WordPress video titles for Lynda.com. Maria’s also a commercial helicopter pilot and serious amateur photographer. Her blog, An Eclectic Mind, can be found at aneclecticmind.com.
 If you read about my trip to the Parker 425 this year, you may recall a certain incident involving an unbuckled seatbelt. I thought the problem was simply cosmetic — a job for a paint shop. But my mechanic believes it might be beyond just cosmetic. He thinks a few of the tiny dents may have compromised the integrity of the fuel tank behind those dents.
 The course stretches about 30 miles across the open desert east of Parker, zig-zagging on existing dirt roads, including more than a few power line roads. The land out there is mostly old sand dunes like those shown in this photo. (This photo was taken from about 800 feet AGL; the dots are bushes about 3-5 feet tall.) The land here is remote and mostly barren. A bold pilot could fly 50 feet AGL without fear of hitting anything. Except, of course, the power lines.
 Track locations are identified by mile number. There are no visible markers, though — that would make it too easy. Instead, if you’re lucky you have a copy of the course map and have secured it to something so you can consult it in flight. Remember, at least one door is off, so the wind is whipping around the cabin and loose paper is not an option. Although you could put all the mile markers in your GPS, that would make quite a mess. So I just have about 10 points in my GPS and I can use them to home in on the point I need to get to.
 One of the videographers (A) claimed he weighed 260 lbs. I added 10 pounds, as I usually do, for clothes and equipment. I then calculated my weight and balance several ways, hoping he’d choose a back seat location with his 190-lb still photography companion beside him. Earth to video professionals: If you want to do aerial photography from a helicopter, slim down. If you want OGE hovers and aggressive maneuvers, your pilot will need all the performance he can get.
 Only one of the videographers (B) had ever worn a harness before. I’d brought mine along and he was very happy to have it. He climbed right in and hooked up. I had to assist the other two with the harness. Tragically, C did not fasten the seatbelt behind him before sitting down and the buckle slipped out of the open door during flight. Dangling there in the slipstream, it did serious damage to the paint on the left side of the helicopter. I can’t imagine how he didn’t see or hear the metal buckle banging, but, as I said earlier, he wasn’t entirely there.
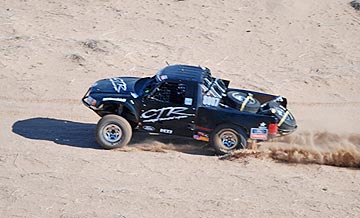 Chase mode. In chase mode, you pair up with the vehicle, putting the photographer(s) in position to shoot. That often means dropping down to 50-100 feet over the desert floor. It almost always means matching the speed of the vehicle you’re chasing. On straight, smooth stretches of road — like one of the power line roads — the vehicle could be going over 100 miles per hour. On roads cutting through lava beds or through canyons or zig-zagging around high tension power line towers, the vehicle could be moving at just 30 miles per hour. The pilot’s job is to keep on the target, always watching out for obstacles and other aircraft, listening to the instructions of the photographer: higher, lower, faster, slower, right, left. It’s tricky when you don’t have brakes or 0-to-60-in-5-seconds acceleration capabilities. I prefer having the photographer sit behind me so I can see the action as well as he can, but that’s not always possible. With two photographers on the left side of the aircraft, I usually can’t see the vehicle — although I can often hear the sound of its engine and passing horn — through my noise canceling headsets and over the sound of the helicopter! — if I’m properly lined up with it. When the photographer has enough footage shot alongside the vehicle, he sometimes asks me to position myself for what I call photo mode.