Why I’m Watermarking All of My “Good” Photos

And why other serious photographers should, too.

Bowman Lake
This photo of Bowman Lake at Glacier National Park appears in my photo gallery, Flying M Photos.

The watermark / copyright notice argument goes back and forth all the time.

On one side are the bloggers and readers of Web content who have created and seen more crap online than the rest of the human race combined. These people claim that copyright notices on photos are tacky and make the photos look ugly. They go on to say — and there is definitely some truth to this — that the average photo on the Web is so poor in quality that the photographer has no need to worry about it being stolen.

On the other side are the serious — or possibly professional — photographers who want to show off their work online but protect it from theft. These people are tired of seeing the results of their hard work and investment in costly equipment appearing on someone else’s Flickr account or in blog posts. Or, as in my case, in an e-mail postcard sent to me.

Why People Steal Photographs and other Web Content
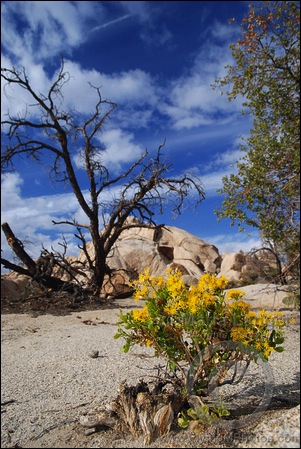
Joshua Tree Bouquet
I clearly recall lying on my stomach on cold rock to get the right angle for this shot. Photographed at Joshua Tree National Park.

There are two reasons why people steal photographs and other content they find on the Web:

  • They mistakenly believe that anything that appears on the Web is in the public domain. This is not true. Most Web content is protected by the same copyright law as the most recent Dan Brown masterpiece of fiction (yes, I’m being sarcastic) or Black Eyed Peas single (do they still call them that?) or Pixar animated feature film. When these people honestly don’t know any better, they’re making an honest mistake. But when they’re told they’re infringing someone’s copyright and they refuse to believe it, they’re being downright stupid and putting themselves in the next group of people.
  • They simply don’t care about the rights of content creators. These people know that what they’re doing is wrong but they simply don’t care. Perhaps they think they’ll get away with it. Or that since everyone does it, the content creator won’t bother trying to stop them. They’re wrong. Many bloggers, photographers, and other content creators actively pursue copyright infringers — and win in court.

I follow many photographers on Twitter and have seen more than one of them complain about their work being used elsewhere without their permission. In many cases, a bunch of us will “gang up” on a copyright infringer to attack him/her for his actions in blog or photo comments. This usually gets some kind of result. A properly prepared DMCA Takedown Notice usually does a better job.

Just Say No to Flickr

In one blatant case I recall on Flickr, a woman was stealing photos from photographers all over the Web and passing them off as her own. If she really had such a huge, diverse library of quality photos, she’d be famous. But all she had was a big, diverse collection of quality photos she’d stolen from other photographers, removing any copyright notices she found along the way. It was quite easy to convince the powers that be at Flickr that she was a thief. Flickr closed down her account. Has she learned her lesson? Who knows?

The worst thing about Flickr is that if someone steals a photo and puts it on his/her Flickr account under a Creative Comments Attribution License, anyone else is free to use the image if they give the Flickr user credit. That means that not only is he/she making a photographer’s work “legal” to reproduce, but he/she will get credit instead of the photographer!

As you can imagine, I don’t use Flickr. It simply makes content theft too easy.

Why I’m Watermarking

I’ll be the first to agree that watermarking photos — putting a visible copyright notice on the face of a photo — can be downright ugly. Depending on how it’s done, it can really detract from the aesthetics of the photograph as a whole. That’s why I’ve avoided them for so long.

But the other day, I got an e-mail from one of Flying M Air‘s aerial photography clients. He’d given me permission to include some of his images on Flying M Air’s Client Photos page (since removed). Flying M Air has an unusual photo format. Each photo is brought into Photoshop, given a yellow background, white border, and drop shadow. It’s then tilted 2° or 3° to give it the feel of a photo album. I purposely use small images, not only to offer more room for text but to make the photos less useful to a thief. Unfortunately, one of his photos had been stolen and it appeared in a Flickr photo stream. The photographer was certain it had come from my site. He said that he’d given me permission to reproduce them, but only if I watermarked them. (I honestly don’t remember the watermark requirement.) To avoid problems in the future, I simply removed his photos from my site. If he experiences any more theft, it won’t come from me.

But the whole thing got me thinking. Here was a professional photographer whose work was being lifted from a third party site and being displayed on yet another site. He’d relied on me to watermark his work. Wouldn’t it have been better if he simply watermarked it himself?

And wouldn’t it be better if I simply watermarked my best work myself?

You might be asking why: what’s the purpose?

The purpose is education. While a watermark probably won’t deter a content thief who simply doesn’t care that he’s stealing from me, it might educate the person who thinks all content on the Web is free to take and use as desired. Or it might protect my work from the person who thinks that only those photos with a copyright notice are protected.

My client issued a takedown notice to the person who stole his photo from my site. The photo was immediately removed. I like to think that the person who stole it simply didn’t know any better. Now he does.

Zenfolio

I should mention here that in addition to my photoblog, I also maintain a library of images at a custom Zenfolio site. Zenfolio is a photo sharing site that offers a number of features a service like Flickr doesn’t offer. For example:

  • I can have my own domain name (www.FlyingMPhotos.com).
  • I can sell photos using format I specify — and actually profit from a sale.
  • I can create custom watermarks that are automatically placed on each image for display.
  • I can limit the sizes of photos that can be displayed.
  • I can customize the appearance of my photo gallery pages.

Wildflowers
I photographed these wildflowers near a mine site last February.

The list goes on and on.

Yes, I do pay an annual fee for this service. But I think it’s worth $100 a year to have control over how my photos are displayed and offered for sale. And I like the fact that my Zenfolio portfolio is completely separate from all others. On services like Flickr and Red Bubble (which I used to use), your photos are simply part of a much larger portfolio of diverse and often quality-challenged work. People who visit my portfolio aren’t exposed to that — unless they want to be.

I like the way Zenfolio places watermarks on images. They’re visible yet don’t need to jump out of the photo at you. I chose the same method for my photo blog; you can see it on all the images on this post. I used Photoshop to create the notice, applied an Emboss filter, saved it as a PNG with transparent background, and then applied it to photos with 20% to 50% opacity. Done.

What Do You Think?

I’d be very interested in hearing what other serious and professional photographers think about watermarking images. I’d also like to see examples of what photographers think are successfully applied watermarks. Use the comments link or form for this post to share your thoughts, horror stories, and links to one or two of your watermarked images.

I’m not interested in hearing from Internet trolls who want to criticize concerned photographers for wanting to protect their work. Or people who want to argue that Internet content is not copyrighted — get with the program already, folks.

Annual Inspection Blues

It might not just be cosmetic.

My helicopter’s annual inspection was started yesterday. My old Robinson mechanic from Prescott came down with a knowledgeable assistant to do the job in my Wickenburg hangar.

Just for fun, I set up my old Canon G5 camera on a tripod with my Pclix timer and created a time-lapse movie of the job. The shots were taken 30 seconds apart and then compiled into a movie at 6 frames per second. Here’s the resulting movie:

Kind of fun, huh?

For those who aren’t familiar with the inspection requirements for aircraft in the U.S., here’s a quick summary:

  • Every year, the aircraft is required to have an annual inspection. This inspection requires an A&P mechanic to remove various panels and inspect parts normally hidden from view. It also includes an oil change, various filter changes, and a bunch of other stuff. It’s a calendar-based inspection.
  • Commercially operated aircraft are also required to have 100-hour inspections. These are virtually the same as annual inspections — in fact, its common for aircraft owners to substitute an annual inspection for a 100-hour inspection if it doesn’t appear that they will fly another 100 hours before the annual inspection is due. My helicopters have always been operated commercially, so I’ve always gotten these inspections.
  • Other time-based inspections or maintenance. These are things like oil changes (every 25 or 50 hours), magneto inspections/rebuilds (every 300 hours), gearbox oil changes, belt changes, avionics tests, etc.

The cost of an inspection or maintenance item varies depending on the age and condition of the aircraft, the type of inspection, and the mechanic’s knowledge and ability to get the job done quickly but thoroughly. The cost of an inspection can also rise considerably if the mechanic actually finds something that needs attention.

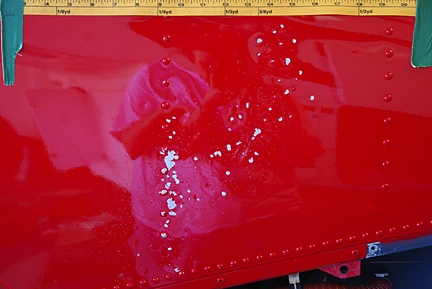
Dented TankIf you read about my trip to the Parker 425 this year, you may recall a certain incident involving an unbuckled seatbelt. I thought the problem was simply cosmetic — a job for a paint shop. But my mechanic believes it might be beyond just cosmetic. He thinks a few of the tiny dents may have compromised the integrity of the fuel tank behind those dents.

Keep in mind that I’ve flown the helicopter at least 6 hours since the event. No fuel leaks, no indication of a problem. The fuel tanks are nearly full right now — and have been full three times since then. No leaks.

But that doesn’t mean the dinged tank might not develop a crack or a leak. At least that’s what I’ve been told.

A new one from the factory will cost $3,700. Plus paint. Plus installation.

Take my advice: be a pilot but not an owner.

Flying the 2010 Parker 425

This year’s experience with the race.

Best in the Desert‘s Parker 425 off-road race is a huge event in Parker, AZ. Attended by thousands of people with hundreds of entries, the race begins just before dawn and ends — at least for some racers — after nightfall.

Sand DunesThe course stretches about 30 miles across the open desert east of Parker, zig-zagging on existing dirt roads, including more than a few power line roads. The land out there is mostly old sand dunes like those shown in this photo. (This photo was taken from about 800 feet AGL; the dots are bushes about 3-5 feet tall.) The land here is remote and mostly barren. A bold pilot could fly 50 feet AGL without fear of hitting anything. Except, of course, the power lines.

This was my third year flying at the race and, by far, my busiest. I flew for three separate clients and even took a local couple for a quick ride so they could photograph their business and home from the air. I learned a bunch of things that I want to document here, for my own reference and for other pilots’ consideration.

Navigating

Finding your way around the course can be a challenge. If you don’t stay on the track, you can easily lose it in the vast empty desert. This is especially true if there’s been some rain and there’s no dust. If there’s dust, you can see the racers from miles away with just a few hundred feet of altitude.

Parker 425 MapTrack locations are identified by mile number. There are no visible markers, though — that would make it too easy. Instead, if you’re lucky you have a copy of the course map and have secured it to something so you can consult it in flight. Remember, at least one door is off, so the wind is whipping around the cabin and loose paper is not an option. Although you could put all the mile markers in your GPS, that would make quite a mess. So I just have about 10 points in my GPS and I can use them to home in on the point I need to get to.

The Photographers

I flew a total of three professional videographers, one professional photographer, and three amateur photographers around the race course this year.

Let’s take a closer look at the video guys, since they’re the most interesting to me. We’ll call them A, B, and C.

  • Two of the three videographers (A and B) were seasoned professionals with either prosumer or professional video equipment. They were a pleasure to work with. The third (c) was a young guy who was obviously very new to the game. He was doing video with a Canon DSLR hooked up to an awkward shoulder rig. His attitude was cocky and he didn’t seem able to either give or follow instructions. In fact, he didn’t seem very alert and I wonder whether his young mind is fully operational. (More on that in a moment.) After the flight, when we were settling up the bill (paid by his client), he told his companion that he was going to charge extra for the aerial work. (As if he’d paid for the helicopter.) I was so put off by his attitude and behavior that I will not fly him again — and that’s something I seldom say.
  • CGOne of the videographers (A) claimed he weighed 260 lbs. I added 10 pounds, as I usually do, for clothes and equipment. I then calculated my weight and balance several ways, hoping he’d choose a back seat location with his 190-lb still photography companion beside him. Earth to video professionals: If you want to do aerial photography from a helicopter, slim down. If you want OGE hovers and aggressive maneuvers, your pilot will need all the performance he can get.
  • Only one of the three videographers (B) had ever shot video from a helicopter before. He understood the benefit of sitting behind the pilot so the pilot can see what he sees. He probably got a lot more and better video for his time because of the simple fact that he didn’t have to direct me. I could see the racer as well as he could. The other two videographers didn’t understand the importance of positioning. A insisted on sitting in the front, despite the fact that his heavy weight in such a forward position made us front-heavy (see W&B charts here), which, in turn, limited my maneuvers. The only reason C sat in the back was because he was accompanied by a still photographer and I had to put them both on the same side so they could shoot at the same thing at the same time.
  • Because A sat up front, he shot at least 50% of his video through the front bubble window of the helicopter. I estimate that 75% of that video will be unusable because of glare.
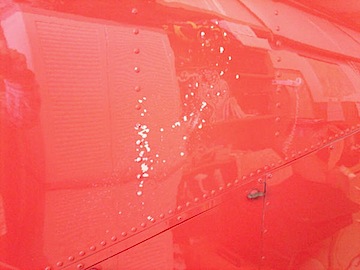
  • Seatbelt DamageOnly one of the videographers (B) had ever worn a harness before. I’d brought mine along and he was very happy to have it. He climbed right in and hooked up. I had to assist the other two with the harness. Tragically, C did not fasten the seatbelt behind him before sitting down and the buckle slipped out of the open door during flight. Dangling there in the slipstream, it did serious damage to the paint on the left side of the helicopter. I can’t imagine how he didn’t see or hear the metal buckle banging, but, as I said earlier, he wasn’t entirely there.
The Flying

The flying can be intense. I’ve written about it before, so I won’t go into very much detail here. Perhaps a more analytical look is in order. I can break the flying down into different phases or activities:

  • Point-to-point travel. In most cases, the photographer(s) on board are interested in shooting just one or maybe a few specific vehicles. When they get on board, they often have a general idea of where those vehicles are. So if the photographer tells you the truck just passed mile marker 38 and you’re at the airport, you have to haul ass out to the middle of the desert to pick up the truck somewhere beyond mile marker 38. The best way to do that is to cruise at top doors-off speed — which is 100 knots for an R44 — in as straight a line as you can. Avoid the track to avoid other aircraft. Pick up the track somewhere around the mile marker where the truck was when you left the airport 20 or more minutes before and drop down into the next mode: search.
  • Search mode. In search mode, you’re actively looking for a specific vehicle. You have the vehicle number and usually know what kind of vehicle it is (i.e., truck, buggy, jeep, etc.) and what color it [mostly] is. If you’re lucky, you have a photo of the vehicle — one of my videographers (B) had an excellent illustrated sheet that actually had photos of the four trucks we needed to find, all on one page. So in search mode, you drop down low enough to actually read the numbers on the roof or hood or side panel of each vehicle. The very best way to do this if you don’t know where the vehicles might be is to move backwards along the track so the vehicles are coming to you as you’re moving towards them. This way, you pass more vehicles more quickly. But if you’re playing catch-up, you’re coming up behind the vehicles. They’re doing 30 to 120 miles per hour, depending on the vehicle, driver, and road conditions, so there’s often up to four minutes between vehicles, especially after the first lap. The whole time, you’re watching out for other helicopters and obstacles while you and your spotter/photographer are trying to identify vehicles as you pass them. When you find the one you need, someone usually shouts out, “That’s it!” and you drop into the next mode: chase.
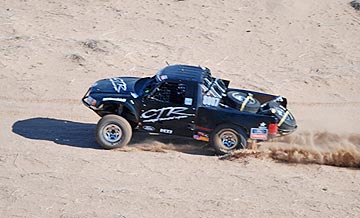
  • Desert Racing TruckChase mode. In chase mode, you pair up with the vehicle, putting the photographer(s) in position to shoot. That often means dropping down to 50-100 feet over the desert floor. It almost always means matching the speed of the vehicle you’re chasing. On straight, smooth stretches of road — like one of the power line roads — the vehicle could be going over 100 miles per hour. On roads cutting through lava beds or through canyons or zig-zagging around high tension power line towers, the vehicle could be moving at just 30 miles per hour. The pilot’s job is to keep on the target, always watching out for obstacles and other aircraft, listening to the instructions of the photographer: higher, lower, faster, slower, right, left. It’s tricky when you don’t have brakes or 0-to-60-in-5-seconds acceleration capabilities. I prefer having the photographer sit behind me so I can see the action as well as he can, but that’s not always possible. With two photographers on the left side of the aircraft, I usually can’t see the vehicle — although I can often hear the sound of its engine and passing horn — through my noise canceling headsets and over the sound of the helicopter! — if I’m properly lined up with it. When the photographer has enough footage shot alongside the vehicle, he sometimes asks me to position myself for what I call photo mode.
  • Photo mode. Let’s face it — minute after minute of footage shot alongside a racing vehicle can get dull after a while. A good videographer will vary his shots. So I might be asked to circle the vehicle or cross in front of it or behind it from a certain direction at a certain speed. Good videographers can envision the shots and I’ve done enough work with them to envision them, too. I also use photo mode in locations where the track bends and curves around itself. “The Python” at the Parker 425 is a perfect example. It’s supposedly 11 miles of track in an area roughly 1/2 mile by 1-1/2 miles in size, right next to the airport. The pits are in there, too. There are lots of banked curves, short straightaways, and huge humps in the road. Spectators all around, just ready to get hit by flying sand as they snap photos with their cell phones and feel the adrenaline surge with each roaring truck that passes. This is what the photographers want to capture — real action. And this is where an inexperienced pilot or an overweight aircraft is most likely to get in trouble. There’s hovering and tight turns at low altitude. Add a crosswind or tailwind and flying in photo mode is a recipe for disaster.

Conclusion

This was my best Parker 425 ever, in terms of work. It was also my most costly: between the ferry time, which was only partially compensated, two overnight stays with meals, and the damage to the side of my aircraft, I’ll likely net zero profits for the trip. But it was a good experience and a lot of fun.

I really do love this kind of flying.

Note to Readers: If you have any photos or videos of a bright red Robinson R44 in action over the Parker 425 for 2008, 2009, or 2010, please get in touch. I’d love to show it off on this blog or the Flying M Air Web site.

Three Productivity Tips from a Long-Time Blogger

A guest post for WordCast.

About this Post
I wrote this post to complement my participation in a Blog Productivity panel podcast for WordCast. I was invited by Lorelle (of WordPress fame), and I really enjoyed participating. If you listen to the podcast, it’ll soon become clear that I’m the “odd man out” (so to speak) in that I do things a bit differently than the rest of the pack. The podcast is full of great tips from all panelists and definitely worth a listen if you’re serious about blogging. This post appeared on the WordCast site earlier in the week.

I might not be the most influential blogger you’ve ever heard of — if you’ve heard of me at all. Or the most prolific. But I’m probably one of the most experienced: I’ve been blogging since October 15, 2003.

Still, I was extremely pleased to be asked to join a panel of expert bloggers for a recent WordCast podcast about blogging productivity. The folks at WordCast asked me to follow-up with a blog post sharing some of my tips. I can’t help thinking that my co-panelist’s tips were better, but here’s what I have to offer.

1. Create and Stick to a Blogging Schedule

One of the most important things about keeping a blog is adding new content regularly. “Regularly” is a tricky word. It doesn’t have to mean every day. It just means often enough to keep your readers checking in for more.

For example, suppose your life gives you enough free time that you can post once or twice a day for a few weeks or months. Suddenly, however, life takes as turn and that blogging time is gone — or you get bored with your blog and put it on the back burner. Go a week without posting something new and the folks who check in regularly for your words of wisdom may stop checking.

While I realize this is an extreme example, it does illustrate my point: regular readers will pick up on the rhythm on your posting and expect you to stick with it. When you don’t, they move on.

The way to prevent this from happening is to create a posting goal and schedule time to write. Perhaps you think twice a week is a good frequency. Pick two days a week — Tuesday and Friday? — pick a time that works for you — at breakfast with your morning coffee? — and blog on schedule. Make it part of your routine, part of your life.

I try to get a new blog post out at least five days a week. My schedule has me sitting in front of my laptop with my morning coffee every morning I can. Since I’m an early riser — usually up by 6 AM — I usually get my blog post done before I start my work day.

Got something coming up that’s likely to break your schedule? Vacation? Business trip? Family commitments? Write extra posts when you can and schedule them to appear in the future. This is particularly handy if your topic is not time-sensitive or you know you’ll be unable to blog on schedule in the future. Here are two suggestions:

  • Long posts can often be cut it into multiple parts with each part scheduled to appear on a different day. Not only does this stretch a single work out to fill a posting schedule, but if done properly, your readers will make sure they come back for the subsequent parts.
  • Do double-duty and write two posts at a sitting, scheduling one of them to appear in the future. If you’re able to write a lot very quickly, you can actually write a week’s worth of content at one sitting. No one has to know that each day’s new post was actually written some time ago.

2. Take Notes

How do you know what to blog about? One way is to take notes. As ideas and thoughts come to you — either from the workings of your own mind or from something you read online or heard in a conversation — jot them down. If you spend enough time thinking and reading and listening, you should be able to accumulate plenty of ideas.

Call me old-fashioned, but I don’t use software or web-based tools such as Evernote to organize notes and clippings. I use paper. I keep spiral-bound notebooks on my desk and in my computer bag and make notes as things come to me. When I’ve processed the note — blogged about it, made the call, tracked down the Web site, ordered the product, etc. — I recycle the paper. The huge file containing all my thoughts and ideas is my blog.

The point is, it doesn’t matter how you take notes. The important thing is to take them. Keep track of the little ideas that pop into your head when you’re in the shower or driving. Write down the key words of a conversation that’ll help you remember what you found so intriguing. Then, when you’re ready to compose a blog post, you’ll have most of the material you need to get it written.

Don’t get me wrong: I’m not knocking software tools. I just can’t be bothered climbing up the learning curve to use them effectively. Pen and paper works for me.

3. Automate!

There are lots of software tools and solutions out there to help automate tasks. After all, isn’t that what computers are for? To do the work and make our lives easier?

Here are three examples of tools I use to automate blogging-related tasks:

  • Delicious with Postalicious. Delicious is a bookmarking Web site. You read a Web page, want to remember it, and create a Delicious bookmark with its URL and a description and tags you specify. I’ve been using Delicious for years, since it could be found only at http://del.icio.us. Postalicious is a WordPress plugin that creates a blog post based on your new Delicious entries and the descriptions you provide. It then automatically posts the links entry to your blog at a predetermined time. You can find plenty of examples on my blog. Postalicious also works with other services, such as ma.gnolia, Google Reader, Reddit, or Yahoo Pipes. I rely on this combination of tools to collect and share Web-based content that I found interesting and want to share with my readers. The format isn’t perfect, but it’s certainly good enough for my needs. Oh, and one more thing: I use the RSS feed for my Delicious bookmarks to generate a list of recently bookmarked pages in the sidebar of my blog.
  • Twitterfeed with Twitter. Twitter is an incredible tool for communicating short snippets of information with other people all over the world. (If you haven’t heard of it or tried it, crawl out from under that rock, brush the dust and cobwebs off your clothes, and join the rest of the social networking community.) Twitterfeed is a Web-based service that scans your blog’s RSS feed and tweets links to your new posts. This is a great, automatic way to tell your Twitter followers about new content on your blog.
  • Feedburner’s Email Subscriptions. Feedburner is a service that modifies your RSS feed to add features. Although it was started as an independent service, it’s now part of Google, so you need a free Google account to take advantage of its features. The Email Subscriptions feature creates e-mail messages based on your RSS feed and sends them out to subscribers. The subscription list is maintained inside Feedburner, so you don’t have to deal with it; users can add and remove themselves without bothering you. This is a great way for folks who want to read your content regularly to get it on a timely basis without using RSS readers. Best of all, once you set it up, it’s automatic.

Conclusion

When thinking about blog productivity, it all comes down to working smart. Make blogging part of your life schedule. Keep notes about the topics you find interesting so you have plenty of topics to write about when you’re ready to blog. And automate tasks whenever possible.

These are just three tips. Give it some thought — or read the blog posts of my co-panelists here — for more.

About the Author

Maria Langer is a freelance writer who has been writing about computers and the Internet since 1990. She’s the co-author of the first-ever book on WordPress and has since authored three WordPress video titles for Lynda.com. Maria’s also a commercial helicopter pilot and serious amateur photographer. Her blog, An Eclectic Mind, can be found at aneclecticmind.com.

Got a Keyboard? Use it.

A blog post should be more than just screenshots of what other people Tweeted.

This morning, as I sat drinking my coffee, I began my usual ritual of checking out some of the links tweeted overnight by the people I follow. One of them was about the iPad. Interested in the iPad as my future ebook reader, I followed the link.

I wound up on a blog post that consisted primarily of screenshots of Twitter. The blogger had posted a question on Twitter about the iPad and then sat back and captured screenshots of the responses as they were tweeted.

I call that lazy blogging.

It was also extremely tedious to read. So tedious, in fact, that I stopped reading after the first scroll down. I did continue scrolling to see if there was some content added by the blogger, but there was so little of it that I wound up simply closing the browser window and getting on with my day.

And then I realized how much it bugged me that there was someone out there passing off screenshots of Twitter responses as a blog “post.”

There is so much crap on the Internet today. Huge quantities of it. I don’t “surf” the net. My Web activity is limited to looking up things I need to know about and following what appears to be interesting links that I receive from friends and business associates verbally, via e-mail, and via Twitter. I don’t want to spend my day wading through the crap online. I want the good stuff.

A blogger should not simply regurgitate what’s readily available on the Web. If I wanted to know what Twitter users thought of the iPad, I’d use Twitter’s built-in search feature — which is also part of Nambu, my preferred Twitter client — and set up a search. I’d then read the results myself. I don’t need to go to a blog to read the same stuff. As screenshots, for Pete’s sake! Hell, if I were at home with my miserably slow Internet connection, the damn page would have taken five minutes to load!

A blogger’s job is to both inform and provide analysis. A summary sentence at the top of 20 screenshots that simply says, “Many people think lack of multi-tasking is a deal breaker,” doesn’t do much for me. And I certainly don’t need to see those 20 screenshots. I get it. You’re not making this up. All these Twitter users said it. I guess it must be true.

And it’s immensely ironic that this post was retweeted. As if it had value. WTF?

My point: if you call yourself a blogger and want to add something of value to the Web, dust off your keyboard and use it.