Fraudulent Credit Card Charges at Tim Hortons in Canada

Have you seen this, too?

On Friday morning, I was having breakfast in Lincoln City, OR when American Express called me. Or maybe I would be more accurate to say that a machine at American Express called me. It wanted to verify charges on my credit card bill for possible fraud. I got a person on the phone and soon learned that my credit card had been used to make charges at a store in Canada. I haven’t been to Canada for some time and the charges were obviously fraudulent. American Express removed the charges from my account, cancelled my credit card, and popped a new credit card in the mail for me.

The whole process took only about 10 minutes.

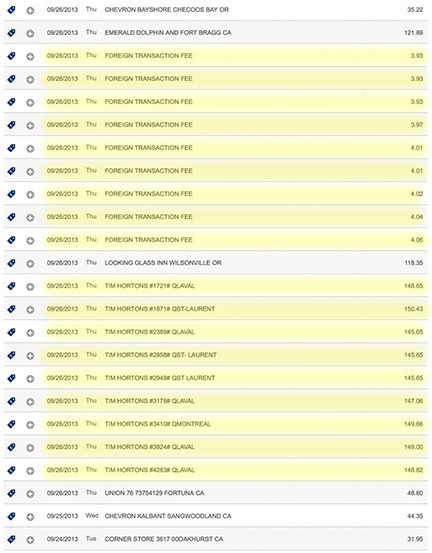
Tim Horton Fraudulent Charges
Here’s part of my online statement with the fraudulent charges and foreign transaction fees highlighted. Interesting how they all seem to be for different Tim Hortons locations and all processed around the same time.

Today, while updating my Quicken records for my personal finances, I tried to download American Express data. The download wouldn’t work because the account number had changed. So I logged into the American Express website to look for the new card number. That’s when I saw nine more charges for the same company, along with nine foreign transaction fees.

Apparently, whoever made a fake credit card with my information on it has connections with the Tim Hortons restaurant chain. My card was used to process nine transactions for $145 to $150 each — all on the same day: September 26, 2013. Each charge also incurred a foreign transaction fee. The total of all this was over $1300.

Of course, I called American Express and talked to their fraud people. These transactions were immediately removed from my account, so I don’t have to worry about any liability. Another 10 minutes.

I don’t know when/where my account information was stolen. My card is always in my possession — unless I’m using it for a transaction. Either one of the companies I shopped/dined at has a crooked employee who stole the information off my card or someone has a computer program that’s able to generate valid credit card number/expiration date/CID combinations and one of them happened to be mine.

But I’m curious: if you’ve found this post through a web search, have you also been hit with fraudulent charges to a Canadian Tim Hortons? If so, please take a moment to comment with the number of charges, the type of card, and the approximate total amount of the charges.

The Joy of Flying with an Experienced Professional Videographer

Makes me wonder why I bother with the amateurs.

I had a great flight yesterday. A flight that should stand as a shining example of the kind of flying I love to do with the kind of professionals I like to work with. Let me tell you about it.

But first — because I can’t keep a short story short — some background.

Dealing with Amateurs

I feel the pain of professional photographers — folks who have invested thousands of dollars and years of their lives accumulating quality photography equipment, learning their craft, and practicing until they know how to make every shot count. These people are now competing with amateurs who buy DSLR cameras and call themselves “photographers.” These people use the “shotgun approach” to photography — they shoot dozens of images with the hopes that one or two of them will satisfy their client. They undercut the professionals in pricing because they simply don’t have as much invested in the business and, indeed, some might even have other jobs to support them. The professionals are losing jobs — and their livelihoods — because the amateurs are taking away their clients.

As a pilot providing aerial photography flights, I see this a lot. I get calls from photographers and videographers looking for a platform to get their aerial shots. If they don’t balk at my prices, they usually come in with a set time limit to minimize their flying costs. I can understand this — to a certain extent, anyway. Then they arrive for the shoot and immediately begin to show just how amateurish and unprofessional they are by:

  • Bringing the wrong equipment. I’m talking about consumer quality cameras and lenses, telephoto and long zoom lenses, DSLRs for video, and bulky camera bags full of equipment they will not need and likely cannot access anyway during the flight.
  • Ignoring my advice for seating. If they’re serious about getting good shots of a specific target, they should sit behind the pilot. That’s the only way the pilot can see what they see.
  • Bringing two photographers with two different missions. Usually it’s a still photographer brought along on a video flight. That simply isn’t going to be as cost effective as they think if they take my advice and put the primary photographer behind me.
  • Failing to communicate what they want or expect. I can’t fly the way they need me to if they don’t tell me what they want. They have a microphone next to their mouths. They need to use it. Without specific instructions, I can only assume that what I’m doing is what they want. They have no right to complain later if it isn’t.
  • Making unreasonable demands. I’m talking about expecting to fill all seats in the helicopter when the extra weight would seriously affect performance. (I no longer do photo/video flights with more than two passengers on board. Period.) I’m talking about expecting the pilot to fly at top speed from target to target and then stop “on a dime” if a good shot comes into view along the way. I’m talking about expecting the pilot to hover low-level, fly close to obstacles such as wires, and perform other maneuvers that simply aren’t safe.
  • Talking down to the pilot. I’ve seen this too many times. Amateurs with a bankroll have expensive equipment, no clue how to use it, and an attitude that makes me want to kick them in the teeth. They know it all — or think they do — and they feel a need to correct me every chance they get. I take guys like this just once, give them what they ask for, and never take them again. I don’t want clients like this.

I can think of at least two posts I’ve written that talk about the problems with specific amateurs: “Flying The 2010 Parker 425” and “Tips for Aerial Photographers.” You can get a better idea of the kind of crap I have to deal with by reading those.

Dealing with Professionals

But that’s not what this post is about. This post is about working with a seasoned professional who has lots of experience with aerial photography.

I started to get an idea of the level of professionalism I’d face before I even met the photographer. It was 7 AM and I needed to meet the client in Ephrata, WA at 8 AM. I was prepping the helicopter for the 20-minute flight. I wasn’t sure whether we’d have a single base of operations or if we’d be moving around. I needed to know whether I should remove doors before heading out.

The videographer, I’d been told, would be using a Tyler Minigyro. I’ve had experience with these before. They’re relatively flexible gyro-stabilized mounts that the videographer holds during flight. Because I wouldn’t be using my Moitek Mount, which needs to be installed in a specific seat, the videographer had three seats to choose from. Which door should I remove?

I called the client, coincidentally named Tyler. He was with the videographer. He asked the videographer what he thought. I heard his response through the phone: “The best seat is behind the pilot so she can see what I see.”

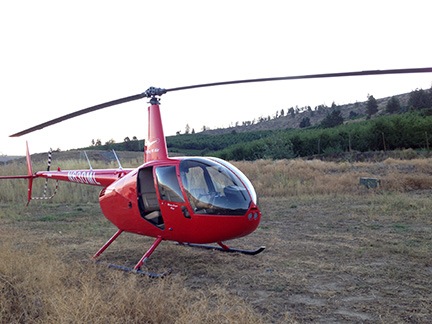
Rigged For Photo Flight
Here’s my helicopter yesterday morning, rigged for the photo flight with both back doors removed.

That was the exact right answer. “I like this guy already,” I told my client. I wound up removing both back doors in case lighting conditions made the videographer want to change seats. As it turned out, I didn’t need to do that and probably shouldn’t have — it caused additional wind to enter the aircraft during point-to-point travel. In all honesty, I probably could have left the doors on until meeting the client — and then stowed them in the client’s SUV.

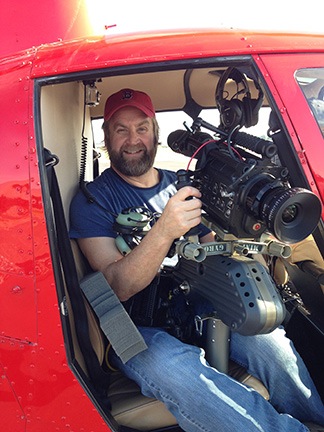
Jim
Here’s Jim, the videographer, almost ready to fly.

After picking up one client in Ephrata and flying down to Desert Aire in Mattawa, I met the other clients, including the videographer. The videographer was a burly bearded guy named Jim who was friendly and good-natured. He’d flown quite a bit with a pilot friend of mine in Idaho. He had a huge array of professional equipment, including the rented Tyler Minigyro, two enormous battery packs, an older RED camera with external hard disk, two lenses, a half dozen camera batteries, and a video monitor for the front seat observer. While this may seem like a lot of equipment, he only carried what he needed onboard; there were no extraneous camera bags and loose items.

After prepping most of the equipment, Jim told me he liked to start each shoot with a meeting to cover the expectations. Another sign of a professional. We chatted for a while about the targets we’d be shooting — mostly dams and recreational areas along the Columbia River — and the kinds of shots he was looking for. I told him what I needed from him — clear communication of what he wanted — and told him that I’d do what I could to get him in position for all of his shots. I assured him that the helicopter’s performance with just three people on board and 3/4 tanks fuel would be sufficient for most maneuvers.

We wound up taking off the front passenger door for the other client, who wanted to get some still images. (Of course.) Fortunately, for the duration of the flight I was not asked to put him into position to get his shots; he just shot what he wanted when he could get the right composition.

We lifted off and got to work around 9 AM, leaving Tyler behind to shoot on the ground. We immediately encountered some problems with the camera. First it was dropping frames and then it was locking up. Jim switched a battery in flight and we were able to get to work. His instructions to me were clear and easy to follow. I could tell that he’d flown with a lot of pilots before by the way he phrased his requests: “If you think it’s safe, can we…” It was obvious that he understood the limitations of helicopters and the potential danger of certain maneuvers. That comes from a lot of flying. (I’ve only had two other clients who clearly understood limitations: one had been a passenger in a helicopter for more hours than I’ve flown as a pilot and the other one is an airplane pilot.)

It wasn’t long before we ware working smoothly together, almost as if we’d worked together for a long time. He’d ask for maneuvers and I’d do my best to deliver them. He and the front seat passenger would ooh and aah when they saw a particularly nice shot in the viewfinder or monitor. He’d tell me when I was doing something right and when I wasn’t doing it quite the way he wanted. Communication was excellent — I don’t think I’ve ever worked with a better communicator.

The helicopter performed remarkably well, especially that morning when the temperatures were still cool. All flight sequences, including sideways “crabbing” flights at speeds up to 30 knots, were amazingly smooth. This was, in part, due to the fact that there was hardly a breath of wind. I couldn’t have asked for better flying conditions that morning, although I wish it was about 15 degrees cooler that afternoon.

We worked our way up the Columbia River, shooting the dams, boats on the river, cultural and recreational sites, bridges, cliffs, communities, and more. We refueled at Ellensburg and kept flying, always moving upriver. Time flew by. By the time we reached the Rock Island Dam just downriver from Wenatchee and Malaga, I was starting to feel fatigued and I think Jim was, too. After a quick stop at Quincy Airport to meet Tyler to swap out batteries, we got onto our last leg of the flight which took us to Euphrata and Moses Lake. We shot agricultural and industrial sites along the way.

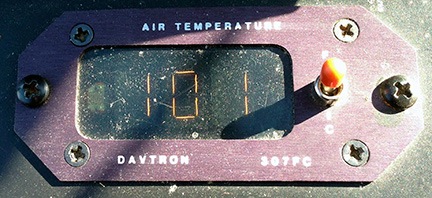
Unseasonably Warm
It’s been unseasonably warm this September in central Washington state.

By the time we landed at Moses Lake, I felt done — as in “stick a fork in me” done. The OAT gauge registered 101°F on the ramp. I was the only one with a door on the helicopter and was sweating up a storm by the time we touched down. Thank heaven for the folks at Million Aire; the girl who greeted us with a cart handed each of us an icy cold bottle of water that I really needed.

747
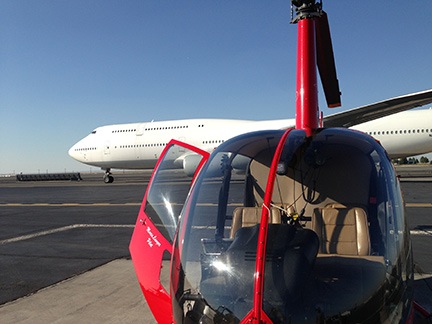
Jeez Louise! That’s a big plane!

By the time Tyler arrived and was escorted with the SUV out to the ramp, we’d unloaded most of the equipment from the helicopter. A Boeing 747 rolled in on the taxiway behind me and parked beside me; I don’t think I’ve ever been so close to a 747 on a ramp. (The damn thing is huge!) My clients stowed their equipment in the SUV and I fastened the door. I also let the FBO top off both tanks with fuel. Then my passenger and I were on our way back to Ephrata and, 15 minutes later, I was on my way home.

I got home around 4 PM. I’d spent 7.0 hours flying.

What Made this Great

I think it’s safe to say that this was one of the best aerial video gigs I’ve done in a long time. A few things made it so good:

  • The experience and professionalism of the videographer. He knew his stuff, he knew what worked, he never asked for anything I couldn’t or wouldn’t deliver. He was reasonable and extremely communicative. He was a real pleasure to work with.
  • The targets. The flight itself took us over some really nice scenery so point-to-point flying was a pleasure. The targets were interesting to see from the air and, in some cases, a bit challenging to shoot because of obstacles such as wires and cliff faces.
  • The length of the flight. It was refreshing to fly with someone who was more interested in getting the shot than minimizing flight time. More than once, we’d redo a shot just to make sure we got what the client needed. We also approached targets from a variety of angles and altitudes. This meant that we were in the air a long time. And I’ll be honest with you: I’d rather do one 7-hour video flight with no pressure to finish within a certain time than seven 1-hour video flights that must be done within an hour.

I really liked this client and hope I get more work with them in the future. And I hope they feel the same about me.

I suspect they might.

The Life, Death, and Life of the O-Grill

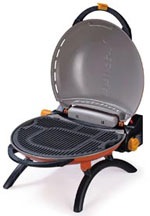
A portable BBQ grill I really like.

_images_ogrill_open.jpgThe Iroda O-Grill.

Back in May 2010, the first season I drove my “mobile mansion” north for my summer job, I stopped along the way to pick up a portable gas grill. I stopped at the Camping World in Junction City, OR — now apparently closed — for the night and shopped before they closed for the day. I wound up with an Iroda O-Grill: a small clamshell style grill with 225 square inches of grilling space that used a propane cylinder for fuel.

I soon grew to love the grill. It was easy to set up and store, easy to clean, easy to use, and easy to find fuel for. I’d fire it up, let it run on highest temperature for 5 minutes, and clean it with a wire brush. Then I’d turn it down to its lowest setting and grill whatever I liked: steak, fish, vegetables — even tofu. You had to cook on its lowest setting; the darn thing put out so much heat with the lid closed that anything higher than that would cook much too quickly.

I used it all that summer and the next. When I brought the RV back to Arizona for the winter of 2010/11, I even brought the grill home to my house. It was a hell of a lot easier to use than the big Jennaire grill my wasband had bought for the patio — a grill I never seemed to be able to light properly. The darn thing always started on the first button push. Always.

The summer of 2013 was summer #4 for the grill. Although it was just starting to show its age — mostly from the time spent outdoors at the Quincy golf course RV park where it was sprinkled on every night by the irrigation system — but was running perfectly well. That is until it caught fire while grilling up some brats.

The fire was hot and fierce. Water from my poor man’s hot tub nearby extinguished it. With a few twists, the gas can was removed and the danger was over.

Burned Grill   Burned Table
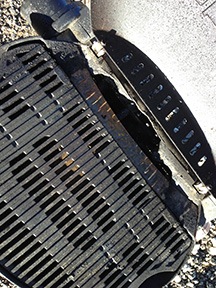
Death of the O-Grill (and the table it sat on).

But my O-Gill had so obviously grilled its last brat. The back of the grill surface was melted off and one of the legs was melted sideways so it didn’t even sit level anymore. Even the folding table it had been sitting on was pretty much destroyed.

I immediately looked for a replacement. Yeah, I know it had caught fire, but it had given me four solid seasons of grilling before that. I liked it. It was worth replacing.

A search online brought up more than just shopping results. It brought up the recall notice. From the notice:

Hazard: The regulator on the grill can leak gas which can ignite, posing a fire and burn hazard to consumers.
Incidents/Injuries: Uni-O has received 10 reports of grills catching fire. No injuries or property damage have been reported.
Description: This recall involves Iroda O-Grill models 1000 and 3000 produced before 2010. Some were also sold under the Tailgate Gear brand. Both models are lightweight, portable, clamshell-type propane grills with steel bodies, cast iron cooking surfaces, retractable legs and a handle. They can be used with either 1-pound propane cylinders or 20-pound propane tanks. The grills come in orange, red, green, blue, silver and black and have the words “O-Grill” stamped on the metal grill cover. Recalled O-Grills do not have ventilation slots in the regulator cover where the propane bottle screws in. Grills with ventilation slots in the regulator cover are not subject to the recall.

Oops.

The notice was more than 18 months old, but I figured that a replacement would be a heck of a lot cheaper than a new grill (which was now selling for $40 more). So I made the necessary phone calls. Eventually, I spoke with a very nice man who asked me some questions about the grill and promised to send me a new one. He even asked what color I wanted. (I picked red.) All he asked is that I send back the old grill in the new grill’s shipping box.

Done and done.

My New O-GrillMy new O-Grill looks a lot like my old one, but it’s red instead of orange.

The new grill, which arrived just yesterday, looks a lot like the old one, although there is a difference in the grill design. This one has a sort of barrier between the grill and the area behind it, near the cover hinge. It works pretty much the same, although I have to admit it doesn’t fire up on the first button push every time. (Not yet, anyway.)

I do recommend this grill. It’s great for camping or tailgating. Very portable and very easy to use. It makes a good complement to my Traeger by providing a quick and efficient way to sear the BBQ sauce on the ribs I’m always smoking.

Life Goes On

Setbacks are bound to happen, but they should never stop you from moving forward with your life.

Over the past two days, I spent a bunch of time with some friends of mine from Wickenburg. These folks were incredibly supportive last autumn, winter, and spring, while I lived in the house I’d previously shared with my husband (when he was around), waiting for him to get reasonable and settle out of court so we could move forward with our lives apart. It was a long wait. I finally left the house at the end of May, right after the second of two court dates. He never did get reasonable and the judge made the settlement decisions for us in late July.

These friends saw me at my very worst, including one of the two times that I came close to what might have been a nervous breakdown. All through those months, these friends gave me some of the moral support I needed and assured me, over and over, that I’d be fine and that I was better off without him.

Oddly, it was also these two friends who, just yesterday, voiced their amazement at just how well I’ve been doing since those dark days.

Because it’s true: I have been doing incredibly well. My business had a very profitable summer and I was able to replenish all of the savings spent on a too-lengthy legal battle — and then some. After the long wait for the judge’s decision, I was finally able to move forward and buy the land I’d wanted for nearly a year. And because I didn’t have to wait for another party’s input on my decision-making processes, I was able to immediately move forward to get the water turned on, install and activate the temporary power pole that brings electrical power to my lot, and even get a septic system installed and approved by the county. I did all of this in just 40 days.

The Problem with the Last Land Purchase

I think back on the last raw land purchase I made. It was 40 acres of “ranch land” in northern Arizona, an escape from the oppressive heat of summers in Wickenburg. I’d been part of a “team” back then, partnered with a man who researched everything to death before making a decision. Often, he’d spend so much time researching an option that the option was no longer available when he’d finally decided. Although we got a fence installed relatively quickly — my accounting records show that it was installed within 6 months of the property purchase — it was two years before the septic system was installed and six years before he finally agreed to put some sort of building on the land. The building was especially frustrating for me. We blew $800 on plans with one builder and $400 on plans with an architect and looked at more than a handful of prefabricated buildings before he grudgingly agreed to the “camping shed” we wound up with. Although we managed to turn it into a year-round cabin and spent several holidays up there — including Thanksgiving and Christmas — he apparently hated it there, later referring to it as “Maria’s white elephant” to his friends. Of course, he never said anything like that to me.

And that was part of the problem. He’d agree to something he didn’t believe in — like the purchase of this land — and then get bitter about it. Or he’d like something one day and hate it a month or year or more later. But throughout this process, he never communicated what he really thought or felt. He just went along with the general idea, but stalled when it came to moving forward with anything of substance. And he never communicated what he was really thinking — or he waited until we’d come too far down a path to go back.

He created dead ends.

And that’s why I’m so much better off without him. I don’t have to deal with his indecision or stalling tactics or change of heart. I can just look at a situation, think about it for as long (or short) as I like, and make a decision. I can act — immediately if I like — and get the benefits of the results as soon as possible.

A Sad Flashback

Yesterday, I was feeling melancholy. It was the 29 year anniversary of the day my ex-husband proposed to me.

I remember the moment perfectly. We were in our bedroom at our Bayside apartment. It was after work. He’d gone to New York to pick up the ring that afternoon. It was the 10th of the month — back in those days we celebrated the 10th of every month to mark the anniversary of the day we met (July 10, 1983).

Engagement Ring
My engagement ring.

I knew it was coming; I’d gone with him a few days before to pick out the diamond. After being spooked by the diamond sellers on 47th Street, we’d would up at his mother’s jeweler on 57th Street. The diamond was beautiful — a one-caret solitaire, white with just a tiny “feather” imperfection. It cost him $3,000, which was a lot of money in those days — but then again, he made a lot of money back then. The setting would be a simple four prongs. It wasn’t as large as the diamonds my friends at work had been getting, but it was infinitely more beautiful, almost perfect.

On the afternoon of September 10, 1984, he got down on one knee in front of me, showed me the ring, and asked me to marry him. I said yes.

I later changed my mind.

Months ago, when I was packing up my things, I found an old journal that dated from 1991. In it, I found numerous entries that reminded me of the problems we were having, even back then. Him belittling me in front of my friends and family members — which he never stopped doing, even after we were finally married. Him putting me down, telling me that I’d never accomplish various things I set out to do. Him basically making me feel like crap — the exact feeling I shouldn’t get from a future husband.

So I didn’t marry him. For a while, I even stopped wearing the ring. The only reason I started wearing it again was because I was getting tired of creepy guys hitting on me.

And then, after 23 years together and an unfortunate sequence of events, when I thought we really were “life partners,” I married him.

Out of all the mistakes I’ve made in my life, that was, by far, the worst.

I had legally tied myself to the man I’d later refer to as my ball and chain — a man who held me back from so many things I wanted to do with my life, a man who made promises he broke, a man who made excuses rather than take action, a man who attempted to communicate his constant disapproval of my actions with sour looks instead of words.

Don’t get me wrong. I loved him. I still do — although the man I loved is long gone, dead to this world.

It frustrated me to no end that a man who had once been strong and ambitious had turned into a weak old man, afraid to communicate his true thoughts and feelings to both his mother and wife, more likely to make excuses about why he couldn’t do something than just step away from the television and do it. The frustration turned to sadness when he gave up on our relationship. It turned to pity when I saw what he’d replaced me with: a desperate old woman who sold herself online, a mommy who would lead him by the hand through our divorce proceedings, feeding him bad advice all along the way and costing him tens of thousands of dollars in legal fees.

How could I not pity him?

Although the pain of his betrayal is still sharp a year later, I do have to thank him for cutting our marriage short. Yes, I was tired of waiting for him to get his act together and start living life. But I would not have left him. I loved him too much.

By leaving me, he set me free. He put me back on track for a good and fulfilling life.

And while it’s sad that I have to move forward without the man I loved, that old man is dead and gone for good. Fortunately, there are other stronger men out there. Men who know how to have fun and make the most of life. Those are the men I’m meeting now. One of them will surely take that man’s place in my life — possibly a lot sooner than I expected.

Life Goes On

“You can’t move forward when you’re looking back.” Another friend of mine gave me that priceless piece of advice sometime within the past year or so. He was right.

So I’m moving forward — and I’m doing it at my typical fast pace. Life’s short — why wait to achieve the things you want?

The divorce proceedings were a time-consuming, costly setback, but nothing more. It was as if I took a year off from life. I’m back now and moving full speed ahead.

Thanks, honey, for setting me free and making me a stronger person.

Cheese: The Cheesemaking Class

I get to see — and participate in — the cheesemaking process.

There’s a cheese maker that comes to Wenatchee Valley Farmer’s Market held each Wednesday and Saturday at Pybus Market: Alpine Lakes Sheep Cheese. As you might imagine, I stopped at their booth tasted some cheese, and bought some. It was very good. I don’t know how I missed it, but my friend didn’t: a rack card that advertised a hands on cheese making class. I went back to the booth and talked to Katha (pronounced with a long a like Kate). The class was five hours long and cost $80. It wasn’t held regularly, like the rack card suggested, but if I could get at least three people to go, she’d do a class.

I immediately thought of my meetup groups and decided to suggest it to the Wenatchee Social and Outdoor Adventure Group. They’re really not big on “adventure” (despite the name) and I thought this might interest them. But I was quite aware that the price tag would likely turn more than a few people off. Still, I got one person to RSVP yes for the August 10 date.

Then I sprained my foot. I wasn’t sure if I could stand for five hours. And I’d failed to get three people.

But Katha assured me that if I was able to attend with my companion, she was willing to do the class with just two of us. So on that Saturday morning, I met with Jill and we carpooled up to Peshastin in my truck. We arrived at 10 AM.

Alpine Lakes has an excellent cheese making kitchen in a converted garage. It has all the things they need to keep the equipment clean and sterile, several cheese making vats in different sizes, draining trays on wheels to capture the whey, and a “cheese cave.” At least a dozen refrigerators line one wall. A set of sinks and dish draining boards make all-important sanitation easy.

Katha was prepared to make four kinds of cheeses: a soft fresh cheese (like cream cheese), a soft ripened cheese (like brie), a hard cheese, and ricotta. She’d already put various quantities of milk into pots or vats and was heating them. The milk was all fresh sheep’s milk from that morning’s milking. The quantities varied from 2 gallons for the fresh cheese to 20 gallons (I think) for the hard cheese.

She explained that each type of cheese used a different culture and required a different temperature. Some cheeses required a very specific temperature while others could be made within a range of temperatures. She let us measure out the powered cultures that came in a foil envelope stored in the freezer and sprinkle them over the milk surfaces. After waiting a short while, we used large skimmer ladles to draw the moistened culture down into the warm milk. After a certain amount of waiting time, we added liquid rennet diluted in a small amount of cool water. Again, we drew the rennet down into the milk, blending it well.

While we waited for the milk mixture to coagulate, Katha kept us busy. We visited her cheese cave — a room off the side of the kitchen with controlled temperature and humidity where cheese is left to ripen. The room was full of shelves where cheeses in various states of the aging process sat waiting for their time to come.

Katha pulled out a tray full of soft-ripened cheese and set it on a worktable. She showed us how the white rind on these cheese is actually a fuzzy white mold that gets more rind-like as the fuzz is pressed down onto the cheese when it’s wrapped. She put us to work wrapping the cheeses.

At around 11 AM, three more women showed up. Katha had been expecting them — they were last-minute participants. She caught them up on what they missed. Soon we were all taking turns wrapping cheese and coating hard cheese in wax.

Katha also pulled out some cheeses for us to taste. I think this was the best part. We tasted the cheeses she usually sells at the market and elsewhere, as well as a few new cheeses and even two cheeses she called “mistakes.” I liked the mistakes a lot — especially the blue-veined one. There was so much about this that I found odd — most of all that if you make cheese, you can’t immediately taste it to know how it came out. Some cheeses need weeks or months to ripen. These “mistakes” were good examples. She knew that she’d done something wrong — or at least something she hadn’t intended to do — but she wouldn’t know whether it would result in an edible cheese for months. I wondered how many other “mistakes” sat on shelves in her cheese cave.

Once the milk had coagulated, it was time to test it for a “clean break” — an indication that there were good, solid curds. Katha demonstrated and each of us tested one of the cheeses. We worked in shifts to cut the curd — large curd for the soft cheese and very small curd for the hard cheese. She had a huge rounded-tip spatula for curd cutting. The hard cheese, which was in the largest vat, required an extra step: curd cutting by dragging a huge wire whisk through it. This was quite a chore that required a great deal of arm and upper body strength. Who would have thought you could get good exercise making cheese?

Through the course of the morning, we scooped the various cheeses into various molds on the whey draining trays. The whey drained away into 5-gallon buckets beneath the trays. Katha told us that she feeds it to her pigs.

Ricotta for Breakfast
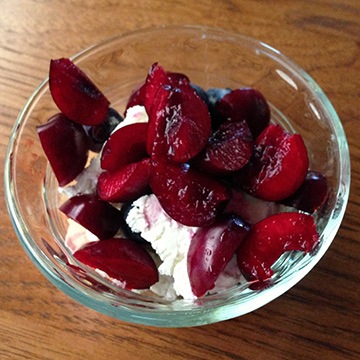
I enjoyed the fresh ricotta cheese for breakfast with fresh fruit.

She also uses it to make ricotta cheese, which is what we did next. She heated about 5 gallons of whey in the now-empty medium sized vat. The whey had to be heated to at least 200 degrees — but could not be heated beyond boiling because it would boil over and make a horrendous mess. It also had to be stirred the whole time. We watched it closely. When it reached the proper temperature, she turned off the heat and added a small amount of vinegar. Small curds immediately began to form. She poured off the contents of the vat into a relatively small cheese bag, letting the whey drain through onto a draining table. After draining and squeezing she had about a quart of ricotta, which she split among the five of us in small plastic containers. I ate it over the next two days with fresh cherries and blueberries from the orchard where I was living along with a small amount of honey from my bees. Amazingly delicious!

Katha took my classmates out to the field to visit with the sheep. Because of my sprained foot, I stayed behind, resting on a chair and munching on cheese.

There was more to the class but I honestly can’t remember the details. I waited too long to write it up. And for some reason I didn’t take any pictures! But I do remember paying an extra $20 at the end so I could take home a bunch of cheese — including those “mistakes” which likely won’t be for sale anywhere.

I’m extremely interested in cheesemaking and, since taking this course, have tried twice to make cheese. My first attempt was probably a success — but I won’t know for sure for another two weeks! My second attempt was a disaster, with a failure of the milk mixture to coagulate properly; I did get a lot of ricotta-like cheese to eat, though. I think my main problem right now is the size of my kitchen (tiny) and my inability to maintain proper “room temperature.” (Remember, I’m currently living in an RV and I detest listening to the constant hum of an air conditioner during the day or heater during the night.)

But I’m very glad I took this course. It taught me a lot about the basic steps of this complex process and what I should expect when I get things right. I recommend a hands-on course like this to anyone interested in making cheese.