Repurposing Old Bee Hive Boxes

Reuse, recycle.

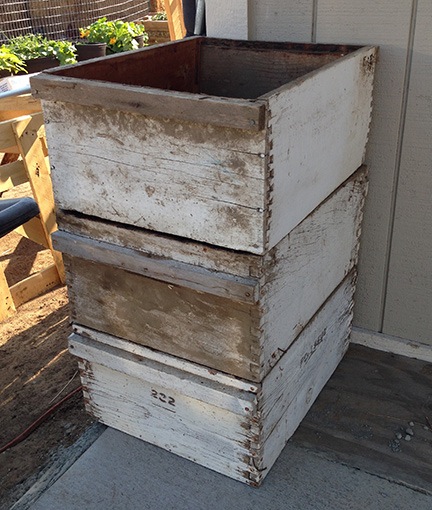
A few months back, my beekeeping friend James told me he’d was able to get a bunch of used deep hive boxes for about $5 each. Knowing I used deep boxes — he uses only mediums — he offered them to me. I asked about the condition and he admitted that they were pretty beat up but could probably be usable with just a cleaning and fresh coat of paint. They were heavy-duty commercial boxes — the kind the migratory beekeepers use. I told him I’d take 10.
Beat Up Hive Boxes
These hive boxes are a little more beat up than I was expecting them to be.

I picked them up a while later. Although structurally sound, they were very beat up. James showed me one that he’d painted and it didn’t look half bad. Since the price was right and I had plenty of paint, I took them.

I spent one morning scraping the paint off four of them with a wire brush and then repainting them. They did look much better. But when I slipped some frames into one of them, I realized that they weren’t consistently sized; the frames fit too loosely and would require careful placement to prevent them from falling into the box.

Behive
This is my garden hive, so-called because I placed it near my garden. It was built with two of the used boxes and it’s pretty clear that they simply don’t fit the way they need to.

But it wasn’t until I placed the first box of frames onto a hive bottom — for a swarm capture I needed to permanently house — that I realized the problem couldn’t be solved with just a coat of paint. The top and bottom edges of the boxes were rough. This caused gaps between the bottom and the box and between stacked boxes. The gaps were large enough for light and air to pass through. That meant the bees would be busy filling all those gaps with propolis, thus gluing them together.

I used the four I’d painted and found the same problem with all of them. Although I didn’t want to invest more money in beekeeping equipment than I had to, it was clear that these boxes would not be suitable for long-term use. They’d need to be replaced.

I placed an order for five new boxes from Mann Lake, figuring that I’d begin swapping them out on my next inspections.

But what to do with the unneeded boxes?

The answer was in my garden, which was growing wild in the planters I’d bought and made: more movable planters.

Understand that bee hive boxes do not have tops or bottoms. All they have are sides. While I could simply place a box on the ground, fill it with soil, and plant something in it, that wouldn’t make it movable. It also wouldn’t keep the moles (or voles or whatever I have making holes on my property) from digging in from underneath to kill whatever was growing in the box.

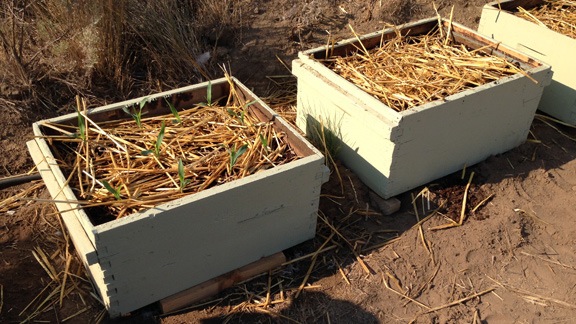
So I did the same thing I did for my large pallet planters — I lined the bottom with wire mesh. I had a large piece I’d been using on the door for my chicken yard that I clipped off, cut to size, and lay inside of each of the three boxes I painted for my trial run. I used a staple gun to fasten the wire to the sides of the boxes. Then I placed the first box in position, put a layer of stray on the bottom, right over the wire, and topped it off with some potting soil. I planted corn in the box, covered the soil with some more straw (to discourage digging by birds), watered it, and left it.

The corn wasn’t supposed to germinate for 8-10 days, but within 6 days, it was pushing its way up between the pieces of straw.
Beehive Planters
A row of the beehive planters. You can see the corn poking up through the straw in the closest box.

I lined up the other two boxes on the ground beside the first. I planted corn in one and onions in the other. When the heat breaks, I’ll prep the remaining three boxes, although I may not plant anything in them until next year.

What I like most about these movable planters is that they’re making it possible for me to have a garden this year, before I’m ready to commit to a location for the garden. And while the bottoms might not be the most sturdy, they do make it possible for plant roots to reach through, into the soil below.

I just hope I didn’t plant the corn too late for a good harvest.

Putting Away My Toys

Well, most of them, anyway.

July 4th was a big day for me. It marked one week after the concrete had been poured for the slab of my new home. That meant it was safe to drive on it.

But what that really meant to me was that I could move most of my vehicles back into covered parking.

Three of my four garage bays were cleared out and ready to accept vehicles. The fourth was my temporary dining area for entertaining dinner guests. I couldn’t really get a vehicle into that garage anyway because of the pile of scrap lumber out front, effectively blocking the entrance.

My Four-Car Garage
Here’s what the inside of my garage looked like on July 4. It’s a panoramic image; the only way I could shoot the whole thing.

Up for storage: my 1999 Jeep Wrangler, my 2003 Honda S2000, and my 1995 Searay Sea Rayder boat. My 2003 Ford F350 SuperDuty diesel truck would have to wait outdoors.

I backed them all in and took a photo before closing and locking the doors.

Toys Stowed
This might explain why I wanted a 4-car garage.

Later in the week, I parked my 1992 Yamaha Seca II motorcycle between the boat and the table and my 1999 Yamaha Grizzly ATV between the Jeep and the Honda. eventually, they’ll be moved into the RV garage where they’ll be easier to get out when needed.

(None of my vehicles are new, but I like to think they’re in decent shape. And they’re all paid for, which is more than most people can say about the flashy new vehicles that are part of their credit-driven lifestyles.)

After more than 10 years living with my vehicles scattered all over the place or parked out in the hot sun, it’s nice to finally have them all under one roof.

Construction, Day 28: The Stairs are Built

And I get a front door lock.

On May 20, 2014, I began blogging about the construction of my new home in Malaga, WA. You can read all of these posts — and see the time-lapse movies that go with them — by clicking the new home construction tag.

Day 28 wasn’t a terribly busy day, at least from the outside. I wish I’d set up a camera indoors.

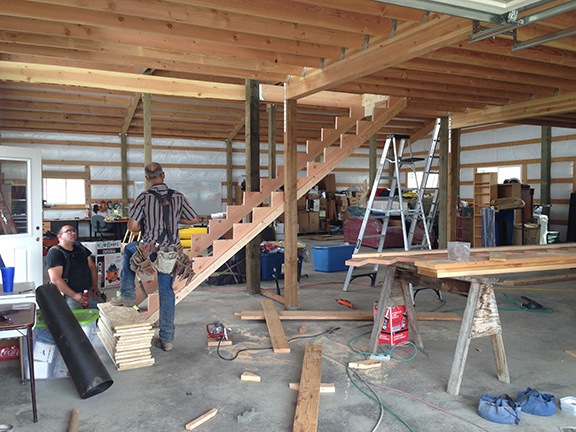
The main task was to build my stairs — something I really wanted them to finish as quickly as possible. The stairs would run from a vestibule just inside the front door straight up to the second floor. Without them, the only way up was on a ladder — they’d taken away the man lift on Sunday — and I just wasn’t comfortable climbing a 12-foot ladder.

They got started early enough and I went out to run an errand. While I was out, Corey called to tell me they needed to run up to Leavenworth to deal with an emergency situation on another project.

“Did you finish my stairs?” I asked hopefully.

He admitted they didn’t, then went on to tell me how important it was to handle this other project as soon as possible. I understood. I assumed that my project had gotten priority over someone else’s during the past six weeks. If I’d waited this long for stairs, I could wait a little longer.

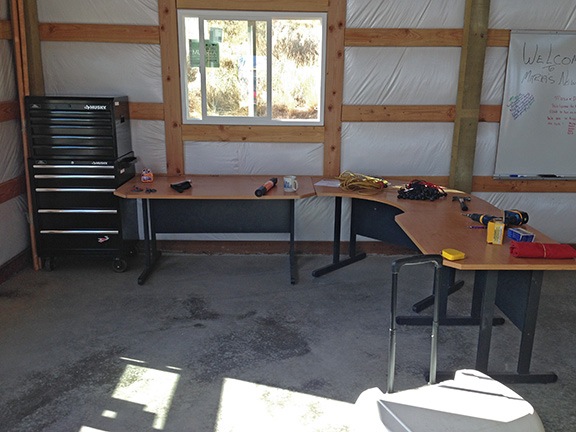
In the meantime, I started setting up my new shop area in the front corner of the big RV garage side of the building. The shop side was 12 feet wide (when looking from the front) and 48 feet deep. I thought of it as having four sections separated by the posts that were spaced 12 feet apart. My boxes of packed items were taking up most of the two back sections. A few days before, some friends had helped me mount my 10 foot long white board — a school surplus equipment sale item I picked up for just $20! — in the second section. They’d also helped me move the three pieces of my old desk into the front corner that would be my shop. I’d toyed with the idea of listing the desk on Craig’s List or giving it to a client who had just set up a new office in town. But I realized that although the work surface — a Formica laminate — wasn’t suitable for working with tools, the tables were a good height and size. I could cover them with a more substantial surface material, like 3/4 inch plywood. It would certainly save the cost of buying or the bother of building a real workbench.

I dragged my rolling toolbox out of the shed and into the building. I placed the new top toolbox on top of it. And then I rearranged the desk components to make an L-shaped workspace. I was pleased with the results.

My Shop
I started to set up my shop on July 3.

As for the desk I’ll use for my computer work, that’ll be much smaller than this old setup. I have a desk and matching file cabinet I bought for the Phoenix condo I lived in part time with my wasband before our divorce. It’ll be perfect in the space I’ve set aside as a home office upstairs. Until then, it’ll wait with the rest of my furniture for the final move.

I should mention here how weird it was — at least at first — to start setting up a permanent workspace. I’ve been living in a number of temporary homes for the past two years: my RV in Washington, my house in Arizona, my RV in California, my house in Arizona, my RV in Washington in three separate locations, a house nearby, my RV in California again, and then back to my RV on my homesite. My worldly possessions have moved from my Wickenburg house and Phoenix condo to my Wickenburg hangar to a Wenatchee hangar and then finally to my building. This has been going on for almost two full years and the temporary nature of my living situation had become almost second nature. But now I had a permanent home, something that belonged to me now and in the future. I’d designed it to have storage space for my things, a shop, and living space. The shop area was ready to move into — why not make the move? This was an entirely novel idea to me, but one I warmed to quickly as I began drilling holes in the girts to hang power tools and cables. It was my space to do with as I pleased.

I think I might have been on Cloud 9 most of the day, despite the stalled stairs.

I was working on my shop when the builders came back. I was surprised. I thought they’d have to wait until the next day. But they showed up around 2 PM and got right to work on the stairs.

Stairs in Progress
Corey and one of his guys working on the stairs. The final staircase has four stringers, making them extremely solid.

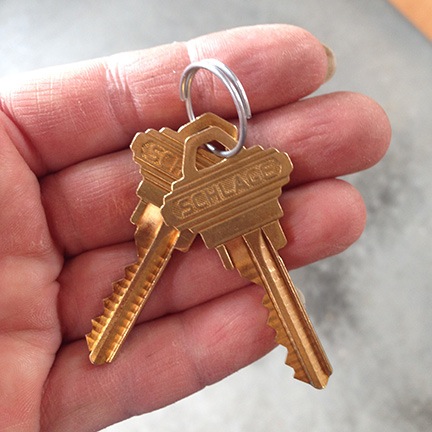
While they worked on the stairs, I set about my next task: installing doorknobs and locks on my front door. I’d never installed a doorknob or lock before, but I couldn’t imagine it being very difficult, especially since the door and jamb were already cut to accept a doorknob and deadbolt. The project price included doorknobs and locks, but I didn’t want them to waste money on the typical Kwikset locks everyone seems to use. I wanted something more secure, so I bought a Schlage set with a door handle instead of a knob.

Keys
It was an emotional moment for me when I realized I was holding the keys to my new home. And yes, I know someone could theoretically cut a set of keys based in this photo. But I later added a keypad-activated deadbolt, and that’s what I use to lock up.

The set went in smoothly — except for the fact that I put it in the wrong hole and needed to move it (duh-oh!) — and worked well. Later, as I walked back to my shop area to put away my tools, I looked down at the keys in my hand and realized I was holding the keys to my new home.

Corey and his helper worked late. Some friends came for dinner; I had leftover chicken and pork tenderloin from the night before. When the builders left, my friends and I tried out the new stairs. I gave them my standard “tour” of the upstairs, knowing that the walls would be in place soon.

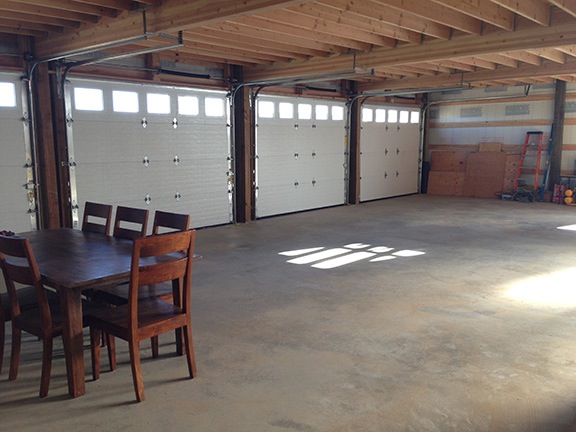
What was really nice was that the garage area was finally cleaned up — the builders had done a great job of picking up their stuff and sweeping before leaving that evening.

Clean Garage
My garage/temporary dining room, all cleaned out.

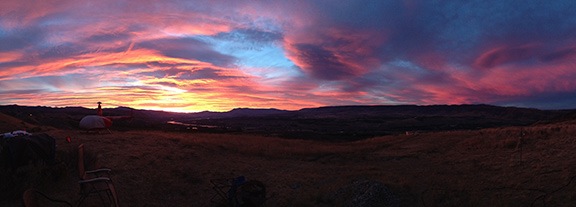
Much later, Mother Nature rewarded me with a sunset so amazing and huge that I needed to use the panoramic feature of my phone’s camera to capture it all. What a great day!

Sunset
An amazing sunset, shot from my front door.

Here’s the time-lapse for the day. Lots of coming and going, but not much in the way of exterior activity. Is it work watching? I don’t know. The movement of the clouds is kind of fun.

Construction, Day 27: Finishing the Front Wall, Framing the Deck

A lot done in one day.

On May 20, 2014, I began blogging about the construction of my new home in Malaga, WA. You can read all of these posts — and see the time-lapse movies that go with them — by clicking the new home construction tag.

I’m way behind on my construction project blogging. Part of reason for that is because construction really slowed down around the time they prepped to put in the concrete. As a result, there isn’t much to report.

But a lot of work was done on July 2.

The workers arrived bright and early and got right to work on the side deck. They’re framing the deck — not finishing it — but it’s still quite a task considering its 58-foot length.

Before lunch, they moved around to the front deck and got started on it. But they couldn’t really get into it until the missing metal pieces arrived. That happened around noon and they spent much of the afternoon removing the temporary pieces and putting in the correct ones.

The last thing they did was to close up the big RV garage doorway. With the help of a bunch of friends, I’d moved all of my worldly possessions into the building on June 28. At that time, the building had no garage doors. The four smaller garage doors were put up on Monday. But the big garage door was still on order and not expected until July 15. That meant I had absolutely no way to secure my home. Someone could drive up with a truck while I was running errands in town or on a cherry drying flight, back right into the big door, load up, and take off.

Yes, the chances of that happening were very slim. But there was still a chance.

The builders remedied the problem by building a solid (although not very attractive) wooden wall across the bottom of the doorway with heavy duty plastic sheeting across the top to keep out rain. That’s what occupied the crew at the end of Day 27. When they left, my building was pretty much secure.

Building Front on July 2
When the builders left on July 2, the metal on the front of my building matched and the big doorway was secured with a temporary wall.

Traegered Chicken
Another day, another meal from my Traeger. This was a locally raised and butchered free-range chicken that turned out very tasty indeed.

Later, when the builders had gone, the guy I hired to do the living space framing showed up with his bid. He made the fatal error of hanging around longer than he needed to — any strong pairs of arms that spend idle time at my place are soon put to work helping me move heavy items. He helped me move my dining table from where my friends had put it in the back of the RV garage into one of the garage bays. When he left, I set up chairs around it, opened the garage door, and hosted a dinner party for four friends on my dining table for the first time: smoked local chicken and grilled pork tenderloin.

Here’s the time-lapse from the day’s work.

The Rattlesnake Living Under My Shed

Is not living there anymore.

My first encounter with a rattlesnake on my property happened about two months ago.

Back then, the grass and weeds that cover my property, which I allow to grow naturally long, was still green and there were still plenty of wildflowers for my bees. I’d mowed a path to Lookout Point and to my beehives and close to my RV, but the rest was tall — some of it more than 3 feet tall! — and I saw no reason to cut it back until it died and became a wildfire hazard.

Until I saw the snake.

It was slithering out of the weeds on a direct path to my RV, probably attracted by the shade beneath it. I looked at it carefully to determine what kind of snake it was. Bull snakes, which are common around here, are friends. They eat rodents and rattlesnakes. But rattlesnakes are enemies, especially since I wasn’t 100% confident of Penny’s Arizona rattlesnake avoidance training, which was now more than a year in her past.

Unfortunately, it was a rattlesnake.

Not having a weapon handy and not wanting the damn thing under my RV, I reached down into my poor man’s hot tub, which I’d set up just the day before, and splashed water toward it. It made an about-face and headed back into the tall weeds. I got Penny into the RV, grabbed a heavy piece of scrap wood, and went after it. I tossed the wood onto it. It struck, but not hard enough to kill. The snake took off into the thick weeds over my septic field.

Later that week, I did what I should have done when I bought the place last year: I bought a shotgun and bird shot shells. Yeah, it might be overkill, but any kind of kill would make me happy. The next time I saw it near the RV, all I needed to do was grab the gun, load it with a shell from the open box nearby, and blow the snake’s brains — and everything else — out. The birds would take care of the rest.

That was the plan, anyway.

In the meantime, I mowed. As the green grass and weeds dried and the flowers feeding my bees died, I mowed them away to create a defensible space — not only for wildfire threats, which are very real here in the summer, but for rattlesnake threats. I wanted to see them coming.

About two or three weeks later, I came outside around dusk to take out the trash. I keep my trash can near my shed. As I passed the temporary water spigot, I noted a hole in the ground that I assumed was from a mouse. I stomped it to close it up and heard a rattle.

I think I must have jumped 5 feet backwards. The snake had been curled up near where I stomped and right after rattling, he took off, under the shed. The shed has a porch and the front part was open underneath at the time. Before I could gather my wits after such a scare, the snake was gone.

Not good. Did he live under there? Had he come out of the hole I’d stomped? Did he have friends?

Needless to say, I was a lot more careful when walking around in the evening.

About two weeks ago, while repositioning some of my pallets from behind my shed for use inside my building, I caught a glimpse of a snake slithering away, under my shed. This time I had time to see and count the rattles on its tail — just 3 or 4 of them. A youngster. Anyone who knows anything about rattlesnakes is aware of the theory that they’re the most dangerous.

Of course, there was no way to reach him and I wasn’t about to start firing a shotgun into the small space under the shed. I took measures to block the openings as best as I could. With skids on two sides of the little building and a new concrete platform out front, there was only one way in or out: the back. I closed up as much of it as possible, thus forcing the snake to come and go through a much smaller opening, as far away from my garden as possible.

Peacefully co-exist. That’s what one of my Facebook friends said when I mentioned the snake living under the shed.

I liked the idea. When I lived in Arizona a rattlesnake lived under my chicken coop for a while. It didn’t bother the chickens and the chickens apparently didn’t bother it. And that year, there were no mice in the adjoining feed shed. If the snake stayed under the shed most of the time and just came out to hunt and stayed away from Penny and my chickens and my garden — well, that would be okay.

But that was a lot of ifs.

Too many, apparently.

This morning, one of my chickens was dead. She’s the second to die of the original eight that I bought. As I started moving around equipment to get my ATV out for her “burial” at the far end of my property, I started wondering what had killed her. Had the snake come over to the chicken coop for a visit? Had they fought? Did a snakebite kill her? No matter how much I hoped that wasn’t the case, I had to admit that it was possible.

And then, when I saw the rattlesnake coiled up under where my little farm trailer had been parked only moments before, it became pretty obvious that the snake was not willing to peacefully co-exist with us.

I didn’t need the shotgun. I was holding a shovel.

As the snake stretched out and headed toward the back of the shed, I brought the sharp edge of the shovel down violently, cutting through the snake’s body. Again. And again. The snake was still moving, but it was pretty much cut into four pieces. Guts were coming out.

My First Kill
My friend Bob was right: who needs a shotgun when you have a shovel?

It was still moving when I used the shovel to scoop it into the recycling garbage pail sitting nearby. It’s a deep pail; I didn’t want the snake somehow getting out.

Then I went into the chicken yard and used the shovel to scoop up the dead chicken. After all, that’s why I’d been holding a shovel in the first place. I dumped the chicken onto the snake, put the pail in the back of my ATV, and headed out to the far east end of my property, which is where I left the first chicken who died. This spot is far enough from where I live that I don’t have to worry about Penny finding them. I dumped them unceremoniously in the same spot; scavengers would take care of cleanup, probably within 24 hours.

Is that the only rattlesnake around here? Probably not. A friend of mine claims they always come in pairs — although I can’t say I agree. I’ve seen solitary rattlesnakes before.

I am sure, however, that the one I killed today is the same one that was apparently living under the shed. Same size, same number of rattles. It’s a load off my mind, anyway.

Too bad about the chicken.