Getting up close and personal with commercial orchard operations is a good way to learn about real-world agriculture.
Yesterday, I did a charter flight for one of my favorite clients, a company that owns or manages cherry, apple, and pear orchards throughout central Washington state. Throughout the growing season, they often need to visit one or more of their orchards for any number of reasons. Yesterday’s charter flight was to take one of their lead horticulturists around to meet with orchard managers or growers, so I landed in four different orchards.

My first landing zone yesterday was a gravel staging area on the north side of an irrigation pond.
I took Penny the Tiny Dog with me yesterday, which I don’t often do. She curled up on a dog bed in the back seat during each leg of our flight and then kept me company while I waited for my passenger to return to the helicopter landing zone from his business elsewhere on the orchard. She also gave me an excuse to go walking while I waited. Together, we walked on the dirt roads around the orchard blocks.
This isn’t something new to me; I’ve been doing this since my first flights for this client two years ago. Along the way, I’ve learned a lot about how various fruit is grown, both by observation and by asking questions when possible during flights. I think some of the things I’ve learned are interesting and, after getting some photos to illustrate what I’ve learned, I thought I’d share them here.
Apple Orchards Need Cooling
Food for thought: Apples bought in the spring or summer are not “fresh”
No matter where apples are grown in the U.S., none of them are picked before August. August through October is apple season. Apples grown in the U.S. and bought any other time of the year have been stored since apple season. There are huge concrete buildings all over apple country called CA (controlled atmospheric) storage in which apples are stored until they’re shipped to stores. There’s nothing wrong with these apples — CA storage is used because it works — but don’t think that the apple you buy in May has been picked off the tree earlier that month. Unless it’s grown south of the equator, it hasn’t.
Apples are among the last fruit to be harvested. Long after the cherries and apricots have been picked, the apples continue to grow and ripen. Some early varieties are ready for harvest in August, but most are harvested in September.
Of course, that means that apples are on trees in the hottest part of the summer. And in this part of Washington — the dry side of the mountains — they’re pretty much baking in the hot sun throughout July and August.
Extreme heat isn’t good for apples. To combat the heat, orchards use evaporative cooling — they have sprinkler heads mounted high above the tree tops and turn them on periodically on hot days. This significantly cools the orchard air.
Where do they get the water for this? Orchardists pull water from sources according to their water right limitations and use it for irrigation. Excess water is stored in ponds on the orchards and used for cooling, as well as for warming during frost season.
I should mention that grower with very deep pockets will sometimes erect shade structures over entire orchards to keep apples out of the hot sun. They sometimes also use crop-dusters to spray chemicals on apples to protect them from sunburn. This isn’t necessary for all apple varieties, however.
Reflected Light Helps Evenly Color Apples
All fruit shipped to market has to meet certain standards. Among these standards is color — red apples need to have a certain percentage of their surface colored red to be salable.
Apples get their red color by exposure to the sun. In a perfect world, apple trees would be widely spaced and pruned so that every apple on the tree got full exposure to the sun. But we don’t live in a perfect world. We live in a world where farmers need to maximize profit on their land to survive. As a result, they plant the trees as close together as they can and prune only as much as necessary to get a good crop.

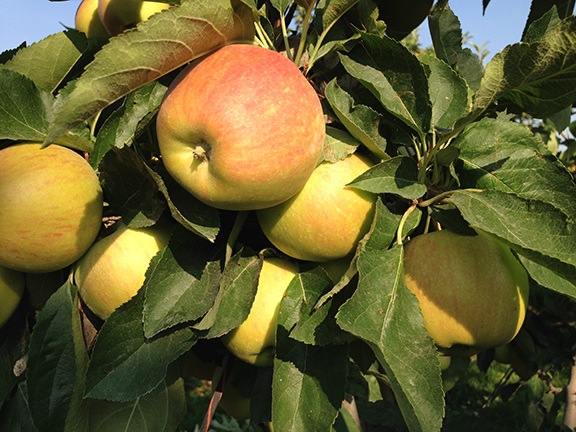
Typical bunch of gala apples growing on a tree in the Ice Harbor area of Washington.

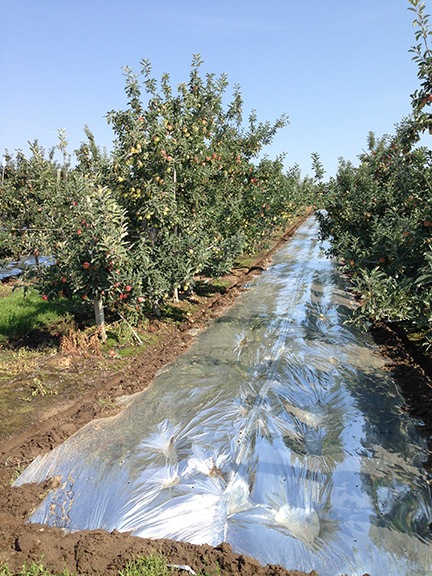
Mylar is commonly used on the ground to reflect sunlight back up to the bottoms of apples.
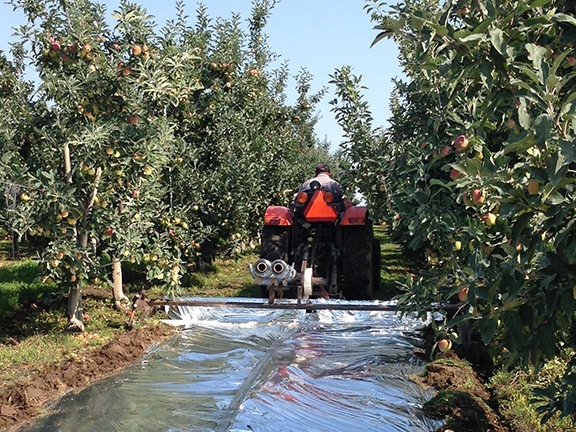
To maximize the amount of sunlight on each apple, growers occasionally use reflective material such as mylar or white sheeting. The growers refer to this as Extenday, which is actually the trademark of a company that makes this material. They roll these sheets out under the trees between every row or every other row, anchoring them with piles of soil. This is done with a tractor and specialized attachment, which I got to see for the first time yesterday. The sheets are removed and discarded before harvest.
Yesterday, I got to see them spreading mylar sheets in an orchard using a special tractor attachment.
It’s interesting to note that Rainier cherries also require a certain percentage of red color. Reflective sheets are also used to help get that color during growth. In fact, that’s usually how I know I’m flying over Rainier cherries when I dry them — because they have more delicate skins, I need to fly higher to prevent bruising.
Some Apples Require Cross-Pollination with Other Varieties
Not all apple varieties can pollinate themselves. Delicious apples, for example, require cross-pollination to bear fruit.
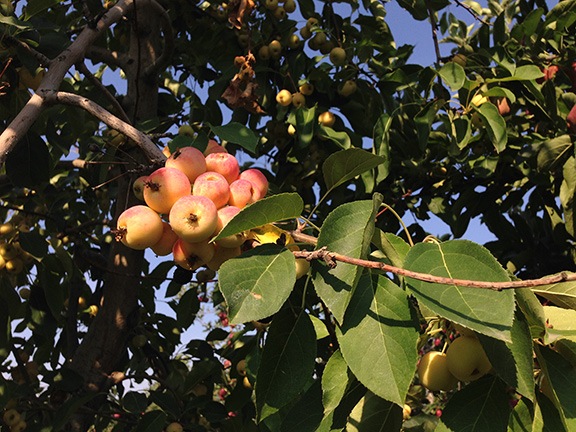
Orchardists commonly use different varieties of crabapples for cross-pollination. These trees are planted within the Delicious apple orchards — perhaps every fifth tree every other row — so that during pollination season bees can spread their pollen around.
Of course, after pollination season, crabapples grow on these trees just as Delicious apples grow on the trees around them. But because there’s no ready market for crabapples, they’re left behind at harvest time to basically rot on and around the trees. This is unfortunate because although they don’t taste very good, they can be used to make other products, including hard cider. Unfortunately, because they’re so tiny and yield such a low financial return, it’s usually not profitable to pick them.
Crabapples growing in a Delicious apple orchard.
Again, some varieties of cherries have the same cross-pollination requirements. Bing, for example, require cross-pollination. Some orchards will plant a less desirable cherry throughout the orchard and leave those cherries behind at harvest time; others will plant another desirable cherry, such as Rainiers or Lapins, and pick them separately.
Bees Can Be a Nuisance to Organic Apple Growers
As a beekeeper, I’m always interested in placing my bees in a location where they get an ample food supply. Earlier this year, when I was touring cherry orchards with a new cherry drying client, I noticed a bunch of beehives in a field. I asked him about it and was very surprised to learn that organic apple growers don’t like bees to be left behind past pollination contracts.
During pollination season, all apple growers rent beehives to ensure pollination of their trees. Non-organic growers don’t care how many successful flower pollinations there are. When the bees are gone and the fruit starts to grow, they spray a chemical that forces a good portion of the fruit to drop off the trees. This ensures that the fruit left behind gets more of the tree’s resources and grows well.
Organic farmers, however, can’t spray that chemical. As a result, they try to limit the number of apples on the trees by limiting the amount of time the bees are present. When a beekeeper removes bees from an orchard but keeps them in the area — perhaps a nearby field — the bees continue to pollinate the trees. As a result, there are too many apples on the organic trees and they need to be culled manually at a great expense to the grower.
So organic growers simply don’t want the bees around any longer than necessary.
Grass and Weeds in Orchards Help Bees Survive
Most orchards have strips of grass and weeds between rows of trees. This is impossible to prevent given that the area is irrigated, fertilized, and cleared of pests. The trees aren’t the only things to benefit from this. The grass and weeds can grow quite luxuriant.
This is good for bees, especially when those weeds produce flowers such as dandelions. In late summer, long after the fruit trees have been pollinated and fruit has begun to grow, other food sources such as wildflowers become scarce. Weeds in orchards sustain the bees.
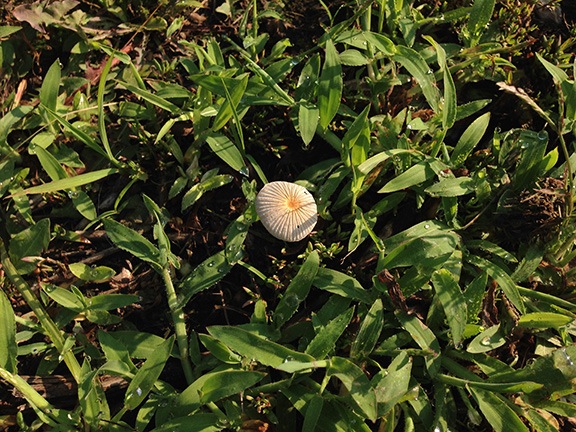
I still don’t know if this weird thing was a flower or a mushroom.
With colony collapse disorder (CCD) killing off bee colonies worldwide, growers are encouraged to leave the grass and weeds in orchards as long as possible to help the bees find a food source. Unfortunately, most orchards are mowed before the pickers come in to make it safer and easier for them to move and position ladders and get around the orchard.
Still, yesterday, I was reminded of this as I wandered into the tall, thick grass and heard bees flying all around.
More to Know
If you’ve gotten this far, I hope you’ve learned at least one thing about commercial fruit growing: that there’s a lot more to it than simply planting and watering trees and picking fruit at the end of the season.
When we go to the supermarket — or even to the farmer’s market — to buy fruits and vegetables, we have no idea what the growers did to make that produce grow and get it to market. The next time you’re at a farmer’s market chatting with a real farmer, take some time to learn more about the food you’re buying. If you’re like me, you’ll find it fascinating and get a lot more respect for them and their efforts.