On Pilots and the Sacred Trust

A violation of trust, an act of murder.

Like most other frequent airline travelers, I was horrified to learn this morning that the cause of this week’s German Wings airplane crash in the French Alps is most likely the deliberate action of the “co-pilot” (i.e., First Officer), who locked the “pilot” (i.e., Captain) out of the “cockpit” (i.e., flight deck) and put the airplane into a steep descent that ended when it hit a mountain.

The only good thing to note about this is that men, women, and children on board likely never felt a thing as their lives were extinguished, like a candle’s flame between two calloused fingers.

As a pilot, this was more horrific to me. Why? Because the pilot who is responsible violated what I consider a sacred trust.

Let me try to explain. When I fly my helicopter, there is nothing more important to me than my passengers. By climbing aboard my aircraft, whether it’s for a 7-minute “hop ride” around town or a cross-country journey lasting hours, they have proven to me that they trust me with their lives. I don’t take that trust lightly. Maybe I pay closer attention to details, like the wind speed and direction or the way the helicopter lifts off the ground into a hover with their weight distribution. Maybe I fly a little higher, to reduce mechanical turbulence on a windy day and ensure that I’m well outside the “Deadman’s Curve” in the unlikely event of an engine failure. Maybe I keep my bank angle on turns a little flatter and my approaches and departures a little shallower to ensure a smooth flight.

I want my passengers to be not only safe, but comfortable. I want their memories of flying with me to include only the pleasant experiences they have during the flight.

I know a lot of pilots who don’t seem to think this way. Their goal is to impress their passengers with what they consider their flying skill. They want to give “E-Ticket rides.” For some reason, they think this is what their passengers want — and maybe some of them think they do.

But what passengers really want is to get off the aircraft in the same condition they got on it: safe, unharmed — and yes — alive.

And that’s what I call a sacred trust. The passengers trust the pilot to ensure their safety. If the pilot does anything to compromise that safety — whether it’s buzzing a backyard barbecue or diving into a mountain in France — he’s violated that sacred trust.

Pilots who even consider doing dangerous or suicidal things with passengers on board should not be in control of an aircraft.

Airplane
I’m about to get on this airplane for a flight from CA to WA. Do I need to worry about the mental state of the pilots?

As a pilot, I’m upset that a young German pilot decided to kill himself and the 149 people who trusted him with their lives in such a horrific act. I’m worried about what future passengers will think about their pilots’ mental state of mind. I’m worried that people will use this incident to fuel their fears of flying, to avoid flying altogether. I’m worried that the FAA or airline management or other authorities will enact knee-jerk rules and regulations — like the one that made cockpit doors impregnable — that further burden responsible pilots with tests and paperwork that add to their stress and workload.

Most of all, I’m angry about the half-informed media coverage and their “experts,” jumping to conclusions and exploring crazy conspiracy theories, grasping for someone to blame, instilling fears in viewers and listeners and readers.

Again.

Let’s get this straight: it’s all about a pilot who betrayed his passengers’ sacred trust.

This is not just suicide by airplane. This pilot committed murder, pure and simple. In doing so, he sullied the reputation of other professional pilots who take their responsibilities as a pilot seriously.

And that’s what upsets me most of all.

28-Feb-15 Update:Pilot Who Downed Airliner Vowed ‘To Do Something’ To Be Remembered” might shed some additional light on his state of mind.

Construction: Pergo Installation Time-lapse

A task I thoroughly enjoyed!

On May 20, 2014, I began blogging about the construction of my new home in Malaga, WA. You can read all of these posts — and see the time-lapse and walkthrough movies that go with many them — by clicking the new home construction tag.

I got a pleasant surprise yesterday: I actually had fun installing the Pergo laminate wood flooring in my bedroom.

The job was remarkably easy once I got the hang of it. I started on the far left end of the room, positioned a piece about 1/8 inch from the wall, and slipped the tongue at the top into the groove of the previous piece at about a 30° to 45° angle. Then I gently rocked it up and down until is snapped down into place. The next piece went pretty much the same way, but also required me to bring the left edge against the right edge of the previous piece and make sure that snapped, too.

Cutting was the most challenging part. Although most cuts were simple straight cuts I did on my miter saw, I did occasionally have to cut around door openings and the like. In some cases, I had to draw pictures of the final piece with measurements. I know that sounds weird, but Pergo pieces can only be installed in one direction and if you screw up a cut, chances are that piece will be unusable as intended. If you’re lucky you can use it for something else. But if you do something seriously dumb — like cut off both ends — the piece becomes garbage. I screwed up two pieces during this installation, which I don’t think is that bad, considering it was my first full room.

Floor Installation
Here’s what the floor looked like when I took my lunch break. I was almost done!

As I worked, I found myself thinking about the sign I’d seen in Lowe’s offering installation at a sale price of 99¢/square foot. I can’t believe people would pay that when it’s so easy to do yourself. Yes, having the right tools does make the job easier — I had a miter saw, a table saw, a special pull bar designed for floating floor installations, and a rubber mallet — but even a battery-powered circular saw with a good blade would have been enough. The way I see it, I had a rewarding DIY day, got to play with my power tools, and saved $288.

If you want to see the narrated time-lapse video, here it is. I figure that if you deduct the amount of time for the two breaks I took while working, I probably put about five hours total into this job. I’m looking forward to finishing up in the living room and hallway — probably next week when the kitchen is done.

Construction: Electrical Finish

It’s mostly in my hands.

On May 20, 2014, I began blogging about the construction of my new home in Malaga, WA. You can read all of these posts — and see the time-lapse and walkthrough movies that go with many them — by clicking the new home construction tag.

I don’t know about other parts of the country or world, but in Washington State, where I live, an owner/builder can get a permit to do all of her electrical work. In an effort to save money, take a hands-on approach to the construction of my new home, and keep myself out of trouble during slow winter months, I chose this option and became my own electrician. I’ve been blogging about this for the past few months; I have links to specific posts in this one.

Like the plumbing work, which I blogged about over the weekend, electrical work has multiple parts. Back in September, I brought the power into the building. I guess that would be considered ground work. The rough-in stage would be getting the wires into the device boxes throughout my home and bringing the home runs down to the circuit panel; I did that in December and January. The final stage, finish, consists of attaching the ends of the home runs to circuits in the circuit panel and then putting devices on every device box in the home.

When I say devices, I’m referring to the electrical components you interact with: outlet receptacles to plug things into, light switches to control lights and outlets, and fixtures such as lights and smoke detectors. Every device on a circuit needs to be wired property before you turn on the circuit. The more devices you have, the longer it takes.

I know I joked about the vast number of outlets I have in my home, saying “You can never have too many outlets.” Well, when I started wiring them myself, I realized that you can.

Prepping for the Job

My home consists of mostly 15 and 20 amp circuits. Although I wanted to use 20 amp throughout, I soon realized that working with the thicker 12 gauge (as opposed to 14 gauge) wire would destroy my girly fingers. The main drawback to having a mix of circuit types is the fact that the device rating must match the amperage. So I couldn’t use a 15 amp rated receptacle or switch on a 20 amp circuit. That meant buying a bunch of each type and carefully matching them as I worked my way from room to room, wiring devices.

Wring Cart
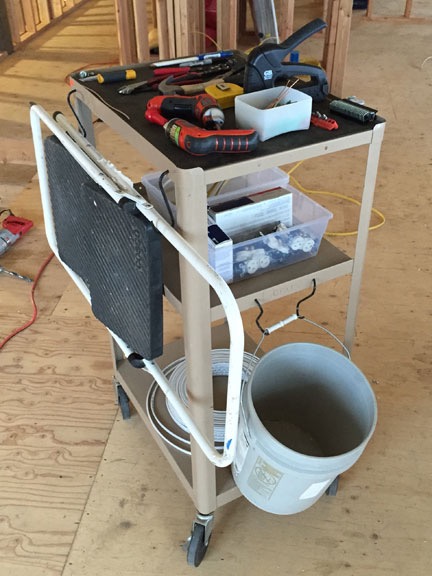
Here’s my wiring cart as it looked during the rough-in stage.

I set up a rolling cart to make the chore easier. The cart came from a school surplus sale I attended last year. It’s an old media cart with three shelves. On top, I laid out my electrical tools: pliers, wire cutters, wire strippers, screwdrivers, electric screwdrivers, bits, utility knife, hammer, drywall cutter (obtained near the end of the process), etc. Below that, in bins, I laid out 15 amp and 20 amp receptacles and switches, as well as a wide variety of switch plates and wire nuts. At the very bottom of the cart, I had a box of wire pieces I could use to create pigtails, as well as a small box for wire trimmings I could recycle. A garbage pail attached to the cart made it easy to keep my worksite neat and clean. I even had hooks I could use to attach my stepladder. I’d wheel the cart from room to room as I worked, keeping my tools nearby. I also wore kneepads and had a gardening pad to further cushion my knees when I did work near the floor.

I bought just about everything at Home Depot; not only did I get a 5% discount on every purchase, but they have an outstanding return policy that encourages people to buy far more than what they think they need and simply return the excess. In the beginning, I just bought huge quantities of everything I thought I might need. I was at Home Depot nearly every day and really got to know the staff. (It’s gotten to the point where they ask me how my project is going when they see me and I show off photos to them.) As the work progressed, I’d return some items and pick up others. Just the other day, I was so close to finishing that I took an inventory of what I still needed, compared it to what I had on hand, and made a “final” return/purchase trip. I have some spares left in case something needs to be replaced, but I don’t have bins full of devices anymore.

Getting the Job Done

I went room by room, trying hard to do one full circuit at a time so I could power it up and test it. The first circuit I completed upstairs was for my living room lights. That was only six devices. I then did the circuit for outlets on the south side of my great room — another five devices, including one outside on the deck. After that, I wired devices as I needed to, completing both kitchen circuits, the range circuit, the dishwasher circuit, the laundry room circuit, and the dryer and water heater circuits.

Things slowed down after that. I had some traveling to do, including an unscheduled trip to California, and that broke my momentum. A friend helped me install my ceiling fans, which hang 13 feet above the floor. I waited for deck fixtures to arrive, realized they weren’t quite right, and had to return them. Then I waited for the replacements to arrive. I tried (and failed) to install the track lighting in the hallway by myself. (It really needs two people to hang.) I wired all the devices I could but still found myself waiting for missing devices or another pair of hands to finish off the circuits.

How It’s Done

The difficulty of the actual work varied depending on the device(s) that needed to be wired. The easiest were the single gang boxes for outlets and switches. One or two sets of wires come into the box and you attach their ends to a device, screw the device into the wall, and screw on a cover plate. Done. I averaged about 10 minutes per outlet throughout my home.

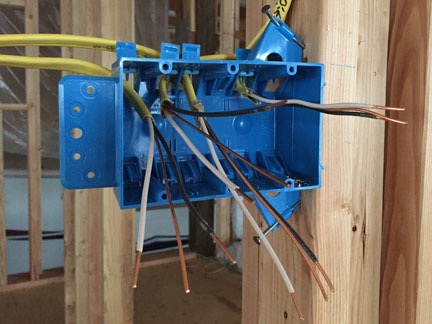
Before the Walls
Originally, the bathroom switch box had only three devices; I had to swap in a bigger box to accommodate the switch for the exhaust fan.

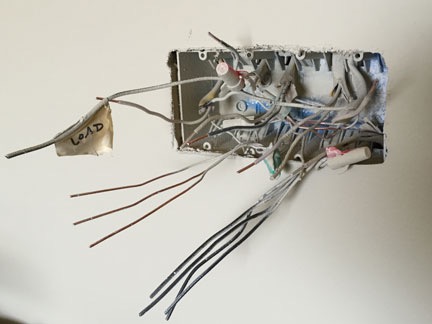
After Drywall
With the drywall in place, it’s hard to see where the wires go.

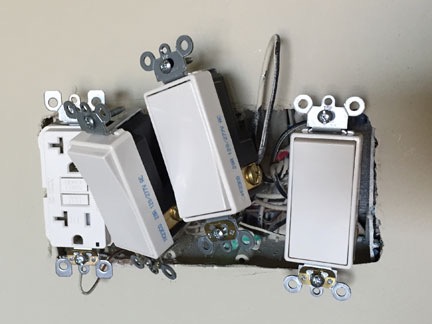
Connected Switches
The switches are connected and ready to screw back into the box. This can be difficult with a lot of thick wires in the box.

Finished switches
The finished box. Well, finished until I open it back up for a little rewiring.

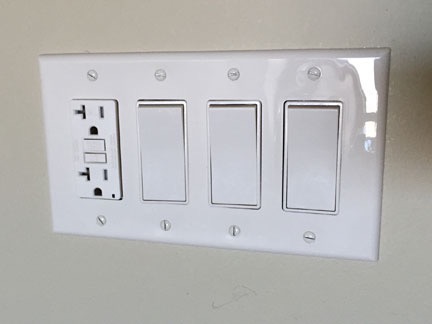
Other boxes were more complex. For example, the box shown here is for my bathroom. It has six sets of wires coming into it: source of power (home run), vanity light, exhaust fan, sconces, and two outlets. The box needed to be wired with one GFCI outlet that the other two outlets needed to be wired into for GFCI protection as well as three switches for the three other devices. Although it was pretty easy to see where the wires came from when there wasn’t any drywall (top image), it became a little tougher once the walls were on (second image). Fortunately, an electrician friend had advised me to mark wires as “load,” giving me a clue on how I needed to connect the wires. I wired the outlet and switches (third image), then screwed them into the box and put on a switch plate (bottom image).

Later, after I’d installed the light sconces and the circuit was done, I flipped the circuit breaker to test my work. I was disappointed to discover that it wasn’t quite right — I’d mismarked the “load” wires and had connected the sconces as a load and a switch to an outlet. The result: when the circuit was powered up, the sconces came on and could not be turned off; their switch powered the outlet on the west wall. Oops. I’ll be opening that box and rewiring the outlet and far right switch later today. So far, this is the only one I’ve messed up, so I think I’m doing okay.

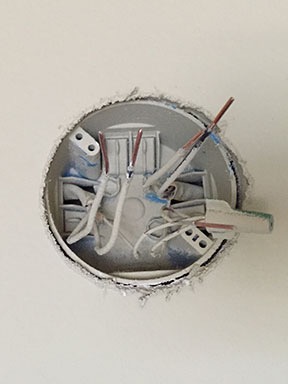
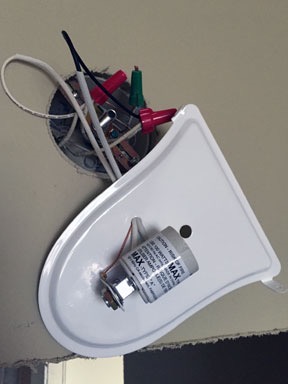
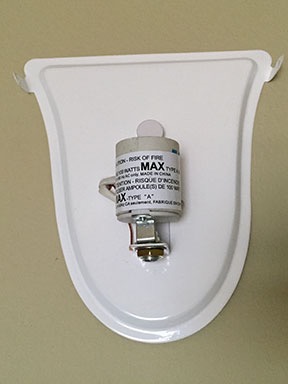
Wiring light fixtures was a bit of a pain because it required not only doing the wiring, but installing a bracket that would hold the fixture in place. The bracket styles varied from one fixture type to another. The picture-based instructions were either incomplete or inaccurate almost every time, so there was a lot of guesswork and trial-and-error involved. Here’s an example using one of my bathroom sconces.

Sconce Installation Step 1 Sconce Installation Step 2
Installing a bathroom sconce. Start with a fixture box with wires (left). Connect the wires to the fixture support — in this case, a metal plate (right).

Sconce Installation Step 3 Sconce Installation Step 4
Fasten the plate to the wall (left) and then fasten the fixture cover — in this case, a glass shade — to the plate (right).

Although installation of the first six fixtures went remarkably well, I’ve since learned that not all fixtures come with the hardware you need to get the job done. The bathroom sconces, for example, came with duplicate parts but were missing vital screws — some idiot at the factory had packed the wrong parts. Fortunately, I had screws to do the job — 8-32 size. (I quickly learned what size screws are needed for different components of a device and began stocking up on extra parts.) This bit me again just yesterday when I tried to wire the motion-sensor lights outside each garage bay — they came with three pairs of screws that the designers apparently thought would do the job, but none of them were long enough. Another trip to the hardware store before I can finish.

Tools Make the Job Easier

SmartDriverWhen I couldn’t find a cheap replacement for the battery charger, I simply bought the same drill, which came with a new charger.

Having two battery operated screwdrivers really helped. I had bought one of them years ago but its charger was zapped in a power surge back in 2013. I realized that it was only a few dollars more to buy a replacement drill with a new charger than just the charger. But why throw out the old drill? They take turns getting charged. I keep a different bit in each drill and reach for the one I need as I work.

My electrician friend, Tom, also gave me a handy tool for tightening winged wire nuts. It fits onto my screwdriver like a drill bit and really does the job well. It’s all about tools.

Like a dearly departed wise man used to say, “Any job is easy if you have the right tools.” I can vouch for that.

What’s Left and Ladder Woes

At this point, I’m nearly done. Here’s my list of devices still needing wiring:

  • 3 garage entrance fixtures (need screws)
  • 4 garage ceiling outlets (need to man up and climb the ladder)
  • 1 outside entrance fixture (need to man up and climb the ladder)
  • 1 inside entrance ceiling fixture (need to man up and climb the ladder)
  • 1 deck outlet (no excuse; this should be done)
  • 6 deck fixtures (need 2 fixtures and need to man up and climb the ladder)
  • 1 smoke detector (need to man up and climb the ladder)
  • 3 sets of track lighting (help is coming on Friday for the cost of a rib dinner)

As you can see, I have a bit of an issue with ladders.

The problem isn’t having ladders. I have ladders out the wazoo. First of all, the drywall guys apparently took my 5-foot aluminum ladder, which is extremely easy for me to move around and left me their 6-foot fiberglas ladder, which is a better ladder but much heavier. And, of course, I already have a 6-foot fiberglas ladder, so now I have two. I also have an 8-foot aluminum ladder I bought for preflighting my helicopter. A friend loaned me his 10-foot fiberglas ladder, which is great except I can’t move it on my own. Another friend loaned me his extension ladder which was moved out to my deck by the drywall guys and will likely remain there until my friend comes to retrieve it — I can’t lift the damn thing. Oh, and for outdoor work, I have a 10-foot orchard ladder I bought two years ago.

Out on the deck, the 5-foot MIA ladder would be perfect — except I don’t have a deck yet and I’m working on 2 x 8 sheets of plywood 10 feet off the ground. It’s scary. I really have to work my way up to doing it. The key is to not look down. I worked on one of the more difficult-to-reach fixtures last week only to discover that the fixture wouldn’t fit in the damn box. After consulting my electrician friend, we decided that the best course of action was to buy a different fixture. That’s on my list of things to do.

In any case, the end of my electrical work is near. I expect to have it all done by this coming weekend. Then on to the next challenge — rails around my loft that are needed to pass inspection for my certificate of occupancy. You can bet I’ll blog about that soon, too.

What’s Blooming on March 16, 2015

The wildflowers have begun to bloom.

This is my first early spring living on my property — last year I house-sat locally until February month-end, then went to California for two months — and I’m glad to be able to see how the season progresses. Already I’ve seen apricot trees down on West Malaga Road in bloom; the cherry trees shouldn’t be too far behind them.

Up here at the base of the cliffs in Malaga, I’m starting to see wildflowers. I took a short walk around the two or three acres closest to my home and found four different kinds of wildflowers in bloom. I looked them up in my WA State Wildflower app; here’s what I think they are.

Prairie-Star

Prairie-Star
Very tiny white flowers. These are widespread — I saw them almost everywhere I walked.

Trumpet Bluebells

Trumpet Bluebells
According to the wildflower app, these shouldn’t be blooming until April!

Biscuitroot?

Biscuitroot?
I’m not sure about this one — and the blurry photo doesn’t help. It’s either biscuitroot or desert parsley. Either way, it shouldn’t be blooming until April.

Balsamroot

Balsamroot
Balsamroot are among the first large flowers to appear in this area. They are perennials and grow quickly. I have a bunch of them growing by my Lookout Point bench and more on the east side of my property. Only a few flowers so far; in a week or so, they’ll likely be in thick bloom.

More to Come

I’ll try to get out at least once a week to catalog what’s blooming here. It’s wonderful to see flowers so early in the season.

When Is a Bathtub More than Just a Bathtub?

When it’s a symbol of how goals can be achieved when you’re not being held back.

When I was in college, I dated a guy whose family was pretty well off. They had two very nice homes and one of their homes included a soaking tub in the master bathroom. I was 19 when I saw it and from that point on, I wanted one just like it.

Of course, that wasn’t immediately possible given my financial situation. We graduated and my boyfriend and I went our separate ways. I lived alone for about a year and then met the man I’d eventually marry. We lived together in three different homes — well, five if you count the apartments he lived in part-time for work for several years — none of which could accommodate the tub I’d dreamed about, even though I could well afford it by then.

I should point out that my last home, in Arizona, had what’s called a garden tub. This was a generously sized bath tub that looked very inviting but was, unfortunately, not deep enough for a good soak. I used it a lot on winter afternoons, when the sun came through the glass block window and warmed the bathroom. I “made do” with what I had, with either my knees or my chest sticking out of the water while I read or sipped wine.

(Much later, during my last winter in Arizona, I drained and disinfected my outdoor hot tub. After refilling it with clean water and having the heater repaired, I spent quite a few evenings out there, soaking in the warm water. I think I used the hot tub more that last winter than I did in all the years I owned it.)

Americh Beverly 4040
My dream tub.

Oddly, on a trip to visit some friends in California around 2010 or so, I saw my dream tub again. It was in a rental home on the American River that belonged to a friend of a friend. It was installed exactly as I would have installed it: by a big window with a view. In this case, it was a view of the forest around the home, but that was enough.

I surfed the web and tracked down exactly what it was: Americh Beverly 4040.

Time passed. After 23 years together, I married the man I loved. He lost interest in me soon afterwards — but not my money, apparently — and left me for a desperate old whore he found online. (Read the posts tagged divorce if you want the sordid details.) He wanted the house and I didn’t so I left. I rebooted my life by buying 10 acres of view property in the Wenatchee Valley of Washington state and began building what has been referred to as a “custom home” but is actually just a very large garage with a modest living space upstairs.

But the more I dealt with divorce bullshit — and believe me, there was quite a bit of it — the more I realized how much I deserved to have the little luxury items I’d been denied for all the years I spent with a man incapable of making a decision without researching options until either I lost interest or the opportunity was long gone.

Little things like my soaking tub.

So when I designed my bathroom, I designed it with a soaking tub in mind. A tub by the window so I could look out and enjoy the view while I had a good, long soak.

Sadly, my dream tub would not fit in the space I designed. It had to do with my windows. You see, because I wanted to be able to enjoy the view whether I was standing up or sitting down anywhere in my home, I chose tall windows that started only 18 inches off the floor. My dream tub was taller than that. Most soaking tubs are. A built-in tub was out of the question. I’d have to get a freestanding tub.

I must have spent 20 hours in total searching the web for just the right tub. Every few weeks, I’d dive in again, looking at many of the same sites and tubs over and over. Trouble was, there’s no showroom anywhere near here that has tubs like I wanted on display. I had to rely on the Internet for photos and measurements. How many times did I sit on the floor with my legs out, holding a tape measure beside me to estimate water depth? It was vital that my entire body be covered with water. I did not want another bathtub that left my knees sticking out.

My Tub
The catalog photo of the tub I selected.

I finally settled on the 67″ Coley Acrylic Freestanding Tub available through Signature Hardware. It cost a bit more than I’d wanted to spend, but the longer the divorce bullshit dragged on, the more I was convinced I deserved it. I was tired of settling for less that what I really wanted.

I didn’t realize it, but the bathtub had become a symbol — a symbol of a new, unfettered life. A life where I was free to make all of my own decisions. A life where I no longer had to consult or debate with a sad sack old man who always seemed to have excuses for why something couldn’t be done. A man who was too fearful of taking risks that he couldn’t make anything worthwhile happen.

The bathtub arrived in January and sat in its huge box for two months. It was finally carried upstairs and installed in my bathroom on Thursday. When the plumbers left, it was ready to use.

And how I wanted to use it!

But I’d promised some friends I’d meet them for dinner and, by the time I got back, it was too late for a soak.

And on Friday, a friend came over for dinner. When she left, it was too late for a soak.

And on Saturday, I helped some friends with a catering job in town. When I got back, it was too late for a soak.

Yesterday was a rainy day. I spent most of the day finishing up electrical outlets and switches and light fixtures around my home. A friend came for a visit and we chatted for a while. When he left, I fixed the ice maker in my refrigerator — the installers had failed to turn on the valve for the water source. Then I sat in my lounge chair by the window in the living room and just listened to the sound of the rain on the roof while looking out over the gray day, with low clouds drifting over the river and alongside the hills. My almost-finished home was warm and dry. I started thinking about that tub.

My First Bath
My first bath in the new tub was exactly as I’d hoped it would be.

A while later, I was stepping into deep, warm water with a glass of wine on the windowsill, well within reach. Hot water tumbled from the faucet, building bubbles high. Before the tub was filled my whole body was submerged.

It was exactly as I hoped it would be.

And that’s when I realized that this first soak was another milestone in my rebooted life. The realization of a goal I’d set for myself almost 35 years before but had abandoned due to circumstances beyond my control. It was possible because there was no “beyond my control” anymore. I had control of my life and could do what I wanted with it.

I was free to make things happen — and I was.