Naked on the Deck

And other benefits of a home with privacy.

Lately, I’ve taken to relaxing on my deck after a shower or soak in the tub. Naked.

Naked on the Deck
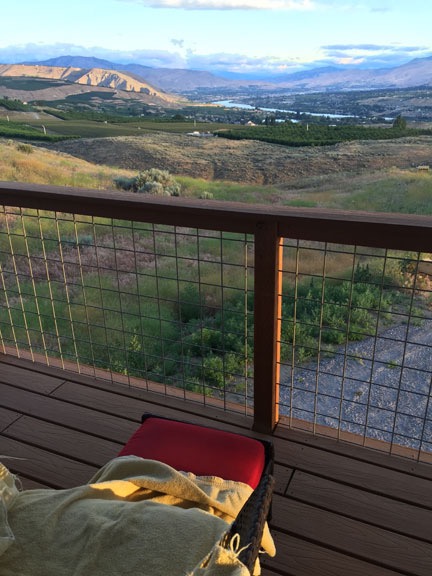
This chair outside my bedroom door to the deck is a perfect place to relax after a shower or soak in the tub.

I can do that where I live. My north-facing deck is covered and blocked from the road by my home. There’s a hill to the west that separates me from my closest neighbor. To the north and east, the land drops away, leaving me with a clear view down to the Columbia River Valley with more than a quarter mile between me and the closest home or orchard.

I have a comfortable chair out there where I can relax, letting a warm summer breeze tickle my skin and dry water droplets my towel missed. I listen to the birds or the crickets or the orchard sprayers while looking out over miles of orchards, scattered homes, a small lake, the winding Columbia River, basalt cliffs, and the city of Wenatchee off in the distance.

It’s one of the perks of living someplace with privacy.

My home in Arizona had nearly as much privacy and I admit I occasionally lounged on my upstairs patio there after a shower or bath — mostly on a warm winter afternoon when the sun flooded the covered area. But I was far more likely to drop my towel at night than during the day; my neighbors were a lot closer and more likely to spot me out there. I’m shy.

My vacation home in northern Arizona was the ultimate in privacy. No one was ever around up there. That place also had a deep silence broken only occasionally by the sound of the flapping of a raven’s wings or a car wandering onto the rumble strip along the closest paved road two air miles away. Or a jet, 30,000 feet up, flying on the jet route over the Grand Canyon.

I value privacy — real privacy. That’s one of the reasons I live on ten acres two miles down a gravel road on the edge of town. Yeah, it’s a long drive — 10 miles to the nearest supermarket — but it’s so worth it.

People complain about loss of privacy from big data collection by social media or portable devices or government agencies like the TSA. Yet these same people live in homes 20 feet from their neighbors’ and rely on association-approved fences to keep those same neighbors from watching their backyard barbecues. Or they share walls with neighbors in apartments or condos and can hear their neighbors sneeze or argue or have sex. Or their windows look out into community spaces, thus requiring them to close the blinds if they don’t want their neighbors to watch them eating dinner or watching television.

I lived like that for a while: in a fishbowl condo that reminded me so much of a movie that I named the network Rear Window. I hated having to use blinds to block out prying eyes — and light. I hated the thought that I had to change the way I lived my life just because I lived so close to other people.

But here in my new home, I don’t have curtains or blinds on any of my windows. I don’t need them. No one is going to look in — no one can. And no one wants to — most of the people out here have their own lives and don’t need to poke their noses into their neighbors’ business. (Sadly, not all of them have learned what living in the country is all about, but I suspect they’ll learn that lesson soon. Seriously: some people who live in metro areas really should stay there. They’re not welcome here.)

So I’ll relax naked on my deck whenever I like, basking in the privacy that my semi-remote home gives me, glad that I made the decision to rebuild my life here, in a place I love, on my terms.

One Wrong Way to Look for a Pilot Job

Be prepared — and then don’t act outraged when you get an unexpected response.

TelephoneYesterday afternoon, I got a call from a number I didn’t know and answered as I usually do: “Flying M, Maria speaking.”

The caller seemed almost surprised that someone had answered the phone. Maybe I’d answered more quickly than he expected. He stumbled over his words a bit and I recall thinking that he might be someone looking for information about a charter flight. Lots of people who call who have no idea how to ask for what they want get off to a rough start.

But no, eventually he asked for “the boss.” Yes. In those words.

“That’s me.” I replied. Now my brain was wondering what he was selling. Anyone who asks for the owner or the person in charge of parts/maintenance/accounts payable/fill-in-the-blank is trying to sell me some product or service I don’t want. My phone is a cell phone and the number is on the FCC’s Do Not Call list, but that apparently doesn’t stop telemarketers from bothering me multiple times a week.

But no, after some more stumbling over words, I learned that he was a pilot looking for a job.

And that’s when I got annoyed. Here’s a guy who can barely communicate what he wants and obviously did no preparation for his call asking me for a pilot job?

I replied that there were no job openings at my company and that even if I had a job to offer, I wouldn’t offer it to him since he obviously couldn’t be bothered to find out who he was calling before he made a call to ask for a job. I told him he needed to work on his technique.

And then I hung up.

After the initial “I can’t believe how inept job seekers are these days” thought, I got back to what I was doing. I had pilot friends coming for dinner and was prepping for their arrival.

This morning, I got an angry email from the person who’d called. Apparently, he was in the U.S. from his home country (which I don’t think I need to share here), had trained in the U.S., and was outraged that I’d been so rude to him. He said:

I was going to let you know that my approach to you asking for a job was not good at all, I just wasn’t prepared before I called and of all the places I call the owner is never taking the phone.

Interesting that he admitted he wasn’t prepared. And odd that I hadn’t noticed his accent, which really comes through in the wording of his written communication.

He went on to say:

My point with this message is that the way you talked to me was just really disrespectfull [sic], rude and unmotivating for a new pilot.

Apparently, he believed that I should drop everything and give him the polite attention he thought he deserved as he interrupted my day to stumble through his job request. A request made without any advance preparation.

Yes, if he’d bothered to do any research at all on my company before calling to ask for a job, he would have learned that the company is a single pilot Part 135 operator with only one helicopter and one pilot. That should have told him how unlikely it was that I’d be hiring. But at the very least, he would have learned my name and could have used that instead of asking for “the boss.”

Or if he’d read the Help Wanted page on my company’s website, which is linked to the Contact page where he may have gotten my phone number and definitely accessed the contact form he used to email me, he would have seen that I was not hiring.

Yes, I was rude. I’ll admit it. (It’s already been established here and elsewhere that I can be a real bitch sometimes.) But when someone acts like an idiot, how should I respond? By gently coddling him so he makes the same mistake again with the next person he bothers?

Don’t you think this guy will think twice before he makes his next call? That maybe — just maybe — he’ll do a little homework first and learn more about the company he’s calling and whether they’re hiring? Or possibly find out who he should be speaking to to ask for a job?

And am I wrong, but do cold calls ever work when looking for a job? Any job?

The other day, I blogged about the importance of networking for career advancement. Networking can help job seekers make valuable contacts they can use when looking for work. It makes time-wasting cold calls unnecessary.

Am I sorry I was so rude to this guy? Maybe a little. He was probably slightly handicapped by a language issue.

But to me, he wasn’t different from any telemarketer who disrupts my day by trying to sell me something I don’t need or want.

And if he thinks I was rude to him, he should hear me when I’m annoyed at one of them.

Bees: The Case of the Missing Queen

You don’t have to see a queen bee to know she’s there.

I started my beekeeping hobby in June 2013 and have been blogging about it periodically. If you’re interested in reading the other posts in this series, follow the Adventures in Beekeeping tag. Keep in mind that the most recent posts always appear first on this blog.

Lately, the North Central Washington Beekeepers’ Association‘s mailing list has been flooded with a rash of panicky reports from members that claim they have a queenless hive. In nearly every case, the beekeeper has made this determination because he or she simply has not seen the queen.

Fortunately, you don’t need to see the Queen among the rest of the bees to know that there is a queen in the hive. I say “fortunately” because I rarely see the queen in my hives, yet I know that she’s in there.

At the beginning of this season, I obtained two nucs and four packages. In each case, I introduced the queen to the rest of the hive by prepping her queen cage and letting the other bees release her. (And yes, I know a “real” nuc should have an established queen — how I got these is a story in itself.) So I know I started with a live queen in each hive.

Queen Bee
Image of queen bee by Pollinator on Wikipedia. Used with permission; Creative Commons 3.0 license.

Yet on my first inspection, I found no sign of a queen in two of my four packages or either nuc. I thought I had a disaster on my hands and started researching how I could get new queens quickly, before the colony died, without driving to Seattle or spending a fortune.

In this case, my slow response paid off. I inspected the “queenless” hives again and found evidence that there was a queen present, even though I didn’t see the queen. All the hives are doing well; I didn’t have to replace any queens.

Now I don’t want to suggest that I’m an expert — I’m not. This is only my third year as a beekeeper and I never even completed the beekeeping course offered by the group. Yet it seems to me that there’s one pretty positive indicator that a queen is present, even when you don’t see her:

Are there eggs?

Pretty simple stuff. If there are unhatched eggs, you know there was a queen in the hive within the past three days. Why? Because it take three days for an egg to hatch.

Now yes, it’s true: when a hive is queenless it is possible for workers to lay infertile eggs. But how often does that really happen?

If you don’t see eggs, are you looking hard enough? I never saw a bee egg until this year. Why? Well up until this year, I had my contact lenses set up for near and far vision. Unfortunately, although I could see okay near and okay far, I didn’t see well either way. So this year I decided to use the contacts for far vision and wear readers for close vision. All of a sudden I could actually see tiny things again! Like bee eggs! So if you’re 40+ years old and your close vision isn’t perfect, don’t expect to see bee eggs without a pair of glasses to help. Put them on under your veil.

Black foundation also helps. The tiny white eggs — much smaller than a grain of rice! — show up much better against black than yellow. Mann Lake and other beekeeping supply houses sell black foundation just for this reason. See for yourself here.

If you still don’t see bee eggs, look for freshly hatched larvae. Those are only a few days old. If you see some tiny larvae today and look again a few days later and see more around the same size, there probably were eggs in there that you just didn’t see. And a queen laid them. Thus, there is a queen in the hive.

Right now, I’m caring for seven hives. I don’t do hive inspections as often as I should — I only get in there about once a month — and this year I’ve probably only done about twenty hive inspections. Yet I’ve only seen a queen four or five times. And in two of my hives, the queen is marked!

Remember, there are thousands and thousands of bees in each hive. If you’re set up with two or more supers and twenty of more frames, do you honestly think you’ll be able to spot the queen in an 30-minute inspection? I don’t. And although I keep an eye out for her as I examine each side of each frame, I don’t waste time searching for her.

It’s more important to assure that the colony is healthy with plenty of brood and food stores than to look for the boss lady that makes it all work.

That’s how I look at it anyway.

A Ghost in the Machine

Traces of a past best forgotten pop up in the most unexpected places.

This morning, I unpacked and installed my HP color laser printer. I’d been using a cheap Brother laser printer — the one I’d bought years ago for home when I moved my office to a condo in Wickenburg for a few years — since moving to Washington state two years ago. The Brother is very fast and reliable with perfectly fine print quality for the limited amount of printing I do. But I needed a color printer to print some satellite images for the pilots who will be working with me this summer and since the HP was packed in its box in my shop storage area, I figured I’d bring it up.

I honestly can’t remember where the printer was when I packed it. I’d had it in my office in Wickenburg for quite a while but in 2011, in a failed attempt to appease my husband (now wasband), I’d moved my office to the condo he was living in during the week in Phoenix. The idea was to spend more time with him, which he led me to believe he wanted.

But that move also came with a lifestyle that had me shuttling back and forth between Phoenix and Wickenburg every week — weekdays in Phoenix, weekends in Wickenburg. After spending the whole summer living in an RV every year, I wanted to be home. In one home. With my office in Phoenix, whenever I had a book project, I needed to be there. And I work weekends when I have to. So instead of spending most of my time in my comfortable Wickenburg home, I wound up spending most of my time in a dark, depressing, noisy, and privacy-free condo in Phoenix that I never even liked. Meanwhile, he kept going home on weekends, making we wonder, at times, why I’d moved at all.

Anyway, I don’t remember if I moved the printer down to that office. I might have. If I did, it was likely one of the possessions I had to beg him to let me have back when he and his mommy/girlfriend began their reign of harassment in the early days of divorce proceedings. In any case, I still had the original box — I kept all boxes in my hangar — and I packed it in its original foam. I’m pretty sure the Brother was in the condo — it was in the cabinet under the TV — and I can’t remember if I got it the day I came to retrieve my possessions or before that.

Honestly, the whole thing is a blur and that’s probably a good thing.

Today, I moved the Brother off my file cabinet — another possession I had to ask for — dusted the cabinet’s top off, and set the HP in its place. It uses the same cables, so I just hooked it up to power and USB. It immediately came to life with a Paper Jam error message.

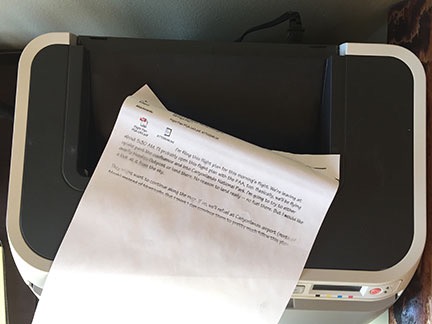
I opened the printer’s big front door. The sheet of paper was clearly visible and easily removed. As I pulled it out, I wondered why I hadn’t removed it when the jam occurred. Then I looked at it and realized that I hadn’t printed it. My wasband had.

Email Jam
The ghost in my machine was a jammed email message printout.

It was an email message I’d written to him back in 2007. It had two attachments, one of which was a PDF of my flight plan. The message told him that I was flying from Page, AZ up Lake Powell and into Canyonlands National Park. I was apparently on a charter flight — probably a photo flight I did with a photographer trying to get images of certain landforms from the air for an advertising poster. I vaguely remember the early morning flight and the photographer holding a camera sitting on a Kenyon gyro. I could probably track down more details in my log book.

I know I’d used the printer after 2007. Heck, I’m not even sure if I owned the printer in 2007. That meant my wasband had printed a long-saved email message while I was gone, probably in the summer of 2012, when he hooked up with his girlfriend/mommy and his delusions went into full swing.

I have an idea why he might have printed this old email. In his deluded mind, he was convinced that he had helped me build my helicopter charter business. That’s how he justified going after half its assets in the divorce. He was unable to prove his case in court — most likely because it wasn’t true — but I assume that he was collecting email messages related to that business as part of his case.

Of course, the reason I sent him an email message with my flight plan that morning at 3:06 AM was because he was my husband and I thought he’d care about my route. At that point, before his delusions began, I think he really did. He might have even still loved me back then.

But mental illness does funny things to people. Once the love was gone and the greed-fed delusions took over, he saw everything even remotely related to my business as evidence of me using him without compensation. I’m sure his lawyer(s) got a stack of email messages from me to him that he thought could help his case in court.

Printed on my printer.

Finding this message jammed in my printer makes me even sadder for him than I already am. His illness, fed by bad advice by manipulative people he trusts, caused him to throw away so much — not the least of which was a friendship and a ton of money. I doubt anything remains of the good, honest man he once was.

I’ll throw this ghost into my recycle bin. Another reminder of a lost life swept away.

Construction: Organization Solutions

Keeping my things neatly organized is a major goal in my new home.

On May 20, 2014, I began blogging about the construction of my new home in Malaga, WA. You can read all of these posts — and see the time-lapse and walkthrough movies that go with many them — by clicking the new home construction tag.

I spent much of the other day working on organization solutions for my home. I want to be able to put things away neatly, organized so they’re easy to find. I want to open a drawer or closet and see things arranged where they belong.

Coat Closet

The very first thing I did was to hang a shelf and rod in my hall closet. This would be my coat closet. All of my coats, on hangars, were in a wardrobe moving box that was basically falling apart under their weight. It was March after the drywall was done and the kitchen cabinets were being installed — the same time I was using a variety of coats. Clearly, I needed a coat closet done.

Coat Closet
The shelf and rod in my coat closet was my first home organization project.

I used a pair of 1×6 boards, cut to the depth of a shelf I wanted on top and mounted rod holders on them. Then I cut a piece of dowel I had — former curtain rods from my Arizona home — and fit in in place. I painted the boards and shelf. Voila! My coat closet, which I’d also use to store my vacuum, was done.

The Pantry

I had decided early on that I didn’t want food in my kitchen cabinets and I didn’t want appliances on my kitchen counters. That meant putting in a pantry.

I call my pantry “the amazing shrinking pantry” because it originally appeared on my plans as a walk-in closet with shelves on three walls. During the framing process, as the skeletons of my future walls were set, it became obvious that if the pantry was that big, it would extend far into the great room and hide the top of the stairway from view of the kitchen island. So we cut it to about half the original size. That made it a deep closet. Later, when I realized that I needed a place to put the ladder for the loft, creating a cubbyhole in the wall where the pantry was could be a good solution. I hired a framer to modify the future walls, cutting space from the back of the pantry. The space that was left measured only 33×32 inches when the drywall went up. The pantry had gone from a small room on paper to the smallest closet in my home.

Melamine
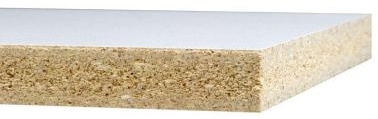
Melamine board is durable and has a washable surface.

Undaunted, I put in shelves a few weeks ago. I bought a 4×8 sheet of melamine board. That’s basically particle board with a melamine resin coating. I had the Home Depot saw man cut it to size on the big saw, not only saving me the trouble of doing it myself but making the board movable. A full sheet is simply too heavy for me to handle on my own. I also bought some white 1×3 trim pieces. At home, I cut the trim pieces to the depth of the shelves and used wood screws to attach them to the closet walls at the studs. (First time I used my stud finder.) Then I laid the shelves atop the trim strips. I spaced the shelves with enough room at the bottom to fit my wine cooler and wine bottle rack (trimmed to size). The first shelf was tall enough to accommodate my countertop appliances: mixer, food processor, coffee maker, bread machine. The next few shelves would hold my food. The very top shelf, which required a stepladder to reach, would hold seldom-used entertainment items, such as a steamer, pitchers, and platters, as well as liquor bottles.

Finishing this first organization project was a real morale booster. I was able to move my food up from my RV, where I’d been living for nearly two years, and unpack my kitchen appliances. It was the first step to really making my kitchen usable.

Pantry Shelves
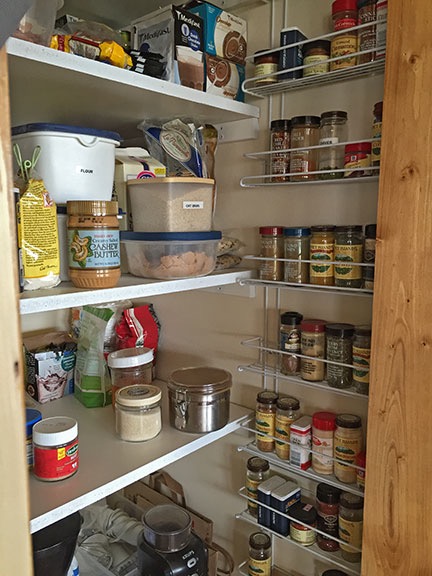
My nearly finished pantry includes shelves for food, small appliances, and spices.

Of course, I wasn’t quite done. After painting the board edges and screw heads with glossy white paint (to match the melamine), I started thinking about adding shelves along the wall in the very narrow space between the edge of the shelves and the doorway. I was mostly concerned with storing spice bottles — with a real kitchen at my disposal again, I had begun doing a lot of cooking and was accumulating small jars of herbs and spices at an amazing rate. I’d been storing them in a basket in the pantry, but every time I needed something, I’d have to dig through the basket to find it. I tracked down white wire spice racks on Amazon.com and ordered four of them. Although my original idea was to put two on each side of the doorway, I wound up putting three on one side. The spices fit nicely — and yes, I did put them in alphabetical order — on those shelves. That was the first project I finished last week.

The Bedroom Closet

My old house had a large walk-in closet in the master bedroom. While it was nice to have all that space, there were two reasons why I didn’t like that closet:

  • The upstairs heater/AC unit was in there. The house had two-zone heat and, because it didn’t have a basement, it had two separate HVAC systems, each of which had the air handler in a closet. This ugly, fully exposed thing stood in the back corner of the closet, taking up about 20% of its space.
  • There were ugly wire shelves for linens in there. The house didn’t have a linen closet. (Who builds a house without a place to put linens?) Our solution was to add shelves in the master bedroom closet. But instead of putting in nice, neat shelves, my wasband went with white, plastic coated wire shelves. The kind of shelves you might have in your garage. They were shoved into place right inside the doorway, like the afterthought that they were. Functional, but ugly.

(Looking back at it now, I realize that it’s just another example of the half-assed solutions I lived with for 29 years. Why do something right when you can do it cheap?)

I didn’t want to be unhappy with my new home’s closet. I wanted to do it right.

The closet is 100 inches wide and 35 inches deep with a 72 inch wrapped doorway. Eventually, I’ll hang a pair of sliding doors on it, but for now, it’s wide open.

I explored a lot of possible solutions, including a DIY shelf setup. Although my pantry shelf project wasn’t bad, I knew I lacked the building skills to create a satisfactory solution from scratch inside the closet. That meant either a kit or hiring a contractor.

I contacted California Closets. That’s a company that build (supposedly) custom closet solutions. I asked for a “free consultation.” I thought that meant someone would come to my home and talk to me about what I wanted. But instead, it meant that a woman would call me from her home or office in Spokane, talk to me about the size of the closet, and email me some sketches. She had no desire to come see me until she knew she had a sale. And with a materials-only quote of about $1500 for a closet design that wasn’t anything like what I wanted, she certainly wasn’t going to get the sale.

That meant a kit. I looked at the John Louis Home Deep Deluxe closet organizer kit several times before finally buying it. I found a coupon code online for 10% off and shipping was free. It arrived a week later in a big box that was too heavy for me to lift. My friend Tom helped me drag it up the stairs, where it sat in the hallway until the movers came. The movers moved it into the bedroom at my request where it sat until last week.

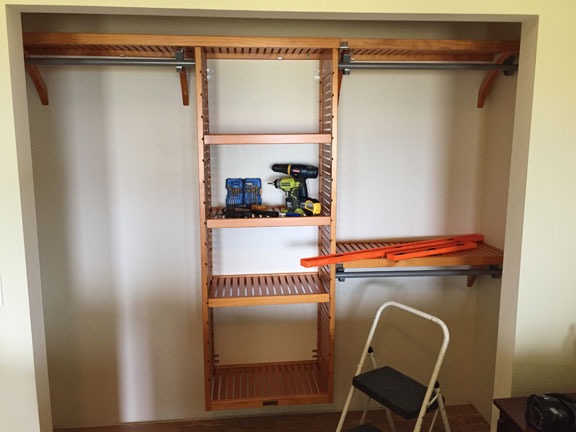
Assembling the John Louis system was not like assembling Ikea furniture. It required precise measuring, driving multiple heavy screws into the wall, and cutting shelves and garment rods. I started it late one afternoon, worked on it for about three hours, and then made the mistake of taking a break for a glass of wine while I watched the sun set. I picked up the task the next day. Although the instructions were clear and in plain english with plenty of illustrations, the installation video, which I watched on my iPad as I worked on each step, was invaluable. The system is extremely flexible and comes with enough shelving to do almost anything you like. I customized my closet with basically equal single and double bars on either side of the standard 24-inch shelves. The resulting organizer exactly filled the entire 100-inch width of the space, which lots of shelf space. It was affixed firmly to the wall, attached to studs wherever possible. And it looked awesome.

Closet Organizer
Here’s the finished closet organizer with the tools I needed to build it. (My chop saw, which I used to cut the shelves, is down in my shop.)

Laundry Room Shelf

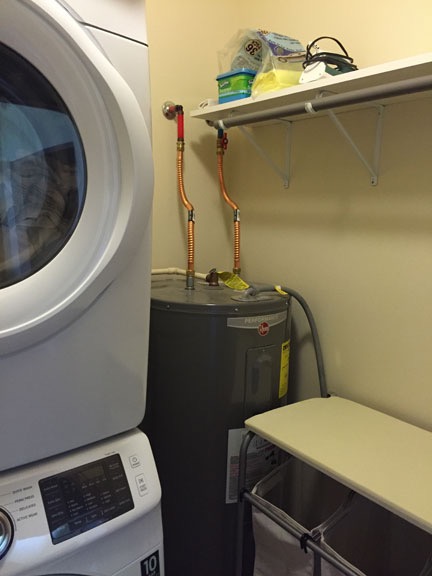
While I was on a roll, I figured I’d use my new shelf-installation skills to put up a shelf in my laundry room. My laundry room is remarkably tiny, only 5×6 feet, and houses a full-sized washer and dryer (stacked), water heater, and 3-bin hamper. I’d been putting laundry soap, clean rags, and other items on top of the hamper and the place was a disorganized mess. A shelf was the solution but because the plumbers had roughed in for a taller water heater, I had some weird water pipes running down the wall. The shelf couldn’t go from wall to wall.

The solution was to mount shelf supports on three studs of the wall and place a melamine shelf atop it. I’d already bought everything I needed. The shelf supports had cups at the end to support a clothes rod — I thought that might be a nice touch to hand dry shirts and other items. My bedroom closet had spare rod.

Laundry Shelf
It isn’t easy to get a picture inside such a tiny room. The other end of the shelf is where I put my laundry detergent. The top of the laundry bin doubles as an ironing board; I got it on Amazon.com.

I spent about an hour cutting the shelf, mounting the supports, hanging the shelf, and fastening the rod. While the result wouldn’t win any design competitions, it was functional and not nearly as ugly as the water heater below it.

Bathroom Storage

My bathroom needed storage, too. I had not designed it to have a medicine cabinet set into the wall. That was mostly due to my complete inexperience as a general contractor and the simple fact that I didn’t think of it. Wall mounted medicine cabinets were big and bulky — I didn’t find a single one I liked that wouldn’t cast a shadow with the over-sink light fixture above it. That meant any medicine cabinet items would have to go elsewhere.

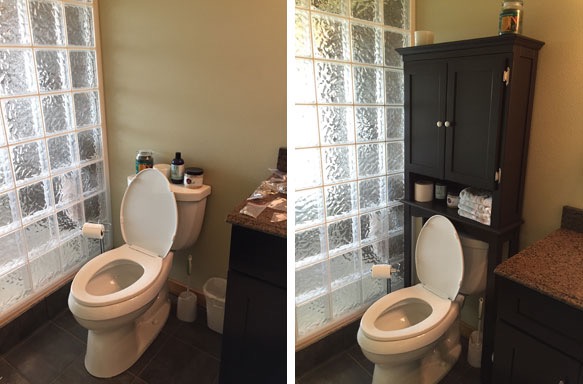
I saw an over-toilet cabinet that matched my bathroom vanity in Bed Bath and Beyond and picked it up on one of my trips into town. While I was still on a roll, I assembled it. Although it looks pretty good and it’s attached to the wall for safety — don’t want that falling down on you while you’re doing your business in the seat — I’m not 100% happy with it. It’ll either grow on me or I’ll find another solution. Perhaps a wall-mounted medicine cabinet over the toilet? With this in place for now, I have plenty of time to think about it.

Before and After Toilet Storage
I think these before and after shots do a good job of showing how much better the toilet area looks with the shelf unit in place. And its practical storage, too.

Remaining Projects

I have two big storage projects left to do:

  • Linen closet shelves. When I bought the melamine board for my pantry, I also bought board and had it cut for the linen closet. I just haven’t gotten around to putting in the shelves. I’ll use the same technique I used for the pantry.
  • Shop shelves. Although I bought and assembled some shelve units from Ikea for shop storage and was ready to buy and assemble more, Ikea no longer sells those kinds of shelves. My friend Bob showed me the shelves he assembled in his garage. They’re simple and sturdy. I already have 12 2×8 sheets of plywood that I’d been using on my deck until I got the decking down. Those will be repurposed for shop shelves. I bought the 2×4 lengths of lumber I’d need for the job. These shelves will go into the far back corner of my shop area, where my furniture was stored until it was moved upstairs. I’ll use them to store shop supplies, camping gear, and other equipment I need but don’t use regularly. I’m a huge fan of clear plastic bins for organizing related items; those shelves will be sized to fit the bins.

I have the materials I need to do these jobs. Now all I need is the time.

Guess I’d better get to it.