Blender Bullshit

Do people really fall for this crap?

I used to own a Kitchenaid blender. It was a pretty simple model with a glass jar. I didn’t use it often, but it worked well enough when I did. Until it broke.

I’d bought one of those Magic Bullet blenders to use in my RV when I traveled. Because I didn’t replace the Kitchenaid, I started using it at home, too.

Magic Bullet
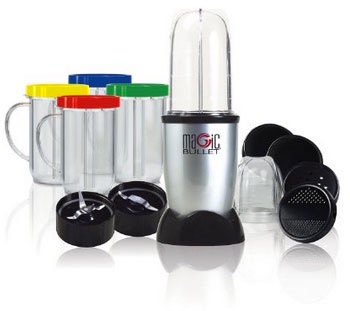
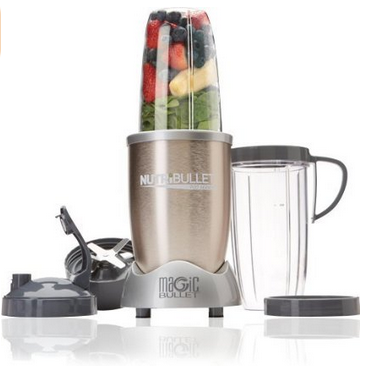
A Magic Bullet blender

A Magic Bullet is basically a blender base with two different blade assemblies and a bunch of plastic cups that the blade assemblies screw into. You fill a cup with what you want to blend, screw on the blade assembly, turn the whole thing upside down, and stick the bottom of the blade assembly into the blender base. When you push down and twist, the blender turns on.

Nowadays the “original” Magic Bullet comes with only a few cups and lids. But when I bought it, it came with about a dozen. I’m not sure why. They were a pain in the ass to store so I threw most of them away, keeping just one of each size. Ditto for the rings that turn the screw-top cups into smooth-top cups. (I’m not going to drink out of a plastic blender cup.) And the lids.

Let me be clear: the Magic Bullet is junk. It’s the same kind of disposable appliance so many Americans bring into their lives. Cheap and functional, but not exactly reliable. I knew mine would break and I knew I would throw it away. The only thing that surprised me is how long it lasted before it finally broke: maybe 8 years?

But it did break. And I was left blenderless.

Immersion Blender
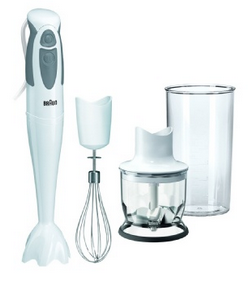
My Braun immersion blender is part of a set that includes a chopper and whisk. I often use the whisk to make fresh whipped cream. I don’t think I’ve ever used the chopper. Maybe I should?

Well, that isn’t exactly true. I have one of those immersion blenders. It’s like a stick that you put blade side down into a pot of soup to puree it while it’s cooking. Mine’s a Braun and it works very well. I didn’t use it often until my Magic Bullet broke. Then I started using it to make smoothies. It got the job done — I’d just stick it into a big cup full of the ingredients and whir it until it was smooth — but I had to be careful if I didn’t want smoothie all over my kitchen.

Clearly, it was time for a replacement blender.

I mentioned it to my Facebook friends and the recommendations started coming in. Apparently, there are a lot of folks out there willing to pay in excess of $300 or $400 for a blender. I think they must use it a lot more than I do. I just wanted a small and functional kitchen appliance that I could store on a shelf in my pantry when not in use.

I was in Costco last month and saw that they had a Nutri Ninja, which another smoothie-making friend had mentioned. Yesterday, I went in to look for it. It was there, next to the $350+ Vitamix, selling for just $99. But it had a lot of parts — those damn blender cups — and I seemed to recall another model with fewer cups and a lower price. I found it hiding behind the Vitamix display for $69. Less parts, less money. I put it in my cart with the other things I’d come to Costco for.

NutriBullet
Not the blender I thought I was buying, but I honestly don’t care.

It wasn’t until I got home that I discovered I’d bought another Magic Bullet.

What fooled me was the larger size and the prefix “Nutri” in the product name. It was a NutriBullet, not a Nutri Ninja. Sheesh. I really should pay attention when I shop.

Another person might have taken the damn thing back to Costco. But I honestly didn’t care. All I wanted was another cheap blender and that’s what I got. This one was bigger and beefier with bigger plastic cups than the old one. If I got 5 years out of it, I’d be happy.

The Cookbook
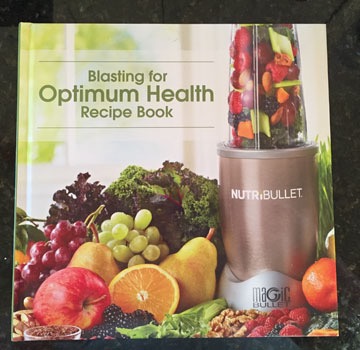
On the surface, this looks like a recipe book, right?

What surprised me, though, was the hard-covered book that came with it. On the surface, it looked like a cookbook. Later, when I went to bed, I took it with me to browse it before I went to sleep. It took only moments to realize what it really was: a piece of marketing material designed to fool people into thinking that they’d bought some kind of special nutrition machine that would make them healthier and help them lose weight like no regular blender could. After all, they’d bought a “nutrition extractor,” not a blender!

Nutrition Extractor!
“Nutrition extractor”? It’s a freaking blender.

Yes, the book had recipes, but it also had a lot of nutritional information about trendy “superfoods” like cacao nibs, organic chia seeds, organic goji berries, and organic maca powder. There were pages and pages about these “foods,” along with information on how you could order them from the NutriBullet website.

And the testimonials! Pages and pages of them from people praising the NutriBullet to high heaven. Here’s an example closing line for one that stretched two full pages:

It has touched my life in more ways than I can explain.

Seriously? A blender? You really need to get out more, Daniel.

I especially liked the recipes that required you to cook a bunch of ingredients, wait for the mix to cool, and then “extract” it in batches before reheating it again. News flash: an immersion blender like my Braun can do it without cooling the soup down, saving hours of food prep time.

In all honesty, I found the recipe book offensive. Cover to cover, it was full of marketing bullshit, touting the mostly imaginary benefits of a crappy blender. I couldn’t believe anything I read inside it and felt insulted that someone thought I might. And the stock photos of the attractive 60+ men and women enjoying their healthy lifestyle were a real turn off. Is this blender for old people?

It amazes me how low marketers will stoop to sell an inferior product.

Anyway, I’ve already tossed the book into my Goodwill box. Maybe someone more gullible than me will find it worth reading.

And yes, today I’ll give it a try. But I won’t be making a “nutriblast.” I’ll be making a good, old fashioned smoothie, just like I always have. And you can keep the goji berries.

A Craigslist/PayPal Scam

Too many people are playing this game. I played along to see what it was all about.

Last week, I re-listed my RV, the Mobile Mansion, on Craigslist. I decided I didn’t want to deal with email responses, so I listed my phone number, which happens to be for my cell phone.

Text Message
The first text message I got about the camper.

The text messages started coming almost immediately. The first wasn’t too odd — except that the person texting me wanted me to reply via email, claiming she wasn’t contacting me from her cell phone. Huh? But I didn’t want a long, drawn out email discussion. So I replied that she should call me.

I never heard back from her.

By the time the second text message arrived the next day, followed almost immediately by another one with nearly the same wording, I knew something was up. (I was born at night, but it wasn’t last night.)

Here’s the one I decided to investigate. It started off pretty weird:

BUYER: Good Day,i searched on CL and saw your< 2010 Keystone Montana Mountaineer 324RLQ - $29900 (Malaga, WA) >which i highly have interest to purchase from you now kindly let me know if it’s available and in Good Conditions ?

Note the deplorable English. It reeked of scam. I played along:

ME: It’s still available. It’s in very good condition. If you want to discuss it, call me.

The response came nearly 12 hours later at 10:11 PM:

BUYER: Sound excellently to me I am from Yakima WA how i wish to come over and view it in person but am currently out of town right now.I work as a Marine Engineer busy sailing on ship right now in U.S naval base.I’m really satisfied with the conditions about it,please kindly text me your actual price that you’re selling it for me ??

Yeah. He’s sailing on a ship in a U.S. naval base. I believe that. I decided to stick to my asking price, figuring that a real person would try to bargain:

ME: $29,900

If there was any lingering doubt about this being a scam, it disappeared with his response:

SCAMMER: Okay i have agree with the price of $29,900 and would have love to pay you via cash but am not around at the moment and i have no one to send to you that’s why i choose Paypal cos its safe,reliable and guarantee transaction safety of funds…so I will want you to get back to me asap with your Paypal email address so that i can proceed with the payment and you will be notify by the Paypal customer care immediately the payment is made and My Mover will be there to pick up and sign all necessary papers as soon as I make the payment …thanks for your consideration.Await your Response

So this guy is supposedly going to send me $29,900 via PayPal and “PayPal Customer Care” will notify me when the payment arrives. Without any paperwork. I don’t even have a name for the guy. I decided to see how far I could string him along.

ME: Don’t you want to see it?

Apparently not.

SCAMMER: In order to enable me to proceed with the payment could you please provide me with the following information below :
Your Full Name:
PayPal Email address:
once i receive the details i will go ahead with the payment and then i will contact my shipping agent for pick up
am okay with it that is why the pickup agent company will contact you for the pick up after payment is made and cleared and take care of the necessary paperwork for the registration after you get the payment. I will need your home address for the Picked

I should mention here that his text messages appeared in 160-character max segments that didn’t always arrive in the correct order. I had to jumble them around to figure out what he was saying. I’m not even sure I got the above quote right.

ME: I think you should see it first. Or do you trust your shipper to inspect it for you?

I heard nothing for nearly 24 hours and figured that he’d realized I knew I was being scammed. I decided to poke him a bit:

ME: I have another person interested but only offering $28,000. Do you still want it? I haven’t heard from you.

Eight hours later, he replied:

SCAMMER: are u there
i am interested have been wating for you to get back to me with your paypal email address and your full name so i can go ahead to make the payment

I made him wait two hours before replying:

ME: I’m not comfortable selling to you sight unseen. I am willing to deliver to you at no cost.
You can give me a deposit on PayPal and pay the rest in cash when I deliver.

A real buyer would be an idiot to turn down an offer like that. But he wasn’t really interested in buying. He just wanted my name and email address to continue his scam.

SCAMMER: PayPal is one of the best ways to make a payment online simply because it’s fast, easy, secure and reliable.

ME: Not as reliable as cash.
And I’m willing to deliver for free. That’ll save you a lot of money!

He replied 28 hours later:

SCAMMER: dont worry about that am okay with it and dis is not my first using them okay
all you do is to get back to me with your paypal email address and your full name so i can go ahead to make the payment right away thanks ‘

At this point, I knew I wasn’t going to get any farther with him unless I gave him what he wanted. But I also wanted to see what he’d say when I insisted on a deposit and cash on delivery. I waited until the next morning before I replied with a fake name and a throwaway email address:

ME: Send me a $2000 deposit. I’ll deliver it to you or someone you designate to accept it. He can inspect it and give me $27,000 cash. Maria Sarducci, zip98828@gmail.com. Be sure to send me delivery info.

Sarducci? Like Father Guido?

Text 2
What idiot would actually believe this message came from PayPal?

Less than an hour later, the next part of his plot arrived in the form of another text message from a toll-free number. I have to say that I wasn’t surprised. I expected to hear from “PayPal,” although I did expect it to arrive as an email message. I also expected the message to include a link which I had no intention of clicking.

The way I saw it, the link could do one or both of two things:

  • It could run an app that somehow installed malware on my computer. That malware could do any number of things that would make me unhappy.
  • It could take me to a page that looked like a real PayPal page and prompt me to enter my PayPal user ID and password. They’d then have access to my PayPal account, which could be catastrophic — if I had a PayPal account with that address.

So the scammer had played his hand: a link supposedly from PayPal that I was supposed to click to get my money. How many people fall for this crap every day? I bet it’s quite a few — over the past week I received text messages from five different phone numbers that were likely going to lead me thought this same script. It must work if they keep doing it.

I decided to pretend I’d never gotten the text message from “PayPal.” I waited until that afternoon and sent another message:

ME: Did you send the $2000 deposit? That other buyer called. If I don’t get the deposit by tomorrow, I’ll have to sell to him.

This morning, I added:

ME: Hello? I’m still waiting for the deposit. You seemed so anxious to buy. What are you waiting for now?

I don’t really expect a response. I suspect he’ll either give up. But if he does respond, it’ll likely be to draw my attention to the text message from PayPal. If he does respond, I’ll tell him I haven’t seen any money come into my account. That should chase him off.

But I don’t expect to hear from him at all again. I suspect he’s got a few suckers on the line — or people like me who are playing him for fun — to keep him busy.

Why did I blog this? I just want people to understand that there are scammers out there and they will rip you off if you’re not aware of the possibility of a scam. When someone texts you and agrees to pay full price for an expensive item you’ve listed online, sight unseen, alarm bells should ring.

This isn’t the first time someone tried to scam me when I was selling a high-priced item. I’d listed my old R22 helicopter for $110K back in 2004 when a scammer tried to con me. You can read about that here.

Don’t be an idiot. If it’s too good to be true, it probably isn’t true.

April 19 Update: I got another message from a different toll-free number this morning. Actually, two identical messages arriving about 30 seconds apart:

You have 2 new messages for 2010 Keystone Montana Mountaineer 324RLQ Fifth Wheel : 15096998044.accmobusr.com/clrv1

Same domain, different link. In the meantime, I wrote back to the scammer:

ME: I’m still waiting to hear from you. The money did not arrive in my PayPal account. If you’re not interested anymore, kindly have the courtesy to tell me.

Again, I don’t expect a response. But if I get one, I’ll update this blog post.

Dawn Time

When first light is first light.

For the past 20 or years, I’ve lived in a place where I could see the horizon and watch the sun rise and set. This wasn’t the case when I lived in New Jersey or New York, in places surrounded by either tall trees or other buildings. It’s nice to see the horizon, to greet the sun when it makes its first appearance for the day, to see the way first light touches the landscape around me, to watch weather move through, to see last light and watch the sun dip below the horizon at the end of the day.

The sun, in a way, is my clock. Not having a scheduled life, I let it tell me when to get up in the morning and, during long summer days, often go to sleep not long after it sets.

I live at the base of some tall cliffs on a hillside overlooking the Wenatchee Valley and Columbia River. The cliffs are to the south of me — the view from my home is about 180°, basically from east to to north to west. To the east, the cliffs rise up from the east to their full height due south.

Pre-Dawn Horizon
The horizon, as shot from my front deck before dawn this morning. The E marks the point that is approximately due east.

During the winter, when the sun is low in the sky and rises more to the south — remember, I’m in Washington State at about 47° latitude — there’s a 6-week period when the sun doesn’t even clear the cliffs at my place (although it does shine down in the valley). I call that the Shadow Time and blogged about it here.

As the days get longer, the sun shifts north, eventually, at the spring equinox, rising due east. As long as it rises behind the cliffs, I don’t get direct sun until after it clears the tops of the cliffs. But this week, about 3 weeks after the first day of spring, the sun began rising far enough north that it appears at what I think of as the true horizon — the place where the horizon isn’t blocked by nearby hills or cliffs. From that point on, I see the sun when it makes its first appearance of the day — and will continue to see sunrise until about three weeks before the autumn equinox.

If all this is meaningless to you, you should explore some of the excellent articles on the web that explain the sun’s movement in the sky and seasons. Here are a few links to get started:

Astronomy is a lot more than stars and constellations. Just saying.

Since I have a name for the time when there’s no direct sun (Shadow Time), I thought I needed a name for the time when I can see the sun rise out of the far horizon. I’ve decided to call it Dawn Time.

If there’s a corresponding Sunset Time — the time I can watch the sun set into the far horizon — that would probably be a bit before the spring equinox. I can see due west from my home — the snow covered peaks of the Enchantment Range out beyond Leavenworth — and that’s where the sun’s setting these days.

Western Horizon
I shot this photo at first light from my side deck a few weeks ago. The sun touches the mountaintops to the west before it rises high enough to shine into the valley. This is probably my favorite part of sunrise.

But for some reason, I’m more interested in sunrise, the start of the day, than sunset. I’m a morning person, through and through and get my best work done before noon. By 5 or 6 PM, I’m pretty much spent. That’s when it’s nice to sit out on the deck with a glass of wine and watch the sun set — and the light show that often goes with it.

Construction: The Loft Rails

One of the last big projects to finish prior to final inspection.

On May 20, 2014, I began blogging about the construction of my new home in Malaga, WA. You can read all of these posts — and see the time-lapse movies that go with many them — by clicking the new home construction tag.

The living space in my home is small — less than 1200 square feet. I designed it to have a vaulted ceiling which climbs from about 10 feet on the north side to 18-20 feet on the south side. (One of these days, I’ll measure it.) My floor plan is simple, with a large great room on the east side and the bedroom, bathroom, and laundry room on the west side. A hallway on the south side connects these two spaces.

Floor Plan
Here’s one of my working floor plans with some measurements. North is down in this image.

Because it made absolutely no sense to have 20-foot ceilings in the hallway and the bedroom closet and because I needed some way to access at least two of the four clear story windows at the top of the south wall (so I could open and close them for ventilation), I added a “storage loft” to the design. You can see it as the gray space in the above floor plan. While I was doing the design work, I envisioned this as a sort of shelf where I could store things that I didn’t want in the garage. But when the framing and drywall work was done, I wound up with a nice-sized room that I figured I’d use for my library — I have a lot of books, including 85 that I wrote — with a futon I had brought from Arizona that could be used for guests. Although the ceiling on the north side of the loft was only about 5-1/2 feet, there was plenty of headspace at the rest of the loft.

That put the loft into a sort of limbo area as far as the county’s building inspectors were concerned. It was clearly not a shelf, but it also was not a room. This was good and bad for me. Good, because I didn’t have to worry about putting in stairs, which I had not designed space for and bad because I still had to surround the entire loft with a guardrail that met county code specifications for height (at least 32″), openings (no larger than 4″), and durability (able to support the weight of a 250 pound person leaning against it. I basically had to build a rail like the one I’d put around my deck outside.

I was not looking forward to this job and, like most jobs I don’t want to do, I put it off. I put it off for a long time. Part of me was trying to figure out how to do it so it would be aesthetically pleasing — I didn’t want anything ugly in my home. The other part of me was just too damn tired of building. I’d already done a bunch of huge projects: I’d wired my shed, my shop, and my living space; I did 95% of the electrical finish work; I’d tiled the bathroom floor; I’d laid 1,200 square feet of Pergo flooring; I’d laid the composite decking and built rails for my 600 square foot deck; I’d set up shelves in various closets and rooms throughout my home; and I’d gotten about 75% finished with baseboard and door trim — a project that’s still in progress. I was worn out.

But putting a job off doesn’t make it go away. This was a job I needed to get done if I wanted a certificate of occupancy for my home — which I did. So by autumn 2015, I was trying to move it to the front burner of my life.

The Hard Part: Design

The hard part about the job was coming up with a solution that would not only be aesthetically pleasing but also allow airflow — some of my HVAC ductwork is up on the loft — be affordable, and be relatively easy to construct. Making that difficult was the fact that the larger of the two spaces was not rectangular, as shown in the above floor plan. I needed to make some adjustments during the framing stage to accommodate a ships ladder to access the loft. For various reasons, that required a sort of cut out. That meant that if I wanted to enclose the entire space, I’d have to have a rail that followed that cutout, with a gate at the top of the ladder.

I have to say that I wasted a lot of time thinking about that. And making measurements. And stressing over how I was going to adequately support each vertical post I needed when I didn’t really have anything to fasten it to. In the end, I decided to just run the rail straight across the top of the ladder, cutting off some of the loft’s floor space to form shelves. Since most of that space was in the low ceilinged area anyway, it wasn’t a big deal.

Railing
The railing system I originally bought. Ick.

As for how I’d build it, I started by looking at the easiest solution: a packaged railing system. Home Depot had one and I actually ordered enough to do the easier of the two rails: the one over the shelf in the bedroom. This was clearly a “shelf” — it was only 4 feet wide, over my closet and the linen closet — but because it was accessible from the larger part of the loft, it also had to be safeguarded with a rail. I bought a white metal railing kit on a special order from Home Depot and even managed to bring it all up to the part of the loft where it would be installed.

It sat there for at least four months. I just couldn’t bring myself to start installing it.

Why? It was ugly. It was designed for outdoors and it was white metal. Everything inside my building was mellow earth tones and wood. Why the hell would I put an ugly white metal railing inside my home?

Wire Railing
Another, more attractive but also more costly option for the railing.

I went to Marson and Marson, the folks who had sold me my doors and had also provided much of the building materials — trusses, lumber, posts, etc. — that the builders had used to build the shell of my home. Rita, the special order lady, priced up another solution: horizontal wire railings. The wire could be combined with hemlock — the same wood I’d chosen for my doors and door trim — for vertical supports and top rails to give me the look I wanted. But by the time she priced up the wire, the special hardware and tools needed to secure it, I was looking at thousands of dollars and a ton of work.

When I balked, Rita suggested another possibility to work with the wood: powder coated “hog panels” from a company called Wild Hog Railing. This would give me essentially the same look I had on my deck outside, but the powder-coated metal would be a bit more polished looking than galvanized wire. I ordered up some panels with black powder coating and then started to think about holding them all together.

The wood was easy. My doors were hemlock and I’d been trimming them with hemlock trim pieces I bought at Home Depot and cut to size. I’d finished the doors and the trim around them with Danish oil (at Rita’s suggestion) and I really liked the way they looked. On a trip to Home Depot, I realized that they sold hemlock lumber — 2x4s, 4x4s, etc. I’d use 2x4s for the top rail, bottom rail, and side rails affixed to the walls. I’d use 4x4s to create support posts on either side of the gate, in the main loft corner, and at the center of the bedroom loft.

Fixing the vertical supports to the walls wasn’t a big deal — I’d find studs or use anchors. But the four 4×4 posts were a problem. I needed a way to fix them to the floor. I’d been looking for appropriate hardware for months and had been coming up empty. But the folks at Marson came to the rescue. They suggested a pair of brackets for each post that could be attached with lag screws to the 4×4 and through the Pergo floor to the underlying wood floor. I bought eight of the brackets and a box of lag bolts.

Trouble was, the hardware was metal colored. The wire for the railings would be black. When I pointed this out to the guy at Marson who was helping me, he suggested getting them powder coated. So on my way home, I dropped them off at Cascade Powder Coating. They had a bit of a backlog, but thought they could have them done within two weeks. That worked fine for me, since I didn’t have the wire panels yet anyway. The total cost to powder coat the brackets and lag bolts: $70.

Putting It All Together

Once I’d assembled the panels, hardware, and lumber, it was just a matter of doing a lot of measuring, cutting, and assembling.

I figured that I’d fit the panels into a grove I’d cut on the inside of the supports. So I went out and bought a dado saw blade set. For my table saw. If you’re not familiar with dado saws, they basically make it possible to cut a groove of just about any width into a piece of wood. But on assembling my new dado blades to give me the right width, I realized that the plate covering the blades didn’t have enough of a gap for the blades. Some research made it clear why: my table saw could not be used with dado blades. This is one of the drawbacks of buying low-end, home improvement grade tools.

Grooves in Wood
I had the guide set so that I could run the wood through once in each direction to create two grooves like this.

I realized that I could simulate a dado set by running each piece of wood through the table saw’s regular blade two or three times, shifted a tiny bit over for each pass. So that’s what I did. It wasn’t difficult, but it certainly wasn’t fun. And, when I had to do the 11-foot long 2×4 length for my bedroom loft’s top rail, I had to wait until I had company who wasn’t afraid of table saws. (There was no way I could get that long piece through by myself.) My electrician friend Tom and one of his buddies, who’d come by to help me with an outlet for my new freezer, helped guide that long piece through the saw three times.

Grooved Wood
I then adjusted the guide and ran the wood through a third time to cut away the piece between the two grooves.

Here’s the process I followed to prepare each part of the wood frame:

  1. Measure the space to be fitted. Then measure again. Do something else and then come back and measure one more time.
  2. Cut a length of wood to size.
  3. Run the wood through the saw blade 3 times to cut the groove. I got really good at setting the guide bar on my saw.
  4. Sand the length of wood with 80 grit and 160 grit sandpaper using an orbital sander. I have a belt sander but don’t like to use it.
  5. Wipe all the sawdust off the wood with a damp cloth and allow to dry.
  6. Coat the exposed sides of the wood with 2-3 coats of Danish oil. Allow to dry between each coat.

Prepping the metal was more straightforward: all I had to do was cut it. Fortunately, I had a 36″ bolt cutter I’d used to cut the fencing for my chicken yard. Still, it was hard work to cut it accurately. And if I screwed up, I’d be looking at buying another $50 panel. So I was very careful.

Gate
The gate was my proof of concept. I think it came out pretty good.

I assembled all the panels with screws, with two in each corner. I drilled pilot holes in every single one. The gate was the first panel I finished, since it did not have to be affixed to the wall or floor. In a way, it was a proof of concept. I was pleased with the way it turned out.

The rest of the rail had to be installed in place. That meant doing a lot of measuring on the loft, cutting and finishing in my ground-floor shop, and then carrying pieces up the stairs and the ladder I’d put in place for temporary access. By this time, it was mid-December and cold downstairs. It was hard to stay motivated. For some reason, I got it in my head that I wanted final inspection done before year-end, so that drove me and I got a lot done very quickly.

I worked through the main loft in just a few days. I had it down to a science. For each section, I followed these steps:

  1. Install the vertical posts against the walls. I used 2x4s and ran the screws through the groove so they’d be invisible in the finished product.
  2. Posts
    Here’s the post at the top of the ladder. And yes, I screwed right through the Pergo. I know you’re not supposed to do that, but at that point, I really didn’t care.

    Install the freestanding posts. I used 4x4s and bolted each one in using two brackets and 8 lag bolts.

  3. Install the bottom rail. I used a pair of blocks cut from 2x4s to prop up the bottom rails while I screwed them into place.
  4. Measure, measure, measure, and cut the wire panels.
  5. Slide the cut panel into place.
  6. Set the top rail over the posts and wire panels and screw it into place.

Panel
Here’s the first panel installed.

I drilled pilot holes for every single screw I put in. I was not interested in splitting wood or stripping screws. I wanted it done right the first time. I had my drill set up with two drill bits I could quickly swap out and my impact driver set up with a screw driver bit and a socket that could be easily switched out. (Someone I knew once used to say that any job is easy if you have the right tools. It’s one of the few things he said that are worth remembering.) Because these tools are cordless, I didn’t have to deal with wires up there. But I did do a lot of crawling around on the floor.

I finished the main loft area just before I went away for Christmas. I go cross-country skiing up the Methow for Christmas. It’s become a bit of a tradition for me — this was my third Christmas away. Just me and Penny, winging it.

Loft Rails
Here’s what the main loft’s rails looked like before I went away for Christmas. The gate is installed and ajar. As you can see, I still have a bit of trim to do up there in the shelf area.

When I got back, I still had the bedroom loft rail to do. All I had installed was the side and central vertical posts. The wood was grooved and cut, but hadn’t been sanded or oiled. But by this point, I’d run out of steam and was thinking only about my upcoming snowbirding trip. It was unlikely any inspector would come during the week between Christmas and New Year. So any thoughts I had about having the project finished by the end of the year were gone. I figured that if it waited this long, it could wait a little longer.

So I left everything just as it was and went on my trip.

Bedroom Loft Rail
The finished loft rail in my bedroom. The top rail is one continuous piece 130 inches long. It’s the one I needed help getting through the saw three times.

My trip included a week home, mostly to relieve my house-sitter so she could go on a trip and to check on things. But while I was home that last week in January, I figured I may as well finish up the rail. It only took about 6 hours split over two days. And then I was done.

It’s a funny thing about the jobs I’ve done at my home. Before I even start, I spend a lot of time thinking about them, planning them out to minimize the chances of doing them wrong and then having to redo them. Then I eventually get to work and, in many cases, work on them for days or weeks or even longer. And then one day, I’m just done. It feels weird to be done because I’ve been so consumed with the project, thinking about it and working on it for so long that there’s suddenly a hole in my life when I don’t have it to work on anymore.

But then I get on to the next project and it’s all forgotten.

Why It Took Me 6 Days to Change a Tire

Hey, at least I finally got it done.

Yes, it took me six days to change the tire on my cargo trailer. But before I explain, let me give you a little backstory. (Regular readers of this blog should expect that of me.)

About the Trailer

I own two cargo trailers.

One of them is a little 4×8 trailer I bought to haul my bees around in the summer months. Lately, while my truck is in California, I’ve been using it to haul pavers and mulch and anything I don’t feel like shoving into the back of my Jeep. It’s a nice little trailer, but isn’t really suitable for hauling anything that weighs more than 600-800 pounds.

Cargo Trailer
This cargo trailer really came in handy when I moved from Arizona to Washington state and needed to haul an extremely heavy helicopter landing platform and 600cc Yamaha Grizzly ATV.

The other one is a big 8 x12 trailer I bought back in Arizona in 2000 to haul furniture and other things related to the rental properties I used to own. It has a wood plank bottom, low metal rails, and a drop down ramp. In the past, I’ve used it to haul just about anything that wouldn’t easily fit into the back of a pickup.

I should mention — only as an amusing point of interest — that this is also the trailer that got swept downstream in a flood when I lived in Arizona. A dry wash ran through my property there and, for most of the year it was completely dry. I used to park this trailer in it. Bad idea. This trailer was washed a full mile downstream one day. I needed my neighbor’s backhoe to pull it out of the sand. (I just spent 30 minutes looking for the buried trailer photo I know I have somewhere and came up empty. Ugh.) Years later, before I moved to Washington, I replaced the tires, had the bearings repacked, and repaired the ramp, which was damaged in the flood. The trailer looks beat to hell but it’s actually still very sturdy and useable.

Parked Trailer
Here’s the trailer right after I offloaded it and parked it on the west side of my home.

When I got to Washington and my building was completed, I off-loaded the helicopter platform that had been on the big trailer for about two years and parked the empty trailer on the west side of my building, out of sight. Somewhere along the way, it got a flat tire, which isn’t too surprising given the number of construction nails that were still scattered around. But I didn’t need the trailer for anything, so I just put the repair on my list of things to do and promptly forgot about it.

Over the winter, I decided to store some extra irrigation hose and wooden pallets on the trailer — again, to get them out of sight. So I moved everything onto it and secured a big, white tarp over the top. It was ugly from the road, but I didn’t care too much. Winter was coming and I was leaving town anyway.

When I got home from my winter travels and the snow melted and the land started getting lush and green and beautiful, I decided I didn’t want to see the ugly trailer and its ugly white tarp parked next to my home, even from the road. I’d been storing my little trailer on the far east end of my property, near my bee yard. I can see it from my home, but it isn’t in my face. I figured I’d move the big trailer out there with it.

But first I needed to get that flat tire fixed.

Removing the Flat

On Thursday, I figured it was time.

I started by pulling off the tarp and offloading the nice, dry pallets I’d stored beneath it. The extra irrigation hose was light and could stay, at least for now.

Then I used my ATV, which has a hitch on the front end (for pulling the helicopter platform) to pull the trailer out of its spot beside my building and into the driveway in front of the last two garage doors. (One garage houses my absentee truck and the other houses my boat, which isn’t going anywhere anytime soon.) It was a tough tow, mostly because of the way the land has been sculpted there by my earth moving guy, Jeff. There’s a bit of a dip that the very flat tire had to “roll” through. But the ATV, in 4WD, managed it.

I took the trailer off the ATV hitch and put it on its support wheel. Then I used the jack from my Jeep to jack up the trailer where the bum wheel was. I didn’t lift it much — I knew enough about changing tires to know that you loosen the lug nuts while the tire can’t spin.

I grabbed the lug wrench from the Jeep and attempted to fit it over one of the bum tire’s lug nuts.

And that’s when I hit my first (of many) hurdle: the lug wrench wouldn’t fit. It was too small.

I didn’t even bother trying the one for my Honda. Instead, I pulled out my socket wrench set and tried the largest one I had: 3/4 inch. That didn’t fit either.

I hopped on my ATV and drove the half mile to my neighbor’s house at the winery. They were in the middle of building a new tasting room and I knew they had tools. After a nice chat with Kathy, I headed back with three different sizes of sockets, from 13/16 through 1-1/4. 13/16 was the right size, but the socket attachment was 1/2 inch and the largest wrench I had was 3/8 attachment.

At this point, I figured I may as well buy my own socket for the tire as well as the attachment I needed to use it with my impact driver and/or drill. So I headed down into town with the little cargo trailer behind me. I bought the tools I needed at the local Ace hardware store, then went to Costco to buy eight bags of potting soil for my garden. One thing I’ve learned living 10 miles from town is that when you need to go into to town for one thing, you should take care of a bunch of errands at the same time.

When I got back, I set up the new socket with my impact driver and went to work on the lug nuts.

They wouldn’t budge. None of them.

I tried my drill, which I thought might have more torque. Same result.

I sprayed some lubricant on them. The only thing I had was silicone. No joy.

By that time, it was getting late and chilly and I decided to call it quits for the day. I left the trailer and jack right where they were.

On Friday morning, I did some work on another project while I was smoking a rack of ribs on my Traeger. At lunchtime, I packed up the ribs and drove to my friend Bob’s house with that little trailer in tow. He was going to help me with a trailer wiring issue on my Jeep. We finished the ribs with sauce on his grill, ate them with some broccoli slaw I brought from Safeway, and took care of the Jeep wiring issue (which still isn’t quite right). Then he handed me a socket wrench with a 13/16 socket, a long handle, and a bar that fit over the handle.

I let him keep the leftover ribs and took his socket wrench home with me.

I gave the socket wrench/handle combination a try and it worked like a charm. It’s all about leverage. I loosened all the nuts, jacked up the tire a bit more, and removed the nuts with my impact driver/socket combination. Then I loaded the tire onto my little cargo trailer.

Fixing the Flat

On Saturday morning, I headed back into town with that little cargo trailer. I dropped off the tire at Discount Tire, then went to Lowes and bought 30 pavers and 30 edgers for another project. When I went back to Discount Tire, it wasn’t ready so I went home and got to work on other things.

Discount tire called later in the day to report that the tire was too far gone and would have to be replaced. Although the tire had been new when it had left Arizona in September 2013, it had spent more than a year sitting flat at the side of my building. What the hell did I expect? I told them to replace the tire and that I’d come get it on Monday.

The trailer sat there all Saturday and Sunday, jacked up on one side with my Jeep jack. I was glad I hadn’t parked it someplace where it would be in the way.

On Monday, I went down to town to fetch the tire. I left the little trailer behind; it still had pavers on it. I had the back seat out of the Jeep, so there was room there for it. They charged me $42 for the new tire, which I thought was quite a deal. Until the guy went to carry the tire out — it wasn’t my tire. It was a tiny tire, like one for my little trailer.

That led to confusion and a search. They asked me what size my tire was and, amazingly, I knew. They found one that matched, said it had been patched and not replaced, and gave me a refund for the $42 I’d paid for the wrong tire. Then they put it in a big plastic bag and loaded it into the back of my Jeep.

I drove to the local garden shop and bought eight lilac bushes that barely fit in back of the Jeep with the tire and drove home.

I did a bunch of stuff, then got around to putting the tire on. It was heavy. I rolled it over to the trailer, got the trailer jacked up a little more, and put the tire in place. Or I tried to. No matter how I positioned the jack, I couldn’t get the lugs lined up with the tire. I worked on it for at least 20 minutes, struggling with the weight of the damn thing.

The Correct Tire
I took a picture of the matching tire in case I had to show it to the guys at Discount Tire.

And that’s when I got the bright idea to look at the other tire.

And that’s when I realized that the wheels didn’t match.

Discount Tire had given me someone else’s trailer tire.

Fixing the Right Flat

I called them up and reported the problem. More confusion. They had to investigate. I gave them the make, model, and tire size of the right tire — I’d bought the two tires at the same time so they were a matched pair. They said they’d call back and they did about 20 minutes later. They’d found my tire, which had not been fixed. Again, I authorized the replacement and I told them I’d be back the next day.

On Tuesday, I went down into town with my little trailer and the mystery tire. I bought another 30 pavers and six bags of mulch at Lowes. Then I made the tire swap. I made them show me the tire before I settled up with them — it was the right one. This one, however, cost me $90. When I complained gently about it taking me three trips, they gave me a $30 off coupon for my next tire purchase. (Since all of my vehicles currently have new tires, I’ll likely never use it.)

Putting on the New Tire

I got home, parked the little trailer, and set about putting on the new tire. It’s amazing how easy the job is when you’ve got the wheel that lines up with the lugs. (Duh.)

I used my impact driver/socket setup to tighten up the lug nuts, then gave them an extra bit of tightening with Bob’s socket wrench. Then I lowered the jack and moved it out of the way.

I hooked up the big trailer to the Jeep and rolled it out my driveway and down the road. My bee yard is very close to the road down there. I found a spot clear of sagebrush and backed it into position. Then I disconnected it, lowered the front end to level it, and locked the hitch.

It only took six days to get the job done.