The Bighorn Sheep in My Yard

Wild Kingdom* out my window.

There are bighorn sheep in the cliffs across the road from my home. I often hear them clattering around in the rocks, creating mini landslides. I’ve also seen them quite often.

Last year, they’d show up pretty regularly across the street in my neighbor’s yard. By regularly, I mean around midday every day. For weeks. I even had the misfortune of seeing my neighbor outside, buck naked, taking photos of them when I was watching them through binoculars and movement caught my eye.

They were gone for quite a while. Sure, I’d hear them up in the cliffs and the sound would often get Penny all worked up. Despite numerous helicopter rides with me, her hearing remains excellent and she often hears them before I do.

A few weeks ago, they started showing up again. A pretty big herd of mostly females. One time, they even put on quite a show for some weekend guests who’d come with their RV. We sat up on the deck having a late breakfast while they grazed on weeds in my neighbor’s yard.

Bighorn Sheep
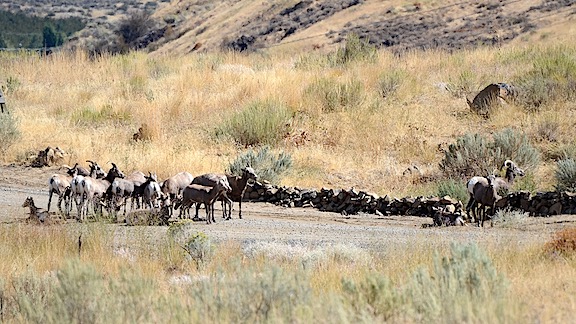
It wasn’t easy to take photos of the sheep at the road; the sun was right behind them.

The other day, they were on my side of the road. I watched them, fearing that they might start grazing on the willow trees I’d planted alongside the road last year. But they seemed more interested in the weeds than the trees. Good.

Penny and Sheep
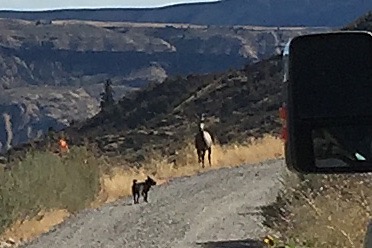
A cropped cell phone picture of Penny facing off with one of the sheep.

On Thursday, I was working on some shelves in my garage when Penny started barking at something. Turned out that she was near the end of the driveway, facing off with one of the bighorn sheep. I managed to get a photo with my phone before the sheep bounded off. I mean that quite literally — it ran off with a hopping motion that was actually quite funny to see. But what really surprised both Penny and me was that the sheep wasn’t alone — are they ever? There were at least a dozen more in my front yard, hidden from view by the tall weeds and my shed. They took off after their friend, running across the road.

I took a break and went upstairs for some lunch. I ate out on the deck. The sheep had moved into the road about halfway down my property line. Some of them were actually lying down in the road. I live on a dead end road and there are only three occupied homes beyond mine, so there isn’t much traffic.

Cathedral Rock Traffic Jam
Seriously? Lying down in the road?

Eventually, however, one of my neighbors went out. Even though they obviously saw the sheep — how could you possibly miss a herd right in the road? — and they drove slowly, the sheep moved.

Into my yard.

As I watched, they came closer and closer to my home. I know they saw me up on the deck watching, but they didn’t seem too interested. They came to the north side of my place, the side that faces the Columbia River and Wenatchee Valley. They were nibbling on the tops of the native grass and weeds that grow wild there. (I have 10 acres and the vast majority of it has “nature’s landscaping.”) They came closer and closer. At one point, one of them was right at the edge of the gravel drive, not 100 feet from where I watched from the deck.

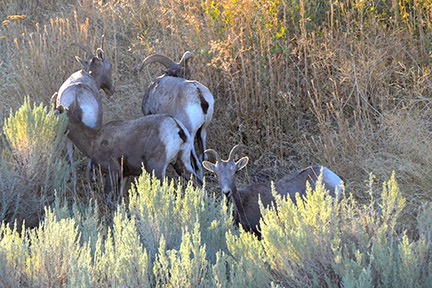
Herd of Bighorn Sheep
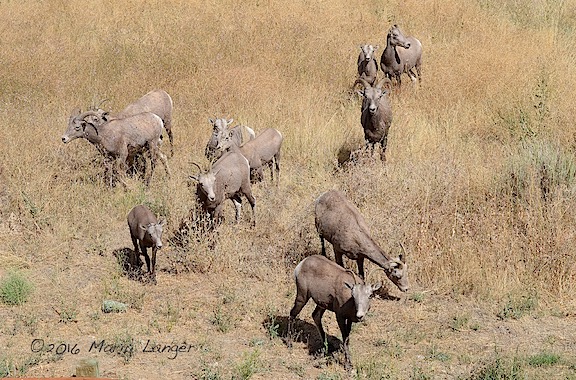
My Nikon was handy and I’d popped the 70-300mm lens on it when they first came into the yard. They were so close that I had to zoom all the way out to capture this group of the herd. This is 70mm from my deck, uncropped. A handful of others didn’t fit in the frame.

They were beautiful. And healthy. Adult females mostly, with a few youngsters.

momandkid.jpg
Another shot from my deck. This was shot at 300mm and is not cropped. They were close!

This is the video I Periscoped. It’s a shame it saves a downsampled version of the video.

I took pictures, of course. Lots of pictures. And video. I did a live broadcast on Periscope and another on Facebook. I wanted to share my experience with my friends. (I guess that’s what this blog post is about.)

I’d left the door open and when I saw them looking down at something, I followed their glance. Penny was out there, sizing them up. I didn’t want her scaring them off so I called her, softly. She seemed to debate whether she should come. But then she trotted back into the house and up the stairs. She joined me on the deck to watch them and stayed quiet.

And then they just left. After about 20 minutes grazing in my side yard, one of them headed off purposefully and the others followed. I watched them go. They crossed my driveway and then the road and headed back up toward the cliffs.

Did they come back yesterday when I was out hiking and hunting for mushrooms with a friend? I don’t know, but I bet they did. And I bet they came back today when I was out doing helicopter rides in Quincy. Tomorrow, I plan to get some work done at home. Maybe I’ll see them again.

I hope so.


* Mutual of Omaha’s Wild Kingdom was a television show about animals that originally aired from 1963 until 1988. I grew up watching this show. A new version began airing on Animal Planet in 2002. Learn more here and here.

Construction: The Garage Shelves

It was a mess. Now it’s not.

On May 20, 2014, I began blogging about the construction of my new home in Malaga, WA. You can read all of these posts — and see the time-lapse movies that go with many them — by clicking the new home construction tag.

I need to start by reminding readers that I have a very large garage. The 60 x 48 footprint is split into a four car garage (24 x 48), a double-wide RV garage (24 x 48), and a shop/general storage area (12 x 48). If you’re doing math, that’s 2880 square feet.

Of garage.

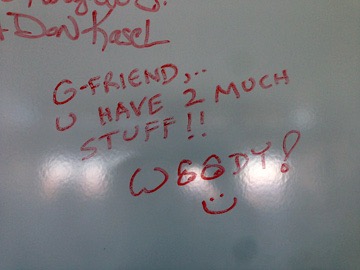
Woody Says
My friend Woody wrote this on my big white board during my moving party back in 2014. He wasn’t kidding.

The great thing about a big garage is that there’s plenty of space to store stuff. The bad thing about a big garage is that there’s plenty of space to store stuff.

I’m doing what I can to keep the garage organized, but even though most things have their place, that place isn’t exactly neat and orderly.

It Started with the Bungee Cords

The other day, I decided to clean up and sort out my bungee cords and ratchet tie downs — you wouldn’t believe how many I have because even I’m having trouble believing it.

I’d been racking my brains on a solution that would enable me to hang them neatly in order of size in a place that was out of the way. That’s when I remembered the curtain rods. When I lived in my Arizona house, I’d bought a few really nice ones. I wasn’t about to leave them behind — not even with shrimp stuffed in them (look it up) — so I packed them. Of course, I don’t have curtains on my windows here so I don’t need curtain rods. They remained wrapped up in bubble wrap in a corner of the garage.

Bungees
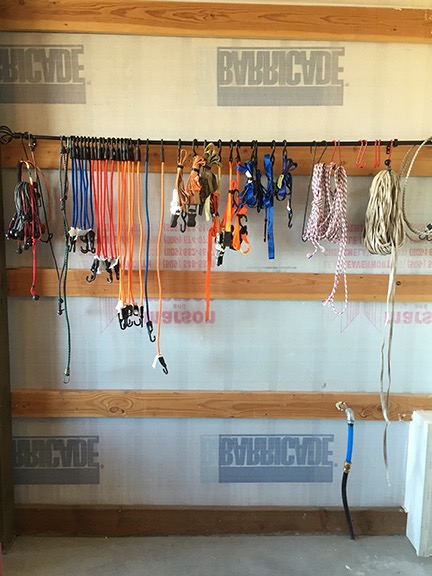
Some of my bungees and tie downs and ropes after putting up the curtain rod. I found a bunch more here, there, and everywhere the next day. The horizontal wooden beams are called girts, by the way. I live in a post & beam building. Beyond the vapor barrier is the metal exterior of my building. The car garage is not insulated.

I unwrapped the living room rod and grabbed a bungee cord. Sure enough, its hook fit neatly over the narrow black rod. A half hour later, the rod was hung on one of the girts in my Jeep garage — each garage bay is assigned a vehicle; the Jeep is in the first bay — and I was taking great joy in arranging my bungee cords and ratchet tie-downs. And ropes and straps.

The Shelves Came Next

I started thinking about how stupid it was to have all that dead space right below the bungee cords. How about a couple of shelves?

Big Shelves
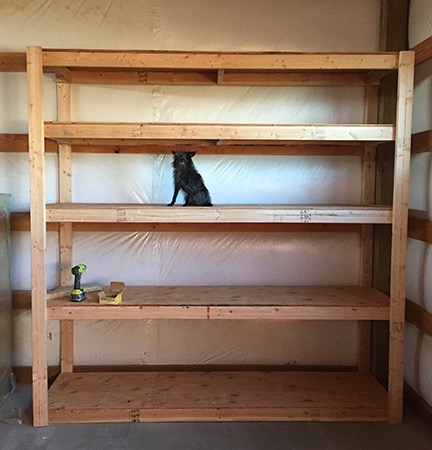
This was the first set of shelves I built for the garage. (Tiny dog for scale.) They’re free-standing and very heavy duty. And just plain heavy. I made two more shorter sets and a workbench with two shelves based on the same design. The RV garage/shop is insulated.

I should mention here that I’ve created shelves elsewhere in my garage. The biggest project was a set 8 feet long and 8 feet tall made of 5/8 plywood and 2 x4 lumber. It was quite a chore to build them, which I did with them lying down on the floor. When I tried to stand them up, I couldn’t. I had to wait for a friend to come by and lure him down into the garage — which was about as difficult as it sounds. (Men love my garage.)

I had limited space in the car garages, though. After all, I had to fit the cars in. Each garage bay is about 12 feet wide. There aren’t any walls between them — it’s one big open space. I knew I could fit shelves that were about 12 inches deep. (The big ones are 24 inches deep.) And I realized that I could build them in place, right against the wall, using the tops of the girts as supports for the shelves. That would save another inch and a half because each shelf could go right up against the exterior metal walls.

So I went to Home Depot and bought a sheet of about 1/2 inch plywood. While I was there, I saw a really nice piece of sanded 1/2 inch plywood that was in the cull pile because of a nasty scratch in one corner. But 70% off? A $35 sheet of wood for $10? No brainer! I brought both pieces over to the big wood cutter and got a Home Depot guy to cut each of them into 8 foot x 1 foot strips. Then I picked up a few 2x4s, along with some very nice 2×3 cull pieces and a long 2×4 cull piece. I don’t see anything wrong with using cull lumber to build shelves in a garage.

Did I mention that I also returned a bunch of lumber I’d bought about a year before but never used? The return completely covered the cost of the new lumber, as well as some additional screws and other supplies I needed in my shop. I threw everything into the back of the pickup, hung a red flag on the long 2×4, ran a few errands, and went home to make dinner with a friend.

The next morning, I really should have tended to my bees, but my truck was blocking my quad and I figured it would be best for me to offload the lumber and move the truck. Or maybe just offload the lumber and build the shelves to get the lumber completely out of the way.

So I did.

Let me explain a little bit about how a post and beam building — or pole building — is constructed. They start by digging holes in the ground and planting vertical posts. My building is made with a combination of 6×6 and 6×8 pressure treated posts. Then they nail the girts in horizontally, 24 inches on center. Next, they put the roof trusses atop the posts. They add rafters to finish framing out the roof. They cover that with insulation or a vapor barrier or both and then screw on the metal skin. They pour the concrete slab last — if the building has one (mine does). If you’re interested in seeing my building built in a time-lapse movie, be sure to check out this blog post.

The posts are usually 12 feet apart. In the bungee cord area, however, the distance between the door to my stairwell and the first post was only 7 feet. The reason: the front door and entrance vestibule is also on that wall. So the shelves needed to be just 7 feet long.

I dragged the saw horses my friend Bob had made me — they’re taller than standard sawhorses and much nicer to use — to the driveway outside the garage door, which I opened. I used my circular saw to make the cuts; later, I used my miter saw and table saw to get cleaner cuts when needed. And bit by bit I assembled the pieces I needed to build a short set of shelves with just a top and bottom shelf. The bottom shelf needed two cut outs — one for an electrical outlet (long story) and the other for the pipe for the outside hose bib. I got to use my new 1-1/2-inch hole saw, which I’d actually bought for a beehive project.

Bungee wall with shelves
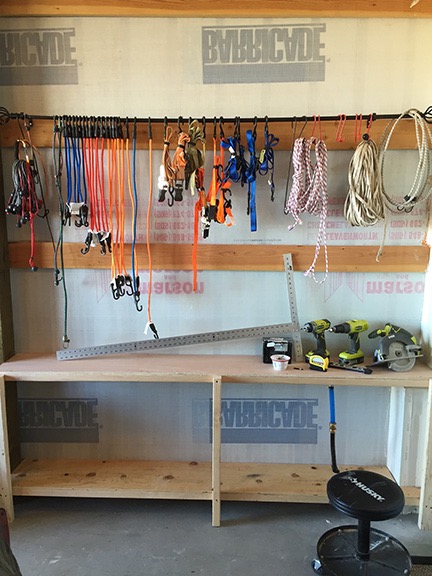
Here’s my bungee cord wall with the new shelves. I arranged all the tools I used for the project on the shelves.

I had to make a few blocks out of scrap wood to support various components of the shelves as I assembled them and screwed them together. I drilled pilot holes — I always do a neater job when there’s a hole predrilled for a screw. I used two 2×2 lengths that had been sitting around forever for the front horizontal shelf supports. These were small shelves so they didn’t need to be very heavy duty.

When I was done, I realized that I also needed a center vertical support. So I used a piece of scrap wood leftover from my windowsill project. Done.

And Then More Shelves

The truck wasn’t empty yet. I still had plenty of wood. I also had a really messy wall at the front of that garage bay. And time.

Old ShelvesHere’s the old shelves with a bunch of car stuff on them. This whole area looks like crap here — and this was after I’d moved some trim wood stored there.

A long time ago, I’d bought a very heavy duty bookshelf for my books. I have a lot of books. I don’t remember if this shelf was from my New Jersey home or if I got it for the office I had at my condo in Wickenburg for a while. In any case, it eventually made its way to my Wickenburg hangar where I stored a lot of stuff on it. When I moved from Wickenburg to an East Wenatchee hangar and eventually to my new home in Malaga, the shelves came with me. I’d put them in the front of that garage bay and was using it to store miscellaneous auto-related stuff.

But it looked like crap.

I texted a friend of mine who has rental properties. Want an old bookshelf in decent condition? I sent a picture. Sure, she answered. Send a man with a truck, I told her. (She’d also taken my old Sony Trinitron off my hands.)

I took all the things off the shelves and used a hand truck to move the shelves over to a spot between Bay 2 (Honda S2000) and Bay 3 (Ford truck). Hopefully, the man with the truck will come within a few days. I swept. And then I got to work.

Four shelves, no shelf cutting needed because 8 feet was fine. I ripped two 2x4s on my table saw and used them for horizontal supports for the front of the shelves. Then I cut 2 2x4s to 79 inches and started piecing all of it together.

Penny and Sheep
I had to crop the heck out of this cell phone photo. My truck mirror is on the right.

And that’s when Penny started barking like a little nut. I went out to investigate. She was halfway down the driveway at a standoff with a bighorn sheep. After some more barking, she spooked it and it bounded off. And then a dozen of its friends shot out of my side yard after it. There had been a whole herd of them less than 100 yards from where I was working and I didn’t even know it.

I took a break for lunch. I saw the sheep again later. They got very close. I got photos. But I’ll save that for another blog post.

I eventually got back to work. Again, I had to cut supports as I mounted each shelf. But once I got the hang of it, it went very quickly. I was done within an hour.

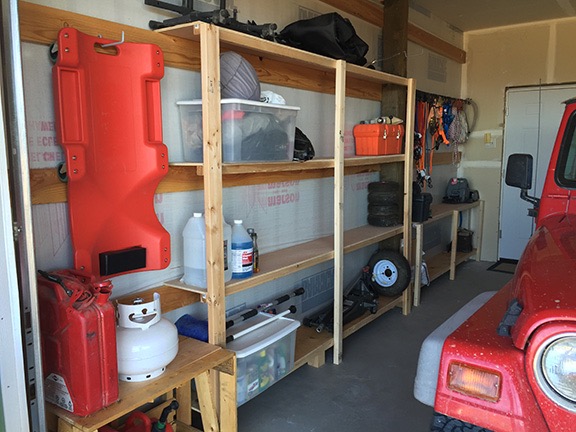
I put away my tools and set about organizing car and motorcycle-related stuff on the new shelves. I found a garage door opener for my old house. I found the stock mats that had come with my old Ford F350. (It had custom rubber mats so these were brand new; I photographed them and put them on Craig’s List.) I walked around my whole garage, looking for anything remotely car or motorcycle related and moved it to the shelves. I still had lots of space to fill.

I had some extra wall space between the shelves and the garage door. I measured a crate I had in my shop and moved it into position. I cut a piece of wood to give it a sold top. Then I moved my gas cans and spare propane bottle onto it. It made sense to keep stuff like that near the door where it could be quickly removed.

I found a few more bungee cords and put them away.

I spent some time admiring my handiwork. I might be the Queen of Clutter, but it isn’t by choice. If everything has a place, everything can be put away. The trick is finding a place for everything. Now I have a place for my car stuff.

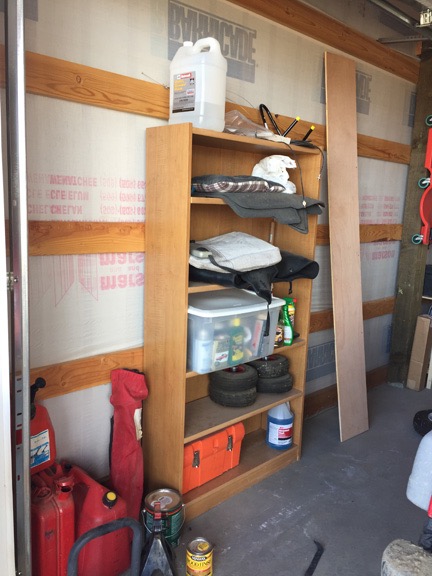
Finished Garage Shelves
These shelves look a lot nicer than the mess I had there before.

Up Next

Before I called it quits for the day and went upstairs to get cleaned up, I took a look at the wall in Bay 4. That’s where my little boat and motorcycle live. It’s a big mess and could really use some shelves. I’m thinking it might be a good place to organize all of my extra beekeeping equipment.

Looks like I’ll be hitting Home Depot for more lumber again.

Footnote

After writing this and posting it and then re-reading it online, I started thinking about all the work I’d done to build these shelves — and to do all the other things I’ve done as part of the construction of my home. A lot of it is difficult, challenging work that requires me to use my brains as well as my physical strength to get a project done. A lot of people would shy away from work like this and either hire someone else to do it or not do it at all. I know this from experience; so many projects at my Arizona house just didn’t get done. Or got done the way a contractor did them — which might not be the way it should have been done to meet needs.

Doing things like this myself is a task and a challenge I really look forward to. I don’t have a regular job that requires me to show up at an office or sit at a desk and make calls all day. My time is infinitely flexible. I could spend it sleeping all day or watching television or just goofing off. Yet many days, I choose to spend my time working hard on projects like this. The way I see it, there are four benefits:

  • I get the thing done and get the benefits of that. In this case, I’ve got a bunch of neat, new storage spaces where I used to have a wall with a lot of stuff piled up on it.
  • I save money on what it would have cost to hire someone to do the job. It’s a lot cheaper for me to spend a few hours on a project like this than to pay a carpenter to do it. It’s not like I don’t have the time.
  • I learn new techniques, often through trial and error. The things I learn can be applied to other projects. The way I see it, if I can’t learn something every day, why bother getting out of bed?
  • I get an amazing feeling of satisfaction every time I look at something I created with my own hands. My home is full of things like this. Read my construction posts to see what I’ve done; I’m proud of every single project I finished.

The people who think I’m doing these things because I’m cheap or bored are completely missing the point. They likely haven’t taken on projects like these, projects that can meet a specific need and give them so much satisfaction for every minute of effort put into them. It’s not difficult if you think it through and have the right materials and tools. Dare I say it? It’s fun.

Try it sometime and see for yourself.
The “Million Dollar View”

A friend reminds me about what I now take for granted.

Not sure if anyone is noticing, but I’m doing my best to blog every morning these days. That means keeping them short when I have other stuff to do. And believe me, I have a lot of other stuff to do.

Inbox
I’m ready to declare email bankruptcy and just clear all of this out.

After spending about an hour with my coffee and nightmarish email inbox, I looked up and realized that the sun had come up. I looked out my side windows — the ones facing the Wenatchee Valley and Columbia River — and was instantly rewarded with the amazing view I’ve come to take for granted.

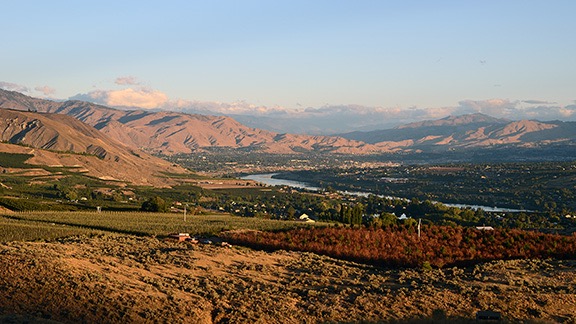
My Amazing Morning View
Here’s what I see most mornings, right from my windows. Not too shabby, eh? Click the photo to view a much larger version where you can see the detail — including my “Lookout Point” bench in the bottom right.

I had a friend over for dinner last night. As the sun was setting, she remarked that I had a “million dollar view.” I looked out and agreed that it was beautiful. (I didn’t mention that it so often looked better.) I told her that it looked best in the morning in the golden hour light, when the low-lying sun cast deep shadows that bought out the texture of the mountains and hillsides. Like in the photo above. Same in the afternoon, when the cliffs across the river were illuminated just right. (Note to self: add photo of that.)

I’m a view person, as I’ve mentioned elsewhere in this blog. Looking out and seeing the world around me energizes me and puts me at peace — at the same time. Yes, I like tall pine trees and forests and canyons, but being surrounded by those things in tight quarters would stifle me, making me feel closed in and possibly smothered. Being able to look out and see for miles and miles makes me feel good about myself and my world.

The seasons are changing now; autumn is coming. The view changes with the seasons. Right now, the cherry orchard on the right has irrigation turned off and is being allowed to die; I suspect that when apple harvest is done, they’ll tear out those trees. Will they get new ones in before winter? Probably not; it’ll be a project I can watch in the spring. There’s still a tiny bit of snow up in the Enchantments, which are hidden in this photo by the low clouds on the left. The river bends as it makes its way into Wenatchee; in the evening, it reflects the changing color of the sky.

So much to see, right from my windows. Like an ever-changing series of paintings, a triptych with more than just three panels, separated by a few inches of wall between each view.

I cannot express how glad I am that my life took the turn it did back in 2012 when I became free to make all of my life decisions. That freedom made it possible to buy 10 acres of undeveloped land high on a cliffside shelf overlooking an amazingly beautiful valley. It made it possible for me to plan and build the home I wanted, a home that would meet my needs and bring this view into every room.

A “million dollar view”? That’s a bit of an exaggeration. But it’s priceless to me.

The Fuel Trailer

I get new life out of an old fuel transfer tank.

Way back in 2008, when I first starting doing cherry drying work in Washington State, the guy who got me started, Erik, told me that I needed to get a fuel transfer tank. He gave me the make and model of a tank and pump that he used: an 82-gallon Transfer Flow. This tank was DOT-approved in all states and made of steel. It was costly, but very good quality.

It didn’t come without problems. First of all, when they heard I wanted it for aviation fuel, they refused to sell it to me. I had to have my wasband call back and order it under his name. Second, the folks who put it together for me didn’t put the proper gasket in the pump so when I filled it the first time, it leaked like a sieve at the pump fitting. A $2 gasket fixed the problem.

A Mobile Tank

I originally had it installed in my first pickup, a miserable 1994 Ford F150. I’d bought the truck to leave on some property I owned in northern Arizona but it quickly became Flying M Air’s utility truck. Of course, it wasn’t up to the task of towing the 22-foot Starcraft RV I had in those days, so the following year it was mounted on my wasband’s 2001 3/4 ton Chevy Silverado, which I took north for a few months every summer. The tank’s DC pump was hardwired to the battery so I didn’t need to deal with cables. Somewhere along the line, I painted it white, mostly so it would stay cooler in the sun — who wants a black fuel tank? — but also so it would look better in my wasband’s white truck. When the divorce started happening in 2012 and my wasband’s mommy decided that he wasn’t going to let me keep the truck in the divorce after all, I had it moved out of his truck and eventually put into my new(er) truck, a 2003 Ford F350. When I killed that truck in December 2015, I had it moved into my much newer 2012 Ford F350.

So the tank has lived in four different pickup trucks in less than nine years.

I did use the tank every summer in Quincy, WA, during cherry drying season. I also occasionally used it for work in Arizona — I remember hiring my friend Janet one day as a fuel truck driver to bring it up to Seligman where I refueled twice during a wildlife survey job. (I honestly can’t remember which truck it was in back then.) By 2014, however, I was moved into my new home in Malaga, WA, and didn’t need a fuel source at the helicopter in Quincy. Instead, I fueled at the local airport when I went out on or came back from a flight. I didn’t really fly much in Quincy anymore — I hired guys to help me with my contracts and two of them were based there with their own fuel sources. So I didn’t need the tank and it was pretty much empty on the back of my truck.

When I decided to replace my fifth wheel “Mobile Mansion” with a truck camper, “the Turtleback,” I needed to get the tank off my truck. At the same time, I knew that if I just put it in my garage or beside my building, I’d likely never move or use it again. A better solution would be to put it on a trailer so I could continue to move it around and possibly use it again.

The Trailer

This spring, a Harbor Freight opened in Wenatchee, which is the “big city” near where I live. Harbor Freight sells tools and other related items. Most of what it sells is cheap junk made in China. (That’s okay, as long as you know what you’re getting and don’t set your expectations too high.) Harbor Freight also has a pretty large selection of you-bulld-it utility trailer kits. One was a 40-1/2 x 48 utility trailer with a 1090 pound capacity. At 6 pounds per gallon, the fuel would never weigh more than 500 pounds. Add maybe 100 pounds for the tank for a total of 600 pounds. Plenty of leftover capacity; better safe than sorry.

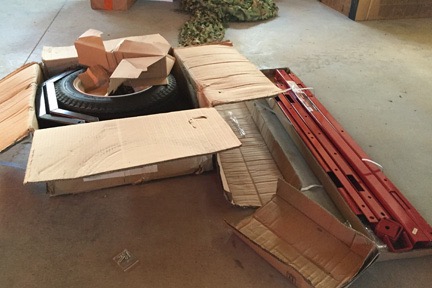
Trailer Kit
The trailer kit came in two boxes. Here are the pieces.

The trailer came in a kit. One day in April 2016, I set about putting it together in my garage. It wasn’t difficult, but it was time-consuming. The wheels had to be mounted on the axles, but they also had to have their bearings packed with grease. I’d never done that before but learned pretty quickly. And the wiring for the taillights was particularly tedious. But I did that, too, and apparently got it right because they work.

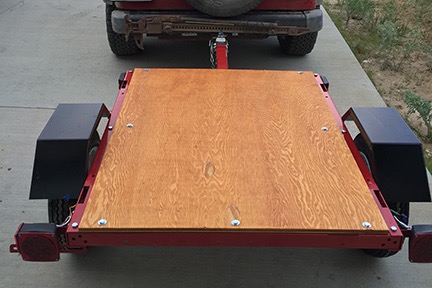
Finished Trailer
The newly completed trailer after dragging it out of my garage on the back of my Jeep.

Of course, the kit didn’t come with a deck. So I went to Home Depot with the measurements and had them cut a piece of heavy duty plywood the size I needed for the deck surface. I took it home, gave it two coats of waterproof stain, and used lag bolts to attach it at six points to the frame. When I was done, I was rather proud of my work.

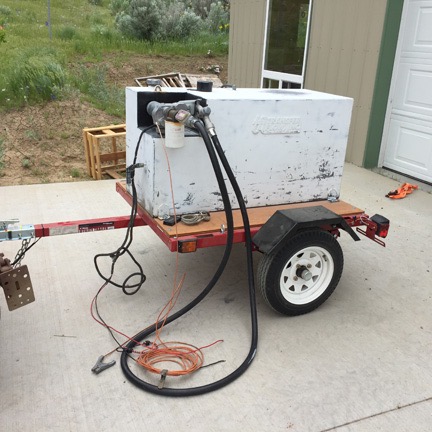
The next thing I needed to do was get that very heavy fuel tank — which still had a bit of fuel in it — off my truck and onto the trailer. When it had been moved from my dead truck to my new used truck, the folks at the car dealer had used a forklift and I’d just strapped it in with tie-downs, knowing I’d eventually move it. I had no idea how much fuel was in it but I knew it wasn’t empty and I knew it would be heavy.

Tank on the trailer
The tank just fit on the trailer.

Fortunately, my winemaker neighbor has a forklift. I drove the truck over there one day while he was working with wine barrels and he pulled the tank off my truck. Then I drove home, hopped in the Jeep, and drove it over with the trailer in tow. My neighbor placed the tank on the trailer bed. It just fit — honestly, I should have gone with the larger but less capacity trailer.

There were a few things I needed to do to finish up:

  • Bolt the tank down to the trailer. There were four bolt holes and I used lag bolts to do the job. But since I didn’t trust the bolts in the wood, I also put a pair of ratchet tie-downs across the top.
  • Paint the tank. I still had a can of white paint I’d bought years ago to touch up the tank while it was on my wasband’s truck. As the picture shows, it looks pretty shabby and I’d wanted it to look nicer on the truck. But I never got around to painting it. Now was the time. I gave it two coats.
  • Secure the hose and grounding wire. I was going to have custom metal hose rack made but the guy I was going to hire to do the job talked me into whipping something up out of wood. I later wound up tucking the hose into the tie-down straps and using a bungee cord to hold it in place in transit. That worked better than I expected.
  • Add alligator clips to the pump wires so it could be connected to a battery for power. The pump had always been hardwired to the trucks it lived on (with the exception of the last one). When I had it moved off the dead truck, they’d simply cut the wires at the battery. Clips would make it easier to use with any battery. I bought clips capable of handling the 18 amps the pump would draw and put them on.

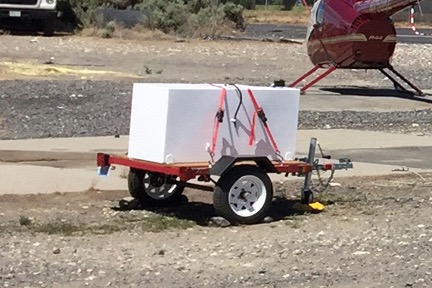
Tank on Site
This is the only photo I have of the tank sitting at the Quincy landing zone. In this photo, the helicopter it had been fueling had been moved. The hose and pump is on the other side.

I got all this done pretty quickly — and that was a good thing. I’d hired two guys to help me out in Quincy for cherry drying and only one of them had a fuel tank. I figured I’d let the other one borrow mine. So I towed it to the bulk fuel place, filled it up, and then moved it to his Quincy landing zone. He’d power the pump with the battery on his rental car.

Final Improvements

The tank sat in Quincy for over a month. The pilot towed it to the bulk fuel place and topped it off. Later, another pilot came and took his place, topped off another helicopter, and then refilled the tank again. Along the way, one of them allowed the pump fitting to get loose and 100LL — which is dyed blue — leaked all over the front of the tank and that nice wooden trailer deck, staining it all. It took me 3 minutes with a pair of pipe wrenches to fix the problem — apparently, that’s too much to ask some people to do.

I towed the tank — still full — home. Now I had 80 gallons of 100LL to offload. I had no desire to use the tank at home and no interest in storing it full over the winter. I topped off my motorcycle and my ATV, filled a 5 gallon fuel can, and managed to put some of it in the helicopter. It was a pain in the neck because I had to move my Jeep over to have something to hook the pump up to.

So I bought a battery to power it. We have a battery place in town that sells all kinds of batteries. I chose a small maintenance free model. I charged it up and it worked fine.

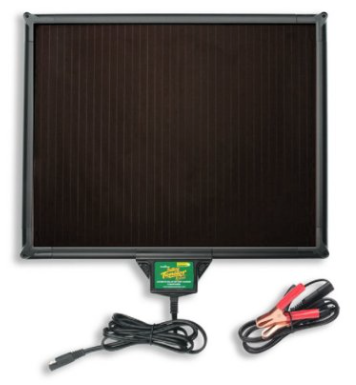
Battery Tender
This very small panel should keep the battery charged; we have plenty of sun here.

And I got to thinking that it would be nice if the battery just had a solar powered battery tender on it so it would stay charged. I did some homework and bought a small, 5 watt Battery Tender Solar Panel.

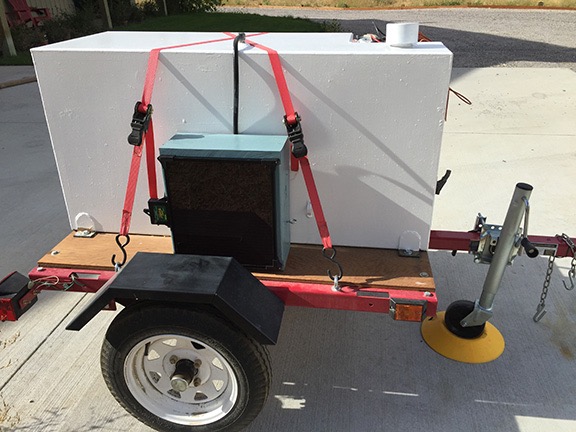
And then I thought that it would be nice if the battery was enclosed in a box with the solar panel mounted on it. So I built a box out of scrap lumber, painted it with some outdoor “Oops” paint I’d bought cheap to paint my beehives, put the battery inside, and mounted the solar panel on the side. (And yes, I did put a vent in the box; I even put some screen over it to prevent mice from getting in.) I screwed the whole thing down onto the deck of the trailer over one of the wheels. But before I did that, I repainted the tank, using up the rest of the white paint I had to hide the dye stains and make it look cleaner.

Finished Tank Trailer
The end result was very polished looking and very functional.

The only thing I still have to do is connect the wires for the pump to the battery. The tank is empty enough to store it for the winter so I probably won’t bother until spring.

I figure I have about $2K invested in this setup — the tank was the most expensive part of it. It’s DOT-approved and road legal. It’ll likely be used annually in Quincy by one of my pilots and may get some use at events that aren’t close to an airport. But I have no interest in fueling at home. All of my flights either start or end at the airport so it’s a lot easier to just get fuel there.

The Sticker on the Coffee Cup

Logic, U.S. government style.

Last week, I was in the North Cascades National Park. On a whim, I stopped by the Visitor Center at Newhalem. In addition to the usual interpretive displays, they have an excellent three-dimensional map of the area that identifies rivers and lakes and dams with lights; push a button and a red light appears on the map to show you where that thing is. They also had a ranger standing at a table with a bunch of reproduction animal skulls (wolverine, wolf, and bear) and corresponding paw castings and pelts. And a gift shop.

I went into the gift shop before leaving because … well, that’s what I do. I found some interesting kids’ stuff and picked out two gifts for my neighbor’s grandson, who has some learning disabilities. Then I saw a large coffee mug I liked — I like a big cup of coffee in the morning — and thought I’d buy it as a little gift for myself. But it had a paper sticker on it that had nothing to do with the mug. I reached for another, hoping to find one without a sticker and that’s when I realized that they all had stickers.

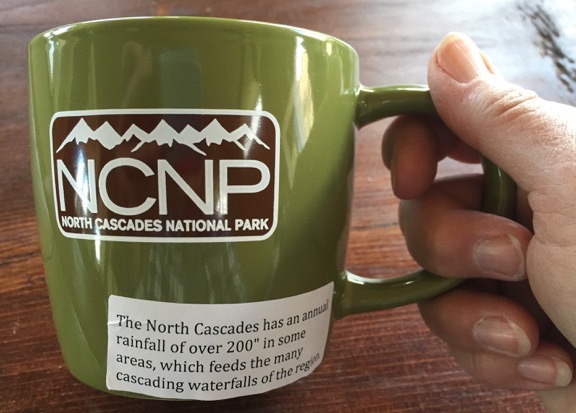
The sticker, which is shown below, says:

The North Cascades has an annual rainfall of over 200″ in some areas, which feeds the many cascading waterfalls of the region.

Sticker on Mug
This sticker was on every single coffee mug in the shop.

On a side note, I can definitely believe that rainfall figure because it rains every single time I go there. Although I like rain more than most people — probably because it rains so seldom where I live — I prefer getting rain at home instead of when I’m traveling. (Yeah, I know: whine, whine, whine.)

Of course, being the inquisitive person I am, I had to know why this sticker was on the mugs. So when I went to pay for my purchases, I asked the ranger at the check out counter.

He didn’t know. He said he’d never even noticed the stickers. He said he’d ask the guy who stocked the shop.

PFDs when flying across the Grand Canyon?

This brings to mind another side story that is related to this.

Years ago, the FAA changed its rules regarding personal flotation devices (PFDs or life jackets) on board flights conducted for tours. The new rule said that if any part of the flight crossed any body of water, a PDF was required for each passenger. This extended to Grand Canyon tours, which, of course, cross the Colorado River 5000 feet or more below the helicopter’s flight path. When I was a Grand Canyon tour pilot (which was before this rule came into play) the pilots often discussed that in the event of an engine failure, we should autorotate anywhere except to the water. The river was about 55°F, flowing at 10 mph or more, and full of rapids. When you’re doing an autorotation from 5000 feet, you have plenty of time to find and navigate to a more suitable landing zone; believe it or not, there are quite a few inside the canyon.

I spoke to the woman who created this rule — an aging FAA pencil pusher who had likely never flown across the Grand Canyon and reminded me of my sixth grade teacher, Miss Dumphy — and tried to tell her how silly (actually, idiotic, but I toned it down) her rule was. She didn’t care. Water was water; the way her rule was written, PFDs would be required when crossing a 3-foot-wide stream.

I didn’t have long to wait. That ranger walked by a moment later and the guy I’d asked called him over and asked him. He seemed almost embarrassed when he told me that they weren’t allowed to sell anything in the gift shop unless it provided some kind of interpretive or general information about the park.

Apparently, just having a logo on the mug wasn’t enough to satisfy some decision maker higher up on the food chain. The sticker was the solution.

I bought the mug as a practical memento of my visit to the park. I didn’t mind paying the price — which I honestly can’t remember — because I figured that it was another way to support the National Park Service. I didn’t need any additional information about the park to help me justify my purchase. And I definitely didn’t need a sticker that I had trouble scrubbing off once I got home.

But it makes me wonder … what other things are National Park Service employees being required to do to meet government guidelines established by someone in Washington who may have traveled to only a tiny fraction of the parks?