Construction: The Windowsills

Something a little different for a different kind of home.

On May 20, 2014, I began blogging about the construction of my new home in Malaga, WA. You can read all of these posts — and see the time-lapse movies that go with many them — by clicking the new home construction tag.

I’ve been living in my new home for about a year and a half now and although I’ve had my Certificate of Occupancy since this past spring, I’m still not quite done with the finishing touches. The windowsills were one of the projects I recently finished. I documented my work with video as I finished up.

The Backstory

Most people have their homes built by builders who are managed by a general contractors. At the end of the project, the general contractor hands over a set of keys to a finished home. For my home, I was the general contractor. Whatever I didn’t hire someone else to do, I had to do myself. While this saved me a bunch of money, what’s better is that it gave me an opportunity to add custom design elements that most general contractors couldn’t be bothered with. My windowsills are a very good example of this.

My building is a “pole building” built with post and beam construction. That means the building’s frame literally hangs on a series of thick, pressure-treated 6×8 or 8×8 posts. When the framers came to frame the inside of my living space, I had two options: frame just the inside walls and allow those wooden posts to appear on inside walls or frame the entire living space so the drywall would hide those posts. The posts weren’t very attractive, so I chose to hide them. This means that they had to frame a secondary wall inside the outer wall, creating a relatively wide space between the inner and outer walls. This was great for insulation purposes — I could fit much thicker insulation in that wall than was required by building codes. But it also left deep wells at each window.
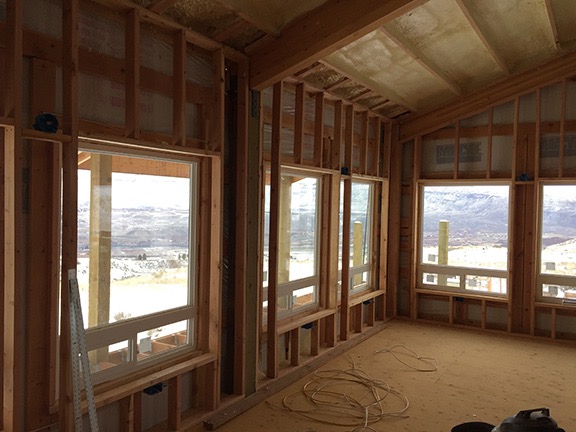
Framed Windows
This photo was shot back on December 29, 2014 when I was working on interior wiring. It’s a pretty good illustration of how the framers framed my interior walls inside my building shell. This is my living room; my TV is currently in that corner.
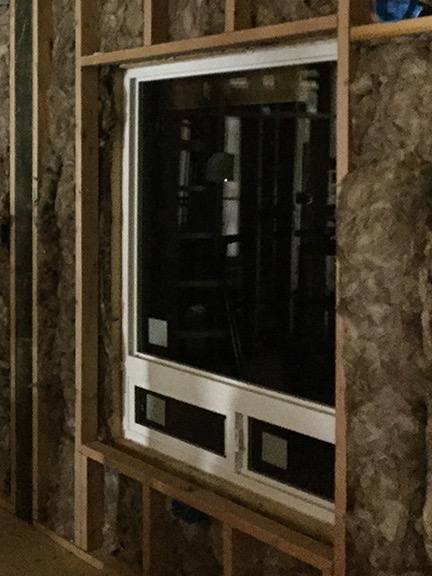
Insulated Wall
This is one of my living room windows after the insulation was put in place in mid January 2015.

When the drywall guys came, I had two choices. I could have them drywall the entire window well, including the bottom part, or I could leave the bottom part unframed and install wooden windowsills later on. I thought back to my old home, which used the first method for its relatively shallow window wells. When windows were left open in the rain or windows leaked — which was a problem with one window not long after we bought the home — the drywall windowsill was damaged and required a professional drywall guy to patch. I wanted to avoid that, so I went with installing wooden window sills later on. I should mention that my four clearstory windows, which are high on my south-facing walls, do have finished drywall window sills. But they’re rarely opened so I’m not worried about damage.
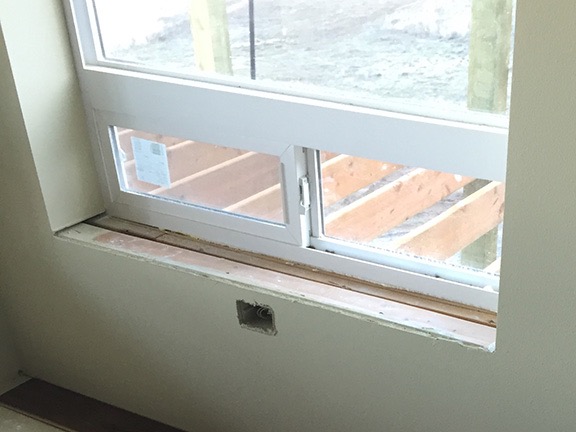
Drywalled and Painted
Here’s one of my living room windows on February 15, 2015, not long after being drywalled and painted. (If you’re interested in seeing what the drywall work looked like as it was being done, be sure to check out the walkthrough video in this blog post. And this blog post includes a video of my kitchen, after installation but before the windowsills were installed.)

So this was what I was left with. Ugly, huh?

The Solution

My first attempt at wooden windowsills used 1×10 and 1×12 lumber that I cut to fit. This turned out to be a difficult job, mostly because the framer (and the dry wall guy) hadn’t created uniformly sized or shaped window wells. Getting the wood to fit perfectly and look good was a nightmare and, as you might expect, I procrastinated about getting the job done. When I finally did it, it looked like crap — at least in my opinion. I started regretting the wooden windowsill decision.
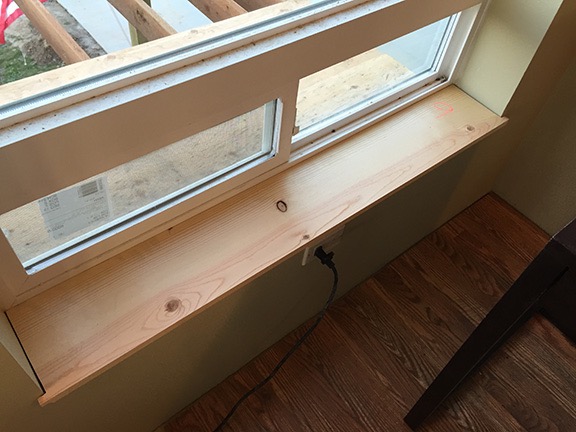
First attempt at a windowsill
This is my first attempt at a windowsill back in March 2015 — it’s the original one in my office area. There were no right angles in the window wells, making cutting the wood to fit perfectly nearly impossible.

Time went on. I cut wooden planks to fit most of the window wells as best as I could. I didn’t like the way it looked, but it looked a lot better than nothing at all.

More time passed. Lots of time. My friend Don built a custom wood cap out of driftwood logs for my stairwell that got rave reviews from everyone who saw it. I asked him to build some furniture for my living room: end tables, a TV table, and a coffee table. He used reclaimed wood and left natural edges. He finished everything with tung oil. They looked great; you can see them in a video in this blog post. He told me about some logs he’d had planed into planks. I talked to him about my windowsills. He asked me how many planks I needed. I told him eight — one for each of my great room windows. He came by one day and delivered 8 raw planks of wood.That was sometime in the autumn of 2015; I don’t know the exact date because I don’t have a photo of the delivered stack of wood, which lay across a pair of sawhorses in my garage. For months.

The trouble was, I didn’t know what to do with the wood. So when Don asked me this past summer how the project was going, I told him I was waiting for his help. So he set a date in July and when that date rolled around, we got to work.

The Job

Don did the first two windowsills for me, start to finish, while I watched and learned.
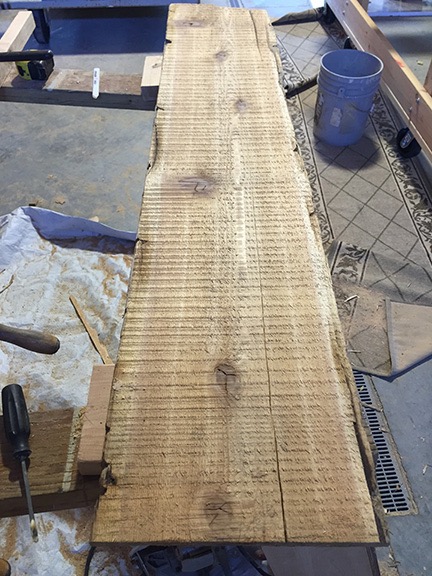
Wood Plank
A typical wood plank. We began working it by closing up cracks, then cutting off a live edge for the back of the windowsill, trimming its length, and shaping its front edge.
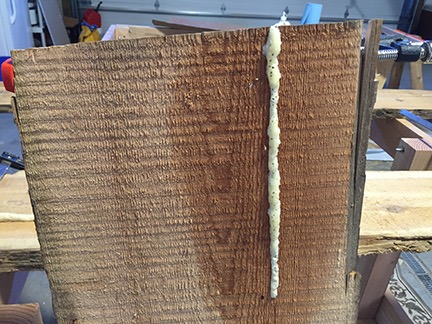
Repaired crack
One of the cracks after gluing it. After scraping away the solid foam and sanding it, the crack disappeared.

The process began with repairing cracks in each piece of wood. The wood had arrived wet and had been stacked horizontally on sawhorses with each row of planks separated by some scrap lumber so they could dry. Cracks along the grain had formed in some of the logs. Don wasn’t concerned. He’d already developed a workable solution for this problem, which he encountered quite often. We wet down both sides of the crack, filled it with Gorilla Glue, and then used clamps to close up and hold the cracks together. Overnight, the glue would set, leaving orangish solidified foam on the outside, That would be scraped away and sanded down with the plank later in the process.

Then we needed to match a wood plank to a window. The planks were all longer than they needed to be, but they came in two basic widths. The wide ones needed to be used for the five north-facing windows while the narrower ones could be used for the east-facing windows, which weren’t quite as deep. We had to pick which side should be the top and which edge should be on the outside, facing the room.

Then Don made a template out of cardboard pieces for a specific window. This had the exact length, including the weird angles, and the depth, including the outer edge. We’d bring that downstairs and he’d lay it on the chosen plank, outline where he needed to cut. Then, using a circular saw, he’d cut off one live edge of the wood to form a straight back edge. He’d also trim the length of the plank and then, using the circular saw and a handsaw, cut the shape of the front with an overhang past the edge of the windowsill area.

Then we’d go back upstairs to see if it fit. And back downstairs to make some adjustments. And back upstairs to see if it fit. Repeat as necessary. When Don was satisfied, we came back downstairs to finish the live edge. That required using a special cutting tool to carve away the bark and shape the exposed edge of the wood. This is where it got artistic and Don did a fine job (as I expected). Finally, he used an orbital sander to sand the top and outer edges of the plank.

When it was just the way he wanted it, we brought it back upstairs, fit it into place one more time to be sure, and then removed it. Rather than use screws or pegs to affix it into place, he took out his trusty Gorilla Glue and spray bottle, moistened the wood, applied glue to both the unfinished windowsill area and the bottom side of the new windowsill, and slipped it back into place. We used a combinations of rags for padding and lengths of wood to hold the windowsills down until the glue could cure — at least 12 hours.

Don did two of these that first day. I paid close attention. He came back the next day and did the rough cuts for a few more, leaving all the finish work to me. A week later, he dd the last two. I paid him for the wood and his time. The rest was up to me.
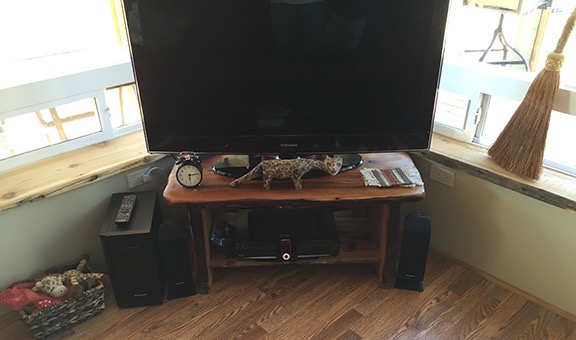
Two Windowsills
This photo shows two of my windowsills. The one on the left was completely finished and installed by Don. All it needed was to be oiled. The one on the right is cut to size but not finished. I had to carve out the live edge (removing the bark) and sand it down before gluing it into place.

With the window framing exposed again — we’d taken off my makeshift windowsills — I was motivated to finish up. So although I had a bunch of other stuff going on — including the end of cherry season and a vacation in my new truck camper — I went to work at it and eventually got it all finished up. Along the way, I shot some video clips of the work I had to do. I put them all together in this video, so folks could get an idea of what had to be done. It’s a little long, but it covers all the steps I took.

By the way, I’m finding that creating and saving these videos in my blog is a great way for me (and others) to look back on the progress I’ve made in building my home. As I wrote this blog post, I stopped to watch some of the videos I linked to here. It was not only great tp see things partially done again, but interesting to hear my narration of plans — some of which changed over time. What a great way to document the evolution of this challenging and lengthy project!

Banking Stupidity

Yesterday’s snafu, which cost me about 3 hours of my life.

I hate when things don’t work the way they should — or even the way you’re led to believe they should. That bit me yesterday and caused a time suck for me. Here’s the story.

I recently moved all my banking to a local bank with branches throughout the state. I was tired of dealing with the mobile app deposit limits imposed by my business and personal banks (BofA and CapitalOne 360 respectively), neither of which had local branches. I figured that having all my accounts in one bank would make it easier for me to do my banking. And I found a bank I really liked, one where I was greeted with enthusiasm when I walked in and gave me service beyond my expectations. One with the online banking, bill pay, and banking by mobile app features that I needed to simplify my financial chores.

All Accounts in One Place
How refreshing to be able to see and work with all of my bank accounts in one place.

I set up the business accounts first and then the personal ones. To access all of my accounts via online banking, they set me up with their Business Manager system. I could see and work with all of my accounts (two checking and two savings) with one login. I could even easily (and immediately) transfer funds between accounts to handle surpluses and shortfalls in my checking accounts. All good so far.

I immediately set up my bill pay information for business and personal bills. I even set up e-bills and auto-pay, which would automatically pay bills on time without me having to remember to set up a payment. I’ve used this capability with online banking for years and it’s a great tool for anyone with a busy life, especially if you travel as often as I do. When I set this up, I was very careful to use the correct checking account for each payee — business bills to be paid from my business account and personal bills to be paid from my personal account.

So imagine my surprise when I got a letter from Premera Blue Cross saying they’d rejected my premium payment because they don’t allow payments from business accounts.

I wasted about 15 minutes confirming that I’d set up the autopay to pay from the correct account. I had.

I wasted another 5 minutes confirming that the payment that had been sent in September was sent from the correct account. It was.

I then spent a total of 30 minutes on the phone with Premera, most of which was on hold — of course — to tell them that they were wrong, that the payment had come from a personal account. They told me that the payment instruction — this was an electronic payment — indicated that it was from “Flying M Air L.” I had to explain at least three times in three different ways that it was a personal account held in the same bank as my business account. (Being on hold for so long put me in a pissy, frustrated mood that got me shouting at the guy and didn’t help my blood pressure reading when I stepped into the doctor’s office 20 minutes later.) The Premera customer service guy told me he’d start an investigation with the accounts receivable people but I was okay for now since my account was paid up for the month. He’d call back (which of course hasn’t happened yet.)

Later, I spent another 20 minutes on the phone with my bank’s customer service department. After not being able to figure out, at first, what was going on, they eventually told me that since I’d used a business log on to create the bill pay instructions, any payments would indicate that they came from my business no matter which account I used. If I wanted payments to show my name instead of my business name, I’d have to create a personal account login and use the personal banking app to manage payments. Fortunately, this wouldn’t change my ability to see and work with all of my accounts from the business login. I just couldn’t create personal payment instructions there.

So this morning, I spent over an hour recreating all of my payees and payment instructions on the bank’s website for personal accounts. And deleting those same instructions from the bank’s website for business accounts.

It’s dumb and its frustrating but at least (I think) it’s fixed.

Now don’t get me started on the bank websites’ crappy user interfaces.

But despite all of this stupidity, I am much happier with my current banking setup. Honestly: why did I wait so long to make this change?

Home Tour, 8-Oct-16

Another look at my work-in-progress home.

On May 20, 2014, I began blogging about the construction of my new home in Malaga, WA. You can read all of these posts — and see the time-lapse movies that go with many them — by clicking the new home construction tag.

I had a friend I hadn’t seen for about a year come over for dinner on Saturday night. It was a good thing he came. I had a few little projects that I’d been putting off for two long — the trim around my bathroom door being the biggest one — and knowing he was coming motivated me to finish them. It also motivated me to clean the place up and throw away a lot of the junk that had been accumulating. I am the queen of clutter and I’m really working hard to control it.

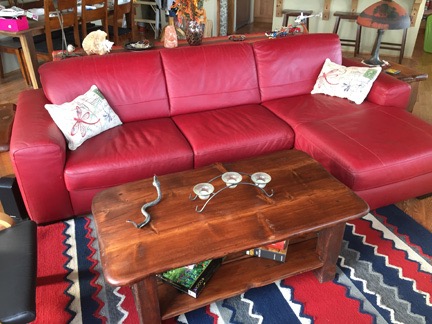
My Red Sofa
I get very serious when I clean. I even took out the leather cleaner and wiped down my living room sofa.

Once my home was all spiffed up, I figured I’d take the opportunity to do a quick video tour. I’ve been videoing various parts of my new home construction and it’s kind of neat to go back through my archive and see where I was at various points.

My living space is about 95% done at this point. I have my Certificate of Occupancy — I got it last spring — so there’s nothing left to get inspected. There are three big finishing projects, though:

  • Build a ladder to my loft. I already have all the wood and hardware. I just have to stop procrastinating and get the job done.
  • Finish the tile around my shower stall. Again, I have most of the materials I need. I just absolutely detest working with tile. So I procrastinate.
  • Paint and trim the stairs. I’m going with paint because it’s durable and cheap. But I still have to sand the steps, paint them, and then add trim along the sides.

I also have some “baseboard” trim work to do. I’m using quarter round to keep it simple. There’s not much left to do. I might knock it off Monday afternoon.

Anyway, here’s the video. Enjoy.

Pressure Cooker Beef (or Oxtail) Barley Soup

One of my favorites, made quickly with a twist.

Oxtails
Oxtails, fresh from the butcher.

One of my favorite “comfort foods” is beef barley soup. I blogged my recipe last December; here’s the pressure cooker version that’ll get yummy barley goodness to your mouth quicker. But rather than use plain old stew meat, this time I used fresh oxtails that I picked up from a local butcher this past week. I whipped it up in my Instant Pot in about an hour.

Ingredients:

  • 1 tablespoon olive oil. The original recipe called for cooking spray. But why not use a little olive oil instead?
  • 2 pounds oxtails, trimmed (or 1 to 1-1/2 pounds stew meat, trimmed and cut into 1/2- to 1-inch pieces). You can make it with less meat, but if you have more, use it. It’ll make a heartier soup.
  • 3-4 large carrots, sliced. Carrots are a must-have in any meat-based soup.
  • 2-3 stalks of celery, sliced. I don’t care for celery, but it is part of the aromatic trilogy.
  • 1 large onion, chopped. The third member of the aromatic trilogy, I put onions in most soups and stews. I still have onions from my garden.
  • 1 large parsnip, sliced. If you can’t find parsnips, add another carrot or two, which is what I did today.
  • 1 medium turnip, cut into 1/2-inch cubes. I skipped this today.
  • 4 cups fat-free, low-sodium beef broth. Today I cheated and used water with bullion, which is the only thing I had.
  • 1 bay leaf.
  • 2/3 cup uncooked pearl barley.
  • 1/2 teaspoon salt. You can probably omit the salt if you don’t use low-sodium beef broth. I did, but then again, I’m trying to keep my salt intake down. Remember you can always add salt; you can’t remove it.
  • 1/2 teaspoon black pepper. Pepper is always good with beef.

Instructions:

These instructions are for an Instant Pot, but I tried to include generic pressure cooker instructions, too.

  1. Heat the pressure cooker for browning. On an Instant Pot, press Sauté.

  2. Heat oil in a heavy-bottomed pot over medium-high heat.
  3. Add oxtail or stew meat to pot and cook until browned on all sides.
  4. Remove meat from pot with a slotted spoon and set aside.
  5. Add vegetables to the pot; cook 6-8 minutes or until liquid almost evaporates.
  6. Return beef to pot with beef broth and bay leaf.
  7. Bring to a simmer and turn off the pressure cooker.
  8. Stir in remaining ingredients
  9. Cover and lock down the cover. Set the pressure cooker to high for 20 minutes. (On an Instant Pot, press Manual and set to 20.
  10. When pressure cycle is over turn pressure cooker off and allow pressure to release naturally. This should take about 15 to 20 minutes.
  11. Remove cover carefully, fish out bay leaf, and serve.

Oxtail Barley Soup
Oxtail barley soup. It was delicious!

Keep in mind that the longer you cook the pearl barley or let it sit in the hot soup, the more liquid it will absorb. The net result could be more of a stew than a soup. If you want a soupier soup, either reduce the amount of barley or increase the amount of broth.

This yields about six to eight servings, depending on serving size. I think it would be excellent with some crusty bread on a cold winter day.

Another Rides Gig

The ground crew really makes a difference.

Last Saturday, I made my fifth appearance at Wenatchee Wings & Wheels, an annual event in East Wenatchee. I was offering helicopter rides out of the soccer field on the north side of Eastmont Park for $40 per person.

My History with Wings & Wheels

The first year I did this event was way back in 2012. It’s an October event, long past the end of my cherry drying season in Washington, and back in those days I still lived in Arizona. In previous years, I’d had to pass up participation because I was expected home by August. But in 2012, my divorce was underway and I was finally free to do whatever I liked with my time. So although I went home in mid-September to deal with divorce bullshit and start packing, I left the helicopter behind in Washington. I went back in October with a friend to do the event and then fly the helicopter home.

Wings & Wheels is a car show with an aviation theme. Or at least it was back in 2012. The event was held at the airport and had a great turnout. I was prepared and had asked my friend Jim from Coeur d’Alene to bring his helicopter. He brought along his wife to handle the money and a friend to work with my friend as ground crew.

We flew all day — long past the time when I was hoping to start the flight home. So my friend and I stayed the night and got an early start in the morning. The helicopter was stuffed to the gills with gear, as well as a 40-pound box of Honeycrisp apples one of my clients had given me. We took the most direct route and made it back to Phoenix in 8 hours.

The following year, I was living in Washington. But the powers that be in East Wenatchee had decided to put the event in Eastmont Park near downtown. The best they could offer me was a static display — I flew the helicopter in on Friday evening and left it until Sunday. People could go look at it and I could sell rides for Sunday at the airport. I sold out on all of the rides by noon on Saturday and did them on Sunday. I don’t remember how many I did, but I think it might have only been about 20. A bust, as far as I’m concerned.

In 2014, the airport started hosting its own airport event in June: Aviation Day. That first year, I enlisted the help of two of the cherry drying pilots who work with me. Between the three of us, all flying R44s, we took just over 300 people for rides. That remains my absolute best event in terms of the number of people flown — although I had to split the revenue with my fellow pilots — and that annual event continues to be my busiest every summer.

But in October, the Wings & Wheels folks wanted me to fly, too. They set me up in the soccer field on 3rd and Georgia. I had a reasonable turnout in 2014 and a better one in 2015. But this year was my best so far.

This Year’s Rides at Wings & Wheels

A few things combined to make last Saturday’s event a real winner.

First of all, the weather was perfect. Cool with very little wind meant that my helicopter had good performance and I didn’t have to alter my departure/arrival route. It also meant that a lot of people had come out for the event.

Second, the event was advertised on the radio and in the newspaper. Wenatchee has several radio stations and they’re really good about advertising local events. Although I hadn’t sent out any press releases, the City of East Wenatchee apparently had and had mentioned helicopter rides. So lots of people heard about it on the radio or read about it in the newspaper (or its website) and took advantage of a beautiful day to come on out with their families.

Third, there were a lot of families. A rides event is a great place for a kid to get a first helicopter ride without mom and dad breaking the bank. The rides were $40/person. More than a few people told me or my ground crew that they’d rather spend the money on a memorable helicopter ride than a few amusements at the carnival that had also set up in the park.

Fourth was my ground crew. They were responsible for collecting the money, doing passenger safety briefings, and loading/unloading passengers. I do “hot loading” at all of my events — that means the engine is running and the blades are turning the whole time. The ground crew is responsible for keeping the landing zone secure and keeping passengers and onlooker safe. (The park people helped out by setting up T-posts with caution tape to create a landing zone boundary.) Without a good crew, I cannot make a rides event work. (More on that in a moment.) This year’s crew was excellent.

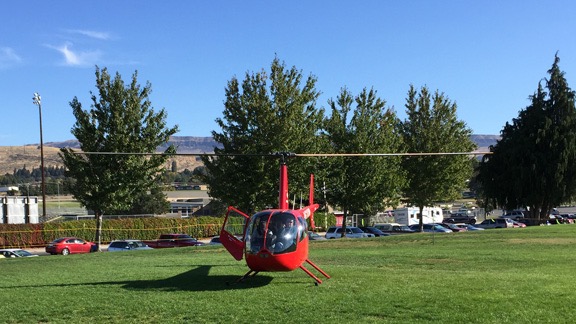
At Wings & Wheels
Alyse, from my ground crew, took this photo of me just before departing on my first flight of the day.

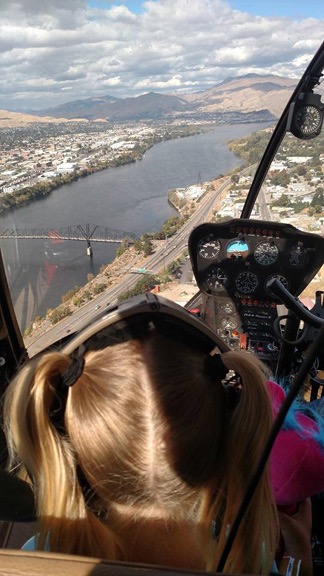
Paassenger Photo
Here’s a photo from one of my back seat passengers that was shared on Flying M Air’s Facebook page. In this shot, we’re going upriver on the East Wenatchee side.

I’ve created a sloppy little map of the setup at the park (see below). The car show — which was huge — was in the baseball fields, on the grass. I didn’t get to see it, other than from the air. North of that were some food vendors and other booths for other things. I didn’t really get to see any of that, either. Then there were some tennis courts and then our landing zone. The red box outlines the area the park people secured for us with posts and tape. East of us was a dirt area with RC trucks racing around and beyond that was a handful of carnival rides.

On departure, I took off to the east, avoiding the trees to the north of my area and trying to avoid the dirt track and carnival. Then I made a circle around the car show area, mostly to make sure everyone on the ground knew there were helicopter rides before heading out to the river. You can see this with the green line. I flew up the East Wenatchee side to the north end bridge and then flew back down the Wenatchee side to the south end bridge. Then I came east and returned to my landing zone by way of a few empty school fields north of the landing zone. You can see this with the blue line.

Wings & Wheels Layout
Here’s the general layout of the event.

We made the paper the next day, too.

The Importance of a Good Ground Crew

In the past, I’ve worked with a variety of different people as my ground crew.

When I did events in Arizona, my wasband often helped out. He knew the drill pretty well but could also be counted on to complain incessantly after each event. On large events, I’d get someone else to work with him. I pay my ground crew and often pay based on the number of rides we do. (Although my wasband always refused to take any money, he later told the divorce judge that working for free at a handful of events over the years made him a part owner of my company. Lying in court about the actual number of events — over a hundred? — didn’t work well for him, either.) We often do dinner, too, on my dime. And, of course, I provide chairs and a cooler full of refreshments for the crew while I fly.

The best ground crew are the people who understand that the goals are:

  • Safety. This is my number one concern. Accidents are not an option. Not only can they ruin an event and likely prevent me from doing future events in the area, but they’re bad for public relations. People are already afraid of helicopters, mostly because they don’t understand how they fly. To have someone get hurt an event confirms those fears. I’ve never had a mishap and I want to keep it that way.
  • Crowd control. When lines form, people bicker. At least I was told that they did in Arizona. In Washington, people are much more laid back and easy going. I’ve never had a local ground crew complain about a crowd, even when wait time exceeded an hour.
  • Quick turnarounds. The quicker my ground crew can unload passengers and load up the next group of passengers, the quicker I can take off. My ride times are pretty fixed at 8 to 10 minutes. Shortening them would make passengers think they didn’t get their money’s worth. So to keep things moving, the ground crew has to keep things moving on the ground. I’ve worked with slow ground crews before and it is frustrating — especially for the folks waiting to get off who can’t depart without an escort and the ones watching the helicopter idle while they wait for their turn.
  • Maximize passenger count. This is where I either make money or lose it. At the $40/person pricing, I lose money on every flight with just one person on board, so I simply won’t do flights for singles. (You can’t make money on quantity if you lose money on individual flights.) With two people on board, I make money. With three people on board, I make good money. The best ground crews are the ones that consistently put three people on board each flight. This not only helps make the event profitable, but it reduces the wait time for passengers. Got a couple up next? Find a single farther back in the line and put him on board, too.

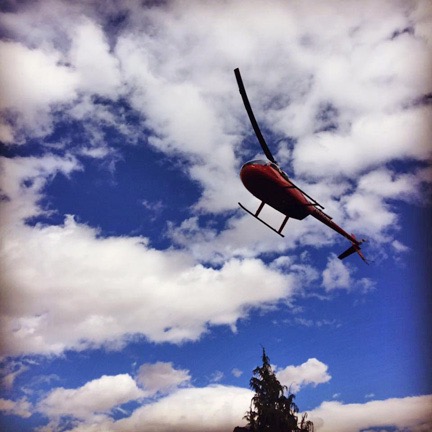
From the Ground
An onlooker who didn’t fly with us posted this photo on Facebook of us flying by.

I had my friend Alyse and her friend Diana work with me at this event. This was their first time working with me. Both women are pretty sharp and caught on right away. Although they weren’t as quick as I’d like at turnarounds — at least in the beginning — they somehow managed to get three people on almost every single flight. I’ve never had that done before at an event — I consider myself lucky if half the flights have two people and the other half have three. (The last Aviation Day event had just two people on most flights.) So not only did I fly a lot more people than I had in previous years, but I also earned more money per hour flown. In fact, on a per-hour basis, it was my most profitable event ever.

My Thoughts on Rides Gigs

I have a lot of thoughts about rides gigs. Although I only do 2 to 4 of them per year, I’ve been at it for 15 years. Without consulting my logbooks, I figure I’ve done about 50 of them by now. I did three this year: Aviation Day (at the airport), Farmer-Consumer Awareness Day (at a field in Quincy), and Wenatchee Wings & Wheels.

Every event is just different enough to keep it interesting. But I have to admit that flying the same route over and over — and answering the same handful of questions — all day long is not my idea of fun. If I didn’t make money at these events, I wouldn’t do them.

One thing I really do like about them is the fact that for at least half of my passengers, their flight with me is their first time in a helicopter. Occasionally, it’ll be their first flight in any aircraft. I like the fact that I can give them an affordable first experience and that I can often take away any fears about helicopter flight that they might have. It’s not crazy, like a roller coaster. It’s smooth, with an amazing view of someplace they see every day from the ground. I especially like it when the kids point out places they recognize but have never seen from the air. It makes the experience fresh for me, too.

As for the regulars, well, it’s nice to be able to see that there are some folks who return every year for another flight, even though it’s the same flight as the previous year. I must be doing something right if they keep coming back.