Spring Has [Finally] Sprung at the Aerie

After a long winter and several “false springs,” spring has arrived with a vengeance.

It was a long, cold winter here in Central Washington State.

(At least that’s what they tell me. I wasn’t around. I went south and suspect I’ll be doing that most winters.)

Snow off roof
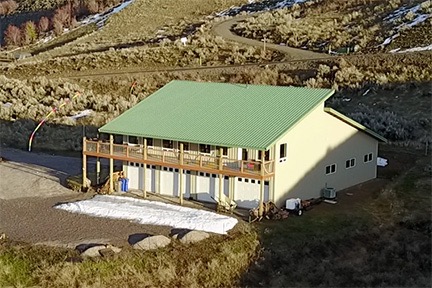
This Mavic Pro image, shot one afternoon not long after my return in March, shows the snow that slid off the roof and accumulated in front of my garage doors during the winter. There was an even bigger pile on the south side of the building, which has a bigger roof.

The cold reached deep enough into the ground to freeze the water lines running to the homes at the end of my road. The snow fell in storm after storm piling up and eventually sliding off my roof into big piles on the north and south sides of my home. And in March, which is normally when the weather starts getting good, every night temperatures dipped below freezing, stalling the wakening of the orchards. Even in April there were bouts of cold weather — as recently as last Monday, I woke to the sound of wind machines in the cherry orchard near my home.

Balsamroot at my House
Perennial balsam root, a native plant, started blooming in April and was finished by mid-May.

We had a few warm spells in April that fooled a lot of us into thinking that spring had finally arrived. The local supermarkets and big box stores opened their garden shops and began selling flowers and vegetables for planting. I planted some cold-weather plants — brussels sprouts and broccoli, for example — that survived through subsequent cold spells, as well as some herbs, such as basil, that did not.

Cherry Blossoms
Cherry blossoms on one of my two young cherry trees. I might actually get fruit this year!

I worried about the cherry trees, knowing that a serious frost could impact my clients’ orchards and, ultimately, the number of contracts I’d get for my summer work. The cherries bloomed and were sufficiently pollinated, although some clients in Quincy had early fruit drop and decided to skip a season.

Last week, spring seemed to finally take hold. After a few cold nights and chilly, rainy days, the temperature began to rise — by about 10° each day! By Sunday, it was in the 80s and I found it necessary to adjust the irrigation in my garden to provide my vegetables with enough water to grow.

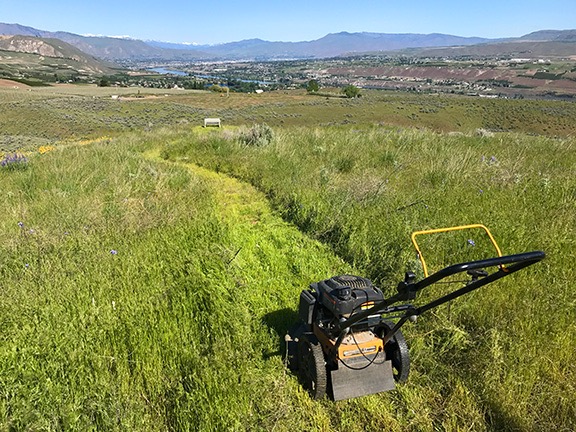
Meanwhile, mother nature had watered the rest of my property. The wild grasses, sagebrush, and wildflowers took off in a wild growth spurt that I didn’t even notice until it was time to mow a path to my Lookout Point bench. The point is in the northwest edge of my property, positioned just before the land drops off into a wildlife corridor owned by the local utility company. Since most of my 10 acres is natural vegetation, I need to mow a path from my driveway to the bench to access it. I have a string mower I use for that but it needed a new axle after I ran it over with my truck. (Note to self: do not park anything in front of the truck’s garage door.) By the time I picked up the mower from the repair shop, the grass was 18 to 24 inches high in some places. I got the mower started and used it to mow my way down to the bench, mow around the bench, and mow a wider path back. I suspect I’ll have to mow it two more times before autumn.

Path to my Bench
The path I mowed down to my bench. I could not believe how tall the grass was along the way.

I began a wildflower class with the local college’s continuing education program. Every Tuesday evening we meet on a trail in the foothills to discuss, dissect, draw, and identify flowers. Most, if not all, of the same flowers grow around my home.

I’ve also started mushroom hunting, although I was apparently too early for the elevations I was hunting at. I suspect I’ll do better later this week.

My garden has taken off — and so have the weeds between the raised beds. Every morning I spend about 30 minutes pulling weeds and feeding them to my chickens.

I’ve caught two bee swarms (so far) and I’m ready to spilt the two healthiest colonies.

And this moment, as I type this, every single window in my home is wide open to let fresh air in. I haven’t heard the heat kick on in over a week and I suspect I won’t hear it again until autumn.

Spring is finally here — and not a moment too soon. Now let’s hope it sticks around for a while. I’m never in a hurry for summer.

Cheese: Miscellaneous Notes

Some things I’ve learned.

I’ve been making cheese on and off for a few years now. I thought I’d take a moment to talk about some of the things I’ve learned.

Basic Needs

I started making cheese way back in 2013, when I took a cheesemaking class at a sheep farm in Dryden, WA. Back then, I was living in my RV and although I tried (and succeeded!) to make some cheese, space constraints were a real issue. Simply said, cheesemaking requires a lot of countertop and sink space. You use countertop to air dry the sanitized equipment and lay out the draining pan, which might need to be out for two days or more. You need sink space to be able to wash, rinse, and then sanitize everything that touches the cheese ingredients. When I moved into my new home two years ago, I had enough space to get back to it, so I did.

Countertop
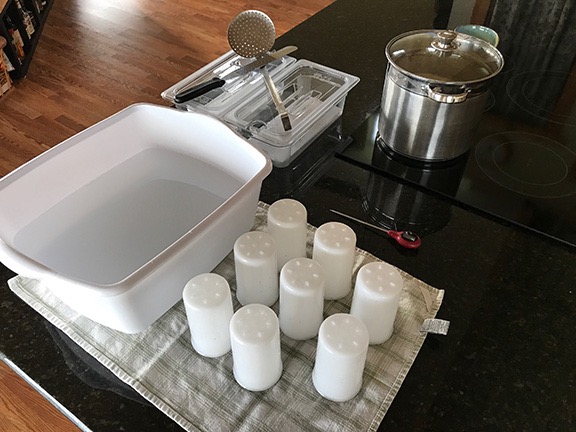
My kitchen island this morning. The white tub is full of sanitizer that I used to sanitize the eight crottin molds draining on a clean dishtowel that I’ll need around noon. The pot on the stove has a gallon of goat milk forming curd for the crottin. Nearby, you can see the sanitized ripening containers waiting for the goat milk brie draining on another countertop (see photo below). I’ll use those other two tools (also already sanitized) to cut and scoop the crottin curd.

Of course, there’s always something else you need to do the job right. Stainless steel pots capable of heating up to 4 gallons of milk is one of them. I have an impressive collection now, along with large canning pots I can rig up as double-boilers. And I blogged recently about the tool I acquired to help me maintain the temperatures I need to hold the milk at while it forms curd.

Cheese Molds
Examples of soft cheese molds; photo from Schuller.us Dairy Technology website.

And molds! I never realized that there were so many varieties of cheese molds: brie, camembert, crottin, tomme, chèvre, pyramid — the list goes on and on. I try, whenever possible, to get molds that can do double-duty. For example, a brie mold with an insert and a weight on top can become a poor man’s cheese press.

I also needed a ripening area. I discovered last year that my small wine fridge, which I brought with me from my old Arizona home, maintained the perfect temperature for ripening most cheeses: 50° to 55°F. Unfortunately, it was small and I also had some good wine I wanted to store inside it. My sister and brother came to the rescue, buying me a new, much larger, thermostatically controlled wine fridge for Christmas. While I still use the old fridge for initial ripening — it’s inside a closet and can be kept dark — the new fridge gives me plenty of space for overflow — and to store that good wine.

Brie
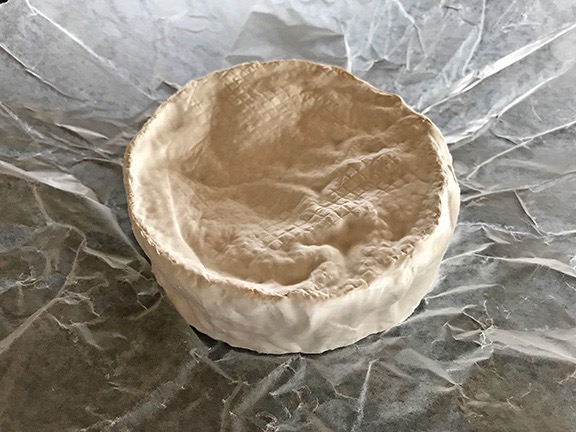
One of the four wrapped bries currently ripening in my new wine fridge. They ripened for two weeks unwrapped and are now in the middle of another two weeks wrapped. I’ll be able to eat this next week and should probably finish them by June 30. (I’ll be sending one each to my sister and brother.)

Ingredients

Pasteurization and Homogenization

The milk you buy at the supermarket is usually pasteurized and homogenized.

Pasteurization is a process that heats the milk to kill harmful bacteria. In my opinion, you should avoid drinking milk that has not been pasteurized.

Homogenization is a process that prevents the milk’s fat from separating out of the milk. Homogenization is bad for cheesemaking because it can prevent the development of curd.

The main ingredient of cheesemaking is milk. Whole milk that has been pasteurized but not homogenized is best. It’s also difficult to find and can be very expensive. I priced up whole pasteurized but not homogenized milk at the local health food store the other day; it was $15/gallon. With a typical 10% to 20% yield, you can imagine how costly the cheese can be.

Of course, processed milk adds challenges for cheesemakers. I’ve known since that cheesemaking class that homogenization makes it difficult for cheese curds to form. To get around that, cheesemakers add a tiny amount of calcium chloride to each batch of cheese. But what I just realized recently is that there are different types of pasteurization and that “ultra-pasteurized” milk also may prevent good cheese curds from forming. I learned this the hard way when I failed to get curds in a batch of blue cheese I was making. It’s heartbreaking to have to throw away 6 quarts of whole milk mixed with a quart of heavy cream that simply won’t curd. So now I’ll be very careful to buy milk that isn’t ultra-pasteurized.

Cow’s milk isn’t the only variety that can be used to make cheese. Since there are so many goat and sheep owners around here, I decided to try getting my hands on some other milk. I placed an ad in Craig’s List. Within a few days, I got an email from a woman in Chelan with a goat. We arranged for her to give me a call when she had four gallons. On Saturday, I drove up to fetch it. We had a nice conversation about cheesemaking and milking goats and shipping goats up and down Lake Chelan on a barge. (Seriously, I can’t make this stuff up.) And I went home with four gallons of literally farm fresh raw goat milk — for $16. As I type this, I have four goat milk bries draining on my countertop and another gallon of goat milk forming curds for crottin. And I have a half-gallon of goat milk left for a batch of brousse or chèvre.

Goat Milk Brie, draining
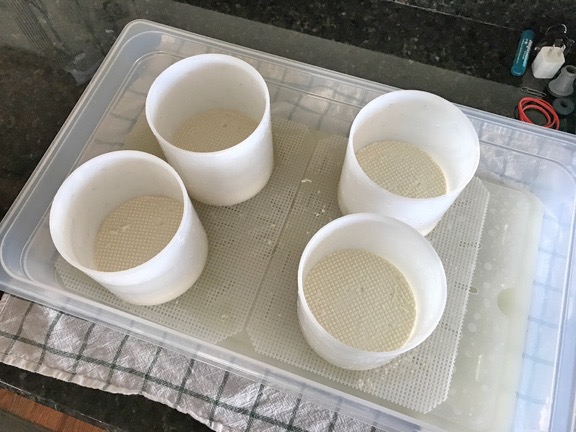
Four goat milk bries draining on a countertop. They’ll drain for at least 24 hours at room temperature before I salt them, put them in ripening containers, and slip them into my wine cooler to ripen for two weeks. While ripening, I’ll have to turn them over every day and wipe away any accumulated whey. The four cows milk bries I made three weeks ago will be ready to start eating next week.

For the record, I did pasteurize the goat milk before using it to make cheese. There are several ways to do this, but I think the best is to get it up to 145°F and hold it at that temperature for 30 minutes. I did this in my homegrown cheese vat, helping the heating process by adding boiling water to the double-boiler’s water vat. I did all four gallons at once. When the 30 minutes was up, I lifted the pot of milk out of the double-boiler and put it into a sink full of ice water. As the temperature came down, I measured out two gallons of 88° (or thereabouts) milk for the brie. Later, I caught the milk at around 72°, which is what I needed for the crottin. So the pasteurization process really didn’t slow down my cheesemaking. The rest is in the fridge.

Culture Packet
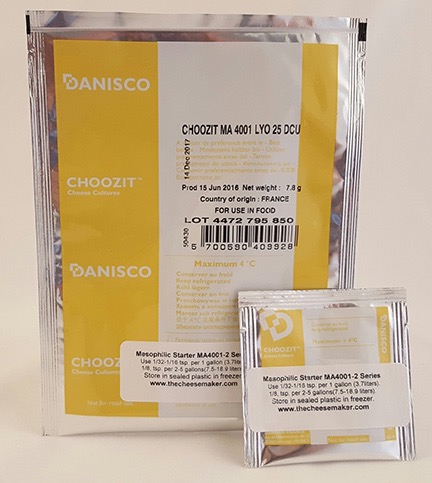
Two sizes of culture packets. The larger one is labeled 7.8 grams and makes 25 batches of cheese.

Of course, milk can’t become cheese without the addition of cultures or other additives that enable it to ripen and/or form curd. Cultures come in tiny foil packets that you store in the freezer. A typical packet of something like Mesophilic Starter Series MA 4001-4002 — which is commonly used for many cheeses — might contains just a few grams of a powder that looks like yeast, but those few grams might be enough to make half a dozen batches of cheese. (Needless to say, you also need very tiny measuring spoons.) The cultures you buy depend on the cheeses you want to make. At this moment, I have about 8 different cultures in my freezer, all ready to be used.

You’ll also need calcium chloride and rennet. These are liquids that come in tiny squeeze bottles and should be stored in the refrigerator. They’re added separately, calcium chloride first, after dilution in water. Although the water out of my tap tastes fine, I suspect it’s not pure well water. (It’s also pretty hard.) So I use bottled spring water to dilute anything I add to my cheese. It would really suck if I ruined a batch of cheese because of some additive in my tap water.

Cleanliness Counts

Every single cheese recipe in my book starts with the instruction: Sanitize all equipment. I do this with a sanitizing liquid diluted in a tub of water I use only for this purpose. I get the sanitizer at the local restaurant supply place or Stan’s Merry Mart (really!) where they sell all kinds of things, including brewing equipment. If you’ve ever been in food service, you know that everything needs to be washed, rinsed, and sanitized. That’s why restaurants have sinks with three tubs. My sink has just two tubs so I use the plastic one for the sanitize step.

Why sanitize? To prevent unhealthy bacteria or other nasty stuff from growing in your cheese to either ruin it or make you sick when you eat it. I don’t take chances.

But I’ve also learned that the key to making cheese without losing your mind is to keep a clean, uncluttered workspace. To that end, I only take out the equipment I need just before I need it and I clean and put away the equipment I’m done using as soon as I’m done using it. After all, the active part of making cheese — heating milk, adding cultures and rennet, setting curd, cutting curd, draining curd, salting cheeses — can take days. That’s time when you must have equipment — and likely cheese — out in your work area. If you’re like me, your work area is in your kitchen, which is also where you prepare meals. Keeping your cheesemaking area neat and clean will make it easier to use your kitchen for other things.

I’ve also learned that clean towels make good countertop protectors. The woman who led our cheesemaking class warned us that whey is acidic and can stain countertops if not cleaned off promptly. My countertops are granite and I don’t know how much they might stain. But better safe than sorry. I use bath towels to cover large areas in the messiest stages of cheesemaking and dishtowels for smaller areas later in the process. When I’m done, I gather them up and toss them into the washer, before wiping down the countertops.

As for storing all that specialized equipment, I use plastic storage bins. One holds all the ripening containers, sanitizing bin, and miscellaneous equipment. Another smaller one holds all the molds. And each of the pots is covered with its lid and wrapped in clean plastic. Everything is stored in my cavernous garage, on one of the shelves I built to store things that can’t fit in my kitchen. This way, the only things that get dusty/dirty are the bin lids and outer plastic wraps.

And yes, I sanitize right before use — not when putting equipment away.

Resources

Finding cheese ingredients locally is damn near impossible — at least in this area. But there are plenty of online resources. Here are a few:

  • The Cheesemaker is a great site for a wide range of cultures and many cheese molds. This is my primary resource these days.
  • Cultures for Health has mostly fermenting supplies, but it does carry some cheesemaking items.
  • The Cheese Connection is based in the Seattle area and was recommended by the woman who led the cheesemaking class I took. It seems to be geared toward small cheesemaking businesses.
  • New England CheeseMaking Supply Co is popular for cheesemaking supplies, but I admit that I’ve never purchased anything from them.

I’ll likely add more links as time goes on. (If you have any resources to add, put them in the comments for this post. Be sure to explain why you like them. No spam, please.)

Note that most of these sites also have how-to information, recipes, and even free cookbooks for cheese. For example, if you get on the Cultures for Health mailing list, you can download a free, illustrated cheesemaking cookbook. The Cheesemaker is also very responsive to questions; I asked him about my failed blue cheese and he immediately responded and tried to help, even going so far as inviting me to call him.

I guess I should add here that I’m a beginner and am not a good resource for troubleshooting help.

Cheat Codes for the Game of Life

One of the best things I’ve read online in a very long time.

I normally wake up very early — think pre-dawn — and start my day lounging in bed. After checking the day’s weather and any text messages that might have come in overnight, I head over to Twitter to see what’s going on.

Most of the folks I follow tweet about politics and I have to admit that I’m getting very tired of it. We generally agree on things, but reading about Trump’s conflicts of interest or golf outings or outrageous tweets gets old after a while. That might explain why I limit my Twitter time to early mornings, late evenings, and the occasional break in the middle of the day.

But this morning there was a treat in my Twitter newsfeed: a link to an article by Mark Manson. Eager to read anything that wasn’t related to the GOP’s attempt to deny healthcare to millions of Americans or the insanity of yet another presidential election with a right-wing nut job on the ballot, I clicked and read.

I don’t know who Mark Manson is, although his blog identifies him as ” Author. Thinker. Life Enthusiast.” Sounds like a guy I’d really like. Apparently he’s written a lot about psychology and life in general. At the end of the article was a link to sign up for a newsletter and get an ebook; I might do that. Why? Well because the article I read was so well written, wise, and completely on point.

I don’t want to rehash what he wrote here. I want to urge you to read it for yourself. It’ll take you about 15 minutes and it isn’t the least bit dull. In fact, it’s a somewhat fun read, written with a sense of humor that I can really appreciate.

I will give you a teaser, though. There are two things I took away from this that I hadn’t thought of before:

  • Five levels to the game of life. This reminds me a lot of Maslow’s hierarchy of needs, which I mentioned in this blog post from 2016 about making things happen for yourself. In fact, when you finish Mark’s post, you might want to come back and read what I wrote there.
  • Solutions vs. Distractions. All I have to say about this is wow. Mark is 100% right about this; why didn’t I see it that way? This has the potential to be life changing for me — and it might be for you, too.

The one thing he did discuss at some length that I already know very well is how you are responsible for yourself.

If there’s one thing I detest is how some people complain about stuff they can control and blame their problems on others. For 29 years, I lived with a man who never admitted (or apologized for) his mistakes or took responsibility for his failures. All he did was blame others. And the older he got, the more blame he threw around. He was his own worst enemy. By the time we parted ways, he was an angry old man, blaming me for his dead-end life when he had plenty of opportunities to make his life better. It’s been nearly five years and he’s probably still blaming me for everything that went wrong with his life. I can’t help but feel sorry for him.

Unfortunately, there are many people just like him. People who hold themselves back in the game of life because they refuse to take responsibility for their own situation. They point fingers at everyone except themselves. They somehow expect the people they blame to stop their own lives and fix theirs.

Of course, that doesn’t usually happen because it isn’t usually possible.

Seriously, you need to read this. Even if you’re on top of your game, you will learn something from it. Better yet, you’ll realize, like I did, that it’s a great piece for anyone who might be floundering on Level 3 — or one of the lower levels. Something you’ll want to share on Twitter or your Facebook feed to make someone else’s life better.

After all, isn’t it better to share something that can actually help people than the same old angry and hateful political crap circulating around?

Go read it now.

The Last Chicken Coop

The last one I’ll build here, anyway.

I just built my third (and final) chicken coop.

The first coop was really more of a chicken lean-to. It was mostly open on one side, had two nice nests and two very rickety perches. I made it mostly out of pallets and scrap wood — and it showed.

Chicken Coop 1
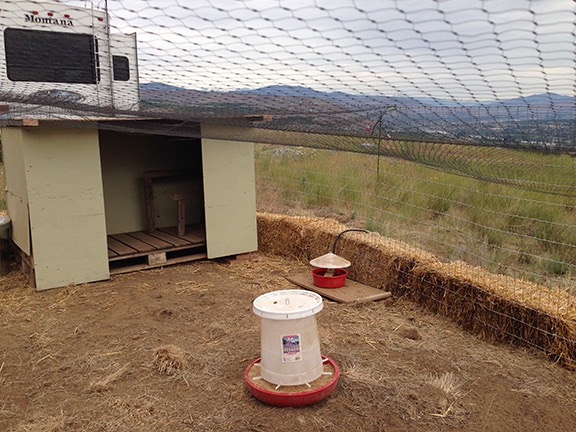
My original chicken coop and chicken yard. The coop lasted from mid 2014 through October 2015; the yard was rebuilt with better fencing early 2015. This photo was shot in early 2014, when I was still living in my “mobile mansion” fifth wheel.

The second coop was way more ambitious. Also built with pallets as its base, it was designed to match the appearance of my home with an exterior finish using the same exact metal. It had three nests under a hinged lid and three sturdier perches. It was also insulated and had a covered porch so I could keep the chicken food out of the rain. It weighed a ton, though, and I had to drag it into place with my ATV. You can learn more about this project and my other efforts in this blog post from 2015.

Coop 2
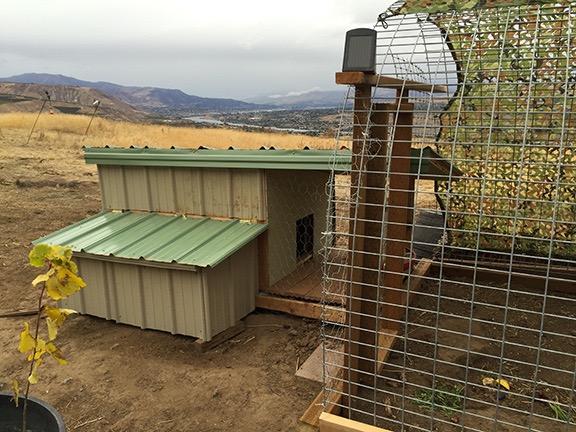
The second coop scored high on durability and insulation values, but low on practicality. I don’t think there was enough room inside for more than the 8 chickens I had at the time. This photo also shows part of my third chicken yard, a hoop affair made of 5×16 foot “hog wire” panels. I like the design and still use it.

What I wanted was a coop that was big enough to hold a lot of birds laying a lot of eggs. But I wanted one I could actually walk into, one that was easy to clean and had plenty of light and ventilation. Although I’d bought a small coop the year before, it was unsuitable for more than two or three adult birds. I wanted to raise chicks into laying hens and sell them when they started laying. To get started, I bought 18 chicks when I got home from my winter travel in March and set them up in a brooder in my garage. That gave me a time limit — I needed the new coop done before they outgrew the brooder.

I almost converted my existing shed into a coop. With a little interior modification, it would have done the job. But then I would have lost my garden storage area. And what about the controls for the irrigation? Did I really want my chickens crapping on it?

I looked into shed kits at Home Depot. They were not cheap and they were a lot of work to build. I could build a custom solution for a fraction of the price.

But no more pallets! I was going to build from scratch.

I sketched out a design. The footprint would be 4 x 8 feet. The roof would be 7 feet sloping down to 6 feet. I began disassembling the old coop. I think that was harder than assembling it. I managed to salvage the framed plywood roof and one of the trim panels. I wanted more overhang on the metal, so I scrapped what I had. I burned pretty much everything else, although I did have to throw away the Trex decking I’d used inside. (I did say it was heavy.)

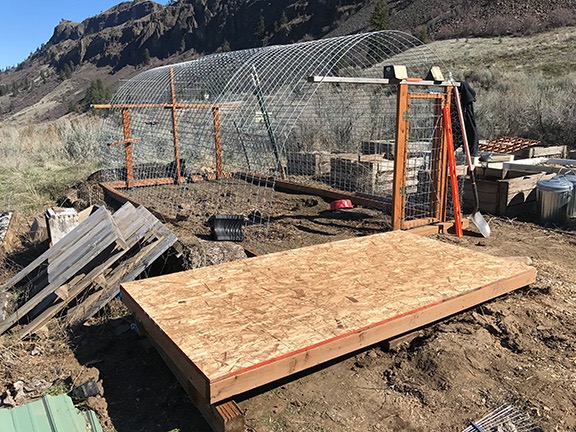
I started at the bottom, building the floor on 4x4s with 2×4 studs 16 inches on center. I used a heavy OBS sheet as the base and gave it two coats of oil based porch paint.

Chicken Coop Floor
I started with a floor on 4x4s, leveled in place.

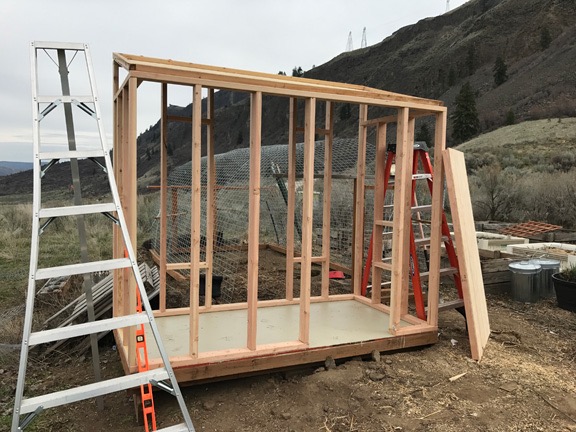
Next, I framed out the four walls. But instead of framing them on the floor, I built the frames on my concrete driveway apron. It was easier for me to work on level ground. I framed them with 2x4s 16 inches on center. Every time I finished a wall, I stood it up against a deck post. I knew that it would be impossible for me to carry the two long walls over to the coop and fasten them into place by myself, so I did as much as I could before prepping the building area with two ladders and a bunch of wood screws and my impact driver. Then I called my neighbor Elizabeth and made an appointment for her to come help me get the walls in place. I promised it would take less than an hour and it did. And not only did we get the walls in place, but we even lifted the roof into position and fastened that down.

Framed Chicken Coop
I shot this photo right after Elizabeth left. The ladders were still in place; the one on the left is an orchard ladder, which are pretty common here. The wood thing leaning against the building is the door, which I’d made while I was waiting to put the walls in place.

The coop design had a 32-inch wide door, three ventilation windows, and two chicken doors. I framed them as needed. The trick then was to cut the T1-11 wood — it’s like plywood paneling — so the openings would match up right. Measure twice, cut once. I think I must have told myself that a dozen times a day during construction. But it sunk in. I fitted the north side short wall and half the west side wall without any problems.

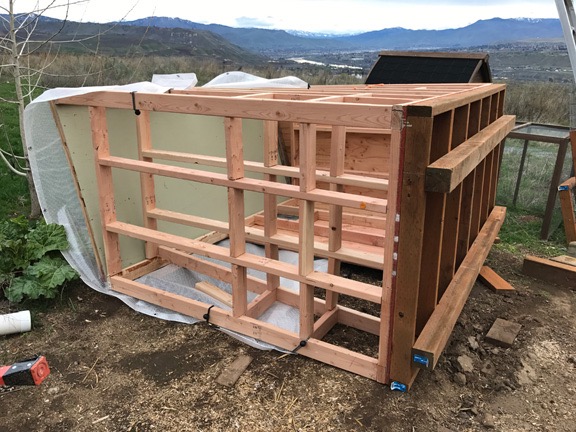
Weather came. We had an unusually rainy spring this year. I had some large tarps and fastened one over the coop’s roof and two wall panels. I hadn’t painted anything yet and I didn’t want the wood to get soaked or ruined. My camper, the Turtleback, was parked on the driveway near the coop, blocking it from view from my home. So I was very surprised to find the coop lying on its side when the weather cleared and I was ready to get back to work. Apparently, strong winds had come though and knocked it over as if it were a sail.

Coop on its side
Oops. Did I mention that it gets windy here? The tarp acted as a sail on the top-heavy coop and it went right over.

Neighbors to the rescue. I had three of them meet me the next morning to right the coop. Damage was minimal. When they left, I got right to work.

I used 1/4 inch wire that I already had between the frame and the T1-11 for the windows. Later, I’d put sliding panels to close them off. I had two doors to the outside but planned on using only one for now; the other one was for expanding the chicken yard with another hoop enclosure. (It’s important to cover the chickens here to protect them from birds of prey.)

The original designed called for nests just inside the door that were accessible through hinged panels from the outside. I decided to do away with the outside access, mostly because I figured a single T1-11 panel would add to the structural integrity of the building. And after all, the building was big enough for me to walk into.

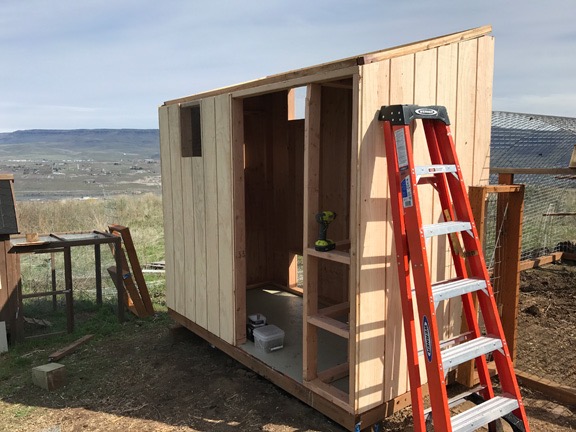
Coop Under Construction
In this shot, only one wall and the door are left to install. The nests are just inside the door to the right.

Once the walls were in place and the door was hung, it was time to paint it all. I used the rest of that oil-based porch paint and even bought a second can. The paint guy had warned me that it would absorb into the wood and he wasn’t kidding. I’m going to need a second coat. But for now, the wood is sealed tough against the elements. A second coat before winter and it’ll be ready for any weather.

Painted Coop
Here’s the coop right after painting it. By this point, the chicks were living inside. I drilled a hole in the wall and ran an extension cord so I could hang their heat lamp. I blocked off the exit to the chicken yard with a framed bit of fencing I already had. The two upper windows have 1/4 inch screen that doesn’t show in the photo.

I still had to finish the roof. I wanted so badly to get metal panels that match my home — after all, the walls of the coop match the walls of my home — but Home Depot had a limited selection of colors. So I chose the dark green. I dreaded cutting the metal — it’s no picnic, believe me — but it went a lot more smoothly than I expected it to. I had insulation leftover from the old coop and I put it into place. Then I painstakingly lifted the metal panels into place and screwed them down. Not perfect by any means, but functional.

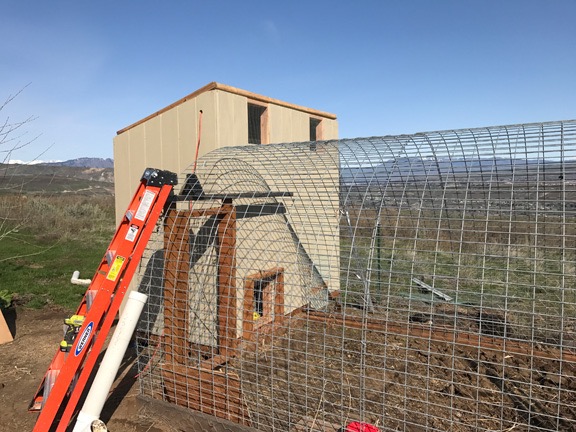
Outside Finished
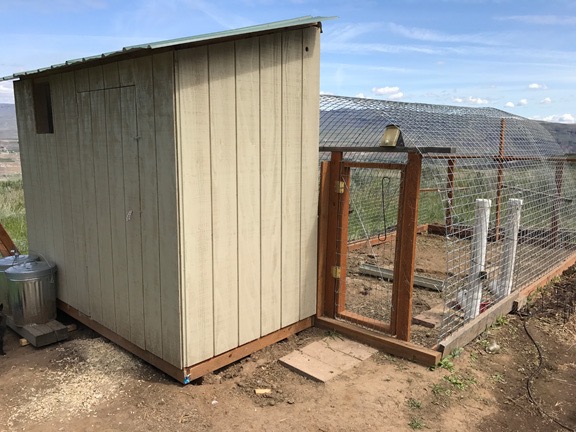
Here’s a photo of the outside of the coop and yard that I took just the other day. The door really blends in; I use a piece of rope as a “doorknob” and a hook to keep the door closed. The long white pipes are chicken feeders I made last year; they each hold about 10 pounds of chicken food.

Coop Perches
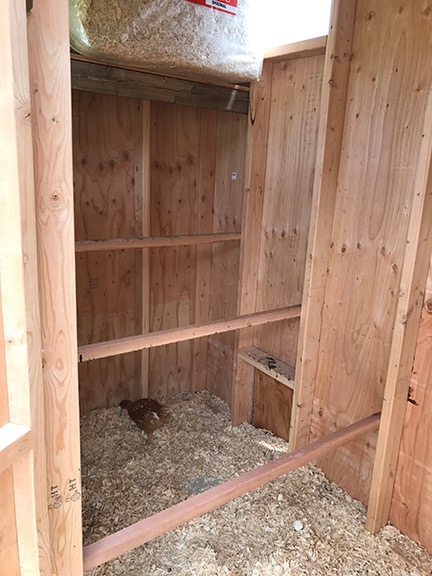
I used 2x2s with rounded edges for the perches. I also added a shelf on the north side, far above the highest perch, to store odds and ends like the pine shavings I use on the floor and in the nests.

By this time, the chickens were installed and able to come and go freely between the coop and their yard. I had put in some perches for them, but as they grew, I knew I could raise them and add more. So I did; they have a total of three perches now, each about 4 feet long. With 8 inches per bird, my 18 chickens (now 17 since one died) have plenty of space to roost. I could easily add 2-3 more if I had to since they’re spaced 16 inches apart.

Coop Nest Area
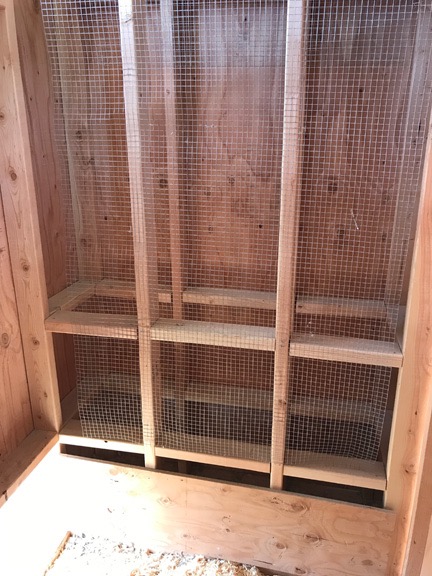
I had to block off the nest area with wood and wire mesh to keep the chickens out.

I still needed to do the nest boxes. The first thing I did was close off the nest area; the chicks were sleeping on the floor in there when they were still very young and I wanted to break them of that habit. They wouldn’t need the nests until they started laying, which probably won’t be until August.

Coop Nest and Brooding
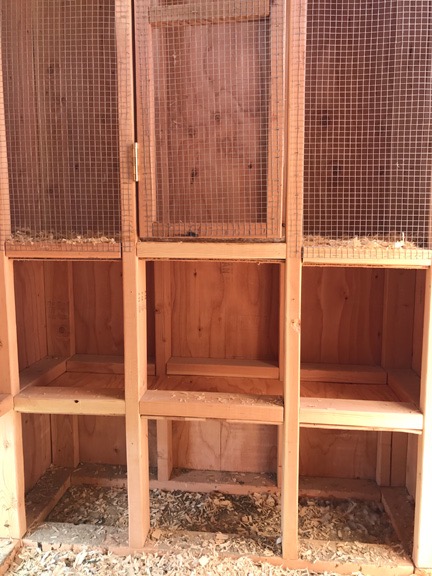
Here are the finished nests on the bottom with the bottom half of the brooding area on top.

Still, I wanted to get them done and create a brooding area above them. My design called for six nests — three on each level — so I had to build a floor for one level and then the brooding area level above it. This required me to take careful measurements of the 2×4 framing because I’d have to cut plywood around it. Then I’d have to lift it into place from below and screw it into the 2x4s I’d put in to hold them. It’s hard to describe and was hard to do, although my little jig saw did make the job easier than I expected. In the end, I had to cut each floor into two pieces to get them into the tight-fitting space.

Once that was done, I used a staple gun to securely fasten 1/4 inch screen to either side of the top brooding area. I framed a door with 2x2s and stapled more screen onto that. Then I put the door on hinges and added a hook to hold it closed. I’d be able to hang a heat lamp over the area if I needed to to keep chicks warm. I figure I can brood up to 6 chicks for up to a month in the space. Keeping them with the other chickens should allow them to get to know each other while they grow, hopefully preventing fights when they’re released into the flock.

When it was all done, I had to block off the nests again. The chickens really like snuggling up in corners when they’re indoors. I wouldn’t mind so much, but they crap where they hang out and it’s a pain in the butt to clean out the nests.

At this point, the chicken coop is mostly done. In July, I’ll pull the covers off the nests and put a fake egg — I usually use an egg-shaped rock — into one or two of the nests. With luck, they’ll get the idea and start laying in there when the time comes.

Although I’d originally wanted to add sliding panels over each of the windows, I think I’ll skip it. The ventilation is good. In the winter, I’ll fasten some heavy plastic over each window to prevent drafts. I’ll leave the door to the yard open for them.

Because this coop is not insulated — neither was the original one — I might buy a chicken coop heater for it. I already have a Thermo Cube that will turn power on when the temperature gets down to 35 and turn it off when it gets up to 45. Attaching that to the heater will run it only when needed during the winter. It’ll never get warm in there, but it’ll stay warm enough to prevent frostbite. You might think that’s nuts, but power is cheap here and from renewable energy (hydro and wind) so I have no qualms about using it to keep my chickens from freezing in the winter.

In the meantime, I’m just happy to have this project done. And even happier that I can’t find anything wrong with this design so I won’t have to build yet another one.
One Way to Do Twitter Wrong

Some people don’t get it.

Last night, before going to bed, I took a moment to check Twitter notifications. I found two tweets from someone I didn’t know who had mentioned me without actually tweeting to me.

I’m not going to embed them here because I don’t see any reason to give this idiot any additional attention. But he’s a perfect example of someone trying to use Twitter to move markets — when he only has 49 followers.

Here’s the first one:

Idiot Tweet

He was referring to a blog post I wrote years ago about Groupon. I think he’s trying to say, in his semi-literate way, that if I advertised on Groupon, I could fill otherwise empty seats on my aircraft with Groupon customers. Apparently, he thinks these people will appear just when I need them and be willing to sit around and wait until I do.

Of course, his theory doesn’t apply to my business because I only fly by appointment and I don’t have seats that are not paid for. So why would I be willing to discount flights by 75% — which is basically what Groupon requires* — thus taking a deep loss on every Groupon deal flight? That was the point of my blog post.

He then replied to that post to add this:

Idiot tweet 2

Not very bright? Well, at least I can string a sentence together, buddy.

My response was simple: “Fuck off.” I then responded to the first tweet by thanking him for the link and following it up with a simple “LOL.”

And that’s when I discovered just how dim this guy is.

He responded:

Idiot Tweet 4

Not personal? He said I wasn’t very bright. That isn’t personal? And does he honestly think being a Twitter user with 49 followers gives him any clout? Enough clout to get me to delete a 6-year old blog post with dozens of comments?

I responded “Is there something about “fuck off” that you don’t understand?” (Yes, I know. I can be a real bitch. But if you had any idea of the kind of trolling I’ve dealt with over the past few months on Twitter, you’d understand why I now have zero patience for idiots on Twitter.)

But it was his response to my tweet thanking him for the link that proved how really dim he is:

Idiot Tweet 3

He didn’t realize that by including a link to my blog post, he was actually sharing it in his Twitter stream. Giving it more exposure. Best of all, he’d done it with a #GRPN tag, increasing the exposure beyond his 49 followers. Anyone looking for the #GRPN tag — people actually interested in Groupon — could potentially see it.

And bash him? Why would I want to do that? If I wanted to bash him, I could do it here by simply embedding his tweets without redacting his identity. But I’m not. Instead, I’m ridiculing him while keeping his identity anonymous. Truth is, I feel sorry for him. He’s so amazingly clueless.

So, to sum up, this clown unwittingly shares my blog post about Groupon with a #GRPN stock tag, says I’m not very bright, and then offers to delete his tweet if I delete the post.

I went to his profile to take a look. It was full of Groupon company and stock related tweets. They guy is an investor — that’s clear. For some reason, he thinks he can use Twitter to influence the price of Groupon stock or get more people to sign on for their “deals.” He’s big on tags like #ecommerce, #investing, #socialmediamarketing, #stocktips, and, of course, #groupon. He could be a bot, but even bots aren’t that dumb.

So I blocked him. He’s still probably trying to figure that out.


* Do the math: Groupon wants a 50% discount “deal” and then keeps 50% of the discounted price. That leaves me with a total of 25% of the original price.