The best photos of an aircraft usually show it flying.
Sunday morning, I flew in formation with another aircraft for the purpose of air-to-air photography for the fourth time.
I’ll never forget my first time.
The first time I did this was back in 2002. Flying M Air had a 1999 Robinson R22 Beta II helicopter and I wanted some air-to-air photos for advertising material. A friend of mine had access to a Piper Cub and we made arrangements to do the flight early one morning on the east side of Vulture Peak here in Wickenburg.
The friend — who, unfortunately, is no longer a friend — is an accomplished airplane pilot. He can pretty much fly anything with wings bolted on, from sailplanes to Piper Cubs to Boeing 747s. He had a lot of formation flying experience and he insisted on a briefing. The briefing was, well, brief. It consisted of the following information, which was drilled into my head by repetition:
The lead plane leads. The wing plane watches the lead.
In other words, in every formation flight, there’s a lead plane. That’s the one that sets the flight path. The other planes are wing planes. Their job is to watch the lead plane and maintain the formation. In fact, the wing plane should look at only one thing: the lead plane. The lead is responsible for keeping an eye out for traffic, making radio calls, and doing everything else. The wing follows the lead.
“What does the wing do?” he asked me?
“Follow the lead,” I replied dutifully.
This was pretty simple stuff, but I could tell that it was very important to him. And although I felt that he was treating me like a child with all the drilling, I had a feeling that he’d flown with other people who hadn’t understood the simple instructions. He wanted to make sure I understood. I did.
 We flew out of Wickenburg Airport early one morning just after sunrise, when the air was still and cool. Mike flew as a passenger in the Cub with my old digital camera. We flew several passes on the east side of Vulture Peak. Sometimes the Cub lead, sometimes I lead. The best photo of the bunch, which you see here, was with me flying wing at the Cub’s 4 o’clock position.
Next, Two Helicopters
A few years later, I made arrangements with my friend Tristan to lease his 2000 R44 Raven I helicopter for a winter season. When Tristan delivered it, I figured I’d take the opportunity to get a few air-to-air shots. We did a little briefing at the airport and took off. Mike took the camera and sat beside me in my R22.
 The flight wasn’t as structured as the first flight, but it turned out okay. We got some good photos of Tristan around Vulture Peak. I trusted Tristan not to do anything crazy, but there was a certain level of stress as we flew around. I felt a constant need to see where he was because I wasn’t convinced that he understood the whole wing follows lead thing.
Then, A Real Scare
When I got my 2005 Robinson Raven II, I needed new photos. So I asked my friend Jim if he’d fly with me. Jim’s got a Hughes 500c.
I tried to do a briefing. I really did. Jim kept telling me that he understood. I thought he did.
But as we flew, I realized that Jim didn’t give a damn about the wing follows lead thing. He was just going to fly along with me so Mike could take photos.
 Part of the problem was that Jim sits on the left side in his helicopter and I sit on the right. So when he was flying on my left side, he was mostly in my blind spot and he had difficulty seeing me. And since I thought he’d be watching me, I wasn’t watching him. Until I happened to glance over and see him a little too close for comfort on my left, right after Mike snapped this photo. To say this wigged me out is an understatement.
Sunday
On Sunday morning, I flew in formation with Dave so aviation Jon Davison could get air-to-air photos of my helicopter for his upcoming book about Robinson Helicopters. Dave is a responsible pilot — heck, he sells aviation insurance for a living! He also might just have as many hours flying helicopters as I do, since he flies his helicopter from Wickenburg to Scottsdale and back — a 30-minute flight each way — most days. So I felt pretty confident that he understood the importance of keeping a safe distance from each other and always knowing where the other one is.
A side note here: about a month or two ago, there was a horrific midair collision in Phoenix between two news helicopters. They went down in a fiery crash and all four on board died. Having something like this happen so close to home — especially when it involves people you know — really peaks your awareness for the dangers of flying with other aircraft. I think this was probably on Dave’s mind as well as mine.
 We took off from Wickenburg and did a slow orbit around Vulture Peak with me in the lead. Jon sat behind Dave on the left side of the helicopter, dangling his feet out the door. They flew at my 5 o’clock position. At one point, Jon asked me to stop and hover on the east side of Vulture Peak while he and Dave moved slowly around me.
I should mention here that Zero-Mike-Lima performed flawlessly, allowing me to hold out of ground effect hovers at more than 3000 feet MSL. It wasn’t hot and it wasn’t windy and that made things a lot easier for me. But I did have full fuel and a passenger on board, putting me at about 2200 lbs (that’s 300 lbs below max gross weight).
After Vulture Peak, we broke off and started east across the desert to Lake Pleasant, with me flying in Dave’s 7 o’clock position. We decided to do some work over the Quintero Golf Course, which most people around here don’t even know exists because you can’t see it from the main road. Dave went in first to scout the area with Jon. Then they directed me into position over a pond in the middle of the golf course. It was 8 AM and there were a few golfers down there. I hovered about 300 feet AGL over the pond while Jon and Dave flew around me. We managed to get the shots we needed in only 3 minutes, then continued on to the lake.
At the lake, we flew slowly up the east shore at Dave’s 9 o’clock position. The sun was behind Dave’s helicopter, shining right on us and on the lake and mountains beyond it. We did a few shots near the marina, then broke off and headed off to the stone house.
The stone house, which I mention briefly in “Why I Don’t Share GPS Coordinates Online,” sits on a saddle overlooking Lake Pleasant. It’s a magnificent structure — or at least it would have been if it had been completed and if the vandals hadn’t destroyed much of what was there. It made a good backdrop for the photos Jon wanted to take. After hovering around in front of it — and scaring away a small herd of cattle that had been grazing on the hillside — we landed and got out for a visit. The place was in even worse condition than it had been on my last visit more than two years before.

We climbed back into our helicopters, cranked them up, and took off to a mill site Dave knew of. It turned out to be Anderson Mill on the Santo Domingo wash. We did some more air-to-air work by the remains of the mill, then broke off and flew back to Wickenburg. Over town, Jon got a few more shots of me flying, this time with Wickenburg in the background.
It was a good photo flight.
More Photo Work Done
We spent yesterday on a whirlwind tour of northern Arizona that included Prescott, Jerome, Sycamore Canyon, Howard Mesa, the Little Colorado River Gorge, Roden Crater, the Grand Falls of the Little Colorado River (not so grand yesterday), Winslow and La Posada (I love breakfast there), Meteor Crater, and Sedona. We flew with Jon’s door off so he could get glare-free photos out the helicopter. But he also took some shots of me flying, using a wide angle lens so he could get the helicopter and views beyond in the shot. Great stuff.
Jon’s still finishing up his editing of the photos he took, but I’ve been watching him work and they look great. I hope to share a few of them here shortly. And I’m sure at least one of them will become Flying M Air‘s new postcard.
Stay tuned.
By the way, you can read more about the first three photos in this piece in “Retouched Photos?“
 Digital cameras are incredible things. You can take 3 dozen photos of the same basic scene and at least one of them just has to be good.
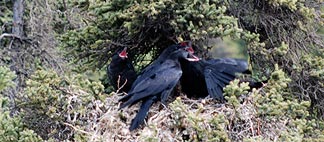 The raven’s nest was the first wildlife we saw. The nest was in a tree not far from the road. I was fortunate enough to snap this photo of one of the raven parents returning to the nest with food for its young.
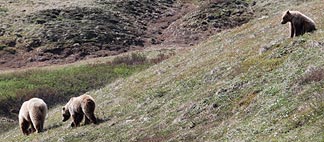 The bear family — mom and the two cubs — was a big hit. They were right near the road and we stopped for a while to watch them. Later, on another bus, we stopped to watch them again. Lots of photo ops. Unfortunately, the driver of the second bus was extremely rude and admonished anyone who had the guts to whisper when we were in the area. Too much noise, he said. As if big buses driving up and down the road all day didn’t make too much noise.
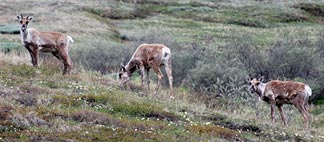 We saw some caribou along the way. At one stop, there were several of them and a bear in sight. I snapped this photo on the return trip.
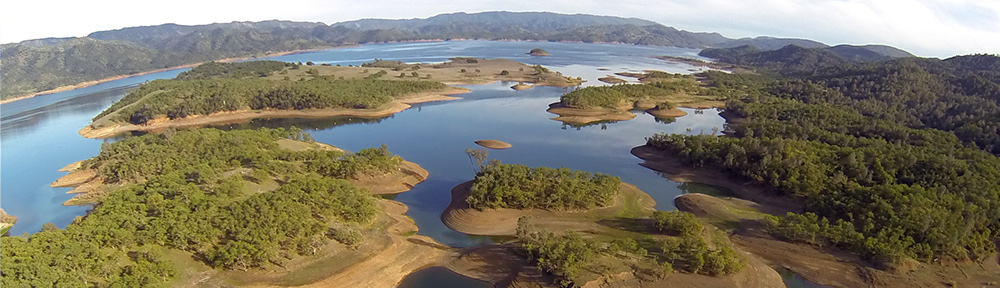
 In June 2007, we made our first-ever trip to Alaska. The first part of the trip was a short stay with friends in Anchorage, followed by a train ride to Denali National Park. The much-touted train ride was long with plenty of scenic bits. The highlight was this view of Mt. McKinley, which I snapped from our train car seat.
 One of the reasons I chose the
  The images in question were 324 pixels wide. The space I had to work with was 970 pixels. 3 x 324 = 972. My luck, sometimes.
 ';
';