In Search of My Next Great Photo

Competing with someone I know I can beat: myself.

Strawberry Hedgehog Cactus

This photo raised the bar for my landscape photography; I consider it one of my best. (Click for a larger view.)

In 2010, right around this time of year, I took my Jeep and camera out into the desert east of Wickenburg for a bit of what I call photojeeping. Along the way, I made many stops and shot many images of the wildflowers that were in such abundance that day. On that day, I also shot what I still consider to be my best photo.

Let me take a moment to describe what I consider a great photo. Simply put, it needs to meet certain criteria:

  • First Impression = Wow! You know how that goes. You look at a photo or piece of artwork or even something that’s not normally considered “art” and your first response is a mental or even audible “Wow!” What you’re seeing captures your attention and holds it. It makes you really look at it. Examples of wow photos can be found daily on The Big Picture and other news sites that feature extraordinary photography. What makes you say “wow” is likely to be different from what makes me say “wow,” but I’m pretty sure there’s some overlap. I’m pretty picky, though, so I’m not likely to say “wow” about a photo as quickly as some other folks. In fact, I’ve been in groups looking at photos that seemed to impress just about everyone but me. The point: it takes a lot to impress me.
  • Composition. This is one of the things that separates real photographers from people who take snapshots. A real photographer — someone who is actually thinking about the photo before he pushes the shutter button — will study the scene before him and determine how to best frame the elements within it. Composing with the Rule of Thirds in mind seldom leads to a bad photo, but there’s so much more to consider than that. Does a composition have depth through the inclusion of foreground and background subjects? Are elements arranged in an aesthetically pleasing way? Too many people don’t realize that a photo’s composition can be dramatically altered by standing two feet to the right, moving ten feet closer to a subject, or shooting from a kneeling position instead of standing up. And then there’s the choice of lens and focal length — it’s so much more complex than just magnification. Is the composition of the subject matter as good as it could be?
  • Grand Canyon

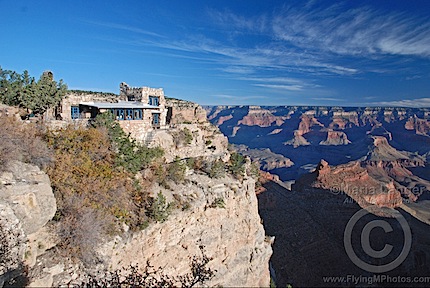
    While this isn’t a great photo of the Grand Canyon, it does illustrate two points that make it more interesting than the standard straight-on midday shot: composition and light. (Click for a larger view.)

    Light. I can’t overstate how vitally important light is for good photography. Consider a subject like the Grand Canyon. Thousands of people visit every day and most of them are clicking away with their cameras. But how many of them are actually making good photos? I’ve been at the Grand Canyon countless times at all times of the day and night. (Have you ever seen the Grand Canyon by the light of a full moon in the winter time, with a blanket of fresh snow on the rim? Try it sometime.) I can assure you that there’s nothing less interesting than a full-frame shot of the canyon taken from the Rim outside Bright Angel Lodge at midday on a perfectly clear day. It looks completely unimpressive and downright flat. Yet that’s what so many people shoot. If you’re serious about photography and making a good picture, you’ll come back when the light is better — low in the sky or maybe filtered between clouds. You’ll let the deep shadows created by nature add depth to the image. You’ll let the golden color of the light add a warm glow to your scene and bring out the natural red color of the canyon walls.

  • Out of Focus

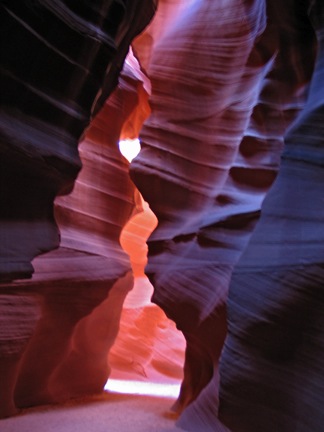
    This photo of Antelope Canyon is out of focus and there’s nothing I can do to make it any better. It is and will always be a crap photo.

    Mechanics. I’m talking here about basics like focus and exposure. A photo could meet all the other criteria, but if its out of focus or improperly exposed, it fails as a good photo. Let’s face it: if you’re serious about photography, you need to master focus and exposure settings on your camera first, before you spend a lot of time, effort, and perhaps money trying to capture great images.

These are just four of many criteria that can be used to judge the quality of a photographic image. They’re the four top criteria I use when I judge mine.

I realized a while back that I’m in a never-ending photo competition, one where I’m always trying to beat myself. I make what I consider a good (or even great) photo and I then try to make one that’s better.

Sometimes it seems easy. For example, when I shot my Desert Still Life (shown at the top of this post), I was unhappy with the focus. It wasn’t terrible, but it wasn’t the best it could be. So I figured I’d just go back and try again. Although only two days had passed, the scene was dramatically different; I’d have to wait at least a year to try again. Timing, in this case, was everything. I got lucky for my good shot.

(Permit me to take a moment to critique this photo a bit more. Focus isn’t the only problem. The other problem is the sky: it’s too damn blue. This is a problem we have in Arizona — most days there simply aren’t any clouds in the sky. A few clouds — heck, even a contrail — would have made this photo a lot better. But there’s nothing I could do about that. Sure, if I waited for a partly cloudy day, I could have gotten a better desert scene. But would those cactus flower have been in such spectacular full bloom?)

So now I just try to beat that shot and others I also think are good with new and interesting subjects. It’s tough. Sometimes I’ll be at a place where I think I can pull it off and I wind up walking away with an SD card with a handful of disappointing images. But I don’t give up. And I keep experimenting — mostly to learn what works and what doesn’t.

And I think that’s the only way to improve at anything: to keep trying to be your best. To look at past achievements and work hard to take things to the next level. To learn from experience and experimentation.

Sure, along the way there will be plenty of frustrations. But will there ever be so many that I give up? I don’t think so.

A Bryce Canyon Photo Shoot

It’s all about timing.

I’m at Bryce Canyon with one of my aerial photography clients this weekend. Although we’re here to do some aerial work at Bryce and then at the Grand Canyon (and maybe Sedona), we’re grounded due to weather. Yesterday dumped at least 10 inches of snow in the area, blanketing everything with thick white snow. Last night, it started to clear out. My client and I arranged to meet before dawn and see what we could shoot in the park at sunrise.

We met at 6:30 AM. The moon, waning two days past full, was still up and, at one point, was beautifully framed by the tall, snow-covered pines along the park’s entrance road. We pulled over into a cleared area and my client spent about 20 minutes standing in the snow across the road with his tripod and camera. I took the opportunity to touch base with my husband back in Wickenburg.

The clouds were moving in again when we finally got back on the road. My client didn’t have much hope. I was uncertain. I know how quickly conditions can change up here. I also knew that the temperature/dew point spread at the airport 5 miles away was only 2°C — and that meant possible fog. I was hoping some of that fog might be in the canyon.

Inside the park, only two viewpoints were open: Sunrise Point and Sunset Point. Both look out into the “Amphitheater” area , a roughly C shaped canyon facing southeast. My client and I were glad the other road was closed; it meant our brief aerial photo work the next morning was less likely to bother park visitors.

Snow Thrower
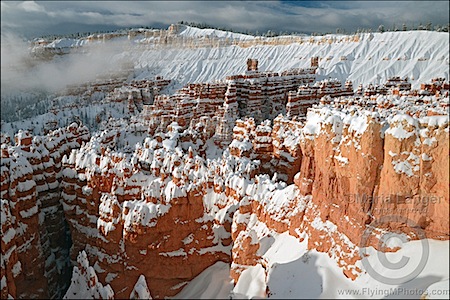
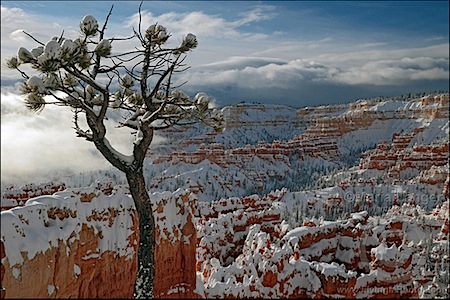
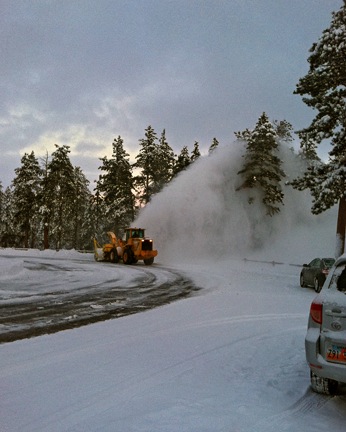
My client steered us to Sunset Point. Two very large snow throwers were at work in the parking area where only two cars were parked. We parked behind one of them, got our gear together, and headed out to the lookout point.

Although the path had been cleared the day before, about 2 inches of fresh powdery snow lay atop the surface. Below that was a sheet of ice. We both walked carefully. The viewpoint was deserted. The view was…well, interesting, but not perfect. The fog I wanted to see was layered in the canyon and at various other places beyond it. There was enough fog to make it interesting without really obscuring the hoodoos — red, column-like rock formations — that we’d come to see. The trouble was, the light was awful. The sun was up, but it was hidden behind thick clouds. The light was gray and lifeless.

The hiking trail down into the canyon was open — despite thick snow covering the pathway. My client, who was prepared to hike in deep snow, announced he was going down. I had the car keys. The idea was that when I got cold, I’d wait for him in the car. My iPad was in there, so I’d be able to read or check e-mail. He headed down and I walked back to the view point to see how things would change.

Another photographer showed up about five minutes later. We got to talking. He was from the Salt Lake City area and had come down the day before. He couldn’t believe all the snow he was seeing had fallen in just that day. As we chatted, we snapped photos. I had my monopod with me; he was shooting handheld. (My client was lugging a very heavy tripod down the trail with him.) A few minutes later, the man’s family joined us. He and his daughter (I assume) headed down the trail, leaving me up top with his wife and other daughter (I assume). We did a lot of chatting and photo snapping as time went on.

First Light
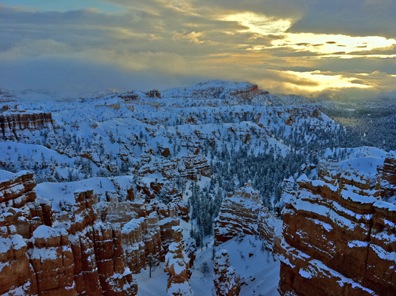
The first hint that things might improve came a while later when the sun started breaking through the clouds. I snapped this photo using the HDR function of my iPhone and then fixed it up a bit more in Photoshop to bring out the shadows. Not too impressive. The light faded again right after that and I started thinking about how warm the car might be. But I decided to stick it out a bit longer.

I was glad I did. A few things happened:

  • The sun rose higher. Of course, I expected that.
  • The clouds drifted on a gentle breeze to the west. The effect of that was to make it easier for the sun to poke over the top of the cloud bank.
  • The fog bank began drifting into the canyon.

The effect of all these changes, which occurred over the course of about an hour, was to make an amazing, constantly changing scene in front of me. I began doing real photography. The three photos shown below are among the best I shot.

Bryce Dawn 1Snowy Bryce Dawn 1
D7000, f/10 @ 34 mm, 1/400, ISO 400, No Flash

What I like most about this first shot is the laying of the low clouds among the hoodoos in the canyon. This really helped to separate the rock formations and add an element of three-dimensionality. It was also neat to be above the clouds without having to fly there.

I had two lenses with me: a Nikkor 10-24mm and a Nikkor 16-85mm. Although I prefer the 16-85mm lens — it’s the absolute perfect all-purpose lens — I found that I was shooting most photos with the wider view. With my Nikon D7000’s 1.5x crop factor, this lens, at its widest focal length, is equivalent to a 15mm 35mm camera lens. There’s very little distortion — unlike my 10.5mm fisheye, which is fun but not practical. I liked the way it accentuated the sky in some of the earlier shots I took.

For a while, I switched back and forth — no easy feat when wearing gloves and relying on a jacket pocket for lens storage. Later, as the light continued to change, I wound up sticking with the 16-85mm lens, which also had a polarizer on it. That came in handy when the sun had risen high enough over the cloud bank to bring out some of the colors. I’m a big fan of using polarizing filters when the light is right for them. It really can accentuate the outlines of clouds and the blue of the sky, not to mention the red in the rocks.

Bryce Canyon Dawn 2Snowy Bryce Dawn 2
D7000, f/10 @ 16 mm, 1/400, ISO 400, No Flash

I’m actually a little annoyed about this photo. When I shoot, I compose in the camera with every intention of using the full frame image. In other words, I shoot photos that don’t need to be cropped. This is very easy if you use zoom lenses, which I do, and take the time to compose properly.

The problem with this image is that when I shot it, I included my monopod head, which was leaning against a fence rail, in the lower-left corner of the picture. It ruined the photo. The only way to “fix” it was to crop it. This was the best I could do. It is not as I intended. I may attempt to remove the monopod head with Photoshop in the future, but I generally don’t like doing things like that. We’ll see.

Bryce Canyon Lone PineBryce Canyon Lone Pine
D7000, f/11 @ 24 mm, 1/500, ISO 400, No Flash

I like to shoot foreground items with interesting backgrounds. This tree, with the fog, clouds, and sky behind it to separate it from the background details, made a great foreground subject. And what could be more interesting in the background than snow-covered red rock hoodoos?

In all, I shot about 50 images over the course of 90 minutes. These were the three I liked most after viewing them on my laptop. I might find other favorites when I get back to my office and have time to look at them again.

I should mention that my camera was outfitted with its Nikon GPS, which worked like a charm to encode location information into each shot. This was the first time I used it. The device is awkward and I’m not sure how often I’ll really want to use it. I might reserve it for tripod-based work.

The fog bank continued to move in and eventually blocked out the sun again. The overlook chilled back down to its pre-sun temperature. Down below, on the trail, my client and the two other people who’d gone down started back up. The dad and his daughter arrived first and the family left together. When I realized my client had stopped for more photos, I decided to head back to the car. He joined me about 20 minutes later.

It had been a nice morning shoot, despite the cold. My client says there’s too much snow on the hoodoos for the aerial shoot we need to do before heading south again. While I agree that there’s a lot, I don’t think there’s too much. The red rocks are still clearly visible and should look great from the air.

As I write this four hours after our return, the snow is falling again. Let’s hope it doesn’t add much more to the scenery here.

A New Camera

Will it take my photography to the next level or have I gone as far as I can go?

Desert Still Life
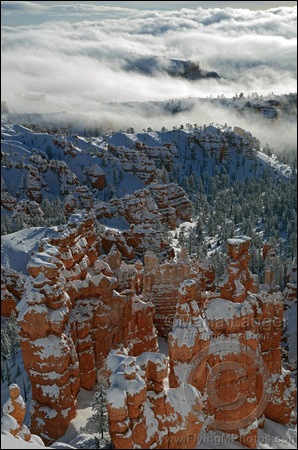
Last spring, I shot one of what I consider one of my best photographs. I’d been “photojeeping” out in the desert when the hedgehog cacti were blooming. I stopped the Jeep on the two-track I’d been following, grabbed my tripod, camera, and cable release, and set off on foot across a relatively flat area peppered with pink blossoms. When I saw this cactus, my eye began a search for an interesting composition. I had to get down on the ground, with my tripod’s legs as short as they could go, to frame this shot. Although I let the camera handle the exposure (as I usually do), I fine-tuned the focus and depth of field using aperture settings. Said simply: I put a lot of effort into this shot — a lot more than I usually do.

And I was very pleased with the results.

Until I looked more closely at the photo in Photoshop, using 100% magnification. That’s when I could clearly see that the image lacked the kind of sharpness I wanted in my photos. It was as if nothing in the photo was in clear focus. Given the depth of field, that just didn’t seem possible.

I had done just about everything in my power to get the best shot I could and I’d fallen short of desired results. It was like being slapped in the face.

Nikkor 16-85mm LensI started doing research. I knew it wasn’t the lenses I was using — this particular image was shot with my Nikon 16-85mm f/3.5-5.6G AF-S DX ED VR Nikkor lens, which was still relatively new at the time. Although this is not a top-of-the-line Nikon lens, it is not a junk lens. The low ISO settings on the camera should have prevented the graininess I observed. That left the camera or me.

I didn’t think it was the camera. After all, I’d come into photography the old fashioned way: using film. When dealing with film, the camera is just a mechanical device to get the exposure — at least at the level of camera I could afford. The lens handles the clarity of the image, so we normally put our money into good optics. Processing and printing (in the case of prints) are also important for the final result.

So it must be me, I reasoned. I resolved to try harder.

Time passed. I took a lot of photos. I started getting accustomed to disappointment. It was taking a lot of the joy out of photography. I’d do a shoot at an amazing place and get ho-hum images.

Nikon D80
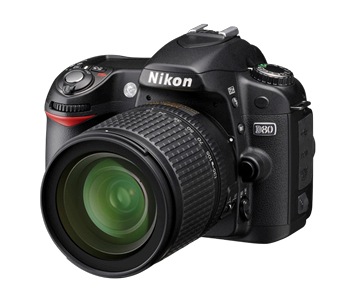
Then I started thinking more about the camera. I knew that my Nikon D80, which I’d had since 2007, had a 10.2 megapixel Nikon DX format CCD imaging sensor. Newer cameras offered higher resolutions (more megapixels or “piglets,” as my family calls them). They also offered different sensors. My husband’s D90, for example, has a 12.3-megapixel DX-format CMOS imaging sensor. And I knew that there were also cameras that had film-frame size sensors. Why the differences? Did it really matter? I began to get an education about how cameras differ in the world of digital photography.

By the autumn of 2010, I was convinced I needed a different camera. I was limited, however, because I already had a huge investment in Nikkor DX-compatible lenses. That meant that I couldn’t go with a film-frame size sensor in a new camera without buying new lenses. That also meant that any thoughts of jumping the good ship Nikon and boarding the S.S. Canon were not entertained. (Don’t get me wrong: Canon makes excellent equipment, too. But I know Nikon and have an investment in Nikon equipment; it makes no sense for me to switch.)

In November, I went to Tempe Camera to learn more. I was about 75% ready to plunk down up to $1500 for a new camera. But the sales guy educated me some more. Although I’d always seen my husband’s D90 as a minor upgrade to my D80, the sales guy told me that the software was far superior in the D90. I’d get better, clearer images from a D90.

Of course, my husband already had a D90, so it didn’t make sense to buy another one. I’d give it a go with his camera.

That didn’t work. When we went shooting together, he wanted to use his camera. Can you blame him? So I’d be stuck with mine and wouldn’t get the opportunity I needed to experiment with a different camera.

Nikon D7000I heard about the Nikon D7000 in, of all places, Wilson Camera on Camelback Road in Phoenix. We’d gone in there to get passport photos taken and the guy at the counter had been almost drooling over the D7000. I started doing some research. I liked what I read. Not only was it another [big] step above Mike’s D90, but Ken Rockwell, a highly respected camera reviewer, said:

The D7000 is Nikon’s most advanced camera at any price. The fact that it sells for $1,200 make [sic] it a no-brainer, which is why it’s sold out. The D7000 is Nikon’s best DSLR ever.

Holy cow. That was quite a statement.

I did more research on Nikon’s Web site. (That site, by the way, is an excellent and well-designed source of information about Nikon products and photography in general.) I liked the feature list. Better sensor, higher resolution images, programmable custom settings, more scene modes, true 1080p video capabilities — hell, it could even do time-lapse photography without an add-on intervalometer. There are a lot more features; if you’re interested I highly recommend reading up on Nikon’s Web site.

But Mr. Rockwell wasn’t kidding when he said the camera was sold out. Once I decided I wanted one, I spent two hours trying to track one down. Amazon.com was selling one for $100 above retail price. (I don’t pay more than retail for anything; heck, I seldom pay retail for anything.) Tempe Camera only had a kit, which came with the Nikkor 18-105mm lens. I don’t have that lens but I don’t need it either — and was not interested in spending $300 more for the camera with lens. A dozen calls all reported out of stock, although many dealers were willing to let me place an order anyway. But like the true American I am, I wanted immediate gratification — or as close to it as I could get. I was going to San Francisco in a few days and planned to use my new camera there.

I wound up on J&R’s Web site. I used to shop in the J&R store on Park Row when I worked in downtown Manhattan years ago. This was back in the mid 1980s, before digital cameras, when personal computers were in their infancy. J&R then was what chains like Best Buy and Fry’s Electronics are now. (Would love to walk through J&R again; maybe the next time I’m in New York I’ll make the trip down there.) I’d bought other camera and computer equipment from them in the past. Their Web site said they were out of stock on a D7000 body only, but I called anyway. The guy who answered in Maspeth, NY (in the borough of Queens, in case you’re wondering) said a shipment had just come in and the Web site evidently hadn’t been updated yet. They were selling at retail. Brand new, in an unopened box, packaged for U.S. sales. (I asked, of course; I know what goes on among some NYC camera dealers.) Free shipping would get it to me by Friday or Monday. I asked how much overnight shipping would cost. $27.27. Sold!

I expect it to arrive this afternoon.

Nikon GP-1 GPS
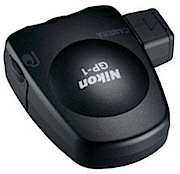
In a fit of crazy shopping mania, I also ordered the Nikon GP-1 GPS from Amazon.com. This device, which can attach to the camera’s hot shoe, will automatically geotag my images. This will seriously reduce my geotagging workflow and ensure that all of my photos are properly tagged. I even coughed up the $4 for overnight shipping to get that today.

Once I get the camera and learn to use it, the ball will be in my court. No more excuses; I’ll have good camera equipment and should be able to take better photos. If I can’t — well, I’ll only have myself to blame.

It’ll be interesting to see whether this camera takes me to the next level as a photographer. I’ve got my fingers crossed.

The Two Antelope Canyons

You must see at least one of them when you’re at Lake Powell.

Antelope Canyon SquareI’m working on an itinerary for a Flying M Air excursion client. They’ve decided to customize their Southwest Circle Helicopter Adventure to add another day at Page, AZ, as well as an overnight stay at Bullfrog Basin about halfway up Lake Powell.

One of the things they wanted to add to their trip was a visit to Lower Antelope Canyon. The trip includes a visit to Upper Antelope Canyon, which is the attraction that gets the most visits. I felt it important to explain the difference between these two places and provide additional information on how they could be visited. I figured this information might help others plan their visit to the Page area.

Antelope Canyon: An Overview

Let’s start with an overview of what Antelope Canyon is and how it was formed.

Upper Antelope CanyonAntelope Canyon was formed mostly by the action of water in Antelope Creek, a south-to-north arroyo southeast of Page, AZ on the Navajo Reservation. During heavy rains to the south, the normally dry creek bed turns into a stream of water that rushes northward, sometimes at dangerous flood stage levels. (Indeed, 11 tourists were killed in Lower Antelope Canyon during a flash flood in 1997.)

Lower Antelope CanyonOver time, the water has carved a series of narrow slot canyons through the red rock sandstone. Two of these slots are open to the public. Upper Antelope Canyon is south of route 98 (see top satellite photo); Lower Antelope Canyon is north of route 98 (see bottom satellite photo). Examination of satellite images of the area show additional slot canyons along Antelope Creek, but they are not open to the public.

Both canyons have restricted access. You must pay a fee to the Navajo Nation and enter the canyon with a Navajo guide.

Both canyons have smooth, carved, Navajo sandstone walls that are quite beautiful. Antelope Canyon is one of the most photographed locations in the area.

Upper Antelope Canyon

Antelope CanyonUpper Antelope Canyon is, by far, the more visited of the two. I think there are two reasons for this:

  • Tour companies based a few miles away in Page take groups of tourists directly to the mouth of the canyon, making access convenient.
  • The floor of Upper Antelope Canyon is generally level, making the canyon very accessible, even to those who are less physically fit.

Upper Antelope Canyon is about 600 feet long, carved through what looks (from the air) like a single sandstone formation. Much of the canyon is so narrow that you can touch both walls with your hands at the same time. The downsteam opening of the canyon is bright with three big “rooms.” The rest of the canyon is much darker and narrower.

Most of the photos you see of Antelope Canyon were shot in Upper Antelope Canyon. At certain times of the day and year, shafts of light come down into the canyon. Photographers often kick up sand or dust into the light shafts for interesting photographic effects.

There are two ways to visit Upper Antelope Canyon:

  • Sign up for a tour with a Page-based tour company. The fee they charge covers the fee to the Navajo Nation as well as their fee for guide service. They will provide transportation from their location in town to the mouth of Upper Antelope Canyon, usually in a large, open-backed truck with bench seats. Your driver/guide will then walk you through the canyon. Afterwards, you’ll have about an hour to explore it on your own.
  • Drive up to the park entrance on Route 98, not far from the power plant. Pay a park entrance fee and park your car. Then pay a fee to tour the canyon. You can then wait on benches there until a tour is ready to go and climb aboard the same kind of open-backed truck to reach the mouth of the canyon. The driver/guide will walk you through the canyon and give you about an hour to explore it on your own.

They’re basically the same experience, but one requires you to wait outdoors in a relatively unpleasant environment while waiting for your tour to depart.

If you’re wondering which one is cheaper, there really isn’t much of a difference in price. I prefer using a tour company based in town, strictly for convenience. If you do decide to use a tour company, I recommend Antelope Canyon Tours.

You cannot drive your car to the mouth of the canyon. You must go with a guide.

If you are interested in photographing Upper Antelope Canyon, you must read this.

Lower Antelope Canyon

Lower EntranceLower Antelope Canyon has far fewer visitors than Upper. Unlike Upper, no tour companies — at least none to my knowledge — visit it. In addition, the canyon itself requires a decent amount of physical fitness. There are ladders, narrow passages, and various places where scrambling on the smooth sandstone is necessary. Heck, even the opening of the canyon, where you descend into a crack in the rock (shown here) seems designed to keep certain folks out: a fatty simply wouldn’t fit through it.

Lower Antelope CanyonThe great thing about Lower Antelope Canyon, however, is that you have up to four hours to explore it pretty much on your own. This gives you plenty of time to shoot photos or lose yourself in thought between the smooth sandstone walls. Because there are far fewer visitors, it’s a more relaxed and pleasant place to visit. You can probably guess that I prefer it.

Lower Antelope Canyon is only accessible by driving up to the parking area, paying the fee, and getting a guide to take you down. Sometimes a guide will take you straight down; other times they make you wait. The entrance to the canyon is walking distance from parking. The guide does not stay with you. Although you’re limited to four hours in the canyon, there’s no one keeping track. You can exit the canyon the same way you entered or climb out on a series of well-built ladders on the far end and walk back along the east wall of the canyon.

Visiting Both

My clients want to visit both, which I think is a great idea. What better way to appreciate the difference between them?

Of course, since they are separate, there’s no easy way to visit both. You can save the park entrance fee — which I believe is about $6 — if you drive to Upper and then visit Lower on the same day. If you’re interested in photography, however, that means that you might not get the best light for both canyons. It all depends upon the time of year and angle of the sun. We’ll be there in March when the sun is nearly straight overhead at noon; midday seems like a good time to visit.

Sunrise/Sunset Times for Photographers

Phoenix times now updated.

SunI’ve just updated my calendar of sunrise and sunset times for the Phoenix area. I’ll be keeping this up-to-date as a published calendar. Subscribe at webcal://ical.me.com/mlanger/Sun.ics. I know you can subscribe with this link using iCal, but I think you can also subscribe with other calendar formats such as Google Calendar.

If you’d prefer to download and import the files, 2011, 2012, 2013, 2014, and 2015 are currently available.

If you’re a photographer or pilot, you know how helpful it can be to have this exact information. Every year for the past ten years or so, I’ve been updating iCal with this information so it’s always available on my computers and other electronic devices (think BlackBerry, iPad, etc.).

The last time I offered to create these files for photographers, I had a lot of folks ask for them but no one seemed willing to cough up a little dough for the time it takes me to create the files.

So here’s the deal: If you want sunrise/sunset times for 2011-2015 — that’s FIVE YEARS WORTH — in ics format, you’ll need to use this Paypal link to send me some coffee money. Be sure to include either the GPS coordinates for the place you want sunrise/sunset times for OR the Zip code. I’ll try to get the resulting files to you in e-mail within 72 hours. (Keep in mind that the more coffee you buy me, the more motivated (or caffeinated) I’ll be to send those files quickly.)

And no, I won’t add you to any e-mail list. I have way better things to do with my time than bother strangers who were kind enough to buy me coffee.