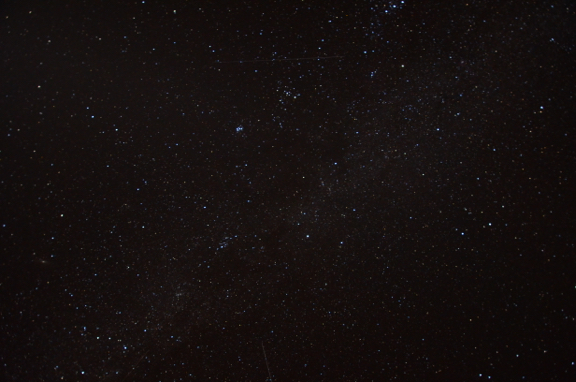
It’s kind of like the stars needing to align just the right way to get the best shot.
Practice Makes Perfect
This reminds me of a podcast I was listening to in the car just yesterday on my way back to Wickenburg from Winslow. It’s an episode of
Freakonomics radio which discusses practice as a way of becoming an expert at anything. If you’re interested in learning or getting better at a skill and like to understand the science behind how things work, I recommend “
How to become Great at Just About Anything.”
A few weeks ago, a friend of mine — we’ll call her Jane — shared a photo on Facebook. She’s an amateur photographer turning pro and has begun to sell some of her work. Other work has appeared in various publications. I’ve known Jane since she first took a serious interest in photography and it’s no exaggeration to say that her work has come a very long way since those early days. Many of the photos she shares now are absolutely stunning. Practice makes perfect — or at least helps you get closer to perfect.
Anyway, the photo Jane shared that day was one of those where she caught the light on her subject just right. It was one of her best shots — in my opinion, anyway — and I complemented her. I also added the comment, “It’s all about being in the right place at the right time.”
I don’t remember her exact response, but it was something like, “It’s a little more than that.” I suspect that I’d offended her and I certain didn’t mean to. But I’ll stand by what I said and make an attempt to prove it with an example. I’ll also share some of my philosophy about photography.
What Makes a Photo Great
The way I see it, a photo can’t be truly great unless the photographer nails three components: subject, composition, and light.
Subject
The subject of the photo is what the photo shows. It should be something beautiful or notable or interesting in some way. Beautiful is pretty straightforward, although I agree that beauty is in the eye of the beholder. Notable is what I think about when using photography to document something, for example, the way a bridge cable attaches to a support or the design of a water fountain. (Yeah, I’m sometimes fascinated by silly things like that.) Interesting covers a lot of ground. The pattern of sand after a wave has come by is interesting. Paint peeling off a wall can be interesting, too. It’s part of the photographer’s job to make the subject something that speaks to us in some way, something that makes us stop and look and think. A good photographer can do that with just about any subject using the other two components.
Composition
Composition refers to the way the photographer arranges the subject and its surroundings in the camera’s frame. You may have heard of the Rule of Thirds and it’s a great thing to keep in mind when composing a photograph. But that doesn’t mean a photo can’t be great without following that rule. One of the differences between a good photographer and someone who haphazardly snaps dozens of photos in hopes that one will be good is that a good photograph can figure out where to stand and which lens to use (or how to set a zoom lens) and how to hold the camera to get the best composition more often than not. I should add here that a good photographer does not need to rely on cropping to get the right composition; she should be able to compose right in the camera. (One obvious exception to this rule is when a photo’s desired aspect ratio is unsupported by the camera; for example, a square photo would require cropping.)
Light
Of course, photography absolutely depends on light. Without light, there would be no photography — after all, that’s what the camera’s sensor (or film in the old days) records. What so many amateur photographers don’t understand is that there is good light and bad light. Natural light changes with the weather and time of day. Blue hour or twilight light is, as the name suggests, bluer and dimmer than daylight. Golden hour light tends to be redder and softer, casting longer shadows. Midday light is often harsh and bright, flattening out the scenery. Beyond that, light can be direct or reflected or shadowed — sometimes all in the same composition. A good photographer using natural light — for example a landscape photographer like Jane (and me) — understands the importance of light and makes a special effort to photograph the subject at the best time.
Get all three of these right and the photo will be great. Get two of these right — for example, subject and composition or subject and light — and the photo might be good, but it won’t be great. Get just one right and the photo won’t be very good at all. (We’ve all seen these — think vacation photos uploaded en masse on Facebook.)
Being a Serious Amateur
I call myself a “serious amateur” photographer and I don’t use that phrase lightly. I see it this way: An amateur is someone who snaps photos without bothering to try to make the photo great. Good is good enough. A serious amateur is someone who understands what makes a photo great and puts a conscious effort into trying to make great photos. Each shot, objectively reviewed, is a step (hopefully up) on the learning ladder. Good is never good enough.
The trick is to objectively assess how good you’ve covered each of these components. And that’s a Catch-22 in itself: if you’re not a good photographer, you likely won’t be able to objectively critique your own work. That’s part of how practice makes perfect. Keep trying, keep comparing, keep objectively trying to figure out what could be better in each photograph you make. If you’ve got a good eye and you’re honest with yourself, you’ll get better all the time.
Right Place, Wrong Time
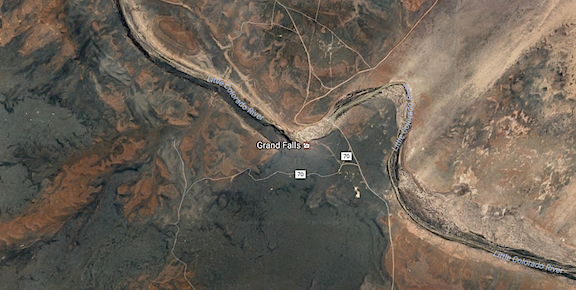
This past weekend, I was up in the Navajo and Hopi Reservations in Northern Arizona. This is an amazing place for landscape photography, with the broad desert scrubland of the Painted Desert punctuated by deep canyons, flat-topped mesas, and towering buttes. The west end of the Navajo Reservation is where red sandstone formations laid down when oceans covered the Four Corners region meet and merge with dark brown lava flows emerging from the multitude of volcanic cones north and east of Flagstaff. That’s where an explorer with a vehicle capable of tackling rugged roads can find the Grand Falls of the Little Colorado River.

Nothing better illustrates the way the two landforms come together at Grand Falls than a satellite image like this one. You can clearly see the reddish rock of the painted desert butt up against the lava flows. One flow forced a bend in the river around it; the falls come right after that bend and then cut into the rock joint, forming the Little Colorado River Gorge. (The Colorado River flows east to west here.) Want to study this for yourself? Use Google Maps to Search for Grand Falls, Leupp, AZ.)
As a subject for photography, the Grand Falls is a crap shoot. I’ve seen the falls completely dry without a single drop of water flowing over the long shelves of rock. While that might be interesting to some folks — geologists come to mind — I personally lack the skills to make it interesting enough to qualify as a great photo. I’ve also seen the falls with water thundering over its entire breadth and mist rising up into the sky. When the water is flowing it’s always reddish brown from sandstone silt it picks up along the way, thus giving it the nickname “chocolate falls” or “chocolate milk falls.”
So timing is vital when visiting the falls. It nearly always runs with spring runoff from the mountains far to the Southeast, so spring time is the best time to visit if you want to see water. It also may run from monsoon rain in July and August — depending on weather, of course. But it was January — too cold for runoff and no monsoon rains. We did, however, have a good rainstorm on Friday night. And my trip to the Hopi Reservation put me just over an hour away. It was worth a try.
I was lucky. The falls were at about half flow: certainly interesting enough for some photos. So I had a good subject.
I spent about an hour shooting from various points along its south shore. I would have crossed the river to shoot from the other side, but there’s no bridge and the crossing looked a lot muddier than I was willing to try, even in my big four-wheel-drive truck. My ability to compose my shots was limited by where I could stand to shoot and the lenses I had with me. Although the photos here are from my phone’s camera, I did have my Nikon and three lenses with me. To fit the entire falls into the shot, I wound up using my 10-24mm zoom lens. This gave me a huge amount of flexibility as far as framing was concerned. I did the best I could and believe I got some interesting compositions that showed off the geology with manmade objects to indicate the scale — after all, Grand Falls is actually taller than Niagara Falls. So I was relatively satisfied with my compositions.
Light was another story. I arrived at midday, which would have been horrible on one of those perfectly clear, blue sky days Arizona gets so often. But it wasn’t a perfect day. It wasn’t even a nice day. I’d driven through fog to get to the falls and the low clouds had lifted only a few thousand feet above me. The light was soft but colorless. The sky was gray. The air felt wet.
Now I know that lots of photographers like the kind of soft light that was all around me that day and I know it’s hard to make a bad landscape photo on a day like that, but it just doesn’t appeal to me. Still, you can’t adjust natural light; you have to take what Mother Nature delivers. So I did what I could. I got a bit excited when, about 30 minutes into my visit, the sun began shining down the canyon past the falls. I watched the soft sunlight creep up towards the falls, hoping it would give me the kind of spotlighting I’d seen downriver. I waited. I was at the right place — or as close to it as I could be — and I was willing to wait a while for the right time.
It didn’t come. The gap in the clouds closed up. Everything returned to the even flat light. I took a few more shots, got back into the truck, and left. The rain started immediately.
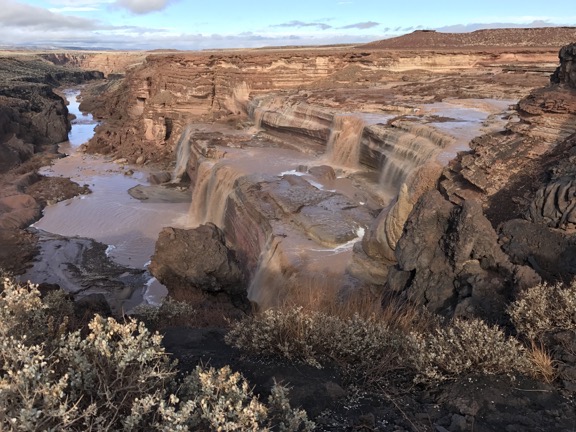
 Here’s my favorite unedited cell phone shot from the visit. Note the sunlight on the canyon wall at the top left of the photo. I was waiting for that light to get to the falls, but it never did. The Nikon version of this shot shows a wider field of view and the composition is a bit better.
So did I get a great shot of the falls? I don’t think so. I did get a good shot, though. And, for a while, I was satisfied with that.
Right Place, Right Time
Until the next day. It rained (and snowed) again overnight and I figured there might be more water going over the falls. I was leaving La Posada in Winslow (where I was staying) and another trip to Grand Falls would only take me an hour or so out of my way. I knew that if I didn’t at least try it, I’d regret it forever. After all, how often do I get up to that area of Arizona with a sturdy vehicle and time on my hands?
There was some fog along the way, but not much. The sky was clearing and blue sky was poking out. There was definitely sunlight but it was filtered through lighter clouds. Soft yet bright light. It was still early in the day — not long after 9 AM — but long past golden hour. (I’m not sure whether golden hour would have been golden anyway; the clouds were still thick around sunrise.) As I drove the last 10 muddy, bumpy roads, plowing through puddles that would swallow a Smart Car, I wondered whether the angle of the sun would cast deep shadows across the falls.
Of course, that’s a whole other aspect of light. The angle of the sun determines where the shadows will be at various times of the day at various times of the year. It was winter, not long after solstice, so the sun was nearly as low in the southern sky as it would be. And it was morning, so it would be low in the southeastern sky. The falls faced southwest, with a canyon wall to the south. Would that canyon wall cast deep shadows at that time of the day? How long was I willing to wait there for the right light?
Turns out, I didn’t have to wait at all. The light was damn near perfect when I arrived. (Perfect as far as I was concerned, anyway.) The sky was an interesting mix of patches of blue with clearing clouds. The falls had about the same amount of water flowing over, which was okay.
This is nearly the same composition, although for this shot I got down into a crouch to include some sunlight-illuminated plants in the foreground. (The crouch also allowed me to block the floating garbage patch at the base of the falls (ick!) with a rock formation.) The light was nice and soft and really added color to the shot. And because it was a soft light, the shadows cast by the wall of the canyon weren’t deep enough to screw up the exposure. This shot is also unedited, from my iPhone.
Is this a great photo? Some people might think so. I’m certainly pleased with it. But I can always do better. I just have to try.
But what it really illustrates is that it’s not enough to be in the right place for a good photo. You also have to be there at the right time. While I might not have been here at the “perfect” time to shoot a “perfect” photo, the timing of my second visit was much better than the timing of the first.
—
Related Posts:
I’ve written a bit about this before. Check out the following posts:


 Here’s my favorite unedited cell phone shot from the visit. Note the sunlight on the canyon wall at the top left of the photo. I was waiting for that light to get to the falls, but it never did. The Nikon version of this shot shows a wider field of view and the composition is a bit better.