Helicopter Flight from Washington to Arizona: Logistics and Flight Planning

Planning my last big cross-country flight before overhaul.

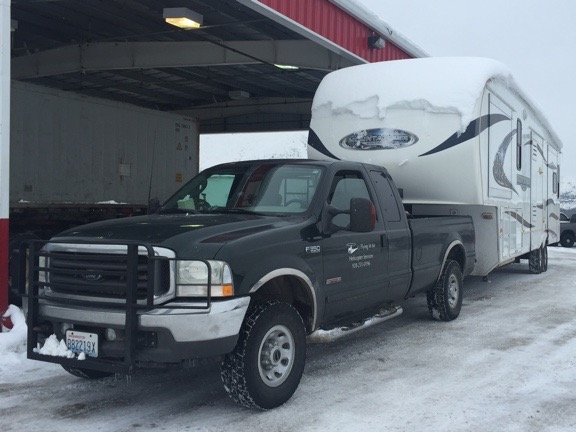
Last week, I flew my helicopter down to Chandler, AZ from Wenatchee, WA with Penny the Tiny Dog and my friend Jeremy. I needed to deliver it to Quantum Helicopters so they could get the helicopter’s first overhaul started by November 1. I’d need it back by mid-February at the latest and overhauls typically take 9 to 12 weeks.

Here’s the story of my two-day flight to Arizona, split into three parts for readability. It’s surprising how much I had to say about the flight — and how many photos I have to share. Enjoy.

Logistics and Flight Planning

With various activities scattered all over my October calendar — including a weekly wine tasting class on Wednesday nights and a weekend-long mushroom foray at Mount Rainier — I didn’t have many options to make the trip. I wound up letting Alaska Air pick the dates by searching for the best deal on a return flight to Wenatchee that would fit my schedule. That return flight was Wednesday, October 19, at 6 AM. Since I wanted one last oil change before I headed south and my mechanics usually don’t work weekends, that meant leaving late Monday morning and getting to Chandler before Quantum closed at 8 PM on Tuesday.

Some folks wonder why it was so important for me to get an oil change before making the long flight. After all, it was going in for overhaul. Surely it wouldn’t matter how dirty the oil was when it arrived. But only 8 flight hours before, on a 50-hour inspection, my mechanics had found more metal fragments in the oil filter than usual. (They had begun finding very small amounts of metal from the aging engine about six months before, but nothing to cause alarm. This was different.) Yes, the helicopter had gone a full 50-hours between changes so the amount of metal would likely be higher than usual. But was it critical? The only way to see how bad it was was to get one more oil change and take a look at the filter. They’d do this the morning before my departure and if things looked bad, I’d scrap the flight plans and arrange to trailer it down.

Fastest Route
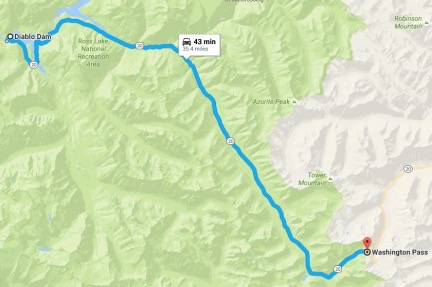
The fastest route from Wenatchee to Phoenix. There aren’t many fuel options and there’s a lot of empty desert.

The fastest route between Wenatchee and Phoenix is a nearly straight line with fuel stops in Burns, OR; Elko, NV; and Mesquite, NV. I’ve taken this route several times and it can get me to Sky Harbor in eight hours with a light load and a nice tailwind. But at least 50% of this route is over empty desert, miles and miles from any road or town. There’s one stretch in particular where for 90 minutes all you’re flying over is grass and sagebrush, with herds of wild horses galloping away at the sound of your approach — no roads, no buildings, nothing else. If the engine got iffy, we might have to land someplace where getting help would be difficult. I honestly didn’t want to deal with it.

Planned Route
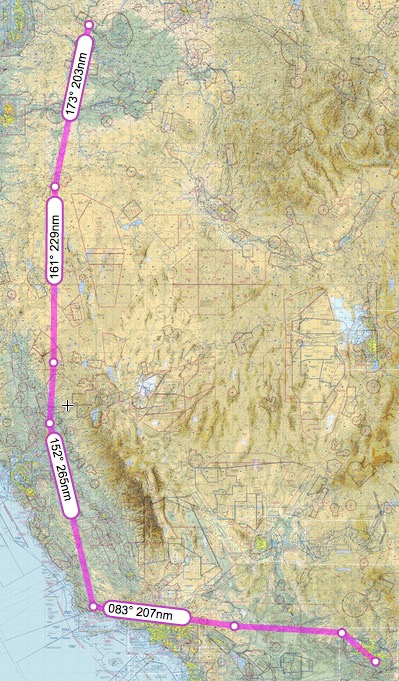
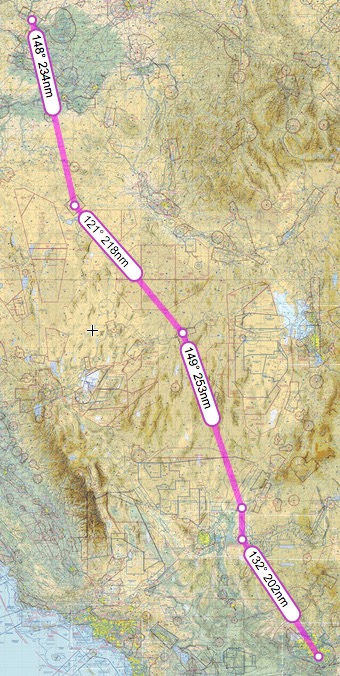
Our planned route was at least four hours longer with a handful more fuel stops along the way.

So I told my passenger, Jeremy, that he could pick the route. He got very creative. He suggested an overnight stop at Sacramento with friends of his on Monday night, then stops at the Hiller Museum at San Carlos Airport (south of San Francisco), and Santa Barbara for lunch with his daughter. That lengthened the route considerably, but kept us near roads, towns, or cities for much of the flight. I started working up a plan. Sacramento before sunset was doable — I’d done it in less than a day more than a few times — but we’d have to leave early and skip the San Carlos stop to make it to Santa Barbara with enough time for lunch before heading east. By that time, I’d also made early dinner arrangements with some friends in Wickenburg, AZ, and we needed to meet them by 4 PM to have an unhurried dinner and get to Chandler by 7 PM. (I had to chat with the mechanic and unload the helicopter before they closed and I certainly didn’t want to hold anyone up.) I plotted the new route, trying hard to find airports with decent fuel prices. Tuesday would be a long day, but I kind of looked forward to flying through the high desert north of the Los Angeles area, which I hadn’t done in several years.

Meanwhile, the weather wasn’t looking good. A pair of storm systems were due to arrive in the Pacific Northwest on the Thursday and Saturday before our trip. Cliff Mass, the Northwest weather guru, was predicting a storm equal to the famous Columbus Day Storm that had hit Seattle back in 1962. Jeremy, who lives on that side of the mountains, was getting nervous. While I was aware of the storm — heck, we were supposed to get a ton of rain in the Wenatchee area on both days — I also knew that storms come and go. The forecasts had it clearing up by Sunday and we weren’t due to leave until Monday. Monday’s forecast called for just 20% chance of rain and forecasts for our entire route, which I began tracking on Friday, looked pretty much the same. Worst case scenario was that we’d fly through some rain. And I’d done that enough times not to worry about it.

The storms came and went, pretty much as predicted. We got over an inch of rain here. Seattle and the coast got hit harder, but not nearly as hard as the weather folks expected. There were some scattered power outages and downed trees, but not the catastrophic storm damage expected.

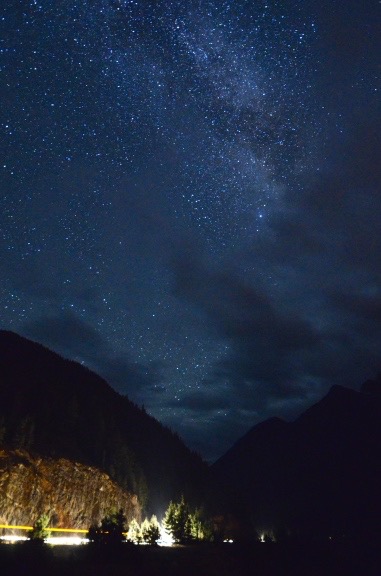
Sunday was mostly cloudy here but there wasn’t any rain — at least not to notice. I picked up Jeremy at the bus station — he took a Greyhound (!) from Seattle — we had a late lunch, and headed home. I spent some time prepping the helicopter for the long trip, getting my GoPros hooked up and pulling out any equipment I wouldn’t need on the trip or after I picked up the helicopter in January or February. Jeremy made Manhattans and opened a bottle of wine he’d brought for dinner. My friend Alyse came for dinner — I cooked up some ribeye steaks and we had them with garden potatoes and carrots.

Eventually Alyse went home and, after chatting for a while, we turned in for the night.

A Change of Plans

I woke up early, as I usually do, and immediately used my iPad to check and file my flight plan. That’s when I got my first surprise: It would take more than three hours to reach our first fuel stop at Bend, OR. That wasn’t right. I woke up a bit more and took a closer look at the flight plan. The plan accounted for 25 knot headwinds.

Shit.

I checked the rest of the flight plan. High, gusty winds from the south were predicted for much of our route to Sacramento. Chances of rain had increased a bit, too. I started exploring other routes that would take us to Sacramento before nightfall. The high winds stretched far to the east, into the empty desert I’d been hoping to avoid. To the west, near the coast, rain was likely and, I knew from experience, visibility would be poor. The weather briefing backed this up, forecasting moderate turbulence inland and mountain obscuration along the coast.

So if we took the route I’d planned on, not only would we be bouncing all over the sky, but we’d be in the air an extra hour or more because of headwinds, with at least one additional fuel stop. I was looking at a miserable day of flying with a passenger who was already worried about the weather. It would not be a good day — certainly not the kind of pre-overhaul flight I was looking forward to.

At breakfast, I reported my findings to Jeremy. That only made him mention his previous weather concerns more. But it wasn’t as if I could call off the flight, or even postpone it. The flight was doable and I already had all my plans made for a return flight that would still get me back for my wine tasting class on Wednesday. (I do have my priorities straight.) I decided that we’d depart on schedule and see how things looked to the south.

So a while later, I was spinning up the helicopter while Jeremy watched from my front yard. I took off and headed to the airport for that oil change. Jeremy drove my truck to the airport so I’d have a way to get home from the airport on Wednesday.

I did treat myself to a nice tour of Wenatchee before heading into the airport. I needed to warm up the oil, after all. It was a beautiful morning with scattered low clouds. Through a gap in the clouds, I could see snow at the top of Mission Ridge. It was the second snowfall they’d gotten up there and I knew my ski-loving friends would be thrilled.

At the airport, the three mechanics of Alpine Aviation were waiting for me. I shut down and we pushed the helicopter into the hangar. They did the oil change while I chatted with the folks hanging out in the FBO lounge and consulted ForeFlight on my iPad for options. There was stormy weather to the east, near Pendleton and Walla Walla. One route I’d taken in the past climbed the Green Mountains near Pendleton and followed I-84 through the mountains and Boise beyond. It was a good route, but I’d also been stuck at the foot of those mountains, blocked by low clouds. It would be a time-wasting detour if that happened again.

The oil filter showed some more metal fragments, but not enough to cause serious concern. The engine was, after all, 2068 hours old. (And that’s based on the collective-based “maintenance” Hobbs — it likely had well over 2,200 hours of actual engine running time.) The engine would not cause a flight cancellation.

Penny on a Box
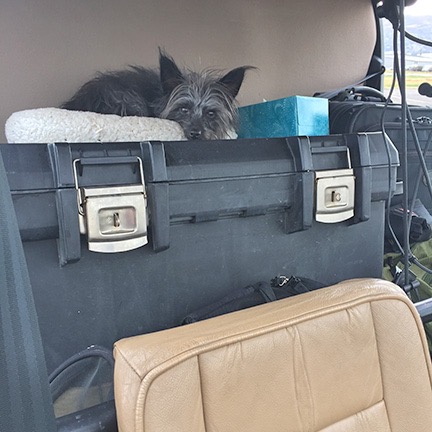
Here’s where Penny would sit for the entire duration of our trip south. She sleeps most of the time.

By 11, I was fueled up, paid up, packed up, and ready to go. I put Penny in her travel bed behind me on top of an empty wheeled box I’d brought along for storing helicopter equipment during overhaul. (I couldn’t bring all of that stuff home.) Jeremy’s wheelie bag and camera bag and tripod filled the space behind him. I shoved my day pack and jacket in the foot space behind my seat. Jeremy climbed into the passenger seat with his camera ready and buckled up. I got the front GoPro’s wifi fired up, climbed into my seat, buckled up, and started the engine.

We felt very heavy when I pulled pitch — was the engine really that tired? — but had no trouble lifting off. Soon we were heading southeast along the river. Our trip had begun.

[read more]

The Mobile Mansion is Gone

Another chapter of my old life ends.

On Monday, I delivered my 36-foot fifth wheel Montana Mountaineer RV, affectionately nicknamed “the Mobile Mansion” to its new owners. Yesterday, I met them at the bank to have the paperwork notarized and get my check.

Early Life of the Mobile Mansion

I bought the Mobile Mansion brand new back in 2010 in Quartzite, AZ. I got a great deal on it. The Great Recession was killing RV manufacturers and dealers; by January 2010, Quartzite dealers were desperate to unload brand new RVs.

Mobile Mansion in Quincy
Here’s the Mobile Mansion parked at the golf course I stayed at in Quincy, WA, for about two months each summer. (I now hire pilots to work my Quincy contracts.)

It was the second — well, fourth if you count the popup camper and horse trailer with living quarters — in a line of RVs I’d owned since the early 2000s. Like its predecessor, a Starcraft hard-sided camper with pop-out beds, It was a business asset for Flying M Air: I bought it as a place to live when I traveled for my flying work. I’d begun working in Washington every summer in 2008 and wanted an affordable and comfortable place to live while I was there. The Starcraft was affordable but not comfortable. The Montana was very comfortable mostly because it was very large. I got a big one because I expected that I’d be living in it for four to six months a year with the man I was married to and our mid-sized dog. I wanted us to have plenty of space. I wanted it to be a true home away from home. When I bought it, I blogged that it was the “perfect” RV.

A Temporary Home for the Homeless

When my marriage fell apart in June 2012, I was living in the Mobile Mansion in Washington State, where I was working for the fifth summer in a row. I didn’t bother bringing the Mobile Mansion back home to Arizona at the end of the summer. Instead, I stored it in a friend’s garage, along with my boat. I’d need it in Washington the following year no matter what happened, so it made no sense to bring it home.

I did move it down to California in February 2013 for the frost control work I started there that year. It was a lot of fun to live part time at an airport with my helicopter parked a few hundred feet away.

At Watts-Woodland
The Mobile Mansion parked alongside a hangar in the Sacramento area. You can see my helicopter parked on the ramp at the left side of the photo.

In May 2013 when the court stuff was finally done and my wasband finally agreed to a division of personal assets in our Wickenburg house and Phoenix condo, I moved out of Wickenburg permanently. By that time, the Mobile Mansion was back in Washington, settled in for my summer work, and I moved right back into it.

I lived in it for most of the next two years. I traveled a bunch in the winter, as I usually do, and had a three-month housesitting job during the coldest months of the winter of 2013/14 when living in the Mobile Mansion parked outdoors would have been tough. The following winter, the shell of my new home was finished and, when I wasn’t in Arizona or California, I lived in the Mobile Mansion inside the RV garage. I had a full hookup in there: 30 amp power, water, and sewer. It was comfortable, but cave-like — sort of like that Phoenix condo I’d hated so much — and it really motivated me to finish up my living space upstairs.

Mobile Mansion in Construction Zone
The Mobile Mansion was my home and base of operations while my new home was being built. I even set up a time-lapse camera on one of the slides to record the whole building process.

In early April 2015, I moved upstairs, sleeping on an air mattress on the bedroom floor. The shower wasn’t done yet, so I still showered down in the Mobile Mansion in the garage. But by the end of the month I was mostly moved in, with my furniture in place. Although my home wasn’t 100% complete, I was done living in the Mobile Mansion.

Or so I thought.

The Mobile Mansion stayed in the RV garage until July. I’d been playing around with AirBnB, using the full hookup campsite at the edge of my driveway as a rental and getting some activity. But in July, I moved the Mobile Mansion back outside and parked it near where it used to be. I pulled all of my personal items out of it, leaving only what was needed for guests. And then I put it on AirBnB. Amazingly, I was able to rent it almost every weekend right into October, getting $80/night with a two night minimum.

Mobile Mansion
People paid $160/weekend to live in the Mobile Mansion with it parked right where it is in this photo. (And no, the helicopter usually wasn’t parked in the side yard.)

(I could probably write a whole blog post about squeezing money out of assets without a lot of headaches. I’ve gotten pretty good at it.)

Mobile Mansion for Sale

By September, I had decided I definitely wanted to sell the Mobile Mansion. I wanted to travel for the winter but I wanted a smaller rig. I’d already started shopping for one. At the time, I was thinking of a much smaller bumper pull. I listed the Mobile Mansion in various places, hoping to sell the truck with it.

After that last AirBnB rental, I took everything out of the Mobile Mansion, gave it a good cleaning, and dropped it off at an RV sale lot in East Wenatchee. The folks there were pretty confident they could get my price.

They came in with two offers, both of them very low. Bargain hunters looking for “motivated” (read that desperate sellers.) I didn’t have to sell the Mobile Mansion. It was fully paid for and not costing me a thing to keep. I’d even made nearly $2K using it as a rental for part of the summer.

By December, I’d decided to go south for the winter. My friends were camping out in the Colorado River backwaters and I wanted to join them. I figured I’d sell the Mobile Mansion while I was away and come home with a different rig. So after my Christmas skiing trip, I went to the sale lot with all the gear I’d need for the winter, packed up the Mobile Mansion, hooked it up to my truck, and headed south on what was supposed to be a three-month trip.

Old Ford
The last of the snow melted off the roof when I reached Blythe, CA.

Despite the in-transit trials, I had a great time. It was good living off the grid with my friends, soaking up the sun, fishing, paddling, horseback riding, and shopping for deals in Quartzsite. I almost sold the Mobile Mansion once — I had a decent deal to trade it for a truck camper and still get cash in hand. But I wasn’t mentally ready for such a huge downsizing. I made some improvements to the Mobile Mansion, thinking I might keep it after all.

Mobile Mansion Parking
Living in Arizona along the Colorado River in the Mobile Mansion last winter was tough. Not.

I regretted not taking that offer when I left Arizona in February and started my trip to California for my frost control work there. Truck trouble stranded my truck and the Mobile Mansion in southern California, really screwing up my plans. I went home, fetched the helicopter for my contract, and spent some time in the Sacramento area with it. But without the Mobile Mansion to live in, I didn’t want to be there. I went home, leaving the helicopter, my new used truck, and the Mobile Mansion scattered around California. It wasn’t until April that I was able to fetch everything and bring it home.

After cleaning the Mobile Mansion out yet again, I brought it right to a sale lot in North Wenatchee. Once again, the sales guy told me how sure he was that he’d sell it — possibly even within a few weeks.

But I didn’t wait for the Mobile Mansion to sell before getting on with my plans. (I am so done waiting for someone else to do something to move forward with my life.) I bought a truck camper to replace it and almost immediately put it to use. After an overnight “shakedown tour,” I put it to work housing one of the pilots who worked for me in Quincy. (I suspect he would have been more comfortable in the Mobile Mansion. Oh, well.)

The sales lot guy was unable to sell it. I think it’s because he was asking so much more than it was worth, hoping to turn a tidy profit on my rig. And the fact that when he didn’t feel like coming to work, he didn’t — so the lot was closed more often than it was open. (Needless to say, he won’t be seeing me again.)

It Pays to Wait

Fortunately, I hadn’t stopped telling the people I know about it. And two of them were interested — but not for the price the guy on the lot was asking.

We agreed on a price. Ironically, it was more than the price my wasband had accepted on our jointly owned 40-acres of vacation property in Northern Arizona the month before. (Desperate sellers will take anything. Yes, I accepted the low offer, too, but the only thing I was desperate about was finally ending any ties I had to the sad sack old man I’d married 10 years before. The money was nothing. Almost literally.)

And I didn’t have to split the proceeds with anyone.

I delivered the RV to the new owners on Monday. I let one of them use my truck to back it into their hangar, which was just deep enough for him to back it in. I showed them how to unhook it. I gave them the full tour, including the “secrets” I’d learned about it in the five years I’d spent so much time in it. That took nearly an hour. I had mixed feelings as I was doing it, but I think the overwhelming feeling was that of relief.

Yesterday, I met them at the bank where we signed and notarized the title and other papers and I got my check. After handshakes and even a hug, I left them and went right to the bank to drop off the check.

Although I’m a tiny bit sad about closing the Mobile Mansion’s chapter in my life, I’m also very happy to do it. To me, the Mobile Mansion was a constant reminder of broken promises, miscommunication, and lies. Although I’ll miss its spacious comfort when I travel, I’m very glad it’s gone.

The First Mushroom Hunt of Autumn 2016

Limited success and a bunch of new mushrooming resources.

Cooler weather is upon us and that means the chanterelle mushrooms are coming into season.

Last Friday morning I went out for a hike/mushroom hunt with my hiking friend, Sue. Sue knows all kinds of things about plants and animals and even rocks, so going on a hike with her is a great learning experience. And although she doesn’t eat mushrooms, her husband does and she’s always game to go hunting with me.

The Hike

We chose a trail we both like up Icicle Creek beyond Leavenworth, WA. It’s a bit of a drive — about 50 miles from my home, including more than 10 on gravel. Another mushrooming friend of mine claimed she’d found chanterelles right on the trail. I was doubtful and I think Sue was, too. So as we hiked, we took occasional forays into the forest on one side of the trail or the other, right where we thought chanterelles might grow. I did find a very nice coral-type fungus that we believe is edible; I took it with me to examine more closely later.

Then it happened: Sue found a golden chanterelle mushroom growing right alongside the trail. While she harvested it, I combed the area looking for more. She joined me. We came up empty.

I should mention here that chanterelles are pretty easy to identify. They normally have sort of misshapen caps and the gills on the underside are more like ridges or wrinkles than regular mushroom gills. They normally extend down the mushroom’s stem. You can find photos on WikiMedia. There are some “false” chanterelles and a similar looking poisonous variety called Jack O’Lantern, but it’s pretty easy to distinguish these from real chanterelles, which are prized as tasty mushrooms. If you’re interested in hunting for chanterelles, study up first and make sure you know what you’re looking for and where you might find them.

We got to a point in the trail where we were within a quarter mile of a place I’d found chanterelles the previous year and took a little detour to check it out. I walked us over to where I found them and we searched the ground. It seemed too dry. I gave up quickly and moved off to another nearby spot, but Sue stuck with it. Soon she called out “I found one!”

I hurried back. She pointed it out and I took a photo. Then we saw one nearby that was just poking out of the forest duff.

And that’s when I started seeing little mounds all over the place. Lots of young chanterelles just popping out of the ground.

Young Chanterelle
A young chanterelle mushroom, just poking out of the ground.

I used my new pocketknife — I bought one with a bright orange handle so I wouldn’t lose it while mushroom hunting — to dig a few out and put them in my bag. They were all a yellowish white color with a relatively regular looking cap. I showed one to Sue and she confirmed that they were chanterelles.

We continued to hunt in that area before getting back on the trail. Sue found some other mushrooms in various stages of decay — russulas. None of them were worth keeping, even if they were of edible varieties.

We finished our hike and headed home, stopping in Leavenworth for lunch and to buy smoked meats (Cured), wine (Ryan Patrick), and cheese (Cheesemonger).

Uncertainty

If there’s a golden rule to hunting for edible mushrooms, it’s this: never eat a mushroom you find unless you are certain that it’s edible.

side of mushroom

top of mushroom

mushroom gills

inside mushroom
Several views of one of the mushrooms I harvested on Friday. When trying to get help with identification, it’s important to show as much detail as possible.

When I got home, I took a closer look at the five chanterelles I’d found. They were all smaller and much more “perfect” looking than any chanterelle I’d ever seen. What if Sue was wrong? What if they weren’t chanterelles and I ate them?

I combed through my mushroom books. None of the pictures matched what I had. I started to write Sue a warning email.

I posted some photos on Facebook, trying to see if any of my friends could advise me. Then I looked for and found three different mushroom identification groups on Facebook and signed up for each of them. I couldn’t post photos until I was approved for membership, though.

Then, as usual, I got sidetracked by something else and didn’t give it another thought until morning.

On Saturday morning, I was thinking about a chanterelle mushroom omelet. So I took my morning coffee to the computer and began searching the internet. I knew there was something called a false chanterelle, and I looked it up. That’s where I learned that false chanterelles have normal fin-like gills while real chanterelles have the wrinkle- or ridge-like gills. There was another chanterelle look-alike called a jack o’lantern that was definitely poisonous, but what I’d picked had very little in common with that. (Keep in mind that although I’m linking primarily to Wikipedia articles here, I consulted many sources.)

I finished the email to Sue and sent it. Then I kept researching. I wanted so badly to eat my mushrooms but I didn’t want to get sick. I’d been approved for all three mushroom identification groups on Facebook so I took and sent photos, including the ones you see here. I kept researching while I waited to hear back.

Around that time, I found a trio of photos on the Mushroom Forager website’s page about Hedgehog Mushrooms. It illustrated three similar mushrooms. The middle photo was almost identical to what I had.

Mushroom Gills
This image, which can be found at The Mushroom Forager website, helped convince me I had chanterelles.

I started cutting up my chanterelles for an omelet.

Then I checked back with Facebook. The mushroom identification group members were starting to chime in. The first few were pretty sure that it wasn’t chanterelles. I put the mushrooms away in a container in the fridge and had an omelet without mushrooms.

Throughout the day, more responses trickled in. And this is where the group dynamics really come into play. Some were sure that they weren’t chanterelles. Some were sure that they were. So I really wasn’t any better off than I’d been before consulting the groups.

Finally, late in the day, some folks who obviously knew a lot about mushrooms started responding. They identified the type of chanterelle with its genius and species: cantharellus subalbidus. While some group members argued with them, they were firm. They provided additional information about the area in which they grow: old growth forests like the one I’d been in. One even provided a link to a page that illustrated it.

I should mention here that of the three groups I joined, the Mushroom Identification Page group seemed to have the most knowledgeable participants, although none of them were free of people who offered incorrect information based on limited facts. (I really need to do a blog post about Facebook group dynamics.)

I should mention that by this time, Sue had also responded to my email. She was certain it was a cantharellus subalbidus, too. She has some resources where she looked them up. I guess she didn’t want to poison her husband!

Feasting on My Find

That evening, I sautéed some thinly sliced veal and prepared a chanterelle cream sauce for it. I had it with a side of fresh steamed green beans from my garden and glass of sauvignon blanc. Delicious.

I finished up the mushrooms the next day by cooking them into an omelet with some scallions and buckboard bacon. Very tasty.

This was my fourth mushroom hunting trip and the second for chanterelles. (I hunted twice for morels this spring.) I marked the GPS coordinates for my find and plan to return this week. Although it hasn’t rained, I’m hoping that cool, shady area of the forest is damp enough for the chanterelles to grow.

I really enjoy collecting my own food, whether it’s foraging in the forest for seasonal mushrooms, gleaning from an orchard after harvest, tending my own garden, or collecting eggs from my chickens. There’s something very special about having that kind of connection with your food.

But best of all, you can’t beat it for freshness.

The Sticker on the Coffee Cup

Logic, U.S. government style.

Last week, I was in the North Cascades National Park. On a whim, I stopped by the Visitor Center at Newhalem. In addition to the usual interpretive displays, they have an excellent three-dimensional map of the area that identifies rivers and lakes and dams with lights; push a button and a red light appears on the map to show you where that thing is. They also had a ranger standing at a table with a bunch of reproduction animal skulls (wolverine, wolf, and bear) and corresponding paw castings and pelts. And a gift shop.

I went into the gift shop before leaving because … well, that’s what I do. I found some interesting kids’ stuff and picked out two gifts for my neighbor’s grandson, who has some learning disabilities. Then I saw a large coffee mug I liked — I like a big cup of coffee in the morning — and thought I’d buy it as a little gift for myself. But it had a paper sticker on it that had nothing to do with the mug. I reached for another, hoping to find one without a sticker and that’s when I realized that they all had stickers.

The sticker, which is shown below, says:

The North Cascades has an annual rainfall of over 200″ in some areas, which feeds the many cascading waterfalls of the region.

Sticker on Mug
This sticker was on every single coffee mug in the shop.

On a side note, I can definitely believe that rainfall figure because it rains every single time I go there. Although I like rain more than most people — probably because it rains so seldom where I live — I prefer getting rain at home instead of when I’m traveling. (Yeah, I know: whine, whine, whine.)

Of course, being the inquisitive person I am, I had to know why this sticker was on the mugs. So when I went to pay for my purchases, I asked the ranger at the check out counter.

He didn’t know. He said he’d never even noticed the stickers. He said he’d ask the guy who stocked the shop.

PFDs when flying across the Grand Canyon?

This brings to mind another side story that is related to this.

Years ago, the FAA changed its rules regarding personal flotation devices (PFDs or life jackets) on board flights conducted for tours. The new rule said that if any part of the flight crossed any body of water, a PDF was required for each passenger. This extended to Grand Canyon tours, which, of course, cross the Colorado River 5000 feet or more below the helicopter’s flight path. When I was a Grand Canyon tour pilot (which was before this rule came into play) the pilots often discussed that in the event of an engine failure, we should autorotate anywhere except to the water. The river was about 55°F, flowing at 10 mph or more, and full of rapids. When you’re doing an autorotation from 5000 feet, you have plenty of time to find and navigate to a more suitable landing zone; believe it or not, there are quite a few inside the canyon.

I spoke to the woman who created this rule — an aging FAA pencil pusher who had likely never flown across the Grand Canyon and reminded me of my sixth grade teacher, Miss Dumphy — and tried to tell her how silly (actually, idiotic, but I toned it down) her rule was. She didn’t care. Water was water; the way her rule was written, PFDs would be required when crossing a 3-foot-wide stream.

I didn’t have long to wait. That ranger walked by a moment later and the guy I’d asked called him over and asked him. He seemed almost embarrassed when he told me that they weren’t allowed to sell anything in the gift shop unless it provided some kind of interpretive or general information about the park.

Apparently, just having a logo on the mug wasn’t enough to satisfy some decision maker higher up on the food chain. The sticker was the solution.

I bought the mug as a practical memento of my visit to the park. I didn’t mind paying the price — which I honestly can’t remember — because I figured that it was another way to support the National Park Service. I didn’t need any additional information about the park to help me justify my purchase. And I definitely didn’t need a sticker that I had trouble scrubbing off once I got home.

But it makes me wonder … what other things are National Park Service employees being required to do to meet government guidelines established by someone in Washington who may have traveled to only a tiny fraction of the parks?

My First Stab at Night Sky Photography

What I learned at a North Cascades Environmental Learning Center photography class.

I love the North Cascades Environmental Learning Center, which is not far from the Diablo Dam on Diablo Lake on the North Cascades Highway (Route 20). I got my first glimpse of it during a camping trip last summer and later that year returned to take a three-day course about mushrooms. This year, I returned for one night of Base Camp right before an overnight seminar titled “Wilderness Photography: Washington Pass at Night.” Here’s the course description, since I can assume the link to the course page will eventually break:

In the grandeur of the North Cascades, moonless nights with clear skies offer fantastic opportunities to capture vivid images of the galaxy.

Join photographer Andy Porter on this specially-scheduled evening expedition to capture images of the Milky Way on this moonless night. We’ll begin the adventure with a short evening workshop on night photography at the North Cascades Environmental Learning Center. Then we’ll head to Washington Pass where, under the towering peaks of Liberty Bell and the Early Winter Spires, Andy will guide us in capturing our own images of the night sky.

I could go into a lot of detail about my stay at the NCELC and the other things I did while I was there, but I’ll try to stay focused for this post. But I do need to talk briefly about the weather, since it did play a major part in how the course went.

The weather was not very good. It was overcast all day and rained more than a few times. Although the clouds were relatively high, there wasn’t a single clear patch in the sky. It was like this all day, which really didn’t surprise me — it rains every single time I come to this area. I like the rain, mostly because I don’t get much of it at home, but I really wish it wouldn’t rain in the mountains when I’m there.

Diablo Dam to Washington Pass
Washington Pass is a 35-mile drive southeast from Diablo Dam on Route 20.

Of course, we weren’t supposed to take pictures in the Diablo Lake area. We were supposed to go to Washington Pass, about 35 miles east. I’d driven through the Pass the day before on my way to the NCELC and it had been partly cloudy, with smoke from a fire I later discovered was burning near Mazama. But the weather information we had showed that Washington Pass was likely just as bad as it was where we were. And there’s nothing worse than making a 70-mile round trip drive to take pictures and not being able to do so.

There was a short classroom session after dinner. Andy introduced himself and showed off a few slides of his work. Most featured an easily identifiable foreground object that was often lighted — like a tent with kids in it or the roots of a fallen log — and a magnificent night sky. He briefly explained how he accomplished the lighted part of the shot by illuminating it for only about a second during the long exposure required to get the night sky. He also admitted to doing a lot of post processing and even showed us before and after shots.

Then he gave us the details on how we needed to set up our cameras for nighttime shooting. Here’s a brief version of his instructions. I’m not giving away any secrets here — all this information is available in a wide variety of places online.

Required Equipment

Before I detail the settings, let me start with the basics. If you don’t have this equipment, you probably can’t do this kind of photography. Or at least I won’t be able to explain how.

  • Camera. At the very minimum, you need a camera capable of setting aperture, shutter speed, ISO, and focus manually. Most DSLRs can do this, although lower end models might have limitations. These days, I shoot with a Nikon D7000, but I’m pretty sure my old Nikon D80 could do the job. And yes, a film camera could work, but the ability to immediately see results and adjust settings make it really impractical.
  • Wide-angle lens. The wider the field of view, the better off you’ll be. In case you don’t know, the lower the focal length, the wider the field of view. I used a 10-24 mm lens for this shoot and set it to 10 mm. Because I don’t have a full-frame sensor in my Nikon camera, that’s equivalent to a 15 mm focal length. There were people shooting with everything from 10 mm to 28 mm in the class.
  • Tripod. You need a good, sturdy tripod. There’s no getting around it. I use a Manfrotto with a ball head and I love its flexibility. If you have options, use one that can be extended so it’s tall enough for you to look through the lens and check image results without having to bend over. Sturdy is especially important if there’s any wind — although this isn’t something you’d likely attempt with anything stronger than a light breeze.
  • Cable or remote shutter release. My camera won’t support a cable release, but it does support a remote shutter release, which I have. If you don’t have either, there is a workaround: use the camera’s self-timer to release the shutter. (This is what I wound up doing when my remote crapped out for some unknown reason during the shoot.) Under no circumstances should you be pressing the shutter release button by hand; it will definitely shake the camera, even on a tripod.

What’s interesting to me is that just about all of the people who took part in the class — and I think there were nearly 20 of us — had brought a bunch of camera equipment. I didn’t bring all of mine, but I did bring my camera body and three lenses. In reality, all we needed was what I listed above. So when it was time to get on the van to drive out to our shooting destination, I secured my camera on my tripod, rested the top of the tripod on my shoulder, and left the rest of my gear behind. I like traveling light.

Camera Settings

The tricky part of shooting the night sky is setting up the camera properly. Andy, our instructor, had us do this in the classroom so we wouldn’t be fiddling with settings in the dark. If you set the camera up right in advance, there’s only one thing you might have to change out in the field.

  • Widest field of view. If you’re using a zoom lens, zoom out to the widest field of view (smallest focal length number). Again, I used 10 mm.
  • Widest aperture. Set your lens so it’s wide open (smallest f-stop number). This enables the camera to take in as much light as possible during the exposure. For my lens, that was f3.5.

  • Manual focus. This can be a setting on your lens or camera or both. (It’s both on mine.) You definitely do not want the camera trying to automatically focus, especially if your camera won’t make an exposure unless focus is locked in.
  • Lock it in!

    This is where I really wish I had some gaffer’s tape with me. This is special tape used in film production; it makes it possible to secure things like you would with any tape, but when you pull the tape off, no sticky residue is left behind. This would have been very helpful for me to lock that focus ring down, preventing me from accidentally moving it during the shoot.

    Focus to infinity. This is actually a lot trickier than it sounds and it took a while for us to all get it right. Simply dialing the focus ring as far as it goes on the infinity side isn’t necessarily correct. You need to play with it a little at a variety of settings out near the infinity symbol (∞). After each setting, snap a photo of something at least 50 feet away and then check it in the review window. Zoom in to see how crisp it is. Then try another setting to see if it’s crisper. Repeat this process until it’s dialed in perfectly. On my lens, the tick mark was lined up with the center of the infinity symbol but it might be different for yours. If you don’t have focus distance symbols on your lens, you might have to use autofocus to get the right focus setting before setting manual focus. I’m pretty sure that’s what Andy helped a few people do.

  • Manual exposure mode. You must set the camera for manual exposure so you’re in charge of how it takes the photo.
  • Calculating shutter speed with the 500 Rule

    If you want to do the math, it’s pretty simple: 500 ÷ Focal Length ÷ Crop Value

    So if you have a high-end camera with a full frame sensor and you’re using a 12 mm lens, the math is:
    500 ÷ 12 ÷ 1 = 41.66, which you can round down to 40.

    With my camera’s 1.5 crop sensor and 10 mm lens, the math is:
    500 ÷ 10 ÷ 1.5 = 33.33, which I rounded down to 30.

    Maximum shutter speed per the 500 Rule. Okay, this is where it gets a little complicated. Andy gave us a handout with a table of settings for the 500 rule, but never explained what the rule was or why it’s important. I did a little research this morning to learn more. We all know that the earth rotates, which means that the stars appear to move across the night sky. They move slowly so we don’t actually see them moving, but if your camera’s exposure is too long, you’ll get star trails — lines made by the stars as their light moves across the camera’s focal plane. To avoid star trails — which is what we wanted to do — you need to set your maximum shutter speed in accordance with the camera sensor size and lens focal length. You can learn more about this on Petapixel, which is also where you can find a table of values. Keep in mind that the shutter speed is in seconds, not fractions of a second. So when I set my camera’s shutter speed, it appeared as 30" in the settings screen. Exposures longer than that require the “bulb” setting on my camera, which means I’d have to manually open and close the shutter based on time I keep with a stopwatch or something.

  • ISO to 2000. This is a good starting point. Of all the settings, this is the one you might be fiddling with in the dark, so make sure you know how to change it. On my camera, it can be done with a combination of buttons and dials but it’s actually a lot easier to just go into the settings menu. I found that my best shots were done at 5000; more on that in a while.

Shooting

Once we had set up our cameras, we all climbed onto the NCELC’s shuttle bus, filling every seat. Andy took a few people in his car. Although it was difficult to see the sky through the tall trees around the campus, it was still pretty cloudy and none of us had very high hopes of getting good photos. They’d decided to try a closer viewpoint: the Diablo Dam Overlook. This offered views of the main lake and dam, as well as up the Thunder Creek arm of the lake and Colonial Peak. With few trees, we’d have a clear view of the sky.

As we drove over the dam, I was looking out the window and saw a single point of light. “I see a star!” I called out. Other people looked but I’m not sure if they saw anything.

Get away from the lights!

Incredibly — to me, anyway — one of the class attendees had to ask the instructor where the Milky Way was. He could see it, but he didn’t know that that the bright band of stars he was looking at was what’s referred to as the Milky Way — the galaxy our tiny planet is part of. This made me sad. I remember my grandfather pointing out the Milky Way when I was five or six years old, sitting with him on the front lawn of his house in suburban New Jersey, long before light pollution hid it from view. Yet this man, in his seventies (!), had spent so much time in the city that he couldn’t even identify the Milky Way when he saw it in the night sky.

Less than ten minutes later, we were at the overlook, which was understandably deserted. It was well after 9 PM and quite dark. But once our eyes had adjusted after the lights from the bus we saw it above us: the Milky Way.

I beelined it to the corner of the overlook where I’d get a good shot up the Thunder Creek arm. My camera was already on my tripod; all I had to do was extend the legs and neck and get it in position. I might have been the first person to take a shot.

And this is where patience is important. Each of my shots was 30 seconds long. Once the shutter closed, the image did not immediately appear. The camera, which is nothing more than a computer with a camera attached to it, had to process all the information it had just collected. I think this took longer than the exposure time — perhaps as long as another 40 seconds. So from the time I started my shot to the time I was actually able to see it in the review screen at the back of the camera was more than a minute.

Thunder Arm at Night
A look up Thunder Arm at night. The cars driving by on the road often ruined shots by illuminating landscape features we wanted to be kept dark.

My first shot came out dark. Yes, I could see the stars, but no, I couldn’t see them well. I thought it might have something to do with my reading glasses, which seem to make things look darker than they are. But Andy took a look and recommended bumping up the ISO, which he’d originally advised me to start at 1600. So I tried 2000. It wasn’t much better.

Meanwhile, other photographers were snapping away, emitting occasional oohs and aahs and cursing at the cars that drove past the view point, illuminating foreground items we wanted to be kept dark. One woman near me had very good luck with her camera ISO set to 5000 so I gave it a try. (My camera goes up to over 24000.) That looked much better, so I stuck with if for the rest of the shoot.

Keep in mind that the higher the ISO setting, the more light is processed in the camera. There is a cost to this, however. High ISO settings lead to grainy images or “noise” (digital artifacts) in the images. Ideally, you want to keep the ISO as low as possible to get the shot you want. But since you can’t open the lens any wider (aperture setting) and can’t lengthen the exposure any longer (shutter speed setting), the ISO is the only thing you can change to vary the brightness of your shot.

I moved around to a variety of places. The Milky Way was mostly overhead, but it did dip down to the horizon in the south. A handful of light clouds drifted by, sometimes obscuring stars.

Diablo Dam at Night
I took a few shots of the dam. The lights reflected off the clouds, reddening them. I think this is the image where digital noise is most apparent, especially in the clouds. (A few people mistook the reddish clouds in their pictures for the aurora. Sorry, but no.)

We shot for well over an hour. I captured about 40 images. I haven’t looked at all of them on my big computer yet; these are pretty much decent random images I grabbed for this blog post. All of these are edited to make the stars “pop” more than they do in the original. If you have good image editing skills, you’ll definitely use them if you do night sky photography. I prefer to minimize editing.

Sky Through Trees
This was shot almost straight up. I think the trees and clouds offer a sense of three dimensionality.

For the most part, the photographers were good to work with. The only real problem we had was with light — too many of them wore headlamps. The trouble with headlamps is that they point wherever you look. So if you look up, your light flashes up, possibly illuminating trees or other foreground object people want dark. This got a bit frustrating and, more than a few times, I called out, “Lights down, please!” One photographer seemed to think that no lights should be on at all and rudely yelled at anyone who used a light, even if it was pointed down at the ground. Sorry, but when walking on uneven terrain in the dark I’m going to use a light — in my case, my phone’s flashlight. If the light doesn’t shine on the subject, it should not affect the photo.

The End of the Shoot… and Beyond

We went back to campus in two groups. I was in the first one. I’d had enough. My remote shutter control had died about halfway through the shoot and I had to rely on the camera’s self-timer to activate the shutter, adding another 20 seconds to each shot. I was burned out and, unlike most of my companions, I live in a dark sky area and can try this again anytime, right at home.

There was no follow-up lesson — although I really think there should have been the following morning. A chance to review and critique what we’d done. I did spend some time at breakfast with other students and got signed up for a Washington State Astrophotography group on Facebook. I’ve already swapped photos and comments with a few classmates there.

Could my images be brighter? I think so. Next time I try this, I’ll do more experimentation with ISO settings. I might need to pop it up some more.

And yes, there will be a next time. I’m thinking of giving it a go on my deck tonight. And I’m definitely looking for companions on overnight outings, possibly with the Turtleback. Washington Pass would make an excellent subject area, especially with the fresh snow I saw on the peaks on my way home. Anyone game for an overnight road trip this coming week?