
Sitting on the fence? Remember and the decision will be easy.
Category Archives: Multimedia
Sunrise from Wenatchee Heights
7
A time-lapse to remember.
For the past five weeks, I’ve been living in my RV on the side of a hill overlooking the Squilchuck Valley south of Wenatchee, WA. Every morning, I’ve watched the sun’s golden light spread out over the valley, illuminating the hillsides, mountaintops, orchards, and grassy knolls around me.
The view out the door of my RV for the past 5 weeks.
I’m leaving next week and although I think I’ll be back next year, I might not. I wanted to capture the experience to remember it.
So at 4 AM, I was outside, setting up my time-lapse camera. One shot per minute, compiled at 6 frames per second yields this 28-second video. Enjoy.
Construction Time-Lapses
More time-lapse fun.
Here are two time-lapse movies I’ve done this month.
The Backhoe time-lapse shows my neighbor putting in his new driveway. Frankly, I liked the driveway he already had. Why tear up all that nice land?
The House Framing time-lapse was done today. My other neighbor has been framing his house for about a week. I’m kicking myself for not starting these sooner. I hope to make new time-lapses for this project for the rest of the week, so stay tuned.
A Serious Amateur’s Guide to Making Movies – Introduction
Making decent videos is more than just pointing and shooting.
I’ll start with a true story.
 A friend of mine who also writes computer books bought a Flip video camera a few years back when they were still pretty new. If you’re not familiar with Flip, it’s a very small, point-and-shoot video camera that captures an hour of medium resolution — good enough for Web, anyway — video. (Newer versions are “HD” and capture 2 hours.) She went out with this camera, shot a bunch of video clips, strung them together in a “movie” using the Flip software, and published them to the Web. She then tweeted proudly about her achievement and invited friends to view it.
I viewed it. It was terrible. The video was shaky. The clips were long, pointless, and boring. The ambient sound — which was the only sound — included wind noise and off-camera voices and sounds. In all honesty, I didn’t waste my time with the ten minutes it ran. There wasn’t any reason to watch it. It didn’t show or tell me anything that interested me in the least bit.
That was a valuable lesson for me. If you’re going to share video, don’t share crap video.
Documentary Videography
I’ve been wanting to get involved in the documentary filmmaking process for some time now. I didn’t really want to make the video myself. I was always more interested in getting a gig as a writer or researcher for a professional production, to apply my existing skills in a new way and learn about the process as I worked with an experienced team. Unfortunately, I have no connections in that industry and I’m not ready for a career change (yet). So I decided to give it a try myself.
My biggest challenges are time and software know-how. After a false (and expensive) start with a video production company that took lots of my money and delivered only headaches, I decided to stop screwing around. You know what they say: if you want something done right, do it yourself.
Just because I want to do it right doesn’t mean I could immediately do so. There are a number of steep learning curves to climb along the way. I’ve been climbing them over the past few months. A few weeks ago, I managed to release a pretty darn good rough cut of a 5-minute documentary about the cherry harvest process. Over the following few days, I finished it up by adding title screens, a music soundtrack, and end credits. If you haven’t seen it and are curious, you can find it in an earlier blog post, as well as on YouTube.
The Series
This morning, I thought I’d start a new series of articles that documents what I’ve learned so far about making “pretty darn good” videos. This will help me remember what I did and learned as well as provide a general guide for other amateurs who want to create watchable video. Throughout this series, I’ll use my cherry harvest video as an example, so you might want to watch it just to get a better idea of what I’m talking about when I refer to it.
One thing I won’t cover in this series: recommendations on cameras or details on how to use the software I used to create the movies.
I don’t know anything about any camera other than the one I worked with. In all honesty, you should be able to do a good job with something as simple as a Flip or any consumer video camera model. Even an older one! As long as you can get the video into your computer, you’re good to go.
The software really doesn’t matter, as long as it has decent editing tools. (I use a Mac and Final Cut Pro, but iMovie should be fine on a Mac and I’m sure there are good, affordable video editing packages for Windows, too.) What’s more important than software is your ability to capture good video and put it together in a “story.” You’ll see what I mean as I go through each part in this series.
I’ll post links to each part of this series in this introductory post as I write them. Stay tuned.
October 21, 2011 Update: The series of articles I wrote for about this topic has been converted into a book. You can learn more here.
Interlacing Woes
One part of my current troubleshooting effort.
I’m trying very hard to create an SD DVD based on original 1080i HD footage. I have the latest version of Final Cut Studio, which should have all the tools I need to get the job done. But when I build a DVD, it looks like crap on my HD TV. Other standard DVDs look fine — actually, great — on that TV. For the past two days, I’ve been banging my head against the wall, trying to figure out the problem. Not having a standard TV handy for testing purposes, I have no idea what it looks like on one of those.
I hate learning by trial and error. I watched Lynda.com video courses about Final Cut Pro and DVD Studio Pro and they helped me build my movie and DVD. But they failed to explain how to get my kind of video (1920x1080i60 AVCHD) into standard DVD format. Do I convert video before bringing into FCP? If so what do I convert it to? How about interlacing? Downsizing? What compression schemes? What settings? And what about the anamorphic setting? Does that still apply with current technology?
To make matters worse, answers in forums tend to be vague. They’ll recommend a compression scheme, but when you go to the menu of options, what they mentioned doesn’t appear exactly as they referred to it. Instead, there are four or ten or twelve options it could be. Other times, when you make changes they recommend, the appearance of the video changes drastically; for example, turning on the anamorphic check box in FCP sequence settings squishes the picture, making everyone look short and fat. Do I need to change the shape of the pixels, too?
And what about the contradictions? One guys says do A while another guy says do B, which is completely different.
What I need is a recipe, a starting point, a list of steps that should work. Then, like a chef, I can fine-tune the recipe to see if I can make it any better.
Right now, the challenge is focusing around interlacing. Interlacing is one method of scanning video; progressive is the other. My camera shoots interlaced video. There’s no progressive option. TVs supposedly can de-interlace on the fly; I don’t know if modern HD TVs can, though. Computers can’t. The result is a kind of flicker anywhere there’s motion. Like in a video clip of a cherry orchard filled with trees that have leaves that flutter in the wind. Ugh.
One source says I must de-interlace before the video is downsized to SD for DVD. Another source, supposedly an “expert,” says de-interlacing “doesn’t work.” (WTF does that mean?) How do I know what’s right?
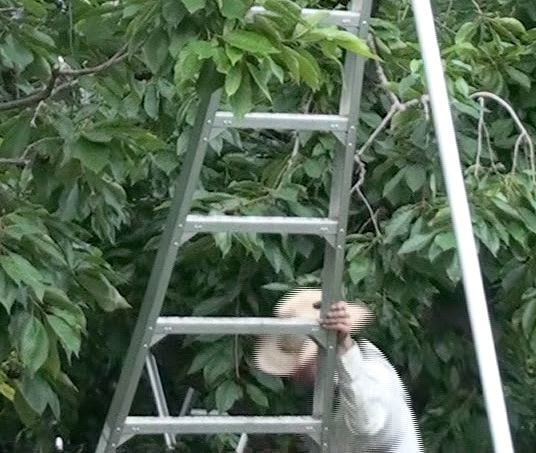
I decided to give it a try. FCP has a de-interlace filter. It took a while to figure out how to use it. FCP’s documentation doesn’t discuss all of its settings, making it just a little bit more challenging to figure out. I wound up running the filter once on the sequence and then again on the same sequence to see if there was any improvement. Here’s a series of three screenshots of a full-sized clip on my iMac monitor:
This is the “before” shot. You can clearly see the interlacing in the picker’s hat:
This is the first “after” shot. In this example, I’ve run the de-interlace filter on the video to remove interlacing. There’s an immediate improvement.

This is the second “after” shot. In this example, I ran the de-interlace filter twice. The first time was to remove interlacing (as above) and the second was for “max” flicker removal.

I don’t see a difference between the second and third screenshots — do you? I’m assuming the difference would be in motion. But I can’t view both videos at the same time; my computer chokes on the task. (Remember, they’re both 1920×1080 pixels.
And, stepping back to look at the big picture, I’m not even sure I’m supposed to de-interlace this video as part of my workflow. This could be a big waste of time!
If you have experience with this and can advise me, please do. Use the comments link. Also let me know if you know of any good, recent online resources to help me understand HD to SD conversion, interlacing, and anamorphic settings. Reading “how-to” information written 5+ years ago doesn’t help much, given the changes in technology and software capabilities since then.