And a deadline.
About two months ago, I was driving a rental car down a perfectly straight dusty dirt road alongside an irrigation canal in California’s Central Valley when my phone rang. It was a woman named Susan who writes for The Good Life, a lifestyle magazine for the Wenatchee area. She had been to the Wenatchee Home Show (which I’d missed because of my trip to California) and had seen the time-lapse video of my home construction that I’d given to Western Ranch Buildings to show off in their booth. She’s spoken to Tanya about the place and learned that it wasn’t just a typical pole building. It would be a home and a garage and a place to store big toys like a giant RV and a helicopter.
She decided that she wanted to do a story about it for Good Life.
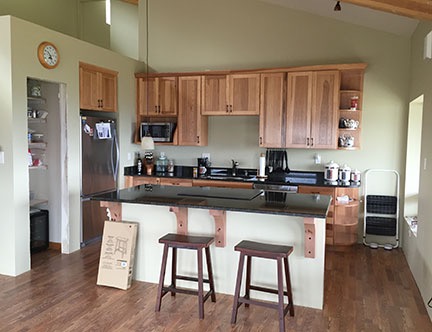
I was flattered, of course — who wouldn’t be? But my home was far from finished. The kitchen cabinets had just been delivered and would be installed the day after my return. Then the appliances would come. The countertops, floors, bathroom fixtures, and so much more still needed to be done. And all those wires sticking out of the walls needed attention.
I told her it would be ready in May. She promised to call back. I figured I had a 50-50 chance of her remembering.
She remembered. She called early this week. We set a date for her and a photographer to come visit and see the place. I put the date on my calendar. I had just over three weeks to finish up and move in.
Holy cow, was I going to be busy!
Still, I work best and fastest and produce the most when I have a deadline Susan had given me one. If I wanted my new home to look the best it possibly could when when and her photographer showed up, I had to stop procrastinating and get finished.
In an effort to stay focused, I’ve come up with this punch list of items that need to be done. They fall into two categories: inspection items and finish items.
Inspection Items
Although several people suggested that I build my home inside my building on the sly without getting inspectors involved, I didn’t think that was a good idea. Maybe I’m being naive, but I believe that inspections and housing rules exist for a reason — safety — and that having an inspector (or two) look over my work would help me keep my home up to standards. With that in mind, my building permit has two parts: my main building (which has been approved) and my living space inside it (which has not yet gone through final inspection). To legally live inside my building, I need to pass all inspections and get a Certificate of Occupancy (CO).
I should add here that my property will have much greater value if it includes a legal living space. I’m thinking of the future, too.
There are two inspectors:
- The electrical inspector makes sure my electrical system meets standards.
- The building inspector makes sure my building and home meets standards.
The good news is, I’m almost done with all items needed for the inspections. I’m pretty sure this is a final list:
- Close up drywall in garage ceiling and fire tape. My bathroom is immediately above one of my garage bays. In order to complete the plumbing work, we needed to leave part of that ceiling open. The drywall guy provided precut panels to close it back up. I need someone to help me hold those panels in place while I screw them in. The entire garage ceiling had to be drywalled and taped to meet county fire codes and the whole thing is done except this one place. I estimate it will take about 2 hours and I’ll need a second set of hands for about 30 minutes.

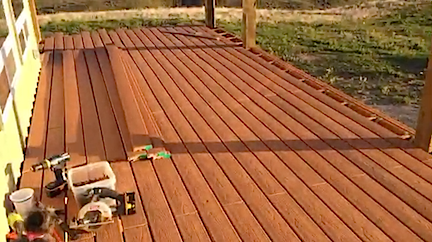
Using “hog panels” as a deck rail solution was suggested by Bob, further developed by me, and executed/fine-tuned yesterday by the two of us. A low cost, rustic solution that doesn’t look trashy.Finish deck. Because two doors open onto my deck, the deck must be finished for final inspection. That includes not only the floor, but a rail and barrier around the edge with openings not larger than 4 inches. The deck is 600 square feet and the rail is 104 linear feet so it’s quite a job. Other than some assistance getting me started the first day, I’ve been doing the deck floor myself. I have about 400 square feet laid. Yesterday, a friend came by to help me work out an idea we had for the rail and barrier. I suspect I have at least another 4 to 6 full days of work on the deck, which could be shortened up with some dedicated assistance from a friend.
- Install safety rail around loft. This is a bummer and I’m hoping I can get the building inspector to give a little on it. I have a loft over my hallway and laundry room and bedroom closet. Because it’s tall enough to stand up in the county requires a rail around it like the barrier around my deck. But I don’t even have a ladder to get up there (yet) and won’t be using it. Such a shame to be delayed for this space. It’ll take about 2 days to get this job done — once I figure out how I’m going to do it.
- Finish electrical work. Yes, there are a few fixtures remaining to be wired. They’re all on the deck. I need to climb a ladder to do them and I figured I may as well wait until I had a deck floor to put the ladder on. There are six light fixtures: two spotlights and four sconces. There’s also the outlet I need to install for my air conditioning compressor; most of the wire has been run and I just need to put in an outlet. (Note to self: call HVAC guy to ask where he wants the outlet. And maybe encourage him to take his man-lift home?) Total time for all electrical work needed to be finished: 3-4 hours, mostly because of some additional conduit I need to run.
- Install hand rail for stairs. I keep forgetting this one. I suspect I’ll use the dowels that were curtain rods in my old home for this job. So glad I packed them and took them with me — it’ll save me a bunch of money. Total time for this job: about 2 hours.
- Install doorknobs and locks on fire doors. I was required to have 20-minute rated fire doors between my garage and my living space. There are two of them in the entrance vestibule at the bottom of the stairs. A friend helped me install them well over a month ago and I bought the doorknobs. Don’t know why I haven’t installed them yet. Total time for this task: 1-2 hours.
- Finish shower stall. I’m actually not sure if this is required for the county. The shower plumbing works, but there’s no enclosure to keep the water in if I used it. This is going to be a bit of an involved task that will take at least 2-3 days. Not only do I need to erect the acrylic block walls I bought, but I need to tile the back wall. And I hate doing tile work. If this isn’t required, I’ll shift it to the list below.

Finish Items
Finish items are the things I need to do to make the house more cosmetically pleasing or functional. They’re not required for final inspection and, therefore, should be done after those higher priority items. This list is extremely long, but I’ve managed to list the ones I want done before the Good Life crew come visit.
- Doors. Right now, I don’t have any interior doors. Even my bathroom has nothing more than a curtain — and that’s just because I assume my guests would want some semblance of privacy when using the facilities. I need the following doors: bathroom, linen closet, coat closet, bedroom closet. I would also consider doors for the laundry room and pantry, although I think both could be handled with a nice curtain. This will require me to order the doors, wait for them to arrive, pick them up, and install them. I have no idea how long this will take or whether it’s something I can do on my own.
- Windowsills. I have eleven windows that are deep set into the walls and need window sills. I’m going to make them out of wood. I figure it’ll take me about 3 hours to measure and cut them and then a total of 3 hours to apply stain and two layers of urethane. And then another 2 hours to install them. Of course, none of the wood working projects can be done at one shot — they all need time for the stain and urethane to dry.
- Ledge around stairwell wall. My stairs are open on top with a wall around them. The top of the wall is unfinished. A woodworking friend will be making a custom ledge to top the wall. He’s coming tomorrow to measure and discuss his ideas with me. With luck, he’ll have them finished and ready to install in a week or so.
- Wood trim. There’s a gap of 1/8 to 1/2 inch between the Pergo flooring and the walls. That has to be covered with wood trim. I’m using 1×4 lumber that I stain and urethane. I really need to get my act together and get this done. I’m probably looking at a total of 3 days worth of time to prep the wood, measure, cut, and install. A friend loaned me his nail gun so installation should be relatively painless — if I measure and cut right!
- More wood trim. If I don’t put doors on the pantry and laundry room, I’ll need to trim out the openings. I’ll use ripped 1x6s with 1×2 or 1×3 framing. All this wood needs to be prepped, measured, cut, and installed. I’m thinking a whole day’s worth of time for this.
- Move in furniture. I don’t think I’m allowed to move my furniture in until I get my CO, but I could be wrong. I’ll find out for sure this week. I’d like to get most of the furniture in so the place actually looks like a home. Most important: bedroom and living room furniture.
- Get the front yard in shape. I need to reseed and mow the lawn, put in irrigation, and plant vegetables in my front yard planter boxes. I really should get that done soon so it looks good for photos.
These are the important items — the ones I need to make my home look like a relatively finished home for the Good Life crew. There are other things I need to do as well: ladder for the loft, window treatment for the bathroom, shelves/rods in the bedroom closet, shelves in the linen closet, towel rods in the bathroom — the list goes on and on. That’s one of the best things of putting together a new home: the little projects that come with it. Once cherry season starts, I’m pretty much stuck here so I’ll have plenty of time to get these things done. My goal is to be 95% finished by September.
And, as any homeowner can tell you, you can never be more than 95% finished with a home.