Life above the Clouds

One of those days when I’m so glad I made my home where I did.

Pictures just don’t do it justice. I know because I’ve been trying to take a good picture of what I’m seeing outside my window for the past hour and a half.

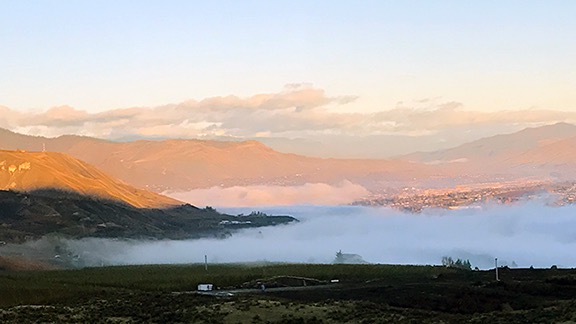
It started before dawn, when the early morning’s gray light revealed the thick cloud blanketing the Columbia River in the valley far below me. It just sat there for a while, apparently still, shrouding the homes and roads and orchards that normally fill my view. I went about my morning tasks — making coffee, writing in my journal, unloading the dishwasher — sneaking peaks outside to see if the view had changed. Every time I looked, it had. Then I begin to notice the movement of the clouds, rising and falling, drifting to the south west, drifting back to the north east. For the hundredth time in as many days, I regretted not setting up one of my GoPro cameras to capture a time lapse of the movement of the clouds.

I took pictures. Dozens of pictures. I used my phone and my good Nikon. I brought the pictures into my computer and fiddled with them, hoping I could get them to show off what I was seeing. For some reason, they always came up short.

Cloud Pano
One of the first photos I shot was a panorama. Click this image to load and view the whole thing.

At one point, I watched the cloud grow and climb and drift right up my driveway to swallow my home. And then, just as quickly as it had come, it was gone.

Airport Clouds
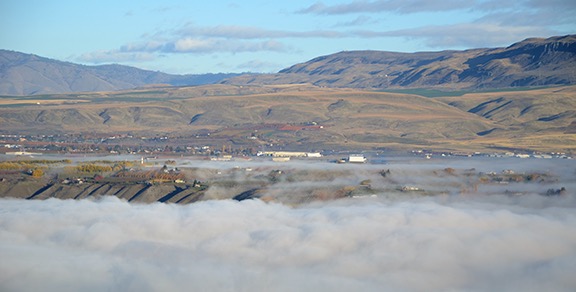
Directly across the river from my home, the local airport is in a bright fog. Like me, it’s quite a bit above the river level.

Autumn
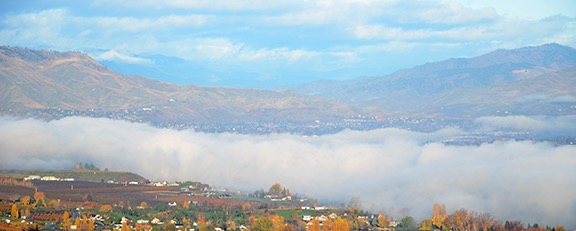
This zoomed in shot looking toward Wenatchee really shows off the autumn colors.

Even as I write this, now two hours after dawn, the view keeps changing. The bright sunlight plays on the autumn colors in the orchards and reflects bright white off farmhouses and shop buildings. I keep waiting for the fog to burn off, but instead it keeps drifting and rising and falling. Below the cloud, its a gray day, but above it, here at the Aerie, it’s bright and beautiful — almost springlike.

Foggy Home
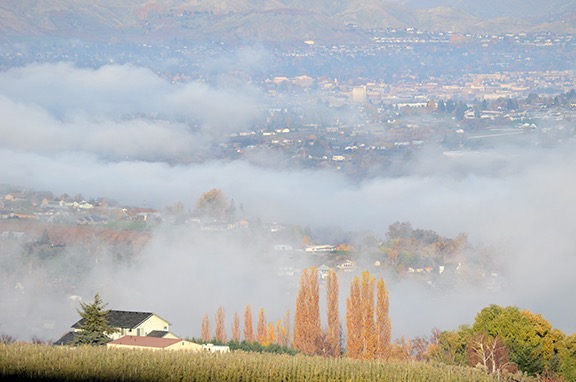
A 300mm lens really compresses the distance between a home about a quarter mile away and the city of Wenatchee five or six miles beyond it.

I’m a view person, as I’ve stated numerous times here and elsewhere. I bought this piece land because of the view and I designed my home to take advantage of it. I don’t need pictures on my walls; I have windows. It’s amazing to me how often the view out those windows varies — with changes of time or light or season or weather. It’s a new show every single day, and although some days are better than others — like this morning’s show — they’re almost always amazing.

The other day, a friend came by for dinner. As we were sitting at my breakfast bar, enjoying our meal, we couldn’t help but take in the view of the city as late afternoon turned to evening and then to night. My friend turned to me and said, “I’m so glad that you haven’t taken your view for granted.”

I immediately knew exactly what she meant. My last home, in Arizona, also had some nice views. In the beginning, when I first moved there, I used to like to watch the way the setting sun turned the mountains to the north an amazing shade of copper red. After a while, however, I noticed that I wasn’t looking quite as often, even though the view was spectacular most afternoons. I had begun to take the view for granted.

I hope that doesn’t happen here.

As I was finishing this up, I noticed that the fog was finally dissipating, being burned off by the warmth of the sun. I took a quick break to shoot video of what I saw — it’s zoomed in a little so the quality of the video isn’t very good. It does give you an idea of what I was seeing and just how beautiful can be here.


A quick video from the deck.

I’m very glad I decided to make my home here.

Found: Camera Equipment

I unpack a few more boxes and find some camera equipment I forgot I had.

Regular blog readers might know that I moved from the Arizona home I lived in for about 15 years to Washington state back in 2013. I packed my belongings over a nine-month period while waiting for my much delayed divorce to make its way through the court system. In the beginning, I packed the things that meant the most to me — heirloom items, mostly — but I also quickly packed my valuable possessions, including electronics and camera equipment. (Eventually, I packed or discarded things I didn’t really need or want, but that’s because I was bored and pissed off and I didn’t have anything else to do while I waited to get on with my life.)

The Migration of My “Stuff”

My new home wasn’t waiting for me when I moved out of my Arizona home. So the boxes went from my Wickenburg home to my Wickenburg hangar (September 2012 through September 2013) to my Wenatchee hangar (September 2013 to June 2014) to my Malaga garage (June 2014 to today). I started unpacking when my living space was nearing completion in April 2015. I’ve been unpacking ever since.

Seriously: I packed way too much stuff. Everyone who comes into my garage tells me I have too much stuff and I have to agree. I’ve given a lot away and I’ve sold a bunch, too. (Craig’s List works much better here than in Wickenburg.) The benefit, of course, is that I didn’t have to buy much when I moved into my new home. I already had almost everything I needed to make a home.

As my modest living space fills with stuff, I struggle to find places to store it all. That’s why I’ve still got about 20 boxes in the garage that need unpacking. One thing I learned is that the first step to keeping your home clutter-free is to have a specific place where everything you own belongs. If something can’t be put away, it should be thrown away.

Finding the Camera Equipment

These days, I’m organizing and arranging my garage’s shop area. Part of the job is to finish unpacking those damn boxes. So while my friend Bob was over, working on his boat, I began tackling boxes again. I had a mission: I wanted to find and unpack my games and camera equipment.

I found the games right away: Boggle, Scrabble, two (?) Monopoly games, Pente travel version, Uno, Skipbo, dominos, Parcheesi, and playing cards — including a few custom decks I’d had made not long after returning home to get divorced. I sorted it all out, with some games going upstairs to live on the bottom shelf of my coffee table and some going into my truck camper (the Turtleback) for my annual trip south. I got a lot of joy out of flattening that empty box and tossing it atop the others waiting for a trip to the recycling center.

The camera equipment was a bit more elusive. Although I had some of it in a plastic bin on a garage shelf, a lot of it was missing. I definitely remembered a light gray camera bag and two identical Nikon 35mm film camera bodies. There was a 10.5mm fisheye lens that I hadn’t seen in a while, too.

The equipment in the bin was what I’d had with me in the big fifth wheel (the Mobile Mansion) where I lived every summer since 2010 and then full-time while waiting for my home to be built. I knew there was more from my old house and I was pretty sure I’d packed it. But none of the boxes were marked “Camera Equipment” — I’d labeled every single box — and I was at a loss.

And then I remembered that I didn’t always label the boxes with the exact contents. The reason: a mild case of paranoia. If someone got into my Wickenburg hangar that last summer and started going through the boxes, I didn’t want him (or her) to find my valuables. The same thing applied to the movers; I didn’t want them knowing exactly which boxes they could find stuff worth stealing.

I looked at the labels on the remaining boxes. One was marked “Old Photos.” But I also had a plastic bin full of old photos. How many old photos did I have? I used my box cutter to open the box. And there was the gray camera bag, along with a bunch of lenses, filters, and other equipment I’d completely forgotten about.

It was like a great birthday or Christmas day: getting presents that you actually wanted.

The 35mm camera bodies — which are pretty much worthless these days — were in the box. But the camera bag was full of lenses. Not only was the missing 10.5mm lens there, but there were three others I’d completely forgotten I had. They’re all Nikon lenses and I suspect, based on their weight, that they’re of different qualities (metal and glass vs plastic). Not only do they fit the D7000 I currently use, but most of them will work with the old film cameras (if I ever start using them again).

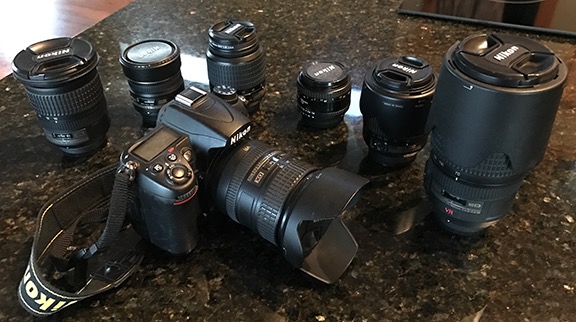
Camera Equipment
With the newly found lenses, I now have seven lenses to choose from: 10-24mm ƒ3.5-4.5 zoom, 10.5mm ƒ2.8 fisheye, 16-85mm ƒ3.5-5.6 zoom (on the camera here; my “everyday” lens), 18-55mm ƒ3.5-5.6 zoom, 50mm ƒ1.8, 55-200mm ƒ4.5-5.6 zoom, and 70-300mm ƒ4.5-5.6 zoom.

This is not “professional” camera equipment. Back when I was shopping for my first DSLR in 2007 — right before my first Alaska trip — I bought a Nikon D80 camera, mostly because it would work with lenses I already had. It had a crop sensor, not the full-frame sensor preferred by professionals. (Learn the difference between full-frame and crop sensors here.) By the time I bought my D7000 in 2011(?), I had a lot invested in lenses and didn’t want to have to start over; that’s why I went with another crop sensor model, albeit one that’s slightly more advanced than a general consumer model: the D7000 I still use today.

Of course, it wasn’t just lenses that I found. There were also about a dozen camera filters — the good, glass screw-on type — that included polarizers, skylight filters, and neutral density filters. There are also a few collapsible reflectors that could be used to either shade or reflect light back up to small subjects. I distinctly remember using those for flower photography in the desert near my Arizona home.

And then there’s my HD video camera and all of its accessories. And my old time-lapse setup. And my geotagger. And my lightweight tripod. And lens pouches. And bean bags.

Needless to say, I’m thrilled to have access to all of my camera equipment again. I’ll be bringing quite a bit of it with me when I head south — well, we’ll see what I can comfortably fit in the Turtleback, anyway. Maybe it’ll motivate me to get a little more creative on this trip. With so much equipment at my disposal, there’s really no excuse not to be able to capture the images I want.

My First Stab at Night Sky Photography

What I learned at a North Cascades Environmental Learning Center photography class.

I love the North Cascades Environmental Learning Center, which is not far from the Diablo Dam on Diablo Lake on the North Cascades Highway (Route 20). I got my first glimpse of it during a camping trip last summer and later that year returned to take a three-day course about mushrooms. This year, I returned for one night of Base Camp right before an overnight seminar titled “Wilderness Photography: Washington Pass at Night.” Here’s the course description, since I can assume the link to the course page will eventually break:

In the grandeur of the North Cascades, moonless nights with clear skies offer fantastic opportunities to capture vivid images of the galaxy.

Join photographer Andy Porter on this specially-scheduled evening expedition to capture images of the Milky Way on this moonless night. We’ll begin the adventure with a short evening workshop on night photography at the North Cascades Environmental Learning Center. Then we’ll head to Washington Pass where, under the towering peaks of Liberty Bell and the Early Winter Spires, Andy will guide us in capturing our own images of the night sky.

I could go into a lot of detail about my stay at the NCELC and the other things I did while I was there, but I’ll try to stay focused for this post. But I do need to talk briefly about the weather, since it did play a major part in how the course went.

The weather was not very good. It was overcast all day and rained more than a few times. Although the clouds were relatively high, there wasn’t a single clear patch in the sky. It was like this all day, which really didn’t surprise me — it rains every single time I come to this area. I like the rain, mostly because I don’t get much of it at home, but I really wish it wouldn’t rain in the mountains when I’m there.

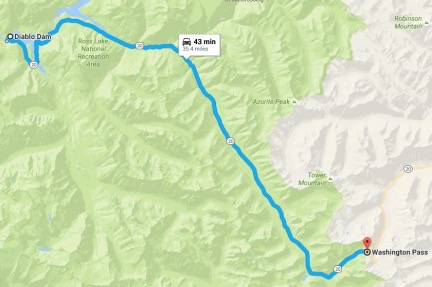
Diablo Dam to Washington Pass
Washington Pass is a 35-mile drive southeast from Diablo Dam on Route 20.

Of course, we weren’t supposed to take pictures in the Diablo Lake area. We were supposed to go to Washington Pass, about 35 miles east. I’d driven through the Pass the day before on my way to the NCELC and it had been partly cloudy, with smoke from a fire I later discovered was burning near Mazama. But the weather information we had showed that Washington Pass was likely just as bad as it was where we were. And there’s nothing worse than making a 70-mile round trip drive to take pictures and not being able to do so.

There was a short classroom session after dinner. Andy introduced himself and showed off a few slides of his work. Most featured an easily identifiable foreground object that was often lighted — like a tent with kids in it or the roots of a fallen log — and a magnificent night sky. He briefly explained how he accomplished the lighted part of the shot by illuminating it for only about a second during the long exposure required to get the night sky. He also admitted to doing a lot of post processing and even showed us before and after shots.

Then he gave us the details on how we needed to set up our cameras for nighttime shooting. Here’s a brief version of his instructions. I’m not giving away any secrets here — all this information is available in a wide variety of places online.

Required Equipment

Before I detail the settings, let me start with the basics. If you don’t have this equipment, you probably can’t do this kind of photography. Or at least I won’t be able to explain how.

  • Camera. At the very minimum, you need a camera capable of setting aperture, shutter speed, ISO, and focus manually. Most DSLRs can do this, although lower end models might have limitations. These days, I shoot with a Nikon D7000, but I’m pretty sure my old Nikon D80 could do the job. And yes, a film camera could work, but the ability to immediately see results and adjust settings make it really impractical.
  • Wide-angle lens. The wider the field of view, the better off you’ll be. In case you don’t know, the lower the focal length, the wider the field of view. I used a 10-24 mm lens for this shoot and set it to 10 mm. Because I don’t have a full-frame sensor in my Nikon camera, that’s equivalent to a 15 mm focal length. There were people shooting with everything from 10 mm to 28 mm in the class.
  • Tripod. You need a good, sturdy tripod. There’s no getting around it. I use a Manfrotto with a ball head and I love its flexibility. If you have options, use one that can be extended so it’s tall enough for you to look through the lens and check image results without having to bend over. Sturdy is especially important if there’s any wind — although this isn’t something you’d likely attempt with anything stronger than a light breeze.
  • Cable or remote shutter release. My camera won’t support a cable release, but it does support a remote shutter release, which I have. If you don’t have either, there is a workaround: use the camera’s self-timer to release the shutter. (This is what I wound up doing when my remote crapped out for some unknown reason during the shoot.) Under no circumstances should you be pressing the shutter release button by hand; it will definitely shake the camera, even on a tripod.

What’s interesting to me is that just about all of the people who took part in the class — and I think there were nearly 20 of us — had brought a bunch of camera equipment. I didn’t bring all of mine, but I did bring my camera body and three lenses. In reality, all we needed was what I listed above. So when it was time to get on the van to drive out to our shooting destination, I secured my camera on my tripod, rested the top of the tripod on my shoulder, and left the rest of my gear behind. I like traveling light.

Camera Settings

The tricky part of shooting the night sky is setting up the camera properly. Andy, our instructor, had us do this in the classroom so we wouldn’t be fiddling with settings in the dark. If you set the camera up right in advance, there’s only one thing you might have to change out in the field.

  • Widest field of view. If you’re using a zoom lens, zoom out to the widest field of view (smallest focal length number). Again, I used 10 mm.
  • Widest aperture. Set your lens so it’s wide open (smallest f-stop number). This enables the camera to take in as much light as possible during the exposure. For my lens, that was f3.5.

  • Manual focus. This can be a setting on your lens or camera or both. (It’s both on mine.) You definitely do not want the camera trying to automatically focus, especially if your camera won’t make an exposure unless focus is locked in.
  • Lock it in!

    This is where I really wish I had some gaffer’s tape with me. This is special tape used in film production; it makes it possible to secure things like you would with any tape, but when you pull the tape off, no sticky residue is left behind. This would have been very helpful for me to lock that focus ring down, preventing me from accidentally moving it during the shoot.

    Focus to infinity. This is actually a lot trickier than it sounds and it took a while for us to all get it right. Simply dialing the focus ring as far as it goes on the infinity side isn’t necessarily correct. You need to play with it a little at a variety of settings out near the infinity symbol (∞). After each setting, snap a photo of something at least 50 feet away and then check it in the review window. Zoom in to see how crisp it is. Then try another setting to see if it’s crisper. Repeat this process until it’s dialed in perfectly. On my lens, the tick mark was lined up with the center of the infinity symbol but it might be different for yours. If you don’t have focus distance symbols on your lens, you might have to use autofocus to get the right focus setting before setting manual focus. I’m pretty sure that’s what Andy helped a few people do.

  • Manual exposure mode. You must set the camera for manual exposure so you’re in charge of how it takes the photo.
  • Calculating shutter speed with the 500 Rule

    If you want to do the math, it’s pretty simple: 500 ÷ Focal Length ÷ Crop Value

    So if you have a high-end camera with a full frame sensor and you’re using a 12 mm lens, the math is:
    500 ÷ 12 ÷ 1 = 41.66, which you can round down to 40.

    With my camera’s 1.5 crop sensor and 10 mm lens, the math is:
    500 ÷ 10 ÷ 1.5 = 33.33, which I rounded down to 30.

    Maximum shutter speed per the 500 Rule. Okay, this is where it gets a little complicated. Andy gave us a handout with a table of settings for the 500 rule, but never explained what the rule was or why it’s important. I did a little research this morning to learn more. We all know that the earth rotates, which means that the stars appear to move across the night sky. They move slowly so we don’t actually see them moving, but if your camera’s exposure is too long, you’ll get star trails — lines made by the stars as their light moves across the camera’s focal plane. To avoid star trails — which is what we wanted to do — you need to set your maximum shutter speed in accordance with the camera sensor size and lens focal length. You can learn more about this on Petapixel, which is also where you can find a table of values. Keep in mind that the shutter speed is in seconds, not fractions of a second. So when I set my camera’s shutter speed, it appeared as 30" in the settings screen. Exposures longer than that require the “bulb” setting on my camera, which means I’d have to manually open and close the shutter based on time I keep with a stopwatch or something.

  • ISO to 2000. This is a good starting point. Of all the settings, this is the one you might be fiddling with in the dark, so make sure you know how to change it. On my camera, it can be done with a combination of buttons and dials but it’s actually a lot easier to just go into the settings menu. I found that my best shots were done at 5000; more on that in a while.

Shooting

Once we had set up our cameras, we all climbed onto the NCELC’s shuttle bus, filling every seat. Andy took a few people in his car. Although it was difficult to see the sky through the tall trees around the campus, it was still pretty cloudy and none of us had very high hopes of getting good photos. They’d decided to try a closer viewpoint: the Diablo Dam Overlook. This offered views of the main lake and dam, as well as up the Thunder Creek arm of the lake and Colonial Peak. With few trees, we’d have a clear view of the sky.

As we drove over the dam, I was looking out the window and saw a single point of light. “I see a star!” I called out. Other people looked but I’m not sure if they saw anything.

Get away from the lights!

Incredibly — to me, anyway — one of the class attendees had to ask the instructor where the Milky Way was. He could see it, but he didn’t know that that the bright band of stars he was looking at was what’s referred to as the Milky Way — the galaxy our tiny planet is part of. This made me sad. I remember my grandfather pointing out the Milky Way when I was five or six years old, sitting with him on the front lawn of his house in suburban New Jersey, long before light pollution hid it from view. Yet this man, in his seventies (!), had spent so much time in the city that he couldn’t even identify the Milky Way when he saw it in the night sky.

Less than ten minutes later, we were at the overlook, which was understandably deserted. It was well after 9 PM and quite dark. But once our eyes had adjusted after the lights from the bus we saw it above us: the Milky Way.

I beelined it to the corner of the overlook where I’d get a good shot up the Thunder Creek arm. My camera was already on my tripod; all I had to do was extend the legs and neck and get it in position. I might have been the first person to take a shot.

And this is where patience is important. Each of my shots was 30 seconds long. Once the shutter closed, the image did not immediately appear. The camera, which is nothing more than a computer with a camera attached to it, had to process all the information it had just collected. I think this took longer than the exposure time — perhaps as long as another 40 seconds. So from the time I started my shot to the time I was actually able to see it in the review screen at the back of the camera was more than a minute.

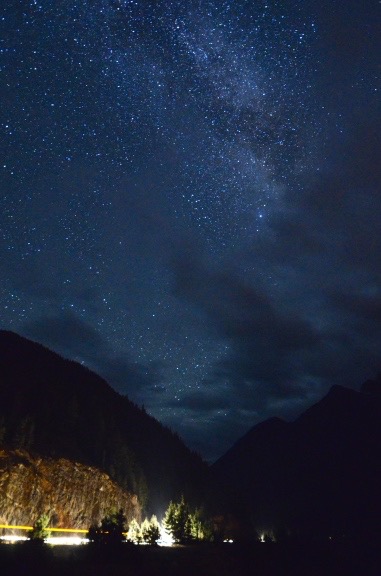
Thunder Arm at Night
A look up Thunder Arm at night. The cars driving by on the road often ruined shots by illuminating landscape features we wanted to be kept dark.

My first shot came out dark. Yes, I could see the stars, but no, I couldn’t see them well. I thought it might have something to do with my reading glasses, which seem to make things look darker than they are. But Andy took a look and recommended bumping up the ISO, which he’d originally advised me to start at 1600. So I tried 2000. It wasn’t much better.

Meanwhile, other photographers were snapping away, emitting occasional oohs and aahs and cursing at the cars that drove past the view point, illuminating foreground items we wanted to be kept dark. One woman near me had very good luck with her camera ISO set to 5000 so I gave it a try. (My camera goes up to over 24000.) That looked much better, so I stuck with if for the rest of the shoot.

Keep in mind that the higher the ISO setting, the more light is processed in the camera. There is a cost to this, however. High ISO settings lead to grainy images or “noise” (digital artifacts) in the images. Ideally, you want to keep the ISO as low as possible to get the shot you want. But since you can’t open the lens any wider (aperture setting) and can’t lengthen the exposure any longer (shutter speed setting), the ISO is the only thing you can change to vary the brightness of your shot.

I moved around to a variety of places. The Milky Way was mostly overhead, but it did dip down to the horizon in the south. A handful of light clouds drifted by, sometimes obscuring stars.

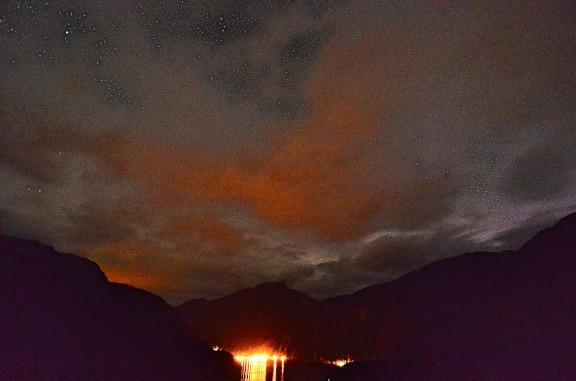
Diablo Dam at Night
I took a few shots of the dam. The lights reflected off the clouds, reddening them. I think this is the image where digital noise is most apparent, especially in the clouds. (A few people mistook the reddish clouds in their pictures for the aurora. Sorry, but no.)

We shot for well over an hour. I captured about 40 images. I haven’t looked at all of them on my big computer yet; these are pretty much decent random images I grabbed for this blog post. All of these are edited to make the stars “pop” more than they do in the original. If you have good image editing skills, you’ll definitely use them if you do night sky photography. I prefer to minimize editing.

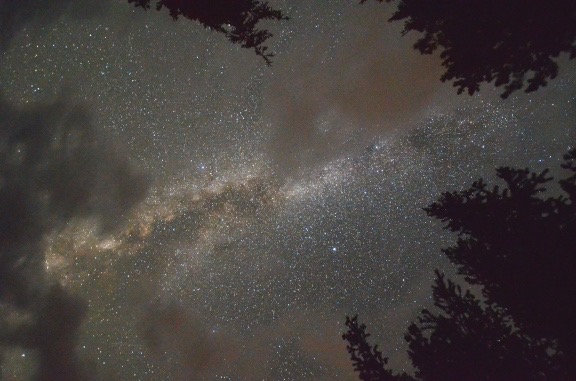
Sky Through Trees
This was shot almost straight up. I think the trees and clouds offer a sense of three dimensionality.

For the most part, the photographers were good to work with. The only real problem we had was with light — too many of them wore headlamps. The trouble with headlamps is that they point wherever you look. So if you look up, your light flashes up, possibly illuminating trees or other foreground object people want dark. This got a bit frustrating and, more than a few times, I called out, “Lights down, please!” One photographer seemed to think that no lights should be on at all and rudely yelled at anyone who used a light, even if it was pointed down at the ground. Sorry, but when walking on uneven terrain in the dark I’m going to use a light — in my case, my phone’s flashlight. If the light doesn’t shine on the subject, it should not affect the photo.

The End of the Shoot… and Beyond

We went back to campus in two groups. I was in the first one. I’d had enough. My remote shutter control had died about halfway through the shoot and I had to rely on the camera’s self-timer to activate the shutter, adding another 20 seconds to each shot. I was burned out and, unlike most of my companions, I live in a dark sky area and can try this again anytime, right at home.

There was no follow-up lesson — although I really think there should have been the following morning. A chance to review and critique what we’d done. I did spend some time at breakfast with other students and got signed up for a Washington State Astrophotography group on Facebook. I’ve already swapped photos and comments with a few classmates there.

Could my images be brighter? I think so. Next time I try this, I’ll do more experimentation with ISO settings. I might need to pop it up some more.

And yes, there will be a next time. I’m thinking of giving it a go on my deck tonight. And I’m definitely looking for companions on overnight outings, possibly with the Turtleback. Washington Pass would make an excellent subject area, especially with the fresh snow I saw on the peaks on my way home. Anyone game for an overnight road trip this coming week?

My Weathercam

A picture speaks a thousand words.

A few months ago, I set up a weather station on my shed. I was mostly concerned with getting wind information back home when I was out flying. But the weather station also provides temperature, humidity, barometric pressure, and rain information. This information is uploaded to the Weather Underground website, where anyone who wants current weather information hyperlocalized to my home can get it.

When I shared the weather link with friends on Twitter and Facebook, some wise guy pointed out that the webcam couldn’t be found. Duh. It’s because I didn’t install one.

That’s not to say I didn’t want to install one. I did. I just had trouble justifying another expense for yet another interest that had taken over my wallet.

But I really wanted one. And when I snagged a frost control contract again this year — my fourth consecutive season; amazing what you can do when there’s no one anchoring you to a dreary existence in a dead town — and the contract guaranteed me even more money than the previous year’s contract, I decided to splurge. I ordered an AmbientCamHD outdoor weather camera.

The camera arrived Thursday. I had to drive out to my mailbox to fetch it — it had been snowing all day and I advised the UPS driver (who texts me when I have a package) not to try the road. I’d spent most of the day with two visitors who had helped me with an electrical project in my garage and then stuck around for lunch and half a bottle of Crown Royal. (Never a dull moment here.) It was still light out when I fetched the package (and dropped off another package for a neighbor on my way home) and I really thought I could have it fully installed before it got dark. But my Mac wouldn’t read the installer disk and the downloaded software, when used with my Firefox browser, insisted on installing an unusable EXE file with the required plugins. (How’s that for geek speak?) After leaving a voicemail for tech support, I tried again with Safari and managed to get the plugins I needed. Unfortunately, it was fully dark when I set the camera out on my deck to share a disappointing picture with the world.

On Friday morning, after breakfast, when the snow had stopped and the clouds drifted out — at least for a while — I went outside with my impact driver, the screws provided with the camera mount, and a Philips bit. It took three tries to fasten it in a good spot on one of my deck posts. (The second try ripped the heads off two of the three screws; I used drywall screws on the third try.) I aimed it out toward Wenatchee, at my “big view.” I made sure enough sky would show to give weather watchers a good idea of conditions.

Webcam after Setup
Here’s what the webcam image looked like right after I completed installatioin.

Of course, less than 30 minutes later, the clouds moved back in and obscured the view. With 5 inches of snow already on the ground, a fresh snowfall — unforecasted, mind you — began again. As I type this Friday morning, visibility is only about a mile in a medium snowfall.

The geek that I am, I quickly discovered the URL for my webcam’s images, which are uploaded to the Weather Underground once every 5 minutes. That makes it possible for me to share the current image on my blog. Here’s what it looks like as you’re reading this; keep in mind that if it’s dark or foggy you won’t see much:

Current Webcam image
Here’s the most recent web image. It’s best viewed on during daylight hours on a relatively clear day.

Of course, the webcam image is now available when you click the Webcam tab on the Weather Underground page for my station. It’s also available from the various Weather Underground smartphone weather apps when you look at the weather in my area or at my station, “Malaga Heights.”

Whew. Glad I got this out of my system.

North to the Future

About one of my photos and the plane featured in it.

I was in Alaska this past week. My friend George has a house up there and he’d told me I was welcome to come any time. Last month, when I was feeling kind of stuck in a rut — long story there — I decided that a trip to visit a friend might be a good idea. I texted George to see if he was going to be around, then bought plane tickets to go see him.

This was my third trip to Alaska.

The Alaska Cruise

The first trip, back in 2007, was with my wasband. We were married at the time and we went on a cruise out of Seward. He had friends living in Anchorage and we spent two nights at their home before heading north on the tourist train to Denali. After Denali, we got on another tourist train to Seward where we picked up the cruise ship.

The trip was memorable, but mostly because both Alaska Air and the cruise line had managed to lose various pieces of luggage in Alaska. It was a huge relief that the one remaining missing bag found its way into our stateroom on the ship.

Although I didn’t hate the trip, I was extremely disappointed. I detest being treated like a tourist and because my wasband had booked everything through a travel agent, that’s exactly how we were treated. I particularly hated the Princess-affiliated hotel we were stuck in near Denali with the boardwalk outside our room that people thundered by on at all hours. Even the cruise was a disappointment. Shuffled here and there, every port full of the same tourist crap shops and cooked-up attractions, and hundreds of midwesterners on the ship who bragged about how they kept their costs low with an inside cabin and no port excursions. Clearly most folks were on the cruise so they could say they’d been on an Alaska cruise. I was hoping for a more unique and positive experience.

Anyway, I blogged about the trip when it was over, so you can read a lot more detail and see some of the photos. Personally, I’d rather forget it in favor of some new Alaska memories.

The Job Interview

My second trip was in March 2008. I flew up to Anchorage for a job interview.

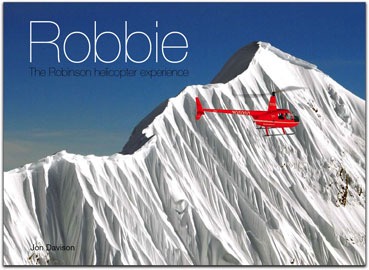
Robbie book cover
Alpine Air Alaska was featured on the cover of the 2009 book, “Robbie: The Robinson Helicopter Experience.”

The interview was at Alpine Air Alaska. I’d met the owner of Alpine Air, Keith, via email when we were both featured in Jon Davison’s coffee table book about Robinson Helicopters. (Can’t believe I didn’t blog about that, but I can’t seem to find an entry.) Keith’s operation was on the cover. I was looking for a summer job that would keep me out of Arizona’s brutal heat and Alaska seemed like a good idea.

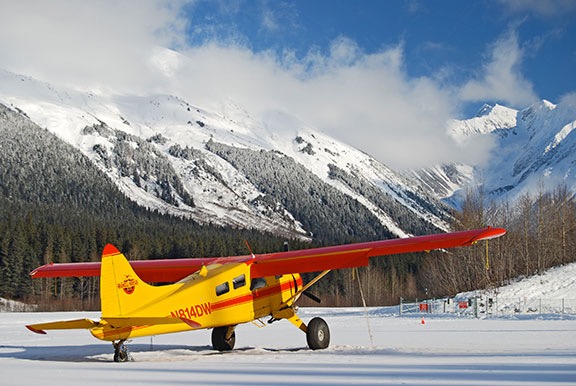
I did a few flights with Keith — including one where we landed an R44 on a glacier and got out for a walk with the passengers — and got a chance to see how incredibly beautiful Alaska is in the spring. There was snow on the ground, but not much, and when the low clouds moved out, there were tantalizing glimpses of the snow-covered peaks around Alpine Air’s base in Girdwood. I had my camera with me — it was a Nikon D80 in those days — and I shot a photo right outside the hangar of a bright red and yellow airplane with the mountains beyond it. Later, I entered it into a state-themed photo contest. That’s where it got its name, “North to the Future,” which is the state motto of Alaska. (It didn’t win.)

North to the Future
Shot in March 2008, I call this photo “North to the Future.”

And that’s really what this blog post is about: the photo. You see, although it looks like a photo of a plane, it’s really a photo of a scene. The snow covered runway, the fresh snow in the trees, the clouds clinging to the mountains, the blue sky beyond, and this brightly painted plane looking as if it’s waiting for an excuse to take off. I just thought it was a great image, and the aviation theme didn’t hurt. It’s actually one of my very favorite photos. The colors and clarity still blow me away.

But the photo has a history beyond the day it was shot.

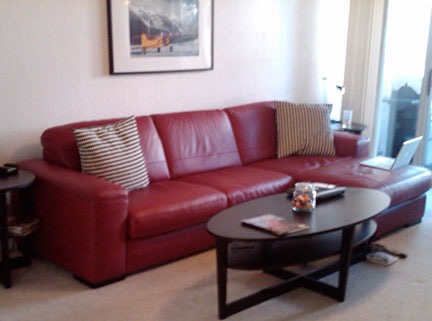
Condo Living Room
I happened to find this 2009 photo of the condo living room in iPhoto while looking for something else. You can see the photo hanging over the red leather sofa. (Seeing this photo reminded me how much I hated that place.)

It was among the first photos I had enlarged and framed in 2009 to hang in the condo my wasband lived in part-time in the Phoenix area. Back when he bought the condo in late 2008, I thought I’d be spending a lot of time there with him. Instead, he got a roommate, a friend who made me feel very unwelcome every time I came around. With my wasband living in the condo four nights a week, our marriage was suffering. In the summer of 2011, I asked him to get rid of the roommate so I could move in. By the time I moved in that autumn, it was pretty clear that my wasband didn’t really want me there; he was likely already planning his exit strategy for our marriage. By the summer of 2012, the marriage was over.

Still, the photo hung over the red sofa in the condo. Several of my other photos, enlarged, matted, and framed, hung in the condo with it. I wanted them back — I couldn’t understand why my wasband and the desperate old whore he was living with would want my artwork in their home. When the court allowed me to retrieve my things from the condo in November 2012, the photos were near the top of my list. My wasband made me ask permission to take each and every item, including the photos. Later, back home, I packed them up with plenty of bubble wrap in big, flat boxes, and moved them first to my Wickenburg hangar, next to my Wenatchee hangar, and finally to my new home in Malaga. (Oddly, I later got the red leather sofa the Alaska photo had hung over, too.)

Back to Alaska. The job interview that March went well and Keith made me an offer. After some thought and a discussion with my wasband, I turned it down. Ironically, I was worried that being so far away from my wasband for five or more months that summer would hurt our marriage. (It wasn’t the first or last time I turned down work because of him.)

It turned out for the best. I started cherry drying that summer — with a mere seven weeks away from home — and it was far more lucrative and better for my business than a tour job would have been. It also gave me a firm basis for my Wenatchee-based business when the divorce finally freed me up to follow my own path in life.

Trip Number Three

I went to Alaska for the third time this past week. I was feeling in need of a trip and had a free week on my calendar when George would be there, too. I invited myself and he welcomed me.

I’ll blog about the trip in some detail later this week — if I can find time. For now, I just want to talk again about that photo.

You see, when I showed the photo to George — I keep a copy in my phone — he said, “Oh, that’s Wrangell Air‘s plane. I use the same mechanic.” (Although George doesn’t fly for a living, he is a pilot with two planes and a gyro.)

A few days later, we took a drive down the Turnagain Arm. On the way back, we went through Girdwood. I wanted to see the Alaska Air hangar and try to better remember those few days in March seven years before. The hangar looked much the way I remembered it. But there was no fresh snow, no blue sky, and no red and yellow plane.

George wanted to talk to his mechanic, so we went to another hangar down the runway. Inside were a bunch of planes in various stages of undress as they were being worked on by two mechanics. Although the guy George wanted to talk to wasn’t there, he talked to another guy while I wandered around.

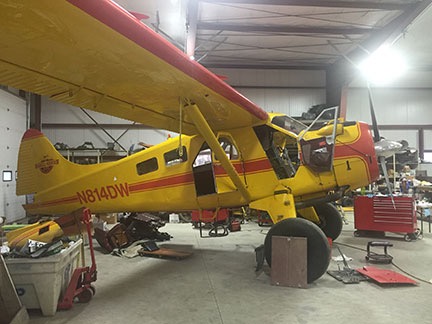
Plane
The red and yellow plane was in for maintenance.

And there was the red and yellow plane, in the back corner of the hangar, in for its annual inspection.

It would have been great if it had been parked outside in the same place and I could get a cloudy autumn version of the same shot. I doubt it would have come out nearly as nice, though.

But maybe I’ll get it the next time I’m in the area. Alaska isn’t that far away and George didn’t seem to mind me being around.

The Photo Today

Back home, I hadn’t unpacked any of my photos. My new home has limited wall space and I’m not quite sure where I’ll fit the large framed photos.

But today I went down into the garage where the big, flat boxes marked “Framed Photos” are leaning up against a wall. One by one, I opened the boxes and pulled out the bubble-wrapped frames. I stacked the boxes on the floor, ready for my next trip to the recycling center, and repositioned the wrapped frames where my other packed boxes remain. There’s room there now — I’m about half unpacked. When I found “North to the Future,” I set it aside.

Later, I brought it upstairs. I’d been thinking about how nice it might look on the wall over my desk. I unwrapped it and held it up to the wall. It was a lot bigger than I remembered it. It would be a bit of a squeeze.

I found a picture hanger and tapped it into place. Then I used a damp rag to wipe the Phoenix dust off the frame and plexiglas over the photo and mat. The wire at the back of the photo found its way into the hook without any trouble. I straightened it and stepped back to look at it. It’ll do.

My Office
I think my office is now officially finished.

Now that I’ve been thinking a bit about this photo and Alaska, I realize that the second two trips are far more meaningful to me than my first visit. Those trips were for a purpose other than trying to cram as many tourist destinations and photo opportunities into the shortest amount of time. They remind me how much I hate being a tourist and how much I love being a traveler. (If you don’t know the difference, you haven’t traveled.)

This photo is the perfect reminder of those trips to Alaska — and great trips yet to come.