My first real camping trip in at least 15 years is an exhausting ton of fun.
Last week, Kirk and I went off-the-grid on a 5-day/4-night camping trip in Washington’s North Cascades National Park.
To many people, the North Cascades is a “drive-thru” park. That’s because one of the nation’s most scenic roads, the North Cascades Highway (SR 20) winds right through it. It’s also part of the Cascade Loop, a 400-mile driving tour through the Cascade Mountains. The loop runs right through Wenatchee, up Route 97 through Chelan, up the Methow Valley on Route 153, past Twisp and Winthrop on Route 20, and then through the North Cascades Mountains past Washington Pass and the Skagit River dams and their lakes: Ross, Diablo, and Gorge. It eventually dumps down into the Seattle area where it goes south, eventually hooking up with Route 2 for the eastbound leg up Highway 2 through Stevens Pass, Leavenworth, and Cashmere, back to Wenatchee.
Although I’ve spent eight summers in Washington and have been living full-time in the area for the past two years, I’d never driven any part of the North Cascades Highway. I was supposed to do a camping trip up there in September 2012, but more pressing matters brought me home to Arizona early that year. But this year, I planned two trips that way: a drive-thru trip on motorcycles with my friend Bob to Friday Harbor later this month and a camping trip with Kirk at the beginning of the month.
The Gear
I had all my camping gear from when I brought it to Washington in 2012. Back then, I had the silly notion that my wasband, who claimed to want to spend the summer with me, would go boat camping out on the Columbia River. So when I packed up my RV for my annual migration north, I packed up all the gear we’d need: the good tent, sleeping bags, cotton sleeping sacks, mess kit, lantern, etc. My wasband apparently had other ideas, so we never used the equipment together again. But it sure came in handy when I packed for this trip.
Although Kirk has an all-wheel-drive vehicle, I really wanted to take the Jeep. I thought there might be some back road opportunities. I’d already removed the back seat from the Jeep so there was plenty of open space back there. The trick was to stow the gear in boxes that would be organized and easy to pack.
Fortunately, I had a number of wheeled storage bins, including a very large, heavy duty Husky toolbox I’d bought to store tools before I had a building on my future homesite. That became the camping gear box and it held everything we’d need to set up camp: tent, sleeping bags, sleeping sacks, tarp, rope, bungee balls, queen sized air mattress, and three air pumps (two battery and one manual).
I used another smaller box for kitchen items: butane camp stove (which I’d bought in 2012 but had never used), two covered frying pans, a coffee pot, a small bin full of dinnerware and cups, and the vitally important equipment to make coffee. That box also took the items that didn’t need to be kept cold: coffee, scones I’d made the day before, bread, cookies, oil for cooking, etc.
I also have a wheeled cooler I bought for my boat. I filled that with frozen meats (burgers, chicken, and sausage) and a wide range of vegetables from our gardens (beans, peppers, and tomatoes from Kirk’s; eggplant, onions, garlic, and cherry tomatoes from mine). I added milk for my coffee, eggs from my chickens, cheese, and two pounds of cold cuts (turkey and ham) for lunch, Two solid ice half-gallon milk bottles would help keep everything cool for the five days we expected to be out.
I packed a bag with clothes and toiletries, Kirk packed two smaller bags with the same. He also brought along his two inflatable kayaks — mostly because I didn’t have a roof rack for mine — life jackets, and paddles. I brought my portable propane grill, which I bought years ago for travel with the RV — it folds up into its own little carry bag.
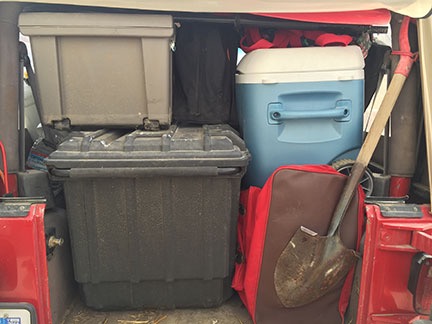
The Jeep was jam-packed for our camping trip.
Packing all this stuff into the Jeep was a bit of a challenge. When we were finished, the back of the Jeep was completely crammed with stuff. So crammed, in fact, that Penny had to ride on Kirk’s lap for the drive.
The Drive Up
We started out at about 10 AM on Monday, heading north on Route 2 to avoid having to drive through Chelan. We filled the Jeep with gas before we got too far, then settled in for the long drive to Twisp, our first stop, which was on Highway 20 not far from where the North Cascades Highway begins.
Twisp is a great place to stop at mealtime. There are two good places to eat there. Most folks like Cinnamon Twisp, which is where we stopped. It’s a great bakery that’s also open for breakfast and lunch. We sat outside with Penny, eating fresh-made sandwiches on whole grain bread. Of course, I bought an oat bar for dessert.
(In case you’re wondering, other place I like to eat in Twisp is the natural foods store next door, the Glover Street Market. Their Curry Stew and Forbidden Rice Bowl are great warmups for cold winter days. I usually pass through Twisp on my cross-country ski trip to Winthrop every Christmas.)
Kirk posed with a taste of cider at the Methow Valley Ciderhouse.
We continued on our way, stopping briefly at Winthrop in search of a good map. We found several in the local visitor’s center. That’s also where we decided to make a quick stop at the Methow Valley Ciderhouse, just outside of town. This is a funky cool place that looks like it would be fun to visit with a bunch of friends. But that Monday morning, it was just us and the owner. We tasted a flight of ciders and I have to admit that I wasn’t terribly impressed. We left empty-handed and continued on our way.
Our next stop was quite a few miles up the road, at Washington Pass. There’s a big fancy overlook there with lots of parking and a short trail to a lookout point. We parked and made the climb. The view was spectacular, but smoke in the area from the Wolverine Fire on Lake Chelan had drifted into the area, muddying the sky. We’d been driving in the haze since leaving my home that morning and to see it this far up in the mountains was very disheartening. Fortunately, the smoke cleared out as we headed down from the pass, deeper into the Cascades.
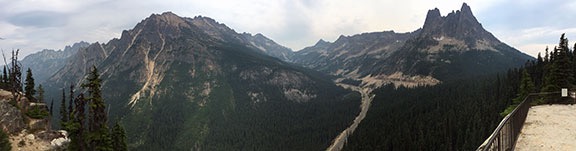
A panoramic view from the overlook at Washington Pass.
Somewhere along the ride, cell phone service completely dropped out. It would be like that for most of our stay in the area.
The First Camp and Hike
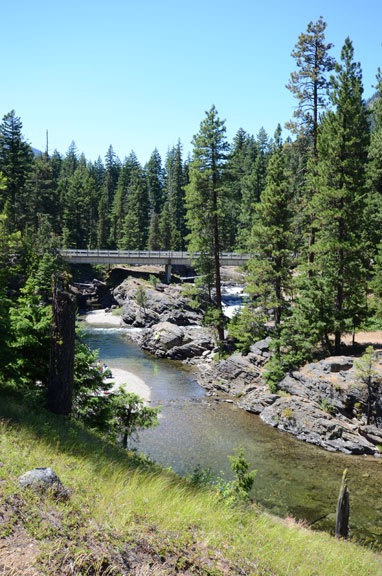
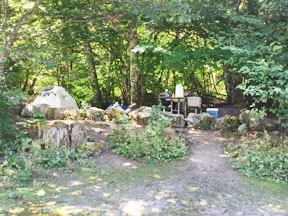
We continued on our way, stopping at just one more overlook. But that time, it was after 3 PM and I was starting to get worried about finding a decent campsite. We’d already decided to camp at Colonial Creek Campground on Diablo (pronounced “Die-ah-blow”) Lake. The campground map showed some tent sites right on the lake and I was hoping to get one of those. By the time we arrived, however, it didn’t seem like any of those sites were open. We wound up instead on a nice, private wooded site. We paid the fee for one night and set up camp.
I was very pleased to see that the tent and its poles were still in perfect condition. I’d bought the tent back in 1992 for motorcycle camping. We needed a good 3-man tent with poles that folded up short enough to be packed on a motorcycle. This was a great tent that had made several motorcycle trips with me and my wasband, including our epic Skyline Drive/Blue Ridge Parkway/Outerbank Islands adventure in 1992 or 1993. Its main drawback was that it wasn’t tall enough to stand up in. That wasn’t such a big deal when I was in my 30s, but 20 years later, it matters, especially when I try to dress. (I wound up changing my clothes outside the tent; our site had enough privacy to make modesty a non-issue.)
The air mattress was another story. Although we’d tested it at Kirk’s place and it had lost some air there, Kirk was convinced that the valves hadn’t been properly closed during our test. Unfortunately, it wasn’t the valves. The mattress, which was admittedly old, apparently had other leaks. It wouldn’t hold air. With no camp store in the area, we couldn’t replace it that first night. So Kirk spread out all our sleeping bags and blankets and towels as padding under where we would sleep.
The campground featured flush toilets in several well-kept buildings on the camp roads, water spigots, and a mix of RV and tent sites. There was a fishing pier and a boat launch. (Boats are limited to 14 feet in the lake, which is why I didn’t bring mine.) Each site had a large picnic table, a designated tent area that was level and smooth, a fire pit (which was useless with a fire ban in effect), and a bear box. A bear box is a secure place you can store anything that smells like it could be food; every night we had to pack up our kitchen box and cooler and stow them inside it.
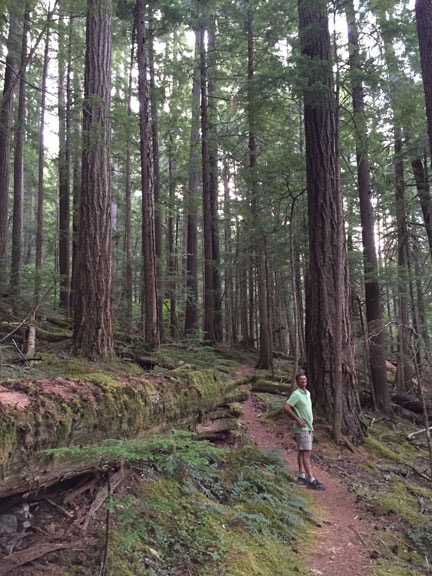
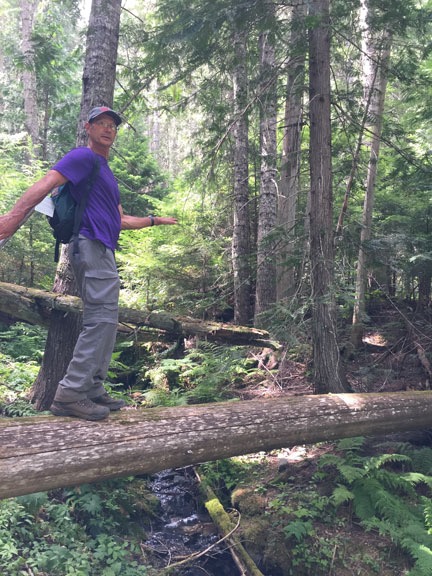
Here’s Kirk along the Thunder Creek Nature Trail. There are some seriously big trees throughout the park.
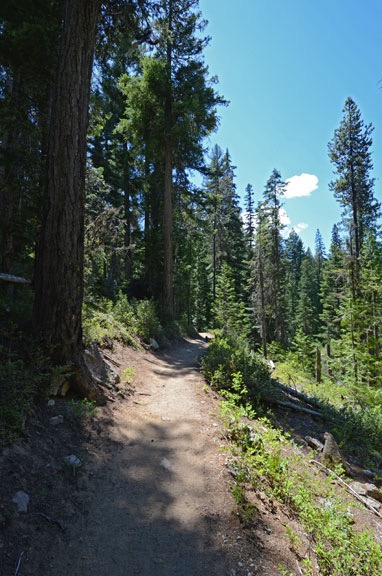
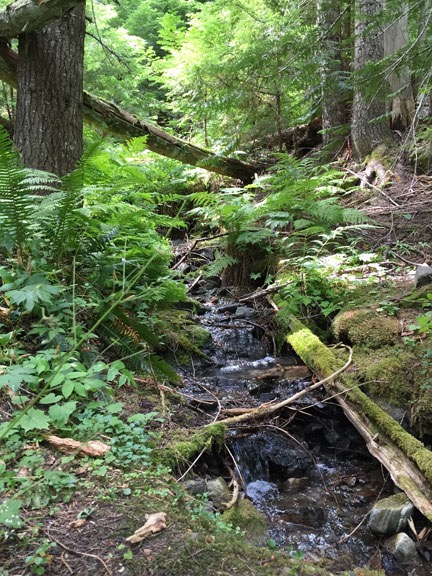
We had burgers and green beans for dinner, then headed out on a trail that led from the campground up Thunder Creek. There was a nature trail off the main trail, a 0.9 mile loop that climbed steeply up the side of the mountain, past rock slides, fallen trees, moss, ferns, and old growth cedars and pines. Numbered sign posts corresponded with a guide we didn’t have so we amused ourselves by making up interpretive comments about what we saw at each sign post. Kirk was very good at this — way better than me.
Later that night, we crawled into the tent and settled down on the relatively hard ground. I thought I’d have trouble sleeping, but I must have been exhausted because I slept surprisingly well. Penny slept like a log, mostly because I’d brought along her bed and she was perfectly comfortable.
Day 2: Hiking, Shopping, Moving, Napping, and Hiking
I heated up the scones with butter in a frying pan the next morning for breakfast. The coffee was good and hot. Because the campground was down in a valley, it took a while for the sun to reach us. I think it may have been a bit overcast, too, and that burned off as we headed out on our morning hike.
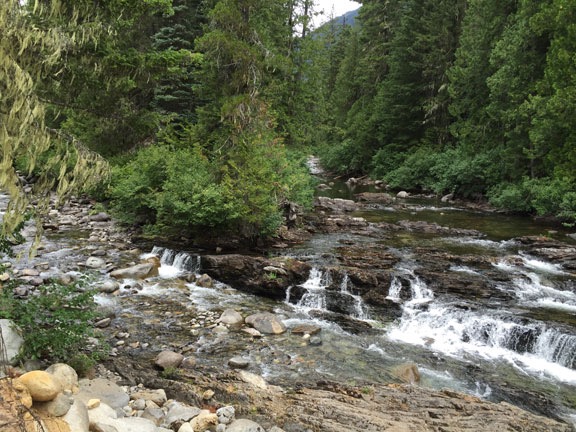
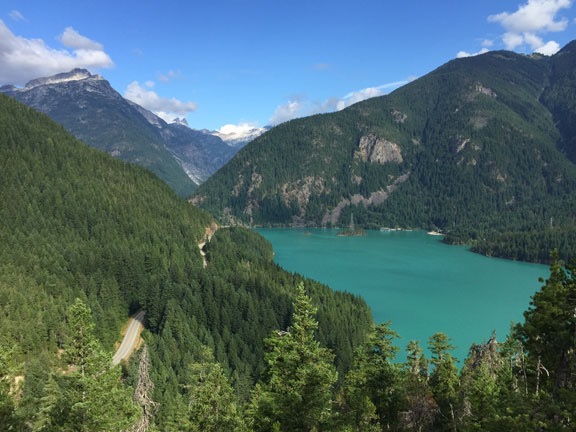
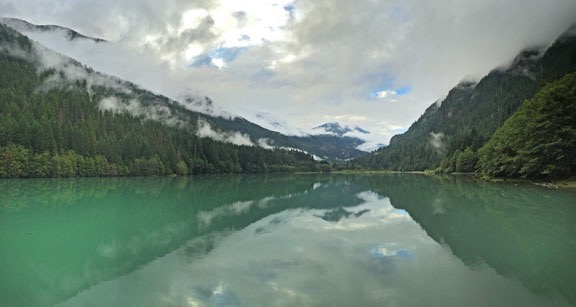
Colonial Creek is full of the “glacial flour” that gives it and Diablo Lake their milky blue-green color.
The hike was on the Thunder Knob Trail. This was a 3.6 round-trip hike that climbed about 425 feet to the top of a heavily wooded hill on the lake. From our campsite, the trailhead was about 1/2 mile away, so we walked to it. The trail starts by crossing Colonial Creek, where glacial runoff flows down the mountain and into Diablo Lake. It then winds through the woods, climbing up on switchbacks. I was still fresh and full of coffee so I didn’t need more than a few short rests. Only one hiker passed us on the way up. At the top were two viewpoints looking down at Diablo Lake and across at the peaks it’s nestled in. It was mind-boggingly beautiful.
Diablo Lake from one of Thunder Knob’s lookout points.
On the way back, we took a walk along the lakeside campsites. Some of the previous day’s campers had departed. We found an excellent site right on the lake and wasted no time staking it out for ourselves. Then we spent about an hour packing up our original camp, moving everything over to the new one, and setting up the camp again. The old air mattress wound up in a dumpster.
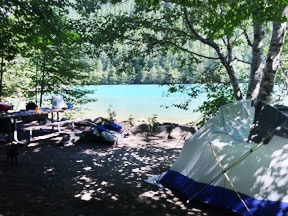
Two views of our campsite: from the lake looking in (left) and from the campsite looking out toward the lake (right). We were right on the lake.
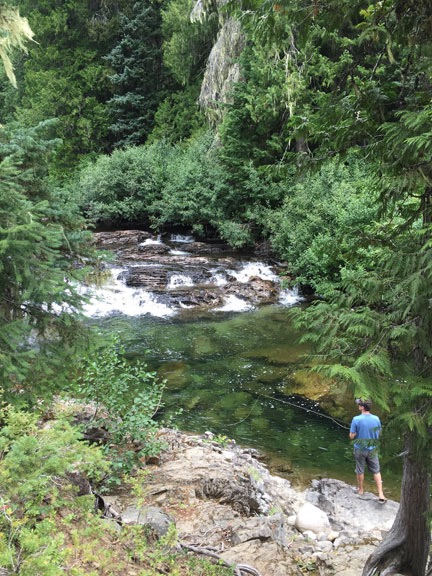
After a good lunch of thick sandwiches and chips, we hopped into the Jeep and headed out to the nearest town, Newhalem, in search of a new air mattress. This was a nine or so mile drive farther down Route 20. Along the way, we passed the Diablo Dam and powerhouse, Gorge Lake, Gorge Falls, and the Gorge Dam.
Just as we got into town, my cell phone, which had been charging in a cradle, came to life with a handful of text messages — including a thank you note from the Realtor who had finally sold my old Arizona house. Let’s just say that I wasn’t the only one celebrating that sale with champagne.
Newhalem is a “company town” that was built by Seattle City Light, the publicly owned power company that owns and operates the three hydro-electric power plants on the Skagit River. It features a general store, a restaurant with odd hours, and a bunch of buildings for company use. Employees who work in the area live in town or in the small community of Diablo, just downstream from the Diablo Dam.
We beelined it to the General Store in search of a new air mattress. The store had a tiny bit of camping gear but no air mattresses. The clerk suggested Marblemount, 14 miles farther up the road.
We stopped for a few minutes at the Visitor Center, which had the usual collection of displays about the river, dams, lakes, salmon, and original native settlers. Kirk spotted a sign with information about a “Dam Good Chicken Dinner” and nighttime tour of Ladder Creek Falls that coming Thursday night. He signed us up. I bought a good trail map.
Then it was on to Marblemount, which isn’t much bigger than Newhalem. The store there had a bit more camping gear, much of it stowed away in a back room. There were some roll-up pads that would have helped us in a pinch. But we were ready to try our luck at Concrete, even farther up the road, when I spotted some twin sized Coleman air mattresses on a bottom shelf. We bought two, feeling very lucky to have found them.

Penny and I posed atop the fake snow at the park entrance sign.
We gassed up the Jeep at the only gas station I’d seen since leaving Winthrop the day before and headed back to the campsite, stopping for some super touristy photos at the park entrance sign, a visit to Gorge Falls, and a very short hike to what was supposed to be an overlook of the Gorge Dam but was blocked by trees.
Back at the campsite, we inflated the two air mattresses and stuffed them into the tent. They literally filled the tent’s floor. Then Kirk inflated his kayaks while Penny went on chipmunk patrol around our site. Sometime around mid afternoon, we found our way into the tent for a nap. The air mattresses were perfect! We woke up near dinner time. I cooked up a concoction of eggplant, garlic, olive oil, and polenta that came out pretty good. We had that with grilled sausages.
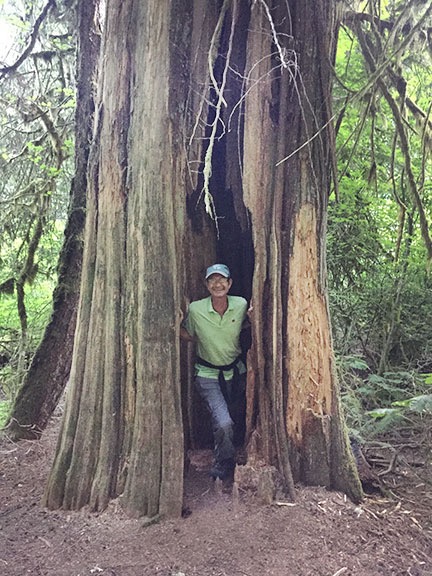
Another shot of Kirk, this time in a tree.
After cleaning up, it was time for our evening hike. We headed back up the Thunder Creek Trail which followed the lake shore up Thunder Creek. It was yet another heavily wooded trail, surrounded by tall, old growth trees but offering few views of either the lake or the creek. Although the trail went on for miles, the idea was to hike until 7:30 and turn back. 7:29 found us at a grove of old growth trees with a big hollow one that was obviously a spot for taking photos. So we took one.
I slept amazingly well that night.
Day 3: Ross Lake, Rain, and the Folks from Maryland
Eggs with tomatoes, onions, pepper, and cheese for breakfast. And coffee, of course.
After cleaning up, we headed out on a hike to Ross Lake Resort. This is one of only two lodging facilities inside the park and it isn’t easy to get to because there’s no road to it. There seems to be just a few ways of getting there. The easiest is to take a ferry from Diablo Dam up to the portage area near Ross Dam, get on the portage truck, and then take a water taxi across Ross Lake. If you’re on a kayak, you can launch it at the Colonial Creek campground, paddle 5 miles up Diablo Lake, catch the portage truck to Ross Lake, and then paddle across. Or you can do what we did: park at the Ross Dam Trail trailhead, hike down to the dam, cross the dam, and hike up the lake to Ross Lake Resort. Although I didn’t have my GPS app tracking us, I estimate the total mileage to be about 2 to 3 miles each way.
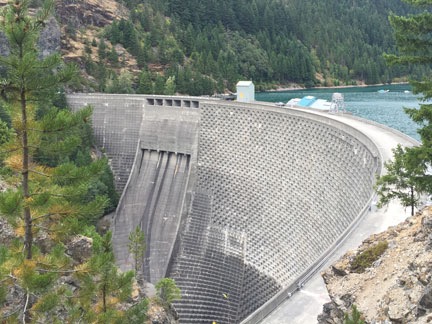
Ross Dam was built with future expansion in mind.
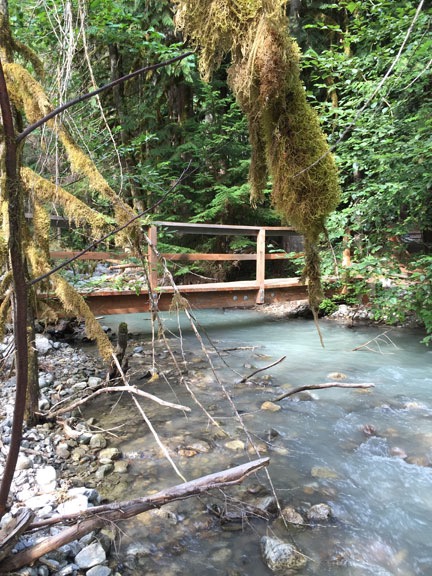
It was a pleasant hike on narrow, well-worn trails. We crossed a creek on a nice wooden bridge early on, near the parking area — more glacial runoff. Then a descent down almost to lake level. Crossing the dam was interesting; I later found out that the reason the Dam has the stepped sides is so that it can be built up to enlarge it at a future date. (Apparently, the Canadians aren’t too happy with that plan.) On the other side, I was surprised to see the trail climb up the side of the hill — I hadn’t planned on two climbs on the return trip — but it eventually leveled out as it headed up lake. We met two hikers waiting for friends at a trail intersection and turned right, down the hill to Ross Lake Resort.
Ross Lake Resort consists of 12 cabins on floating platforms: house barges, in effect. They’re all moored against the shore. There’s an office, a boat rental facility, and not much else. No restaurant, no store beyond snacks. Anyone who stays there not only has to get there, but he has to bring in all his provisions. The cabins are various sizes and include everything you need to live comfortably for the length of your stay. Most folks likely spend most of their stay boating and fishing; most cabins had a boat tied up out front. And of course, the place was entirely off the communication grid. Talk about a comfortable remote getaway! Sign me up!
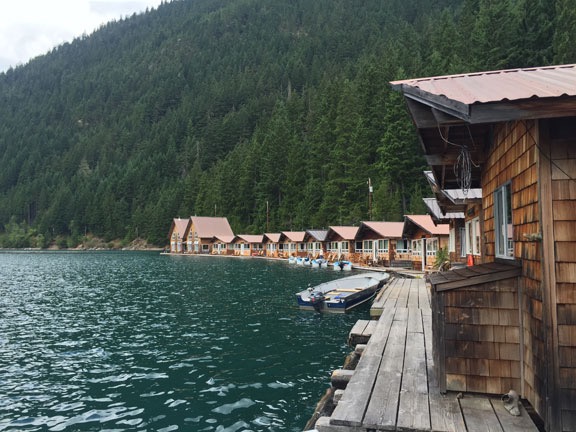
Ross Lake Resort consists of a string of floating cabins.
I let Penny off her leash to play with the other dogs, including a boxer named Maple. Kirk and I rested, snacked on nuts and energy bars we’d brought along, and prepared mentally for the walk back. By that time, it was starting to cloud up. We’d heard in Newhalem the day before that there was a 20% chance of rain on Wednesday and it seemed to be coming. The first small drops started falling on us as we crossed the dam. The drizzle continued, on and off, but we arrived back at the Jeep dry enough.
We drove back toward the campground and beyond. Kirk wanted to check out the town of Diablo. I directed him on a turn that took us over the Diablo Dam instead. That put us at the Seattle City Lights Ferry terminal instead. We saw a few young deer and followed a sign for the North Cascades Environmental Learning Center. I was hoping they had a restaurant where I could get something hot to eat, like soup or chili. I ran in to investigate and discovered the only other lodging place in the park: a learning center with weekend programs on a wide variety of topics. I took some literature to check it out later on.
We continued along Highway 20 and soon found ourselves back in Newhalem. (My phone alerted me when we were getting close by displaying a list of new text messages and missed calls.) I bought a can of chili in the General Store and we headed back.
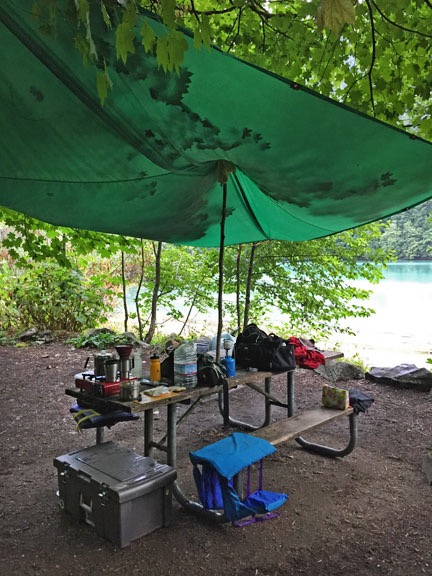
We rigged up this great old ripstop nylon tarp over our table. (They don’t seem to make tarps like this anymore.)
By this time, it was raining lightly but steadily. It let up a bit when we reached camp and we had enough time to heat and eat the chili and some sandwiches before it started up again. I mentioned the tarp I’d brought along and we pulled it out, along with the rope and bungee balls I had. It took two tries, but soon we had it hanging nicely from four trees. We moved the table under it just before the rain started coming down in earnest.
We read and napped the afternoon away. The tent stayed remarkably dry, despite the fact that we hadn’t properly tied out the fly. The tarp completely covered the table. I propped a walking stick under its middle on top of the table to raise it and help the water find a way off.
Later, we ran to the bathroom, took care of business, and waited in the shelter of the building overhang for the run back. That’s when we met a family from Maryland who were camped near us and had just returned from a very long hike. They were disappointed that they didn’t have any shelter from the rain and would likely be eating cold food inside their tent. So we invited them to bring their food over and prepare it under our tarp with us. The tables were big enough for all six of us to eat outdoors and keep dry. I don’t think they thought we were serious, but a while later, when we were preparing to make our own dinner, Kirk ran over to their site and reminded them they had the option of joining us. I had just begun heating up the frying pan for a stir fry of green beans (of course), onions, tomatoes, and chicken when they arrived with two big ham steaks, the biggest yam I’d ever seen, two stoves, and two frying pans. Soon we were all cooking and chatting and then eating in the bright light of my old camping lantern, which had to be at least 25 years old.
It was dark when they left. We cleaned up, packed up the bear box for the night, and turned in. It was still raining. But by morning, the only rain sound was the dripping of water through the trees.
Day 4: Long Hike, Where I Sh*t in the Woods, Bear Sighting, Dam Good Chicken
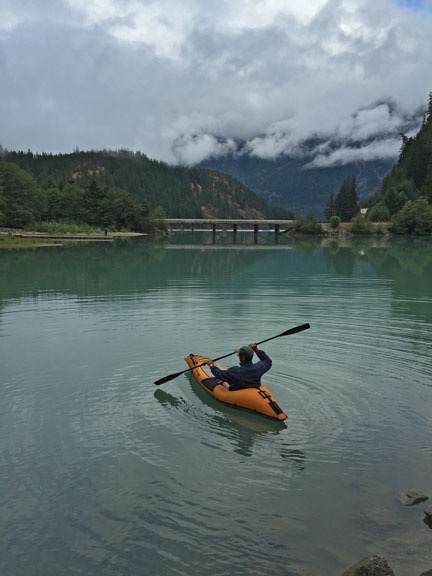
Kirk headed out for a pre-breakfast paddle on Thursday morning.
It was still cloudy when we woke up, but with low clouds that clung to the mountainsides offering glimpses of blue sky beyond. After coffee, Kirk took one of the kayaks out on the lake, which was as smooth as glass. I stayed behind and prepped to make breakfast. When he returned, we had the last of the eggs and onions. And the scones. The cooler was getting empty enough to start storing other food in it. The ice was nearly gone, but it was cool enough.
Soon I couldn’t resist the call of the smooth lake surface beyond our campsite. I changed into shorts and climbed into the kayak for a quick paddle up the lake toward Thunder Creek. There were geese feeding on grassy areas and a low ground fog hanging over the water surface here and there. I snapped a few photos with my camera before turning back. The wind was just beginning to pick up when I pulled into shore.
A view up the Thunder Creek arm of Diablo Lake from a kayak, early in the morning.
We debated two hikes from the same trailhead that morning: East Bank and Happy Panther. Both ran alongside the Ruby Arm of Ross Lake. Although it seemed to me that Happy Panther Trail might run closer to lakeside, Kirk opted for the East Bank Trail. So we headed that way, descending down to lake level where Panther Creek and Ruby Creek met. There was an interpretative sign there with information about mining operations that had been in the area, as well as a hermit who lived in a home across the creek. We crossed the bridge and started up the trail on the other side, which led downstream toward the lake as it climbed gradually up the hillside. Yet another densely forested trail, soon there was no sign of the creek, although we could hear it and the cars on the road we’d come in on. Soon even that faded away as we walked through the forest on what used to be a road, crossing small creeks along the way.
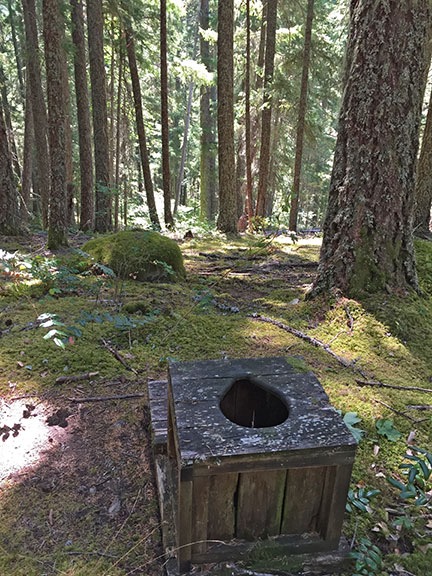
With no one around, this beats a stinky outhouse any day.
My GPS app, which I’d preloaded with topo maps of the area, showed a barn and horse meadow and we tried unsuccessfully to find that. I think we may have found where it had been, though. We certainly found meadow areas, long overgrown. A little beyond that was the Ruby Pasture campsite, where someone had hung his covered hammock between two trees before heading out on a hike. There was a sign for a toilet and I followed it through the woods. It ended at a pit toilet out in the open with its seat facing the forest and lake. It was probably the nicest pit toilet I’ve ever used.
After a short rest, we headed back. Thats when my leg muscles started aching. I think the rest was the mistake — it seemed to flip a pain switch inside me. I joked that I’d reached my weekly hiking distance limit of 10 miles and now my body was shutting down. I kept a slow pace on the way back, despite the mostly level terrain for the first part. That was probably a good thing. Because I’d hung back, Kirk’s approach down the trail was quieter. So quiet, in fact, that the bear about 100 feet off the trail didn’t hear us until I joined him for a look. It was a young bear — maybe a year old — and it seemed to be alone. After taking a good look at us, it headed up the hillside away from us. I like to think that Penny’s tentative bark drove him off. I took two pictures, but I won’t waste your time or mine sharing them; the bear is nothing more than a black lump in the trees.
I’ll admit that it was great to get back to the Jeep. I was exhausted. We’d only hiked about six miles, but I’d done so much hiking during the week that I really was beginning to tire out.
We went back to the campsite for a quick bite to eat. It was late — about 3 PM — and we didn’t want to ruin our appetite for the dinner later that evening. Then we were back on the road, this time zeroing in on the tiny community of Diablo along the way. This is a collection of company housing for the folks who work at the dams. A bunch of houses that all look the same and a road that terminated at Diablo Dam.
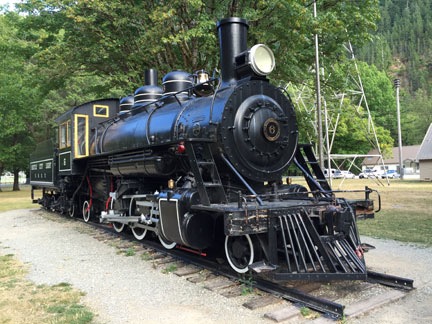
I felt a little like a kid climbing up on this nicely preserved steam engine.
From there, it was on to Newhalem. We bought a frozen burrito for the next day’s breakfast — we’d run out of breakfast food — climbed the old steam engine parked nearby, walked the 1/3 mile long Trail of the Cedars Nature Walk, and then checked out the Ladder Creek Falls trail, where we’d be walking later that evening. I was too pooped to make that climb before dinner, so I hung back and waited for Kirk, answering a few text messages and posting a photo or two on Facebook and Twitter while I had cell service.
We got to the Gorge Inn dining room just in time for dinner. It was cafeteria style dining with family style seating. I got to sit beside the ranger who would be leading the walk after dinner. Across from us were a pair of brothers who had grown up in the area and were revisiting it as adults. Dinner was fried chicken, using the same recipe that had been used when the dining hall first opened, with mashed potatoes, and gravy. And green beans, if you can believe that. Dessert was homemade apple pie and ice cream. We left feeling stuffed. I got a doggie bag of chicken skins and meat for Penny and left it for her in the Jeep before we started the walk.
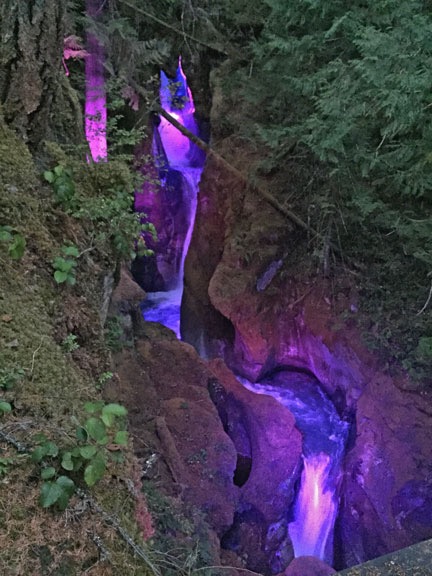
One of the ways that Seattle City Light got early support for their dam project was to offer nightly tours of these falls lit up much as they are now. Electricity was new back then so this was a real treat for visitors.
There was a group of about 40 of us for the evening walk. The ranger took his time getting from the Inn to the falls trail — he needed to wait for the lights to come on. Along the way, he talked about the natural and social history of the area, including the history of the dams along the Skagit River. Finally, we reached the start of the falls walk. The lights up the trail were turned on and the colored lights on the rushing creek and falls were doing their thing. We walked along the trail with our companions, stopping to look at the lights along the way. It was funky weird and thoroughly enjoyable.
It was nearly 10 PM by the time we got back to our campsite. We fell into the tent and got right to sleep.
Day 5: Views, a Hike, and a Walk around Winthrop
We heated up that burrito in a frying pan for breakfast. It was remarkably good. But then again, everything tastes good when you’re camping.
We packed up camp at a leisurely pace. Everything was dry. I didn’t bother washing the dishes since the next time they’d be out was home, with my dishwasher handy. We got everything back into the Jeep and even had room to put Penny’s bed up on top of one of the camp boxes, behind the driver’s seat.
We headed out, making just one stop in the park before leaving: Diablo Lake Overlook. We’d stopped there before, but the light and sky was much prettier that morning and I wanted a good photo.

I shot this using the pano feature of my iPhone; panoramas don’t have to be wide.
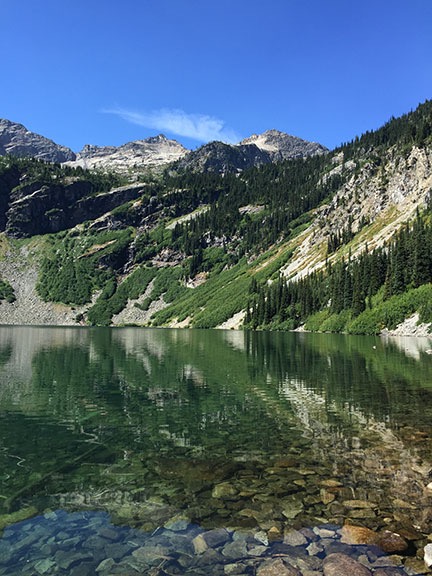
Rainy Lake. Can you see the waterfall just left of center in this shot? It was so quiet, we could hear it from the trail’s end.
Then it was back down the road toward Winthrop and home. But not before one more hike. We stopped at the trailhead for Rainy Lake. This was a “handicap accessible” trail, meaning that it was paved the entire way. It wound through forest, under a canopy of fresh-smelling foliage, with signs that pointed out the different vegetation along the way. At the end of the trail was the lake, nestled into a glacier-dug cavity. The entire lake is surrounded by mountains and a waterfall at the south end feeds it with a healthy flow from melting glaciers out of sight above it. Amazingly, there was no one there when we arrived. We climbed down to the water’s edge and watched fish swimming in the clear water. We also found some kind of water bugs in the shallow water that were strangely fascinating to watch.

Another view from Washington Pass.
Back in the Jeep, we continued toward home. We stopped again at Washington Pass. Although we’d started to notice smoke again, it wasn’t nearly as bad as it had been on Monday. I wondered if the Wolverine Fire had gotten some of the rain we did on Wednesday.
From there, it was downhill and eventually back in civilization. We passed the turn off for Mazama without stopping and headed into Winthrop, which was surprisingly busy for a Friday midday. We had lunch at a Mexican place — I felt like having a hot, hearty meal — and then walked around town. I bought a birthday present for my friend Bob who turns 65 later this week. After a few hours in town, we got into the Jeep and pointed it toward home again. We stopped for fuel in Twisp but skillfully avoided the bakery, which I longed to visit.
The final stop along the way was at the Orondo Cider Works, which I thought was a cidery. Instead, it’s more of a farmstand that also sells cider. I bought an 8-ounce bottle to drink immediately — I was parched — and Kirk bought a gallon to split with me at home.
It was nearly 5 PM when we pulled into my driveway. We unloaded the Jeep and unpacked the perishables. I checked the chickens — they’d laid nearly 2 dozen eggs! — and irrigation. Everything was fine. Nice to know that I can leave for 5 days without having to worry about anything at home.
Final Thoughts
The trip had been great — everything I wanted and more. Kirk is a good traveling companion who prevents me from being lazy when I might be. We stayed active most of the time and I really got a workout that I needed.
But what surprised me the most was how well we’d packed for this trip. We had everything we needed with some minor exceptions:
- A second rope would have made hanging the tarp easier.
- Duct tape would have made it possible to repair the storage box for my camp stove when it cracked.
- Fresh batteries for the pumps would have made them work a bit faster.
- Throw rug would have been nice to have outside the tent to keep the entranceway clean.
- Some canned chili or soup would have been nice when the weather turned rainy.
- More breakfast food. I honestly hadn’t expected us to stay four nights.
The camp boxes made bringing equipment down to the lakeside campsite — which was not near the car — very easy. And they also made it easy to keep things secure and dry when the wind kicked up or it rained.
There were only three casualties on the trip:
- Kirk’s air mattress. Admittedly, it was past its prime.
- One of my folding chairs. I carry two in the Jeep but broke one when we sat out by the lake one evening.
- Ground cloth. This old piece of plastic, which had to be at least 20 years old, was stuffed in the tent bag. It had become brittle and although it worked for this trip, it would not be good for the next.
Would I do it again? Hell yes! But I think we’ll take Kirk’s big tent next time. I’m getting too old to crawl in and out of that old tent’s doorway.