I make my first tab-mounted gemstone pendant.

The definition of cabochon from Merriam-Webster dictionary.
I have about 500 gemstone cabochons in my collection these days. When customers marvel at them on display, I joke that “I make jewelry to support my stone habit.” Sadly, although it’s a pithy punchline, it’s also kind of true.
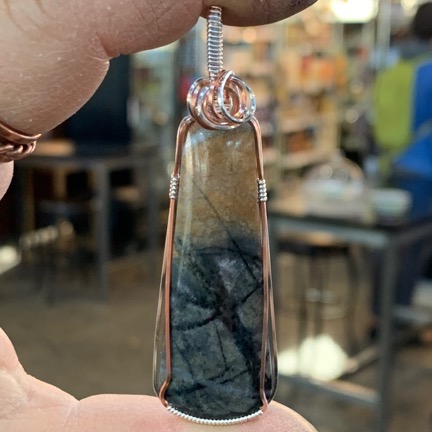
I made this Picasso Stone Jasper in sterling silver and copper pendant recently.
I use the cabochons (or “cabs”) three ways:
- I make silver and/or copper framed pendants from cabochons I select from my collection.
- I let customers select cabochons from my collection and make silver and/or copper framed pendants for them.
- I sell cabochons from my collection. (Yes, I mark them up from their purchase price. No, I don’t double the cost to come up with my price.)
That Rose Quartz Cab
I purchase most of the cabochons at gem and mineral shows or directly from lapidaries. I do, however, also have a CabKing cabochon maker, which I can use to make my own cabs from rough or slabs. While I’m glad I have the CabKing, I honestly don’t use it enough to make it worth buying. The trouble is, it takes a long time to make a cab — sometimes an hour or more per stone. So unless I can’t get a cab elsewhere, it just doesn’t make sense for me to make it myself. At this point, I use it to make cabs from local stones such as petrified wood, obsidian, Ellensburg Blue agate, and Washington State jade.
But back when I first got it, I made a bunch of cabs from stones I’d bought to tumble. One of them was a piece of rose quartz that, for some reason, I’d cabbed into a triangle. (What was I thinking?) The piece sat in my collection for well over a year. It was time to do something with it.
Tab Mounting Ideas
I pulled it out on Sunday and took a good look at it. I wanted to use it with one point down, but I knew that it would look ridiculous framed in wire. And then I realized that it might be a candidate for a new (to me) technique I wanted to try: tab mounting.
Tab mounting requires you to take a piece of metal and cut tabs into it that you can then bend up and over the stone to secure it in place. I had seen a few videos about the technique and even read up on it in some of my jewelry making books. Coincidentally, I had passed on a jewelry making class in Tacoma that very weekend that covered tab-mounting. (I had already driven to the west side of the mountains three times this autumn and felt that was enough.) Maybe it was time to try it myself.
I took out a piece of paper and started sketching — which is something I rarely do. (I have no drawing skills.) I came up with an idea that might work, however, and got very excited about giving it a try. Unfortunately, I was at my day table booth in Pybus Market for the day and had agreed to meet a friend at the neighborhood winery afterwards. So it wasn’t until Monday morning, after dropping off my truck for some maintenance, that I had a chance to explore my idea.
Making the Pendant
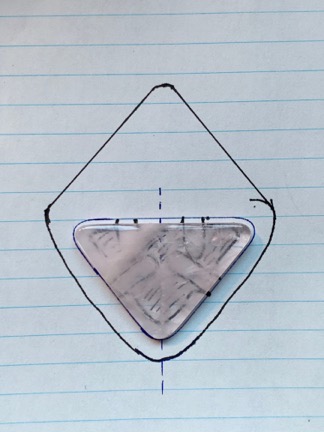
Here’s the sketch with the stone positioned on top. Because the stone was translucent, I wanted the area behind it to be mostly empty.
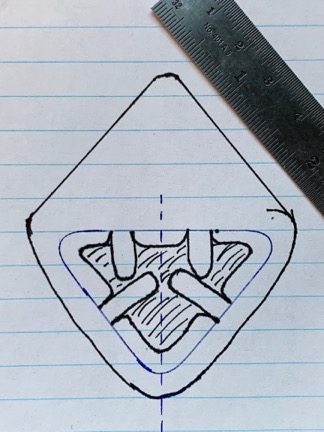
Here’s the sketch without the stone. I shaded in the area that would be cut away.
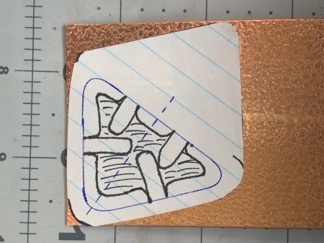
I glued the sketch diagonally on one end of the metal strip.
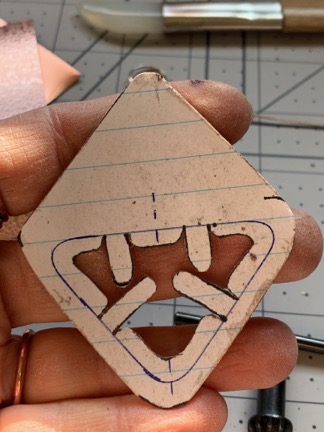
Here’s what the piece looked like after it was cut.
I started by re-sketching the idea. You see, it required a lot of cutting with a jeweler’s saw — a skill I learned last year during the three-day Beginner Intensive Metalworking class at the Tacoma Metal Arts Center. I’d been taught to take what I wanted to cut and paste it onto the metal with rubber cement. After it was cut, the paper could be peeled off.
So I traced the stone on paper, drew dashed lines to mark the center, sketched in the tabs I’d need to cut out, and then drew the pendant’s border around the stone. I shaded in the area that would be cut away, mostly so I wouldn’t make any mistake about where I cut.
Then I prepared the metal. I planned to use 22 gauge copper for this first experiment. I needed a piece approximately 2-1/4 inches wide so I cut a strip that wide with my bench shear. I wanted the metal textured and decided to use my rolling mill to keep the texture uniform. It was important to roll the copper before cutting it since rolling it tends to stretch it a bit. I picked a texture plate and rolled it out.
Next, I cut out my sketch with a pair of scissors and glued it to the textured metal. It didn’t matter which way the texture ran so I placed it on the metal to minimize waste.
Now the fun part (not!): cutting. There were two cutting techniques required for this piece:
- Cut around the outside of the template. This was easy — I did it with a pair of metal shears.
- Pierce cut along the black lines inside the pattern to remove the shaded area. This required me to drill a small hole in the shaded area (to pierce it) and then thread a thin blade on my jeweler’s saw through the hole. Then, resting the piece on my bench pin, I sawed on the lines. Although this wasn’t particularly difficult — the jeweler’s saw is made for this kind of work — it was time consuming. And I did break three saw blades. (#4/0 blades are a lot thinner than the #2 blade I use for most of my work. Fortunately, I buy all my blades in 24-blade package.)
Once it was cut out, I peeled away the paper and cleaned any remnants of glue off the piece. Then I spent a while doing my least favorite thing: filing and sanding the rough edges. One of these days, I will find the perfect tool for doing this quickly and consistently. Monday was not that day.
At this point, I could have mounted the stone and finish up. But I wanted to use another technique to add some creative elements to the metal: fusing sterling silver onto its surface. I dug into my sterling scrap bag — I recycle all my sterling silver — and pulled out a piece of 22 gauge square wire. I cut it to length and curled its ends into a pair of spirals. Then I took my beloved solder cutting tool and chopped up the remaining square wire into tiny pieces. I positioned all this silver onto various places on the textured copper and laid it out on the charcoal block at my soldering station.
I cannot say enough good things about this torch, which can supposedly reach 2500°F and doesn’t have sissy features like child-proof ignition.
I used my new Blazer Big Shot butane torch to melt the silver onto the copper. This is something I’d learned earlier in the month at a jewelry making class. It’s not difficult to do, but it does require your full attention and quick reflexes. I wanted the tiny chips fully melted but I wanted to retain the shape of the swirls. I think I did a decent job, although I wish I could have melted the left swirl a little better.
As you might imagine, the copper got very hot — glowing red. I let it cool naturally on the block for a short while, which really didn’t make sense because charcoal really holds the heat. Finally, I quenched it in some water and dried it off. It was very black. I used a 280 grit radial polisher on my flex shaft to clean it off, then repeated the process with a 400 grit polisher to give it more shine.
I was going to do some fire painting to bring some more color into the copper, but so little copper showed through the silver that I didn’t think it was worthwhile.
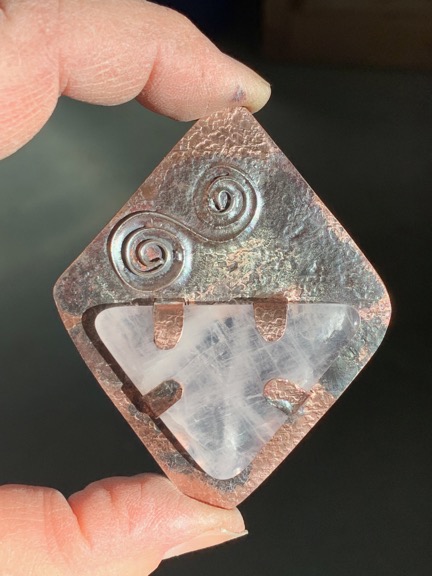
Here’s the almost finished piece. I still have to add a bail at the top. It’s interesting the way the silver appears shiny in some places and blackened in others. I like that look. I’ll probably make a pair of simple copper with fused silver earrings to go with it, using the same spiral motif.
So, instead, I just mounted the stone. It was easy enough to do: I pulled the four tabs forward, bending them where they joined the rest of the piece. To my utter amazement, the stone fit perfectly between them. I bent the tabs back over the stone. It was all very easy to do since the piece had been annealed when I melted the silver.
I’m very happy with the results. I know that this kind of jewelry isn’t for everyone, but neither are my sterling/copper framed cabochon pendants. I think it’s important to have a variety of items to appeal to many people. I can see making a “line” of jewelry in this style. Every piece, of course, would be different.
I can make silver pendants this way, but I can’t melt copper onto them. I’d have to use other techniques to make the pendant’s backing interesting: texturing, stamping, antiquing, etc. It’s exciting to me, in a way, because I get to try different things. When I show them at art shows, etc., I see the reaction of shoppers and learn what works and doesn’t work.
Discover more from An Eclectic Mind
Subscribe to get the latest posts sent to your email.

Creative! I have a rounded pear shaped piece of sea glass that should match the Hope Diamond!
Trying to envision the right gemstones to emulate a similar setting. The blue is piercing!
I think the key is to work with stones that are odd-shaped (for visual interest) and very flat. I’ve tried this mount with a rounder (read that taller) stone and I just can’t get it to sit properly.
Very beautiful and meaningful to me. Thanks for showing this
I really like it. It is very different from any pendant I have ever seen. I love the colors and textures! Great job!
Thanks very much. I’m going to try to make more like this over the winter.
I think its amazing! Would you part with your King Cab and sell it?
Sell the CabKing? Possibly. I certainly don’t use it enough to keep it. But it wasn’t cheap and I wouldn’t let it go for less than $1200. It’s nearly brand new.
Coincidentally, I planned on firing it up this afternoon. I have a piece of Ellensburg Blue I need to polish.