
It’s been a long, ongoing project but it’s finally done.
This morning, I put the finishing touches on my kitchen when I finally removed the paper backing from an adhesive light strip and stuck the over cabinet lighting to the cabinet tops. At this point, all the difficult work in the kitchen is done. There’s just some trim around the floor, which I’ll likely do next week some time.
I decided to sum up the entire project with pictures and links to related blog posts. When you buy a home that’s already finished, chances are you have no idea what went into building it. This blog post will give readers a pretty good idea of what’s “under the hood” in a kitchen and how I built mine. Although it’s been mostly done — and certainly in use — for the past eight months, it’s nice to take a look back and remember what I did, with the help of contractors and friends, to get where I am today.
The Long Road
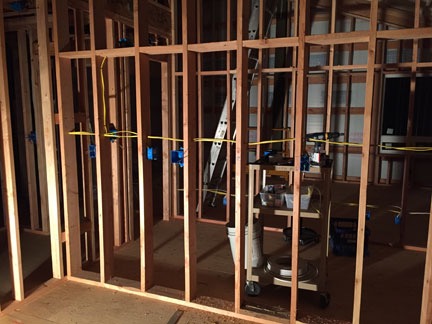
The back wall of my kitchen in December 2014. The framing was done and I’d just begun the wiring.
I started planning my kitchen well over a year ago. Back then, all I had was a framed out wall between the future kitchen and the bathroom behind it. I knew I wanted a galley kitchen with an island for the stove and breakfast bar. The framing was done in September and I didn’t wait long to take the next step.
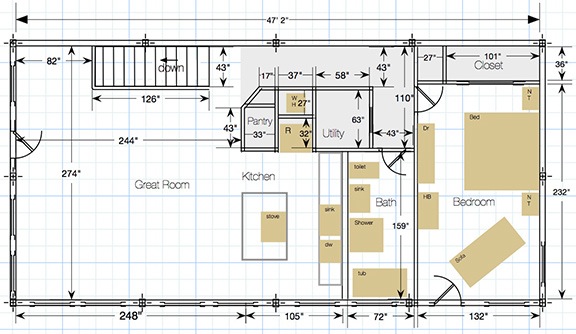
Here’s the framing floor plan with wall widths taken into consideration.
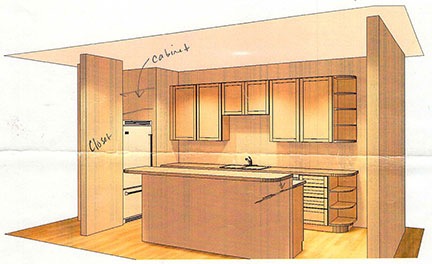
Here’s Home Depot’s first stab at my kitchen.
That next step was to talk to the folks at Home Depot and Lowes about kitchen cabinets and appliances. I go into some detail about that in a blog post about planning the kitchen. That’s also where you can read about getting quotes for cabinets and the things that were important to me that led me to finally place an order with Home Depot for Kraftmaid custom cabinets and granite countertops. And because I wanted my kitchen to be “perfect,” I also arranged for professional installation.
I actually ordered the appliances more than a week before I ordered the cabinets and countertops. I ordered them from Home Depot, too, taking advantage of their big “Black Friday” appliance sale to buy a Samsung Dishwasher, a Samsung Range, and a Whirlpool refrigerator, as well as a Samsung washer and dryer for my laundry room. Not long after placing the order, I realized that the refrigerator I’d ordered would be too wide for the space framed out for it; I had to change the order to buy a slightly narrower model.
Once the cabinet dimensions and layout were set in stone (so to speak), I could build the stub wall for the center island. I had a framer over to do a few other odd framing jobs, including the wall around the stairwell, which was open to the area below. I copied the way he did that wall to build the island’s stub wall. Then, after a lot of measuring — “measure twice, cut once” — I screwed it down into the floor, making the exact location where my center island cabinets, stove, and countertop would go.
I did the wiring for the whole place, including the kitchen. I was crazy about including outlets and placed the ones on the countertops three feet apart with alternating circuits. I added two more outlets on the island. I originally had the refrigerator on its own circuit, but electrical inspector said it had to be on the same as one of my 20 amp outlet circuits. Likewise, I had the over/under cabinet lighting outlet and switch on a 20 amp outlet circuit but the inspector said it had to be on a different circuit. So I wired it into the loft’s circuit. The same went for the exhaust fan, which they allowed me to put in the wall rather than the ceiling; I had to wire that into the living room circuit. When all that was done and the electrical inspector was satisfied, I got the okay to cover — that meant I could have them do the insulation and drywall work.
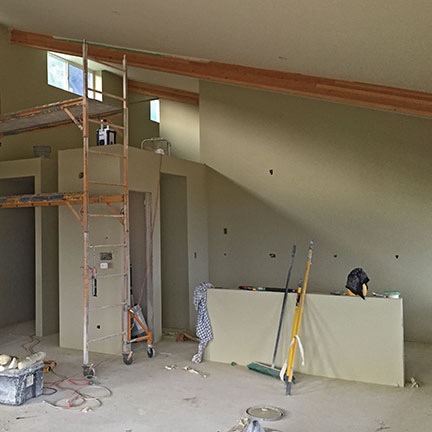
Here’s the kitchen with the drywall done and the painting almost done. The large opening is for the fridge and its cabinet; the small opening would be my pantry.
In January, a contractor began work on the insulation, drywall, and painting for my home. I think the task was a lot bigger than they had expected — especially the drywall for my 20-foot tall interior wall and vaulted ceilings. As the drywall was finished, each room — including my kitchen, of course, suddenly began feeling like a room. They’d put in the shell for my living space. I left for a trip to Arizona while they were still working on it, but when I returned in mid-February, I was thrilled to see mostly painted and ready for the next step.
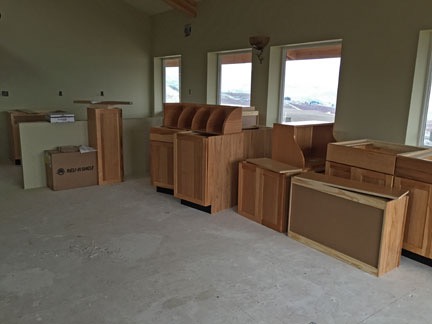
The cabinet installers unboxed and inspected each cabinet before bringing them upstairs.
Not a moment too soon! I got right to work on the electrical outlets and lighting. I needed the outlets done before the appliances would be delivered and I couldn’t get in the way of the cabinet installers, who were coming next. I wired a lot of outlets in a very short time. I took delivery of the cabinets the day before the installers came to measure again, unbox the cabinets, inspect them, and carry them upstairs.
Then it was off to California with the helicopter for frost season. I stayed a few days before returning home.
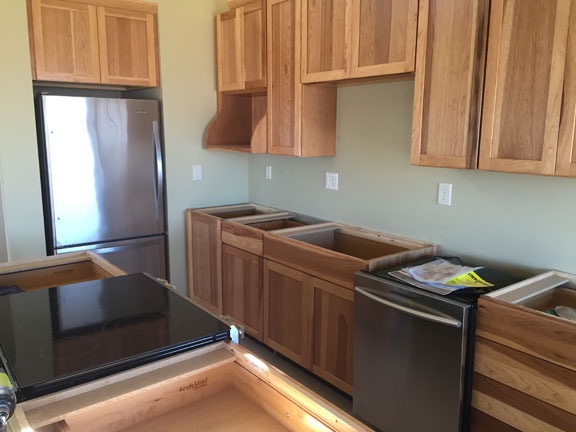
When I got back, the cabinet installers returned and got to work. They did most of the job in two days. There were some minor problems. Two cabinet doors needed to be replaced and the lower shelf unit was the wrong color. They ordered replacement parts and more trim.

Here’s how my kitchen looked by the end of the first day of cabinet installation work.
The appliances came a day or two later, on February 28 — the delivery date I’d specified three months before. (I really know how to cut things close.) I’d had just enough time over the previous day to prepare vinyl adhesive plank flooring for under the fridge, dishwasher, and stove. The rest of the floor would get Pergo and the manufacturer recommended that the appliances not be placed on top of “floating flooring.” The vinyl was practical, and didn’t look bad. It would be mostly covered anyway.
The appliance delivery went very smoothly. There was some confusion about the refrigerator two weeks later when I turned on the circuit it was plugged into — it wouldn’t work. But then I pulled it away from the wall and realized the installers hadn’t plugged it in all the way. Those darn tamper-resistant outlets!
With the appliances installed, it started looking like a kitchen.
The countertop guys came and took exact measurements based on the cabinet installation. It would be a while before they were back with the countertops. Before they left, they told me I’d need corbels to help support the weight of the granite over the void of the breakfast bar area. I went in search of an appropriately sized, relatively attractive solution and came up empty. So I found a company that made corbels and ordered four of them, placing a rush order so they’d be at my home on time.
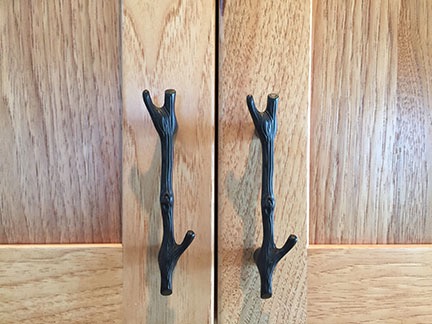
I wanted something unique and I found it — at Home Depot, if you can believe that.
Meanwhile, the cabinet guys came back and finished up their work on the cabinets. That included replacing the bad doors and off-color shelves, adding trim, and adjusting doors and drawers. They also installed all of the cabinet and drawer pulls. I’d chosen an unusual twig design available online through Home Depot. (The twig seemed to go well with the design of my great room sconce lighting, which features a sort of vine support.) They did a fine job, but they’d ultimately have to return one more time for some final adjustments. This is one of the best things about working with Home Depot; the contractors they send do the job right, no matter how many trips it takes. And there’s no surprise on pricing. (I wish I could say that about my drywall contractor.)
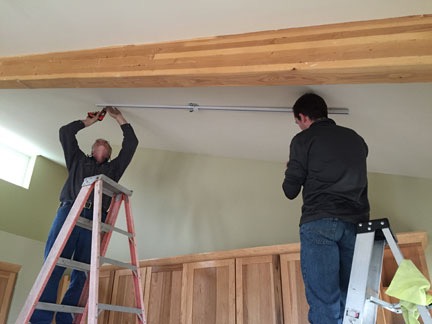
Jim and Cy hung the track lighting. (I couldn’t do it on my own.) Their wives, Kriss and Alix, came along and a dinner party broke out.
I chose these art glass light heads for the hallway and kitchen.
Some friends came by one evening to help me with the track lighting in the kitchen and hallway. I’d bought the tracks and 10 art glass light fixtures at Home Depot but was unable to hang them with just one pair of hands. The beauty of track lighting is that you can easily add, move, and point fixtures wherever light is needed. and with the right track heads, it doesn’t have look like a throwback from the 1970s. I thought I’d be helping Jim, but Cy stepped in and the two of them knocked off the job in no time at all. That cost me a smoked rib dinner and was so totally worth it (especially since it gave me an excuse to make and eat some ribs, too).
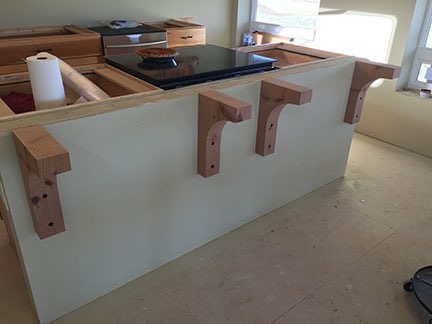
Bob and I attached the corbels one Saturday or Sunday. I rewarded him with a fresh-baked quiche. By this point, I’d begun using my stove pretty regularly, although I still lived in my RV.
When the corbels for the breakfast bar support arrived, my friend Bob came with a set of forstner drill bits and helped me install them with special screws I’d bought at Home Depot. Each screw is inset; one of these days, I’ll cover the holes with wood buttons.
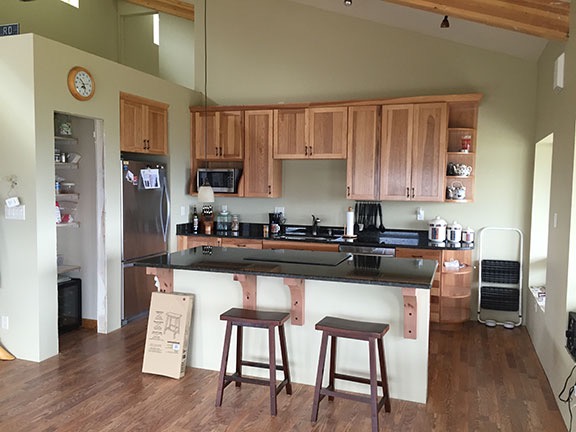
The countertops came next.I felt sorry for the guys who had to carry those huge granite slabs up the stairs. They did a great job in only a few hours, handling the installation of my under-counter composite granite sink as part of the job. I was thrilled that the 4 x 8 island came in one piece; the 12-foot main countertop was split in two at the sink but the seam is barely visible. I should mention here that I’d decided early on to keep the island at just one level rather than raise the breakfast side. This gives me a huge surface for food preparation.
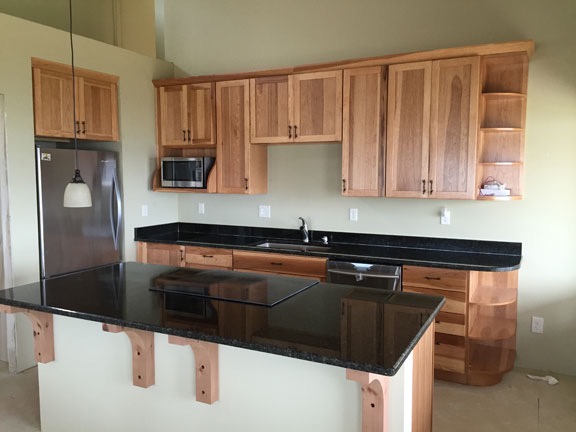
At this point kitchen was at least 90% done. You can see in this shot that only one of my three hanging pendant lights have been hung.
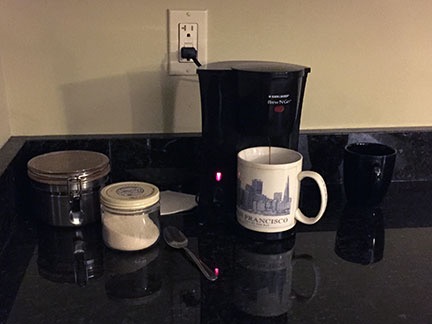
First cup of coffee in my new kitchen.
On March 28, 2015 I moved my coffee maker upstairs and made coffee in my new home for the first time. While that might not sound like much, it was a huge deal for me.
I almost got the floor done in time for my kitchen unpacking get-together with friends.
Meanwhile, I’d been working hard on the Pergo floor, starting at the east end of the room and working my way toward the kitchen. I had planned a get-together with some of my girlfriends to unpack my kitchen boxes and I really wanted the floor done before they arrived. Unfortunately, I came up just shy of being finished. But we unpacked the boxes anyway and I put most of the things I’d packed two years before in Arizona. It was great being able to use my Calphalon pots and pans and Mikasa dinnerware again after two years of cheap Silverstone and Corelle in the RV.
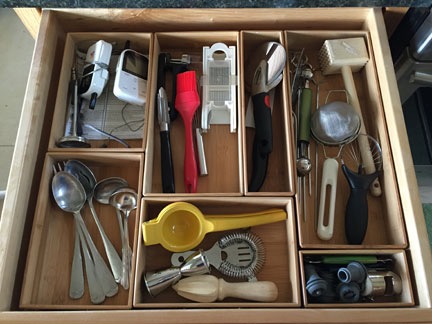
I love keeping kitchen drawer contents neatly organized and these bamboo dividers were perfect for the job.
I bought bamboo drawer organizers at the local Bed Bath and Beyond to organize silverware and kitchen gadgets in the drawers. I really like being able to keep the drawers organized and prevent gadgets from shifting around when I open and close the drawers.
I did a few more trips to California for frost work. I was enjoying the ability to commute down there when needed so I could spend the rest of my time working on my home.
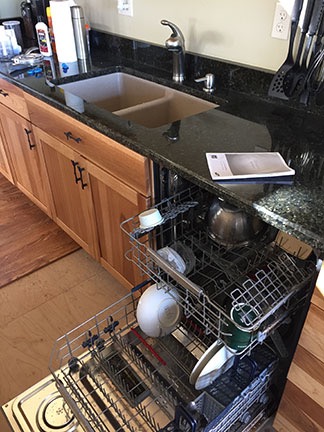
My dishwasher, right after installation.
The plumbers came back at March month-end to finish all the plumbing work. That included hooking up the sink and dishwasher. I celebrated by loading the dishwasher. That night, I slept in my new home for the first time.
I installed my over-cabinet lighting. I’d bought two adhesive LED lighting kits — one for over the cabinets and one for under the cabinets. Since the over-the-cabinet lighting was a straight run, I ran the tape, fastened it down temporarily with masking tape, and plugged it in. It was great indirect lighting. But I put off installing the under cabinet lighting since it would take three separate runs and I hadn’t quite figured out how I’d do it.
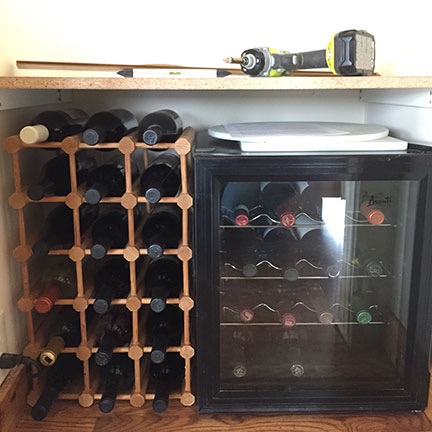
I have my priorities straight; I built my pantry shelving to accommodate my wine fridge.
I built shelves in the pantry out of white Melamine board. (I detest those crappy white wire shelves you can buy in kits.) That gave me plenty of space to store food and countertop appliances. (I’d already decided that this kitchen would not have cluttered countertops.) I’d put an outlet in the pantry specifically for my wine fridge, so I designed the lowest shelf high enough to fit the wine fridge under it. (The wine rack shown beside the fridge in this photo was subsequently moved out of the pantry and into a dedicated “bar” area I set up months later.)
I bought three bar stools designed for countertop height surfaces. Although a lot of my friends had been telling me to buy comfortable stools with cushions and backs, I decided to go with a simpler and cheaper solution until I could find the “right” stools. But after using them for the past eight months, I’ve decided that they are the right stools for me. No need to get super comfortable at the breakfast bar; I have a dining room table and sofa in the same room. These are light, easy to move around, and they stack when I set my Roomba loose to vacuum for me.
I finally finished the floor, although I didn’t even start doing the trim. That’s when I felt ready to share a progress report on my blog. On April 7, I posted my first kitchen video tour.
Here’s what my kitchen looked like on April 7, 2015. I made a video that day to show it off.
After that, it was mostly trim and finish that needed to be done. I worked on it between more trips to California, including one in late April to retrieve my helicopter, and a lot of work I had begun doing outside in my garden and on my deck.
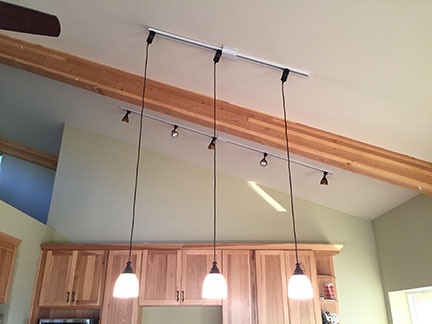
I finally hung the pendant lighting with a friend in mid April.
Another friend helped me hang the three pendant lights over the breakfast bar. I’d hung one with Jim and Cy but had to wait until two more like it were in stock at Home Depot.The trick was getting them lined up when the ceiling they hung from sloped. The job was nearly impossible with one person but relatively quick and easy with two.
I hung a painting by a friend that happened to fit perfectly in the area over my sink. I later replaced it with a very large clock. I also moved the utensil rack I’d hung under one cabinet to the other side of the sink and packed up my canisters for sale on Craig’s List.

These spice shelves fit nicely onto one wall of my pantry.
I added spice shelves to one wall of my pantry so I can keep all my spices handy and organized. I find that it’s a lot easier to put things away when they have a specific place — and a lot easier to find them when you need them. I blogged about some of the organization features I’ve incorporated into my new home.
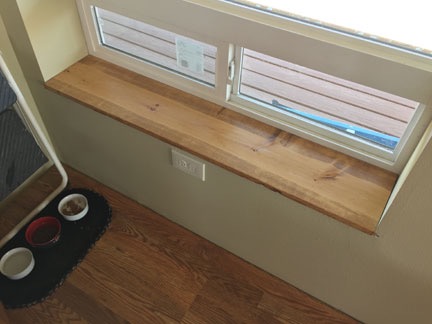
My kitchen windowsill was one of the first I installed.
I installed a windowsill on the kitchen window. That window would see a parade of radios ranging from a small boom box to a big boom box to a small iHome — all of which I already had. (I might not watch much TV, but the radio is nearly always on here.) I’ve recently gotten some cedar planking with bark edges to replace all my windowsills, but I suspect I’ll tackle that huge project in the summer months.

The pantry doorway got a curtain instead of a door.
I trimmed out the doorway for the pantry when I realized that I just wasn’t interested in spending a lot of money on a custom door for its narrow doorway. I used a spring rod and a curtain to close off the area. That was probably the best solution, considering that my wine fridge generated a bit of heat; a door would have turned that space into a warm room. The curtain introduces leaves to the design, which, of course, goes great with the twigs.
I didn’t do much over the summer. I was busy with life and doing things outdoors. The kitchen was nearly done and was in full use. I don’t have any pictures of newly completed tasks — just lots of pictures of food, especially baked goods.
Last week I got back to work on the kitchen. I unpacked the silk plants and baskets I’d had over the cabinets in my Arizona kitchen and put some of them in place over my kitchen cabinets. Although the jury is still out among my Facebook friends, I like the way they add depth to the otherwise empty space up there.
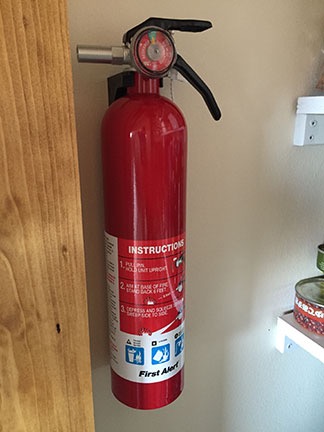
Here’s something I hope I never have to use.
I also bought and installed a good-sized fire extinguisher inside the pantry door. I have one downstairs in the RV garage, but I thought it was a good idea to have one handy in the kitchen, too.
The Finishing Touch
I considered my kitchen “finished” the other day when I finally installed the under-cabinet lighting.
I honestly don’t know why I put it off so long. All I needed to do was figure out how to run the light tape under the cabinets and buy some 20 gauge wire and electrical connectors. Once I had the parts I needed, I had to cut the tape, temporarily put it in place with masking tape, and run that 20 gauge wire between the cabinets. That turned out to be the hardest part; one of the cabinet pairs had a very tight fit. Then I connected everything together, plugged in the power supply, and flipped the switch.
And there was light!
I was glad I’d used masking tape for a temporary mount. I’d placed the light strip on the bottom of the cabinets, facing down. As a result, when they were turned on, they reflected in my absurdly shiny granite countertops. I didn’t want to see those tiny points of light, even as reflections. So I mounted the lights on the bottom trim of the cabinets, facing the wall. Much better.
I then climbed on top of the countertops, dusted off the top of the cabinets, and used the tape’s adhesive backing to permanently secure the over-cabinet lighting to the top of the cabinets. I rearranged the silk plants and baskets, climbed down, and flipped on all the switches to admire my handiwork.
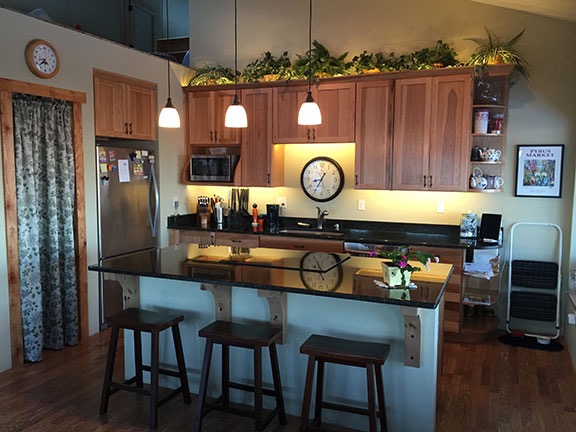
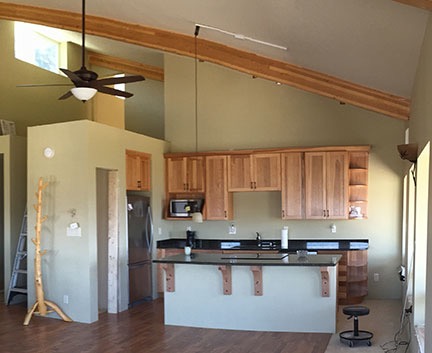
Shot before dawn on a cloudy day, this photo shows my kitchen with all lights turned on. Can you believe how reflective my countertops and stovetop are?
I should mention here that when I wired the kitchen for this lighting, I placed a 2-socket outlet over the top cabinets and wired each outlet to a separate switch beneath the top cabinets. Doing this made it possible to use two separate power supplies and turn on each light string independent of the other. So I could have upper lights on, lower lights on, or both sets of lights on. The power supplies are hidden in plain sight eight feet off the ground, behind the upper cabinet trim and under the silk plants.
I’ll do another video tour one of these days. I actually shot one but didn’t like the way it turned out.
Practical Use: The Verdict
No blog post about a finished kitchen would be complete without a quick summary of how practical it is. Remember, I designed this whole thing, from its size and the placement of walls, to the selection and location of cabinets, appliances, and countertops.
I’m not a kid anymore and I’ve lived in enough homes with kitchens to know what works and what doesn’t work. While many people seem satisfied to hand over kitchen design to an architect or kitchen planner, I wasn’t that interested in their ideas of what would work. So I take full responsibility for everything that’s in my kitchen today.
For the most part, I got it right. The placement of the refrigerator, sink, and stove is in the classic triangle that most kitchen designers recommend. I set up the kitchen so that the left side was for food prep and the right side was for serving. So everything I need to make a meal is on the left and everything I need to serve a meal is on the right. With access around both sides of the island, I can be cooking while a companion sets the table. Or fetches himself a glass and something to drink.
In late June, when I started dating a guy who liked to cook, I was very pleased to see that my kitchen was spacious enough for two without getting in each other’s way. Plenty of room to get past each other behind the island, too.
With counter space right by the open refrigerator door, there’s always someplace to put the items going into or coming out of the refrigerator. The trash is also nearby, making it easy to clean out the fridge when something in there is looking funky.
Dishwasher next to the sink is a no-brainer, of course. I put it on the right side mostly because my dishes are stored on the right side. But it’s also the location of the dishwasher in my last four homes. Maybe that’s standard?
I didn’t get a disposal for the sink and I halfway regret that. I can always add it; there’s a free outlet under the sink just for that purpose. I do a lot of composting and feed salad scraps to my chickens, so I don’t really need it. It does come in handy, however, when rinsing plates after a meal. Like I said, I can always add it later.
Although I thought I’d be using my countertop appliances — think Instant Pot, mixer, food processor, blender, bread machine, ice cream maker, dehydrator, vacuum sealer, toaster — on my main countertop, it turns out that the island countertop makes a much better surface. It’s right next to the pantry where most of these items are stored, so it’s very convenient for the heavier appliances, such as my mixer. Using the appliances there also keeps the rest of my countertop clear for other use, such as staging food to be prepped or stored.
The island has also become the go-to place for meals either alone or with one or two friends. I sit there with my morning coffee and journal, gazing out the window as I plan my day. Friends sit there to keep me company while I cook or clean up after a meal.
So I definitely got the island right, even if it was by accident.
Storage is good, too — although I honestly wish I could have made the pantry larger. I have plenty of room for my pots, pans, plates, utensils, and gadgets. I love the fact that there are no food items in any cabinet — everything edible is either in the refrigerator or the pantry. The pantry can fit all of the food on hand and most — but not all — of my countertop appliances. I store the appliances I use least — my bread machine and ice cream maker — downstairs on shelves in my shop area. I might set up some new shelves just inside the RV garage door for these items — I’m getting an upright freezer next week for that area and shelves beside it might be a good idea to keep these things handy. We’ll see.
So other than wishing the pantry could be larger — which is not possible at this point — and not having a disposal in the sink — which can be added later — I’m very pleased with the way the kitchen turned out. It might be small, but it’s extremely functional and easy to use.
Certainly something to be proud of.
Discover more from An Eclectic Mind
Subscribe to get the latest posts sent to your email.
Dishwasher usually goes on the right, cause most people are right handed.
Does your fridge generate a lot of heat? Being enclosed on five sides?
All in all, this all looks terrific. Definitely personal and definitely practical!
Oh, is that why? Makes sense.
No, the fridge doesn’t generate much heat at all. There’s a good amount of space around it on all sides, so it’s okay.
Thanks very much. I definitely went for practical!
Firstly, congratulations on a good job well done. Seems you did a lot of the wiring yourself. Respect.
The large open-plan layout brings with it choice and a few conundrums too, as wall space is limited and appliances such as ovens (stoves?) become floor standing rather than placed in vertical cabinets, as in smaller apartment kitchens. Stacking has some advantages as backs weaken with age.
The finished project clearly has utility/practicality and that is what a kitchen (the engine room of the house) is all about.
Not sure that the pantry curtain will be useful in the long term though? That is going to be one very well thumbed piece of cloth…..
First, thanks so much! I’m very pleased with it.
I like that idea: the kitchen as the engine room of the house. How true!
The curtain is working out fine so far. I normally leave it halfway open anyway. I’m a bit concerned about heat buildup because of the wine fridge.
I had a wall-mounted oven in my last kitchen and with the microwave sort of built into the wall right above it, it looked great. And it was nice to have it higher off the ground. But you’re right: I do have limited wall space. I wanted to maximize counterspace. So a standard range in the island was my solution.