Not bad, but I’m not ready to buy yet.
I spent part of Sunday afternoon in Sedona, AZ, on top of a red rock with about 270° views of the red rock cliffs around me. I was playing with panoramic photography.

I’d just bought a new tripod head for my camera. I wanted a ball head set up with a swivel base for panoramas. That means compass points marked off for precision panning. I wound up with another Manfrotto, which makes sense because the tripod is Manfrotto, too. It cost about twice what I wanted to spend, but I figured that between it and the tripod head it was “replacing” I’d have all the tripod heads I’d ever need.
Anyway, I was experimenting with panoramas shot with the camera held vertically, in portrait view. Most folks don’t think of doing panoramas that way, but if you want great big finished photos, you need to maximize your pixels. Do the math. My 10 megapixel Nikon D80 shoots photos that are 2592 x 3872. Shoot that vertically, and your panorama becomes nearly 13 inches tall at 300 dpi. That’s 5 inches taller than if the photos are shot in landscape.
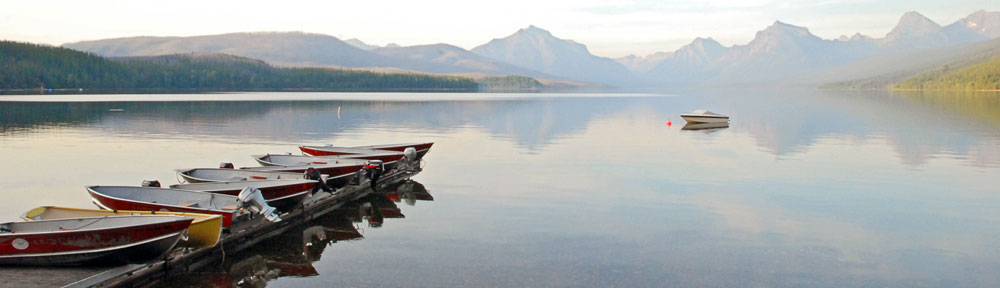
Of course, the drawback is that you need to stitch more photos together to get the final image. Like this one, which is 8 images:

In case you’re curious, the images in this panorama were shot with a 50mm focal length (that’s a 75mm equivalent for standard 35mm film cameras, if that matters anymore). All the shots had the same exposure: f6.3 at 1/160th second. The tripod head was rotated at 15° increments. If you’re looking for a seam, you won’t find one — not even in the full sized image.
This represents my first stitching attempt with Panorama Maker 5, a Mac OS application by ArcSoft. Panorama Maker takes a lot of the guesswork out of creating panoramas by automatically identifying shots taken around the same time (and likely to be part of a panorama) and handling the stitching for you. Just click a photo in its browser and it selects the shots that go with it. Tell it what kind of panorama you want, and let it get to work.
I ran into frustrations with the software immediately. For this particular panorama, even though the software’s browser recognized the images as vertical shots, the stitching component wanted to turn them all sideways before stitching. This would basically attempt to stitch the top of one shot to the bottom of the next. I couldn’t find a way around this — at least at first. But then I just told it to create a vertical panorama. I saved the resulting image and opened it in Photoshop, where I rotated it 90°.
Later I realized that if I used the software to rotate the images 90° and then rotated them back, it properly recognized them for a stitch. Personally, I don’t think that step should be required. I think the software should stitch photos in the same orientation they appear in the browser. Period.
I also tried a 360° panorama. The images were great (if I do say so myself) — 24 shots taken at equal intervals using a tripod with manual exposure settings. The software had a lot of trouble with it. It failed on several attempts and when it finally succeeded, one of the images was shifted way higher than it should have been. I had to manually edit the match points on one shot. That fixed things, but it really did take forever (or almost) on my old 15-inch MacBook Pro, which is what’s with me on this trip. At one point, the fan was screaming. And the resulting QuickTime movie looked like the first effort that it was. (You can click here to download it; didn’t think it worth embedding in this post.)
Panorama Maker is try-before-you-buy software and the folks that make it don’t time-limit it. Instead, they display the usual annoying reminder and limit save size to 1/16 of full size. Perfectly fine for testing purposes. It costs $70 to buy and I’m not 100% sold on it because of the problems discussed here. When I get time — if I ever get time again — I’ll try it on my iMac back at home. I suspect it’ll be a bit quicker and not have to wheeze to get the job done.
If I see any improvements, I’m sure I’ll have more panoramas to show off here.
In the meantime, I’d love to get comments from readers about solutions they’ve found that work on Mac OS.
