A few lessons learned.
Flying M Air is now the proud owner of a gyro-stabilized Moitek video camera mount, which is available to aerial photography clients. Learn more about this mount here.
Those of you who have been following this blog know that I’ve been working on a series of video projects for some time now. The projects were stalled for a number of reasons — raw video that remained uncataloged, miscommunication between me and the video crew, the holidays, and the discovery that much of the video we needed was either not acquired during our October shoot or was of insufficient quality to move forward on the projects.
This whole thing has been a huge learning experience for me in so many ways. And I’m sure that someday, I’ll blog about some of the other lessons I learned the hard way.
Today, however, I want to focus on the lessons I learned about capturing video from a helicopter. This is a long post, but I think it’s worth reading if you have any interest in shooting video from a helicopter without spending a fortune on equipment.
The Camera
Back in December or January, when I’d cataloged about 2/3 of the raw video that had been shot in October, I realized that we needed to “make up” some shots. For reasons I’d prefer not to go into here, I decided that it would probably be better for Mike and I to fly up to the location — Lake Powell near Page, AZ — and get the missing footage ourselves.
 I’d bought a Sony HDR-CX12 Handycam before Christmas in preparation for getting some of the footage we’d need for the projects. At the time, I didn’t expect we’d need to capture so much of it. Had I known, I might have chosen a different camera. But the quality of images from the Handycam is truly amazing — a fact we discovered when we hooked it up to an HD TV with a HDMI cable in January. Holy cow!
I should mention a few things about this camera.
- It’s amazingly small and light. Weighing in at 1 pound, 4 ounces on my postal scale, it’s like holding nothing. My digital SLR with the 16-200 lens it normally wears is a good 3 times the weight.
- It does not have a viewfinder. Instead, you frame your images by looking at a tiny LCD monitor. This might not be the best solution for folks who have trouble focusing on things close to their faces.
- It uses Memory Stick PRO Duo media, which are tiny little cards that go into a slot at the bottom of the camera. I’d bought a bunch of 4GB cards so I could easily archive each card to a single layer DVD. As a result, we could record only 28 minutes of high-definition video — we’re talking 1080i here — on each card.
- Its wide angle view is not very wide. While this eliminates the chance of distortion, it also requires that the subject be far enough away to fit into the camera’s view.
- And have I mentioned that the quality of video shot with this camera is absolutely amazing? It’s equal to or better than much of the footage originally shot on this project using professional camera equipment.
The First [Re]Shoot
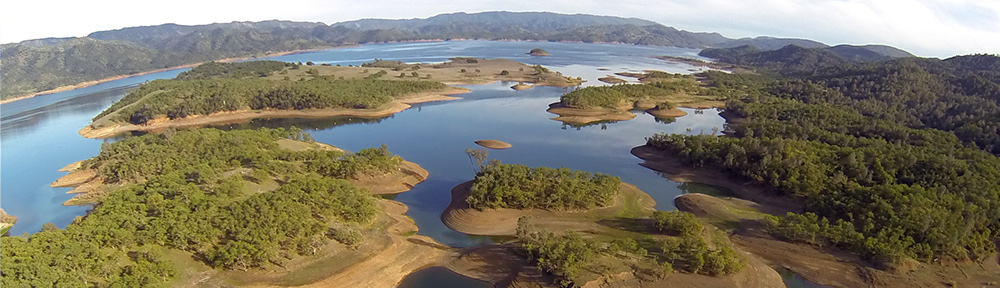
In late January, Mike and I flew up to Page for the day to capture some of the video that had been missed on the original shoot. This included historic Hole in the Rock and a lot of “big view” sequences of the lake. We had other business in Page — I’d bought a hangar there and wanted to give it another inspection since the previous owner left. I also had some business in the terminal building. We made a day trip of it and shot about 20 minutes of raw footage over the lake with another 10 minutes of footage over the Little Colorado River Gorge.
For this shoot we set two options on the camera:
- Part of the original footage we needed to replace was bad because of a focusing issue. The videographer’s camera was unable to lock in focus on certain areas. As a result, every fifth or tenth or twentieth frame of the video was blurry. The net effect of this was what appeared to be camera shake. But a frame-by-frame examination of the video clearly revealed the truth — the camera wasn’t focusing properly. This made video that simply could not be fixed or used. We headed off this potential problem on our camera by switching the camera to “Landscape” mode, which would automatically set focus on distant objects.
- The camera comes with a featured called SteadyShot. The description of it in the camera’s configuration window is “Compensates for camera shake in recording.” This feature is turned on by default. It appeared comparable to the “image stabilization” feature in other camcorders. Since we were flying in a helicopter, which is known for vibrations, I figured that the SteadyShot feature would be helpful to smooth out the video.
We got home and I looked at the footage. To say I was extremely disappointed is an understatement. As you can see in the following representative clip, the SteadyShot feature hadn’t done enough to steady the video. What we’d shot was mostly unusable.
[qt:https://aneclecticmind.com/wp-content/movies/FirstShoot.mov https://aneclecticmind.com/wp-content/movies/FirstShoot-poster.mov 480 286]
The Gyros
Time marches on. The project was going nowhere fast. There were other difficulties that, again, I prefer not to detail here. Things were getting ugly. And a client I’d promised a 4-6 minute video clip from the final video was calling, asking when I’d deliver. I needed to get the project done. I needed to start bringing in some revenue to cover my losses.
 So I did some research on gyro mounts that could stabilize the image and get out the shake. One of my still photography clients several years ago had used a Keynon Labs Gyro Mount. I went to the Kenyon Labs Web site and called them to get some information. It appeared that the KS-4 Gyro Stabilizer might resolve the vibration/shake problem. The unit in a kit that includes power source, charger, and other accessories would cost me $2,000 to buy. I wasn’t interested in making that kind of investment until I knew whether it would do the job. Fortunately, the folks at Kenyon Labs (and their distributors) rent the gyros. I arranged a weekly rental for $200 and timed it so it would arrive midweek. We’d return to Page the following weekend.
The gyro arrived on Tuesday. I was in Phoenix that week and had brought the video camera with me. We tested it one evening by driving around in the car and shooting video out the window. While the gyro did eliminate any vibration, the video was far from steady. We thought it might have something to do with rough roads and the car’s tight suspension. But we weren’t sure.
Discouraged, I decided to try the Handycam/gyro solution from a helicopter. After all, that’s what we’d be shooting from. So I rented an R44 helicopter and pilot for a half-hour test shoot in the Phoenix area. I got back to our Phoenix apartment, plugged in the camera, and had my fears confirmed. The vibration was gone, but a wobbly roll element had been introduced. You can see what I mean in the following sample footage:
[qt:https://aneclecticmind.com/wp-content/movies/PHXTest.mov https://aneclecticmind.com/wp-content/movies/PHXTest-poster.mov 480 286]
This made perfect sense. The gyro stabilized on two axes: pitch (up and down) and yaw (right and left). Roll, the third axis, was not controlled. Since it wasn’t controlled, the camera was more likely to move that way.
If this was the quality of video I could expect, it wasn’t worth the four-hour roundtrip flight from Wickenburg to Page plus the time over the lake to do a reshoot. If I were smart, I’d cut my losses and give up on the idea of us getting the footage we needed.
 But I’m stubborn and not willing to give up so easily. So I went back to the Web and continued researching. I e-mailed Aerial Exposures, a Keynon dealer based in New Jersey who uses their gyros from helicopters in the New York Metro area. The owner of the company, Arnie, very kindly called me back to chat about my problem. He provided a number of suggestions on holding the camera/gyro in flight. He also explained that the best solution would include two gyros on a mount — the second gyro would eliminate the roll movement. Aerial Exposures makes mounts — mostly large ones for use with big cameras in helicopters. His smallest mount, the LSG-2 (shown here), might meet my needs. He also suggested the Micro Gyro Mounts made by Blue Sky Aerials in California, which also sold and rented his mounts. He gave me the phone number for the company owner, Tom, and told me to call him.
 I called and talked to Tom. By this time, it was Thursday morning and we were supposed to head up to Page on Friday afternoon to arrive right around sunset. Tom and I talked about his Micro Gyro Mount HDV KS-4, which used two Kenyon KS-4 gyros. He’d rent me the mount with one gyro and I could use the other gyro I already had with it. That would save me money. Trouble was, Tom was out of town on assignment and wouldn’t be back in his office until that night. But he promised to put the gyro kit on a Southwest Airlines flight first thing in the morning; I could pick it up at Sky Harbor Airport around midday. (I didn’t even know you could do things like that.)
On Friday, I picked up the gyro mount and headed back up to Wickenburg. I had a billion things to do before we’d depart and didn’t even get a chance to open the case until after 4 PM. We pulled the gyro and battery charger from Kenyon out of its case and put it in the case with the Blue Sky Aerials mount. We grabbed some tools, packed up the helicopter, and took off.
It was a good thing we left when we did. It was dark when we got to Page. This isn’t a city kind of dark. It’s a dark kind of dark. Real blackness beyond the town’s lights.
The Second [Re]Shoot
We were in the air the next morning, just after dawn. I’d fly, Mike would shoot. He sat up front beside me. Both our doors were off. It was cold.
The Micro Mount was quite portable, but still heavy with nearly 7 lbs of gyros and camera attached to it. We flew all the way up the lake, stopping at Cal Black Memorial Airport to fuel up and warm up. We shot all kinds of footage we’d missed or covered poorly on the first shoot, including the Defiance House Ruins, Hole in the Rock, the Great Bend in the San Juan River, and the Rincon. It was four hours of flight and we filled all five of the 4 GB memory sticks. We landed at noon, feeling good about the shoot and starving. So we ate first, then went back to the hotel to look at what we’d shot.
It wasn’t pretty. There was still considerable shake in the images. Not a vibration and not really a roll. Just a general unsteadiness.
[qt:https://aneclecticmind.com/wp-content/movies/FirstTrySecondShoot.mov https://aneclecticmind.com/wp-content/movies/FirstTrySecondShoot-poster.mov 480 286]
We were discouraged but still not ready to give up. Mike rigged up a bungee cord system to hang the camera and mount from. This had been suggested by Kenyon, Arnie, and Tom. We had hesitated because we weren’t quite sure how to set this up. But necessity is the mother of invention, so we figured out a way. We did a late afternoon shoot and came back to the hotel to look at what we’d done. It wasn’t much better.
Sunday was forecasting high winds — up to 60 miles per hour — in the afternoon. We had two options: pack it in and head home in the morning or do another shoot in the morning before the winds picked up, relax in the afternoon, and fly home on Monday after another morning shoot. We decided to stick it out. Did I mention we were stubborn?
SteadyShot
Sometime around this time, I started thinking about the SteadyShot feature of the camera. What exactly was it?
Before embarking on this shoot, I’d used my Twitter connections and Sony’s technical support (useless) in an effort to determine whether SteadyShot should be turned on when the camera was attached to a gyro. I never got a definitive answer, but the consensus was that it wouldn’t hurt. I was starting to wonder, though.
I pulled out the manual, which I’d printed (since Sony neglected to do so) and brought along. I put on my cheaters to read the tiny print (I’d printed it 2 pages per sheet to save paper) for the fifth or sixth time:
STEADYSHOT
You can compensate for camera shake (the default setting is [ON]). Set [STEADYSHOT] to [OFF] when using a tripod (optional), then the image becomes natural.
What the hell did that mean? The Sony support person had been unable to explain in a live chat that only proved how well Indian/Pakistani support staff can use macros and scripts. There was no other information in the entire manual — 115 pages of it — about this feature. And an online search of Sony’s support Web site had failed to explain.
What if I turned it off for use with the gyro mount? Tom had suggested trying it both ways. Maybe it was time to take his advice.
I turned SteadyShot off and we hopped into the rental car for a ride. Mike shot video out the window at distant cliffs. We came back to the hotel and looked at the results. The video looked better.
Could this be the answer?
The next morning, we shot some more video with SteadyShot disabled. We used the bungee solution. The light was pretty poor, with thick clouds that sucked the color out of the landscape, so we didn’t get much video. (We were pretty demoralized at this point.) We went back to the hotel to look at it. It looked better, but still not perfect.
We talked about the possibility of it being a smoother flight in the back seat of the helicopter. We resolved to try that the next day.
We took our cameras and tripods down to Lower Antelope Canyon. We spent three hours down there, hiking the whole thing in both directions. Above us, the wind kicked up, sending fine sand down on our heads. I don’t think I’ve ever used my blower or lens brush as many times in a single shoot. We were literally the last people out of the canyon. The Navajos had closed down both Upper and Lower Antelope Canyon due to high wind.
Then we went over to Wahweap Marina. That’s where I shot this telltale footage. I’d turned SteadyShot back on while doing handheld work in Antelope Canyon and had forgotten to turn if off when I put the camera on a tripod. I happened to take a shot of Tower Butte with the camera zoomed all the way in. The wind was howling, blowing at least 30 miles per hour, shaking the tripod ever so gently. Check out the effect on Tower Butte in the sample footage below. Looks like heat rising off the desert in front of the butte, no? It wasn’t.
[qt:https://aneclecticmind.com/wp-content/movies/TowerButte.mov https://aneclecticmind.com/wp-content/movies/TowerButte-poster.mov 480 286]
(I should mention here that the image quality is otherwise inferior for three reasons: image compression for online viewing, full zoom in of camera, and dust storm in progress when shot.)
“Set [STEADYSHOT] to [OFF] when using a tripod (optional), then the image becomes natural.” It now made sense. SteadyShot was doing something weird inside the camera’s software to steady the image. This was introducing wave-like image distortions.
The problem went away as soon as I turned SteadyShot off.
The next day, we went back out for more video. Overnight, there had been slow flurries. Although there was no accumulation in Page, there was a nice dusting uplake on the cliffs and buttes. It made for an interesting contrast. Mike sat in back, behind me as we reshot Hole in the Rock and did a run up the Escalante River for the benefit of my POV.1 “nosecam.” We landed, took a break that included a trip to City Hall and a stop at Starbucks for hot cocoa — it was 0°C in the air and a door was off — and went out for one more shoot. Then we got back to the airport, returned the rental car, packed up the helicopter, and headed home.
We’d flown a total of 12 hours, including ferry time.
That last bit of video was the best of the shoot.
Image Stabilization
Still with me? I know this is a long story, but it does document the entire trial and error process of the shoot. Keep reading. It gets better.
Back home, I found myself with several hours of new video, most of which wasn’t much better than the video I already had. It was time to look into image stabilization.
Yesterday, Mike did a bit of homework for me. He found three possible solutions on the Web, all of which worked with Mac OS (sorry, I don’t do Windows):
- iStabilize by Pixlock was a $60 solution, available as a demo. I downloaded it and thought I’d try it first.
- Apple Shake by Apple was a $499 solution that had a boatload of additional features I might or might not use. The demo movie you can find here is very convincing.
- iMovie ’09 by Apple was software I already had. I had never tried its image stabilization. Frankly, I didn’t think it would be any good. Tom had suggested it, but I thought he was just trying to be nice by suggesting an affordable possibility.
Mike came into my office to ask if I’d tried iMovie yet. I told him I hadn’t. He urged me to do so. We imported a 3-minute clip from my camera archive with image stabilization analysis enabled. The dialog that appeared told us it would take 24 minutes to process.
I spent the time watching a Lynda.com video about the feature so I could see how it worked. When the processing was done, I called Mike back to look at it with me.
The difference was mind-blowing, as you can see in the following video. The original video is in the inset box; the stabilized video is in the main frame. Compare the wobbliness in the inset box to the smoothed out version in the main frame:
[qt:https://aneclecticmind.com/wp-content/movies/StablizationSmall.mov https://aneclecticmind.com/wp-content/movies/StablizationSmall-poster.mov 480 286]
We repeated this exercise for video shot at different times during the weekend. Then video shot on our first [re]shoot. Then video shot around Phoenix in my single-gyro test. All of the video was improved. In many instances, video that had been unusable was now not just usable, but good.
The Final Solution
After all of this trial and error effort, we’ve come up with what we think is the best solution for making high-quality video from a helicopter with high-end consumer camera equipment. (The Sony we used retails for $899.)
- Mount the camera on at least one gyro. A two-gyro solution like the Micro Gyro Mount would be best, but with a $4,200 price tag, it’s hard to swallow. (A single gyro like the KS-4 is still tough to swallow at $2,000.) Renting is a definite option.
- Use a bungee cord attached to the aircraft above the camera and attached to the mount near its center of gravity. This reduces the weight in the cameraman’s hands. The bungee should obviously be the right length to ensure comfort for the cameraman. It should also be firmly affixed to the aircraft and camera so it doesn’t spring loose in flight. (Obviously, the camera and mount should be attached to the cameraman or airframe with some other non-stretching device, in case it’s dropped.)
- Seat the cameraman in the back. There seem to be fewer vibrations back there, at least in an R44 helicopter.
- Turn OFF software stabilization features in the camera. If they’re as crappy as Sony’s SteadyShot feature, they’ll just make the image worse.
- Set the camera to Landscape mode, if available, or manual infinite focus.
- Set the camera to full wide zoom. If you zoom in, you will likely have horrible, shaky footage.
- Shoot at the highest available resolution. This will come in handy later, when stabilizing video in post production.
- Use a neutral density filter on the camera. This generally made for a better image. (I did some testing of this before the shoot. The colors seemed richer with the filter on.)
- Run any video that shows any undesired camera movement — shake, roll, etc. — through image stabilization software after it has been shot.
Obviously, it’s a good idea to practice with your camera setup before the shoot so you’re really familiar with its operations. When you’re spending $450/hour or more for flight time is not the time to be learning. And I shouldn’t have to tell any serious videographer about the importance of light.
Many Thanks
I’d like to end this blog entry with a big thanks to all the folks who helped me come up with this solution:
- Randy and Bobbi at Kenyon Laboratories were extremely helpful and patient on the phone while I tried to decide whether I should rent their gyro.
- Arnie at Aerial Exposures provided lots of insight and encouragement. His solutions are a bit more complex than I need or want, but for serious aerial videographers, they’re definitely worth considering.
- Tom at Blue Sky Aerials provided incredible customer service to ensure that I got the equipment I needed more quickly than I thought possible. He also followed up to see how we were doing during the shoot. I hope to one day be able to justify the purchase of his Micro Gyro Mount, which I think is the best solution for our limited needs.
- The iLife Development Team did an amazing job incorporating image stabilization features into iMovie ’09. For $79, I have a complete video publishing solution that, while not quite up to the task of a major DVD project, can certainly handle my immediate needs. Way to go, Apple!
I’d also like to throw a big, fat, rotten raspberry in the general direction of Sony and it’s technical support department for wasting my time during two different online chat sessions. If the information I needed were available in the manual or online or in the tech support database, I would have gotten better video from the start, probably with just one gyro.
If you learned anything from all this or you have anything to add, I’d appreciate your comments.
And I hope you’ll keep checking in at Flying M Productions; we hope to have our first DVD available soon.
Discover more from An Eclectic Mind
Subscribe to get the latest posts sent to your email.
Interesting read…wish I had known what you were up against, I could have offered some advice to avoid trail and error stuff. Tried the stabilization and gyro thing many years ago in many different forms and the result was always the same–go with the external gyros and turn off whatever stabilization system is built in the camera. We tried many different combinations of mounts, cameras, stabilized lenses, external gyros, etc., and the result was the same…internal “shake eliminators” were worthless. Ended up using Tyler mounts, then chucked that altogether and went with Wescam…then Flir in various incarnations, then Cineflex. That’s another story…
Re: handheld…I did a lot of handheld TV work in the 1980s and preferred the Hughes 500D (five blades, a bit more stable) for hand-held, stay-low and shoot-wide work, along with a custom-built harness built by Thornton Technologies in Carlsbad, CA. No stablization whatsoever, just my harness and my body and some good pilot skills (including one amazing guy who still flies at 80 years old)…Front door off was best, tho I did some seated-on-the-floor back door stuff from the left side when it was critical that the pilot see exactly what I was doing. The 500 is a great mountain machine and absolutely devoid of any creature comforts. Did a network news morning show shoot (mountain flying) in this manner years ago and the New York people were agog..calling and wanting to know what the mount was and who built it. “God built it and you can’t buy it…” was my answer.
Sounds like you have a great project going…I feel your pain, as I’ve been involved in a number of self-financed projects where you try like hell to get the best aerials possible, then feel your stomach grind as the blades turn and you see your dollars leaving your wallet as the ol’ Hobbs meter ticks merrily away…
Hi Maria,
Here is the perfect solution for you. The ATM (advanced travel mount). Low cost and only 16 pounds (30 pounds in the case).
http://www.aerialexposure.com
Take care,
Arnie
I found your article on stabilization so detailed and helpful, I’ll share a tip. I was looking for something to keep my Sony HC-1 camcorder warm in bitter cold conditions. It saves on battery life, and keeps any moving parts from damage. (I ruined a focusing mechanism in zero degree weather once) It’s a fraction of the cost of the jackets you can purchase, and looks real pro…
>
> I picked up two Silicone Grip Pot Mitts by Canopy (each about 7X12″)at that big store that we all must shop at. They are only $4ea, and come with handy pouches (where your hands would normally go) that you can use to put Hothands handwarmers in. I just wrap them around the camcorder somewhat like two burrito shells, and fasten the tops and bottoms together at different points w/ velcro. With the top and bottom openings, you can get at accessory shoes on top (for ext. mics), and the bottom can be somewhat open for mounting camcorder on a tripod. The point is that when using two separate halves, you have flexibility to fasten them around your equipment at different points as needed. Plus, the mits are insulated!
Sam
Sam: Thanks very much for sharing this with us. It’s a great tip and I’m sure anyone who works with cameras or other electronic equipment in cold weather can benefit from it.
THanks a lot for this post – the info was EXTREMELY helpful. I’m a noob, admittedly, to the video world, and with two helicopter shoots coming up, I can’t thank you enough for taking the time to put this info together, along with the footage samples etc.
I’m on a shoestring budget with these shoots, and am quite nervous about spending the dough without knowing for sure what will work and what won’t. It’s doubtful the client will even spring for any kind of gyro – so now I’m down to probably a couple passes, one with and one without the internal stabilization on, just to see what works best (without a gyro). I have a couple thoughts on building something myself to help out, and I think the bungee idea, along with maybe a counterweighted mount, might at least help. I’m not expecting much, but this certainly helped me realize there were some things you could do to help yourself along the way… including the software. That was huge. Thanks again!
@Rob
The software was huge for me, too. I was ready to give up until I ran it though iMovie. iMovie! Who would think a $79 program could make such a huge difference?
The most important thing to remember is to NOT brace the camera against anything in the helicopter that might vibrate — which is basically anything in the helicopter. Your body (hands, arms, etc.) should isolate much of the vibration, but the seat, door frame, etc. will not.
I do need to point out one thing, though: without some kind of stabilization, it’s very doubtful that you’ll get usable clips more than 5 to 10 seconds long — especially if you’re zoomed in at all. The long, sweeping shot as you fly by the target is not likely to become a reality without some sort of external stabilization. That’s why I just bought one of these: http://www.flyingmair.com/aerial-photography/moitek-video-mount/
Good luck!
I have read it all!
Very, very helpful, thank you for wrting it
Darek
Thanks for taking the time to comment. I’m sure most folks don’t have the patience to read through the whole saga, but I think it does help people understand everything I tried that didn’t work — so they know what to expect when they try the same thing.
Hi Maria,
Thanks for taking the time to write this. I can vouch for the advice to use your body to isolate vibration, and to use minimum zoom to help keep the subject in frame. I can also add that tulips or lens protectors seem to only make stabilizing the camera more difficult.
Did you ever try using any sort of brace or SteadyCam type device? I’ve thought about buying an inexpensive shoulder-mounted stabilizer to keep in the office for the guy who, despite all warnings, still shows up hoping to get video with a hand-held SLR.
(Oh, and have you ever posted pics of your nose-cam? Back when I had the VIO, I got some decent video from it mounted on the door frame, but the GoPro and Contour systems don’t work quite as well from that position.)
I have a gyro-stabilized mount now: http://www.flyingmair.com/aerial-photography/moitek-video-mount/ It takes all of the vibration out of the video and prevents unintended movement of the camera. It’s a costly device that I bought to make my aircraft more attractive to aerial videographers.
There are lots of photos and videos from the GoPro nosecam here. Here are a few links:
A Few Aerial Views from Today’s Flight
Departure from DVT Video
Desert Run by Helicopter: 100 feet @ 100 knots
Drying Cherries
Lake Powell to Monument Valley by Helicopter
I just got a RAM mount that I should be able to use to mount a GoPro to a skid. Hope to experiment with that later this month.
Hi Maria,
I’m a professional aerial photographer and do about 75% of my work from R44’s. I’m very interested in learning more about how you mount your GoPros on the nose (outside). I appreciate your reluctance to show photos or discuss online but would really like to be able explore this further. Just a few hints on mounts (RAM??) and safety measures you take would really be appreciated.
Thanks, and great blog, BTW :)
ST
RAM makes a lot of good mounts. The GoPro tripod mount adapter is key. Tape and plastic wire ties are also very important. I’ve been fiddling with camera mounts for about three years now and have finally figured out satisfactory setups in five different locations in/on my helicopter. Again, I prefer not to share details.
It’s really up to your pilot to make camera mounting decisions, especially if they’re on the exterior of the helicopter or anywhere near the flight controls. There’s no consensus on the legal (per FAA) aspects of exterior mounts that aren’t STCed. I don’t know any smart pilot who would allow a client to mount anything on the outside of the helicopter without extensive testing (in solo flight) first.
Good luck.