Helicopter Flight to Crescent Bar

A video from the FlyingMAir YouTube channel.

Join me and Penny the Tiny Dog for a flight from our cherry season base in Malaga, WA to an orchard at Crescent Bar in Quincy, WA. I’ll fly you down the river and tell you a little about what we’re flying over and past while also telling you a little about helicopter operations.

Before you ask, the blue rag over my iPad keeps the sun off it so it doesn’t overheat. (I usually use a yellow rag, which works better because it’s a lighter color.) If you ask in the comments, I’ll tell you to read this description and then you’ll feel silly. Just saying.

Answering more questions:
– This is NOT a video game. If you think it is, it’s time to shut off your gaming platform and go outside. You might need sunglasses; it could be bright out during the day. Real life is cooler than video games if you work a little to make it that way.
– The helicopter is a Robinson R44 Raven II — the same one that appears in the photo at the beginning of the video. You can learn more about them here: https://robinsonheli.com/r44-specific… I own this helicopter. It is the third one I’ve owned since 2000.
– I have been flying for about 20 years. My nearly 4,000 hours of flight time is in R44, R22, Bell 206L (Long Ranger), and Bell 47 helicopters.
– The video was recorded with a pair of GoPro cameras, one of which is connected to the helicopter’s intercom system. Both cameras record audio, but I dialed down the helicopter sound to about 25% of normal volume so it wouldn’t be annoying. I wouldn’t mind leaving it out altogether, but lots of folks seem to want it, so there it is.
– The intro music is by Bob Levitus, famed Macintosh book author. By this point, he may have written more books than me. I should ask him.
– Penny the Tiny Dog weighs 7 pounds and flies with me quite often.

My helicopter has ADS-B Out and is picked up by radar facilities. You can see my track for recent flights on Flightradar24:
https://www.flightradar24.com/data/aircraft/n7534d
This is a great site for tracking any almost any flight, including the airlines.

I’m trying to drop flying videos like this one every Sunday morning and usually drop “extras” with more info about owning and operating a helicopter midweek. Subscribe so you don’t miss anything new! And tell your friends. The more subscribers I have, the more motivated I am to keep producing videos like this one.

Snowbirding 2019: At the Backwaters Campsite

Vacation on the Colorado River.

Posts in this series:
The Long Drive
At the Backwaters Campsite
In Mesa and Gilbert
A Quick Stop in Wickenburg and Forepaugh
Off Plomosa Road
• Camping at the Big RV Show
• A Trip to Organ Pipe with the WINs
The Tucson Gem & Mineral Shows
Wickenburg Gold Rush Days
• Constellation Park Interlude
• White Tank Mountain Park
Bumming It in Phoenix and Apache Junction
A Dose of Civilization
Return to the Backwaters

After my long drive south from home, I settled in for a two week stay at my favorite campsite along the Colorado River backwaters. This is south of Ehrenberg, just off a maintained gravel road on BLM land.

BLM, in case you’re wondering, stood for Bureau of Land Management long before it stood for Black Lives Matter. BLM land is federal land and there’s a ton of it in the southwest. It pretty much surrounds the Quartzsite area and stretches all the way to the river. Because you can camp in any one spot for up to 14 days for free on most BLM land, it’s a haven for snowbirds in self-contained campers. In fact, the availability of BLM land all around Quartzsite is probably what makes Quartzsite the January snowbird destination it has become.

Colorado River Sunset
Mother Nature treated me to a nice sunset the day I arrived at camp. Here’s the view from the levee road about 200 yards from my campsite that evening. That’s some California farmland south of Blythe on the other side of the river.

A Little about My Little Rig

These days, I travel with a Lance slide in truck camper. That’s the kind of camper that sits in the bed of a pickup truck. Although not as spacious as the original one I bought years ago to replace my 36-foot fifth wheel with four slides — that huge setup, which became my home for nearly two years, was overkill for one person and a tiny dog — it has everything I need: kitchen with sink, stove, oven, microwave, and refrigerator; bathroom with toilet, sink, shower, and medicine cabinet; queen bed (it came with twins but I replaced them); dining table that can seat three; heat (which runs on propane and DC power) and air conditioning (which requires AC power), and plenty of inside storage. Lance is one of the premier brands of this kind of camper and it really shows. It’s well designed and very comfortable. Best of all, because it’s small I can take it nearly anywhere and I can still tow something behind me. (Last year, I brought my boat along.)

My rig is self-contained — with limits, of course. Its three tanks — fresh water (what comes out of the taps), gray water (sink and shower waste), and black water (toilet waste) — hold 30 gallons each, which may not seem like a lot, but with just one person to utilize them, it’s not bad. Fresh water is the limiting factor here and I carry two empty 6-1/2 gallon jugs so I can haul water back to my rig and refill the tank when supplies get low. Of the two waste water tanks, only the gray water tank can be dumped without harming the environment; I use bio degradable soaps and have a hose to direct water into thirsty desert greenery. I don’t do that unless I absolutely must. The longest I’d ever gone without dumping the black water tank was 10 days, so this stay would (hopefully) create a new record at 14. And no, in answer to a question by others who wonder, the toilet tank does not stink. I use some eco-friendly chemicals in the tank and have been pleasantly pleased by the complete lack of smell, perfume or otherwise.

For power, I’ve got two deep cycle batteries and 200 watts of solar panels on the roof to charge them. A solar controller tells me how much power is going in when the sun is out and what the current battery voltage and charge percentage are. I’ve seen incoming power reach 5.4 amps — without even being pointed toward the sun. On a typical Arizona cloudless day, the battery percentage will go from a pre-dawn low of 40% to 50% — mostly because I run my forced hot air heater at night — to 90% by noon. (It won’t read 100% for reasons I still don’t quite understand.) If the weather is cloudy, which does happen even in the desert, and I can’t get enough power into the batteries with the solar panels, I have a 2KW Honda generator I can run for a while to charge everything up. I generally don’t use AC-powered appliances like the microwave or a coffee maker but I admit that when the generator is running, I might take advantage of its AC power to reheat leftovers in the microwave.

For Internet, I’m at the mercy of my provider and location. I’ve been a Verizon subscriber for more than 20 years now and that’s mostly because it really does have the best network coverage. Even so, I’ve been in more than a few locations where coverage is poor or non-existent. When I camp, I like to get away. And honestly, do we really need Internet access 24/7/365?

My Camping Companion

This year I was joined at the river again by my friend Janet, an artist that lives mostly in Colorado. We’ve been friends for about 20 years now and that’s at least as long as she and her significant other, Steve, have been going to Quartzsite in January to show and sell her artwork. I’ve been camping out on the river with Janet (and often others) since my first snowbirding trip south in 2015, when I hauled my old fifth wheel down for the last time and killed my old truck doing it. Although she and Steve live in a fifth wheel (remarkably like my old one) year-round, she has a much smaller pull trailer she uses at shows and that’s what she brings to the river to camp in. Last year she and I camped a bit farther down the road.

I arrived on Thursday afternoon; Janet came in on Friday. She arrived in a new (to her) used truck that had a van front and a box back. It was called Wild Blue because it was blue and had previously belonged to the air force. This was an upgrade from her old van, which was getting “tired” after a long life on the road. In the future, she and Steve would configure the back with shelving to secure and store her art show booth panels and artwork. But for now, it was mostly empty, holding her kayak and some of her art supplies. Like me, she planned to work on this vacation.

Janet had Lulu, her geriatric pug along with her. Lulu is nearly blind and deaf and needs to be carried up and down stairs and placed in appropriate places to sleep or do her business. Assisted living. But she has a good appetite and doesn’t seem to be in pain. She definitely communicates when she’s hungry. I was pretty surprised to see her; I thought she might have died by now. Now she’s thinner and frailer, but still wearing that pink hoodie on cold desert mornings.

I’d been sick all day when they arrived — I’m pretty sure it’s something I ate in Vegas on Wednesday night. (I like to think it wasn’t the oysters because they were the best part of the meal.) I’d been dozing all day on the bed with no appetite and nausea that I was barely able to keep under control with Sea Bands (pressure point nausea prevention that usually works like a charm for me). So when she arrived, she found the campsite pretty much the way it was when I arrived the afternoon before: camper and truck parked separately but nothing else done. It was a good thing she didn’t need my help setting up because I was pretty much useless. In fact, I was so out of it that I went to bed before it got dark, leaving her alone by the campfire she’d built.

The Shop Tent

After sleeping about 10 hours, I was 80% recovered. By noon I was 90%. By Sunday, I was back to normal. But in the meantime, I needed to finish setting up my camp so I had room to live inside my stuffed camper.

You see, the only major drawback I had on this trip was the amount of stuff I had to bring with me to show and sell my jewelry at the two shows I was scheduled to attend. That included a 10×10 foot tent shelter with all its canvas, three folding tables, a tall director’s chair, table cloths, easels, all the jewelry and cabochons I put on display, selling supplies, and the tools and materials I need to create more jewelry. I’d also decided to practice my soldering skills so I brought most of my soldering equipment. Although I would have loved to bring my CabKing cabochon maker, I had a hard enough time squeezing the above listed gear and my additional camping equipment — generator, water jugs, bicycle, etc. — into my camper and truck. Living with this stuff inside my rig was not an option, but I had a solution: I’d put up the tent shelter and set it up as a shop.

Stowed Tables
When it came time to packing my gear, I got creative. Here are three folding tables and three cases of cabochons secured at the foot of my bed. These didn’t really get in my way during the trip and could have stayed here.

I should also mention here that last year I bought a custom canvas setup for the space under the sleeping area of the camper, so when it’s off the truck, I can put on the canvas and create a sort of garage. I’d set that up for my bicycle and generator and other stuff.

So that’s what I did on the Saturday after my arrival. Janet helped me with the tent — the damn thing is tough for one person to assemble alone. I staked it down, put on the sides, and even spread a mat on the floor inside. Then I moved the tables out from where they had been secured against the wall inside the camper at the foot of my bed and the chair from the back of the truck. Little by little, I brought out everything I could, freeing up valuable living space inside and making my truck usable for transportation by two people and two dogs. (I wish I’d taken a photo, but I don’t seem to have any pictures of our campsite at all.)

Turkey Tail Fan
One of Janet’s tasks was to remove feathers from a wild turkey’s tail fan. I shot a narrated video of her that we put on YouTube.

Meanwhile, Janet set up a little shop just outside Wild Blue. There was no wind and the weather was perfect in the sun — a good thing because she was working with feathers. For the next few days, she’d work on a new project there while I tried to practice soldering in my tent.

Sunrise
Mother Nature also served up some pretty dramatic sunrises. Here’s one from my camper’s back door early during our stay.

Recreation

Of course, it wasn’t all work for us. In fact, it was very little work for us. We spent a lot of our time just taking it easy.

Kayak Bag and Dog
I got Penny to pose atop my Hobie kayak bag to give some sense of the size of the bag. Although it’s big and rather unwieldy, it has wheels and handles that make it easy to move around. The whole kayak, including seat, pedal drive, paddle, and pump fits in this bag.

After camp was set up, I pulled out my new kayak and pumped it up, thrilled to see that it required very little pumping to get it up to the right pressure. We brought our kayaks down to the backwater and launched them. I struggled a tiny bit getting the pedal drive in place and secured and then gave it a workout. I realized that although I could also paddle, the high seat position I’d chosen made it difficult to do so without getting wet. I’d lower the seat the next time I assembled it. We’d go out a few times over the next two weeks. Janet likes to fish and although I do, too, I don’t like it nearly as much as she does. So while she fished, I pedaled around. The backwater is about a mile long — very quiet with calm water, ducks, and herons — and makes a perfect place to explore.

Penny on the Boat
One of the days we went paddling, the conditions were perfect for some nice reflection photos. This shot would have been better if I hadn’t been shooting through a plastic bag.

Janet Kayaking
Here’s Janet in the kayak with Dually. Dually absolutely loves to go boating and, remarkably, can stay balanced on the kayak.

We went on a power walk most mornings. Sometimes we took a short route that was about a mile and a half. Other times we took a longer route that was more than two and a half miles, much of it in sand. Penny ran all over the desert, following the scent of rabbits we never saw, and snooping into burrow holes. After Christmas, we also had Dually, Janet and Steve’s big dog. When he could, Dually would get a drink out of the backwater channel, wading in up to his chest sometimes.

We ran errands in Ehrenberg — post office, water, etc. There’s a shop there that caters to off-the-grid campers; for $1 I could fill both of my water jugs. We refilled our propane tanks — I’m not shy about using my heater or water heater and went though 10 gallons of propane in two weeks.

Trump Shop
Yes, there’s at least one Trump Shop booth in Quartzsite this year. I find it hilarious that Trump supporters have managed to cash in on the popularity of the con man in the White House.

We went into Quartzsite a few times. The shows were just setting up before Christmas and were almost fully set up by New Year’s Day. We always need a few tool-like things for camp and we know just where to get them. There’s a discount grocery store we visit, too. I think one of the challenges for me is to outfit my camper and camp as frugally as possible. If you know where to go in Quartzsite, it’s easy enough to do.

Every night we’d share a meal together which was usually a joint effort with food from Janet’s place and food from mine. For the first time ever, we both seemed to have brought along enough food that shopping expeditions were unnecessary. We had a campfire most nights and, on occasion, we’d use its hot coals to roast sweet potatoes or even potatoes from my garden — I brought whatever I had left — for dinner that night or snacking the next. (There’s nothing quite like sweet potatoes roasted in foil on a campfire.)

Campfire with Potatoes
One night we roasted two regular potatoes to go with our steak dinner and one sweet potato for me to snack on the next day.

The Christmas Break

Nopalitos
A typical breakfast for me consists of a breakfast meat sautéed with veggies and topped with one or two eggs. After my trip to Blythe, I could include chopped nopalitos — prepared prickly pear cactus pads — in my veggie mix.

Steve came just before Christmas and he and Janet left with both of their dogs to visit Steve’s family in California. I had the campsite to myself during that time. (I blogged about my quiet Christmas in the end of this blog post.) While they were gone, I went grocery shopping in Blythe, right across the river in California, where I picked up nopalitos that I often mix in with the other veggies in my breakfast scramble. I also went on a bead buying expedition in Quartzsite. As a jewelry reseller with all the necessary paperwork, I was able to get wholesale prices without having to pay sales tax. That’s a huge savings given Quartzsite’s outrageous 10% sales tax. I don’t use a lot of beads in my work, so I bought enough to last a year.

It’s around then that the wind kicked up just enough to put a thin layer of dust all over everything in my shop tent. It took me a while to realize why I was having trouble keeping my hands clean and why the polishing wheels I used on the rings and bracelets I made were turning black. When I noticed that I was hammering dirt into the silver I shaped for a new design of earrings, I gave up in frustration. The shop tent was not working out — at least not there.

Earrings
A new earring design requires me to hammer lengths of heavy gauge wire flat. The conditions in my tent shop were too dusty for me to make more than a few pairs.

Dreams of a Cargo Trailer Shop

Heirloom Rosary
I made this rosary from carnelian and obsidian beads, sterling silver cross and medal, and a lot of fine silver wire. It took a long time — each bead is separately attached in its own segment — but I’m very pleased at how it turned out.

When Janet returned and moved her workspace into the back of Wild Blue, pointed into the wind so she was sheltered even with the back doors wide open, I joined her for work on a new project: an heirloom rosary in sterling and fine silver with carnelian and obsidian beads. It was nice sitting in the sun, sheltered from the wind and dust. I started thinking about a cargo trailer I could set up as a mobile shop.

This wasn’t the first time I’d had that idea. Twice over the past six months I’d considered buying a cargo trailer to bring south with me. I’d even priced up new ones at a trailer place in Moses Lake near where I live. But I have a lot of stuff and did I really want more? No.

But I was started to think that I needed it. Not only would it give me a good place to work while I was traveling every winter, but it would reduce the amount of stuff I had to load into the truck and camper when I broke camp and moved to my next spot. So I did something my friend Bob would be proud of: I started searching Craig’s List. I found a few good candidates in the Phoenix area that I could check out on the next leg of my trip.

Time to Move On

The two weeks on the river went quickly, as it always does. My first show, the annual Flagg Gem and Mineral Show, was in Mesa, AZ with setup on Thursday, January 3. I’d be spending that whole weekend with some friends in nearby Gilbert.

Camper Roof
The roof of my camper with the kayak (left) and tent frame (right)fastened to the roof rack. Getting them up and down on my own was not an option.

I started getting things together on Tuesday and did most of my packing — including taking the shop tent down — on Wednesday. A friend came by to visit and I enlisted his help getting the tent frame up onto the roof of the camper so I wouldn’t have to put it in the back seat area of the truck. Janet helped me get the kayak, now back in its bag, on the roof. Janet broke camp, too, although I don’t think she had nearly as much stuff outside her camper and truck as I did.

On Thursday morning, we hooked up our rigs. I pulled out first; I needed to check for mail again and wanted to top off my water tank. We met later on at RV Pit Stop in Quartzsite where we dumped our tanks and I refilled a propane bottle. Then we met up again in the big parking lot behind Tyson Wells.

Although the rock show hadn’t officially started yet, about 80% of the vendors were set up and open. The vendor I’d been waiting for was there and I told Janet to go on without me as I spent about an hour browsing cabochons. This particular vendor sells certain stones that I use a lot of at a good price. I planned to stock up for all of 2019. I wound up buying 32 of them and will likely go back for more before the end of January.

By that time, it was 1 PM and I had a 2-1/2 hour drive ahead of me. We parted ways and I headed out of town, stopping only long enough to buy a very messy burger from a vendor nearby. My hands smelled like fried onions for the whole drive.

Bluehost Domain Deactivated Scam

Another day, another phishing attempt.

This morning, I got an email like this for three of the domains I host at Bluehost.

Bluehost Scam
I found one of these in my email inbox for three of my domain names this morning. I added the red underline; I explain why below.

Here’s the text, in case you can’t read it:

MARIA LANGER

Your web hosting account for flyingmair.com has been deactivated (reason: site causing performance problems).
Although your web site has been disabled, your data may still be available for
up to 15 days, after which it will be deleted.

If you feel this deactivation is in error, please contact customer support via:
http://my.bluehost.com.[redacted].piknini.org/account/8236/reactivation.html

Thank you,
BlueHost.Com Support
http://www.bluehost.com
For support go to http://helpdesk.bluehost.com/
Toll-Free: (888) 401-4678

I have to say that it looked very real. Simple, to the point. From “admin@bluehost.com”. All the links I pointed to actually went to where they said they were.

What really made me almost believe they were real was the fact that I’d made some changes to my domain setup a few weeks ago to lower my hosting costs with a slight hit to performance (which I hoped to be able to minimize with a new cache plugin). So the fact that performance might be causing issues just happened to make sense in my world.

Except, not for the domains it reported: flyingmair.com, flyingmproductions.com, and gilesrd.com. You see, none of those sites get any significant traffic. The only one of my sites that does get significant traffic is the one you’re reading this on right now, and I didn’t get an email message for it.

And then I took a closer look at the link I was supposed to click to resolve the issue. It started off fine: http://my.bluehost.com. But instead of a slash (/) after the domain, there was a dot and an alphanumeric string followed by the real domain I’d be going to if I clicked.

I switched to my browser and manually typed in www.flyingmair.com. The site came right up. It sure didn’t look deactivated to me.

I went up to my loft-based office where I could look at the email on a real computer (rather than an iOS device). I didn’t learn anything new, but by this time I was convinced it was another scam.

It bothered me that I’d almost been fooled. I called Bluehost and was told that they were already aware of the problem. Jeez. You think they’d send out an email warning us about it.

In any case, what I’ve always said about these things still applies: never click a link in an email message you were not expecting. If you think there’s any truth to a reported problem like this, manually type in the domain name of the site you can use to check — in this case, bluehost.com — and log in the usual way to follow up. Or just use the tech support number you should already have on hand to get more information.

Don’t get scammed.

And, for the record, I’d much rather blog about the things going on in my life that aren’t related to someone trying to rip me off than crap like this.

First Tries at Bottle Slumping

Yes, I’m firing up the kiln again.

Years ago, in the autumn of 2014, when my building was first built but my home inside it was barely started, I took up yet another hobby to keep me busy while I waited for my wasband to get his head out of his ass and pay me what he owed me from our divorce settlement. That’s when I started doing “warm glass” work — specifically, making things like Christmas tree ornaments and jewelry with melted down, repurposed wine bottle glass.

Some Backstory

Star Ornament
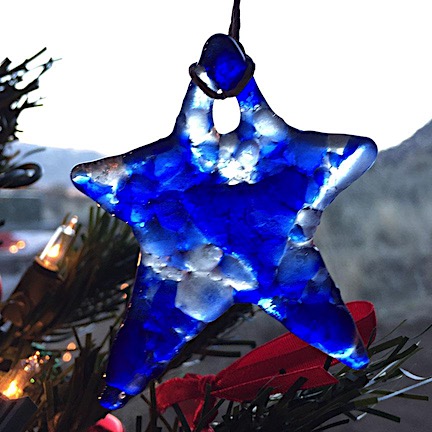
Here is one of the Christmas tree ornaments I created from broken bottle glass in my tabletop kiln back in December 2014. The blue glass is from a sake bottle.

I bought a tiny desktop kiln and tinier molds to fit inside it. I then acquired countless used wine bottles from the wineries in the area, broke them into tiny pieces, and melted down the pieces in the molds. Some of the resulting items — especially the Christmas tree ornaments — came out rather nice. But beyond that, I was disappointed, mostly because of problems with devitrification. Simply described, the rough edges of the broken glass, when melted down, prevented the final product from having a smooth, shiny surface.

I did all kinds of experiments to get rid of the unsightly marks and finally concluded that they’d have to be polished out. I bought a lap grinder as a sort of universal polishing tool — I was also trying to turn wine bottles into drinking glasses and needed to polish the rims — but it never worked the way I needed it to. I got discouraged and, as I usually do, set it aside and picked up another project to keep me busy. In this case, it was wiring my entire home prior to professional installation of plumbing, insulation, and drywall.

That took me through the winter and into the spring of 2015. I moved into my home and continued working on projects there: finishing my deck, trimming out the doors and windows, finishing up the loft. With flying work and an active social life, I didn’t have much time for playing with broken bottles and a kiln, especially since the results were so frustrating. Yet sometime around then, I bought a bigger kiln. I think I was considering larger glass projects, but don’t remember. The kiln arrived, I assembled it on a wheeled platform I built for it so it would be easy to move around my shop, and I promptly forgot about it.

Last autumn, before departing for my winter trip south, I finally got around to trying out the “new” kiln. I was able to set up several molds inside it. It took a few tries to get the firing schedule right and when I did, I was satisfied with the glass fusing of the items I put into the molds. But I hadn’t licked the devitrification problem, so I wondered why I was even bothering.

Of course, devitrification would not be an issue if I purchased glass specifically made for fusing in a kiln. It was available online from a variety of sellers and would make beautiful pieces. But that wasn’t my goal. My goal was to take garbage — wine bottles — and turn it into something desirable. And I was failing — at least to make pieces up to my own standards which, admittedly, are sometimes a bit too high to achieve.

The Jewelry Connection

Turquoise Pendant
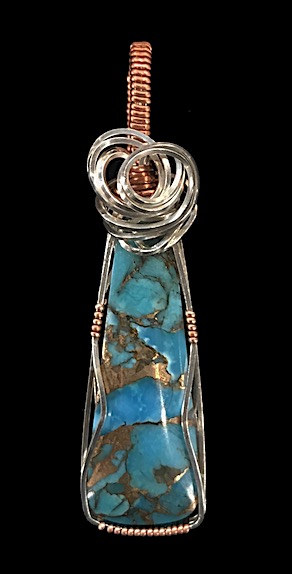
Kingman turquoise with bronze wrapped in sterling silver and copper. I made and sold this pendant last Friday.

In January, I took up wire-wrapping gemstones to make pendants and earrings (so far). I developed a real knack for this and quickly developed my own style. I’ve sold a few dozen pieces so far and haven’t gotten bored with it yet. I think it’s because of the variety of stones and the new techniques I can experiment with. And having people praise me for my work — and actually pay me to own a piece — is a real motivator.

I occasionally set up a vendor table at Pybus Public Market on Fridays or Saturdays. (Last Friday I sold five pieces, including one that I’d just made less than an hour before.) One of the other vendors does art glass work. She uses the kind of glass she buys specifically for fusing and turns out some wonderful bowls and plates and other items. I asked her if she ever makes cabochons — after all, why not wrap a “stone” made of glass? She said she could but even after prodding her a few times, she hasn’t delivered any. I told her about my kiln and how it was nearly brand new and hardly used. She said she might have a friend interested in buying it.

I’ve been shedding a lot of the things I’ve owned for years that I lugged to Washington when I moved. I had too many things taking up space in my garage that I knew, deep down inside, I’d never use. The microwave from my old house was the first to go. An old Sony television, still in its box, went next. Both of those went for free. But I also sold my old desk, curtain rods, luggage, and all kinds of household items I packed from September 2012 to May 2013 while I was waiting for the court date for my divorce. (Honestly, if my wasband hadn’t delayed the court date, I would have had less time to pack and would have left a ton of stuff behind.) My telescope and a set of cast iron cookware were the most recent things to go and they each brought in a surprising amount of money. Maybe it was time to sell the “new” kiln.

Or maybe not. There was still one other thing I wanted to try: bottle slumping.

Bottle Slumping 101

I’ve been to a lot of arts and crafts shows. My good friend Janet is an artist and I’ve visited her at many of the shows where she sells her work. One of the craft items that occasionally appears at these shows is wine bottles that have been flattened in a kiln to make a plate. The technique is referred to as bottle slumping.

While my original kiln is too tiny to slump anything bigger than a shot glass, my new kiln can handle a standard sized wine bottle if I place it diagonally across the floor of the kiln. Yes, that means I can only do one at a time, but it was still worth a try. The way I saw it, if I didn’t use the damn kiln, I should sell it. I needed a reason to keep it. Making something desirable out of garbage was my goal. I still had literally hundreds of wine bottles to work with. (I had actually started disposing them in my recycle bin at the rate of 3 cases every two weeks but with 12 cases gone, I’d barely made a dent in what I had accumulated. When you have a lot of storage space, you find a way to fill it.)

I did research online. Using a kiln isn’t as easy as just turning it on and waiting for it to finish. You have to find and program in an appropriate firing schedule. Schedules vary based on what you’re trying to achieve, what kiln you’re using, and what kind of glass you put in it. So right from the get-go, I knew I’d be doing a lot of experiments.

I should also mention here that there are two ways to slump bottles: with and without a mold. I didn’t have a bottle slumping mold so, by necessity, I’d have to slump without one. That got me worried about glass sticking to the bottom of my kiln. I had Thin Fire paper — it’s a thin sheet of paper that turns to a white powder in the firing process and prevents melted glass from sticking to whatever is under it — but I didn’t know how much the glass would melt and whether it would get into the corners of my kiln. Still, I was ready to give it a go.

First Try

In case you’re wondering, here’s the first schedule I tried:

SegRampTempHold
1500°1100°10 min
2250°1300°0 min
3300°1425°10 min

Let cool naturally.

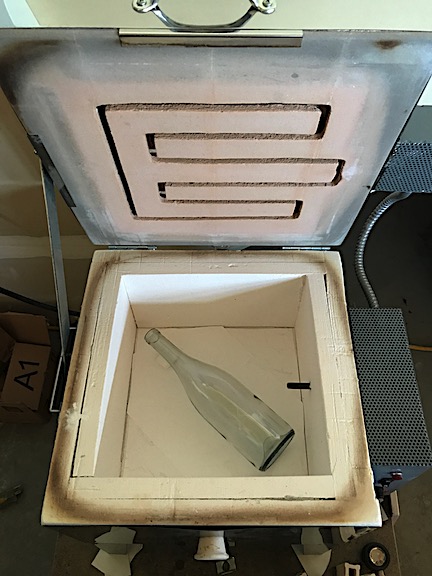
So the other day, I programmed in a simple three-segment schedule, leveled the kiln — I use it in my car garage, which is gently sloped toward the door — put a bottle in there, closed the lid, and started it up.

The other thing many folks don’t realize about using a kiln is that it isn’t fast. The schedule I used would ramp up the temperature from my garage temperature to 1420°F over a matter of hours. Cooling would take even longer. I had dinner guests that night and the kiln was still too hot to open before they arrived at 5 PM. Although it might have been ready before I went to bed at 10 PM, I’d forgotten about it. But I remembered in the morning and went down to check it.

And I was pleasantly surprised with the results.

The bottle had melted nearly flat right in place, without seeping into the corners of the kiln. I say “nearly” flat because the bottle’s bottom, which is thicker than the rest of the bottle, had sort of collapsed and folded to make a lump. Although the neck of the bottle had collapsed, there were two air pockets inside. And when I washed the kiln paper power off the bottle, some water got inside along the neck.

The side that had rested on the floor of the kiln would be the top of the plate. It was flat with the texture of the bottom of the kiln, which I rather liked. When I set it on the countertop that way, however, the bulge at the bottom of the bottle lifted that end up, resulting in a plate that wasn’t level.

First Try Bottle Slumping
Here’s my first try. You can clearly see the big air pockets inside the bottle.

So I had three problems to resolve in my next test: get the air pockets out, close up the neck better, and come up with a way to level the resulting plate.

Second Try

I tackled the first two problems first and managed to resolve one of them. I decided that the reason there were air pockets and that the neck allowed water to get in was that I hadn’t melted the glass enough. I’d try again, but this time raise the highest temperature to 1450.

I reprogrammed the kiln, set another clean bottle in there, and got it started.

I do need to mention here that when I say “clean bottle” I mean completely clean and dry glass bottle, inside and out. I had to remove the labels by soaking in hot water for more than an hour, scrape away adhesive residue, and then use 90% rubbing alcohol to get the last little bits of glue off. Then I used hot water and a lot of agitation to rinse the inside of the bottle at least four times. Then I had to stand the bottle up on its neck in a place where the water would drain out and the bottle would eventually dry. This prep work is, quite frankly, a pain in the ass. But I do them two or three at a time so there’s always another bottle ready to slump.

I went about my day, running errands and doing chores around the house.

The schedule took another few hours to run and hours to cool. Finally, by mid afternoon the kiln was down to 200°. I opened it up but wasn’t foolish enough to touch the bottle, which would also be 200°. I did get a good look at it, though and it looked better. One of the air pockets was gone and the neck was nicely closed up, but there was still an air pocket right below the neck.

Second Try Slump
This is my second try. The neck had closed up nicely, but there’s still a good sized air bubble right below the neck. You’re looking at the flat side of the bottle.

When the kiln temperature got down to 90°F, I touched the bottle and found it cool enough to remove. It was better than the first one, but not quite “perfect” yet.

Third Try

Bottle in Kiln
Here’s the third try bottle inside the kiln. Note the tiny piece of shelf leg positioned under the neck. It’s unfortunate that I can only do one bottle at a time; once I get the schedule perfected, it would be nice to do two at a time.

In the meantime, I’d called the art glass lady from Pybus to get some advice. What I really wanted to know is whether I had to keep using the kiln paper or whether I could just use kiln wash at the bottom of my kiln. I would quickly run out of kiln paper if I used a fresh sheet for each firing and it isn’t something I can buy locally. She told me she uses the same stuff I was using and recommended it. She offered to sell me some, but I didn’t want to bother her with that. I also told her what I was doing and mentioned the air bubbles. She suggested ramping up at a slower rate and holding it longer at the 1300° temperature.

So I grabbed another bottle — which happened to be a slightly different style — and stuck it in the kiln. At this point, I’d also decided to try propping up the neck of the bottle so that when it slumped, it would make a raised edge that would (hopefully) balance out the folded ridge of the bottle bottom. The trick was finding something to prop it up on. You can’t use just anything when you’re heating it to 1450°F. I poked around my broken glass fusing supplies, which were all neatly organized in a rolling cart in my shop, and stumbled upon the shelf legs for my tiny desktop kiln. I wrapped one of them in kiln paper, laid it on its side, and stuck it under the bottle’s neck, about 3 inches from the top. Then I reprogrammed the kiln controller again following the glass lady’s advice, closed it up, and got it started.

Finishing a Product

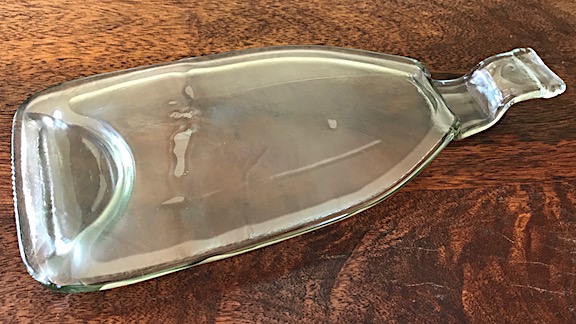
While the kiln did its thing, I played around with my first experiment. I wanted to make a branded cheese plate that local wineries might use or sell. I had some old wine labels from a friend’s winery and stuck it on the bottle. I then mixed up a batch of food-safe clear coat that I’d purchased earlier in the day, leveled the bottle-plate on a work surface, and poured the mixture over the label and flat side of the bottle. I soon realized that I’d mixed up too much and spent some time dealing with drips as the mixture self-leveled, resulting in a thin coat over the top of the plate.

It was tough to resist the urge to touch it, but I managed. According to the package instructions, I’ll need to wait at least 48 hours before I attempt to test the surface for durability. Remember, if this is a cheese plate, it should be able to stand up to the work of a cheese knife on it.

First Try with Label and Coating
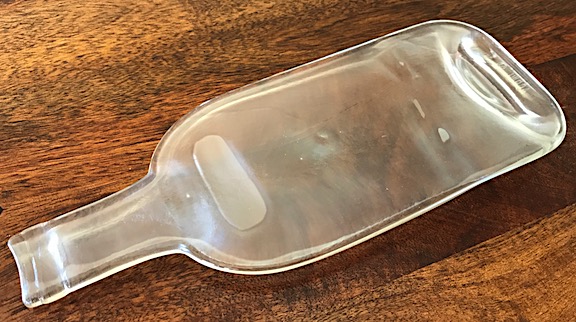
This is my first try bottle with my first try label and coating. This is good enough for me to use, but not good enough for sale. Still, I’m on the right track.

Third Try Results

This morning, after making my coffee — I have my priorities straight — I went down to fetch the third try. I felt a moment of panic when I thought that little piece of kiln shelf leg was stuck but it came loose without much effort. The result was a squared out bump in the neck of the bottle which forms a sort of leg when the bottle is set with the flat side up.

Trouble is, it’s too high. Now the plate tilts down the other way. That’s easy enough to fix; all I need to do is trim the shelf leg — which I think I can do — to make it flatter for the next try.

Third Try Bottle Slumping
Here’s my third try. There are fewer air bubbles inside the bottle and there’s now a leg to hold up the neck end. Trouble is, the leg is too tall and I really want a bottle with no bubbles.

As for the air pockets in the bottle, they are greatly reduced. But I’m not convinced the firing schedule fixed that. This bottle had a different shape with a more gently angled transition from bottle body to neck. Perhaps that’s why air wasn’t trapped inside the bottle when it melted? The only way to know for sure is to use the same schedule with a bottle shaped like one of the ones I originally used.

Fourth Try

In case you’re wondering, here’s the schedule I’m trying now:

SegRampTempHold
1500°500°12 min
2500°750°12 min
3600°1100°10 min
4200°1300°20 min
5250°1475°10 min
69999°1100°60 min
7500°970°30 min
8120°750°20 min

Let cool naturally.

My fourth try is in the kiln right now. I took the same shape bottle (since that’s what was prepped), cut the shelf leg so it would be shorter, and positioned everything in the kiln. And then, rather than modifying the simple schedule I’d been using, I reprogrammed it entirely using the longer, more detailed schedule for bottle slumping that I’d found. My theory is that the slower ramp up and longer hold times will give the air in the bottles a better chance to escape, thus eliminating the pockets of air.

Kiln Controller
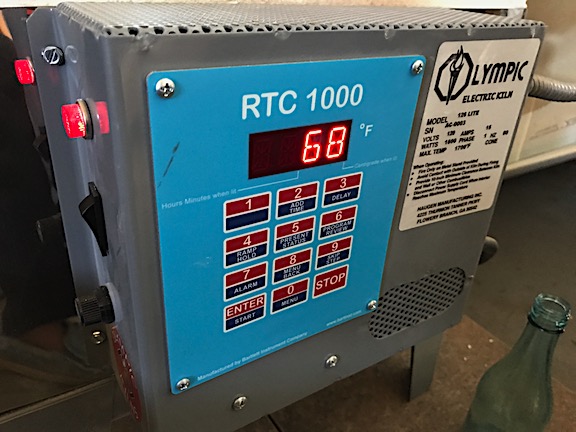
My kiln has a programmable controller which can store up to 6 user schedules.

Timing and Power Use

Keep in mind that each of these trials takes about 10 hours to complete. With only enough space for one bottle, I can only do two bottles a day — and that would require me to put the next one in each time I remove one. That’s not a huge deal for me; I’m here and once the schedule is set up just right, it is as easy as positioning a bottle and pushing a button on the kiln.

As for power usage, my kiln’s controller has the ability to calculate costs for me once I program in my kilowatt hour rate — which I just did. But I already know that the cost will be lower than what most people might think. Chelan County, where I live, supposedly has the second lowest electric rates in the country thanks to hydro and wind power: currently 2.7¢/kilowatt hour. (Compare that to 13.27¢/kilowatt hour where I lived in Arizona and 15.39¢/kilowatt hour where I lived in New Jersey.) The electric bill for my all electric house was only $25 last month. I’m thinking each firing might cost 25¢ to 50¢.

Goals

My final goal is to get a relatively level plate that can be used to serve cheese either as is directly from the kiln or with the application of a local winery label with a food safe clear coat to make it washable. I’d then sell those to local wineries for their use or make a product that they can sell to visitors. I can think of a few wineries that would be all over it once I got the kinks worked out.

Next time I’m at Pybus, I’ll bring a sample with me to see what kind of interest I get. Wish me luck.

Getting Facts, Analysis, and Opinion

Where do you get your “news” and what are you believing?

Profile
My Twitter profile is a simple list of the things that make me me.

In my Twitter profile, you’ll find the phrase truth seeker. I’m occasionally ribbed by far right Twitter users who don’t like my one-liners, often at the expense of people they support, including Donald Trump, Mike Huckabee, Sean Hanity, Bill O’Reilly, and Ted Cruz. These people, who cry “fake news” whenever they hear something they don’t like, wouldn’t know the truth if it hit them with a baseball bat.

But I take truth seriously. I want to know the truth about things. I want to be able to form my own opinions based on facts. I try to be yet another phrase in my profile: independent thinker.

And that’s why I’m so frustrated when people share inaccurate information, including links to false or seriously biased news stories on social media. It was enough to drive me off Facebook and it keeps me fine-tuning the list of people I follow on Twitter.

But what are good, reliable sources of information? Back in February, I blogged about an article in Forbes that attempted to identify some of them. For the most part, I agreed with the list. But it was limited and it failed to indicate any biases or whether the source presented facts, analysis, or opinion.

Some Definitions

Let me take a moment to define each of these, because it’s very important to understand.

  • Facts are truthful statements of what is or was. This is black and white stuff that can be proven and is not questioned (except maybe by people who cannot accept the truth).
  • Analysis puts facts into context in an attempt to explain why they matter. This can be extremely helpful for folks trying to understand the impact of past and current events and why they should care. Although knowledgable people can often make their own analysis, when there are too many facts that impact a situation for the average person to understand, fact-based analysis can be vital for the average person to make an informed decision. Bias can come into play in analysis, but the best analysis sticks to facts and avoids bias.
  • Bias, Defined
    The definition of bias.

    Opinion is what one person or organization thinks about a situation. Opinion can be well-reasoned, based on solid facts and good, informed analysis. It can also be based on false information and similarly flawed analysis. Most often, it’s falls somewhere in between with a mixture of good and bad information and analysis. But it always includes bias, which can seriously degrade the value of the opinion — especially for someone able to think for herself.

So what am I looking for in my news sources? Facts and unbiased analysis so I can make my own opinion.

The Chart

A while back, I came upon an infographic that listed news media sources on a chart. On the Y (vertical) axis was how factual the source was. Higher was more factual. On the X (horizontal) axis was how biased the source was. Middle was unbiased, left was liberally biased and right was conservative biased. The original version of this chart listed quite a few news sources. In answer to a question a Twitter friend asked the other day, I went looking for it online. I found version 3.0, which I’m reproducing in a reduced size here:

Media Chart 3.0
Version 3.0 of the chart by Vanessa Otero. (I highly recommend that you click the chart to view a larger size and the article that explains it.) This is an extremely handy tool for evaluating news sources — so handy that I’ve printed out a copy for future reference and will be looking for updates.

Understanding the Chart

No chart is perfect and if you read the comments on the post that explains this version of the chart, you’ll see that people have argued with its author. In most instances, they’re claiming that various sources should be shifted left or right from their current positions.

If you accept that it’s at least 95% representative of reality — which is where I stand — if you’re looking for facts, you should be most interested in the news sources inside the green box. That actually makes me feel pretty good because that’s where most of the news sources I listed the other day reside: the New York Times, Washington Post, BBC, and NPR. In fact, my main source of news is NPR, which is minimally biased fact reporting. I listen to NPR on the radio all day most days when I’m working at home.

If you want analysis, look for sources inside the yellow box. Ideally, you’d want something in the middle of the yellow box, which is nearly empty. One of my favored news sources, the Guardian, falls slightly left in the top of that box; another, the New Yorker, is slightly down and slightly more left. This isn’t terribly surprising since I lean more liberal than conservative in most of my views. Still, neither source is either “hyper-partisan liberal” or “liberal utter garbage/conspiracy theories.” Whew.

The orange and red boxes contain sources that are light on facts, and high on biased opinion. Unsurprisingly most of the news sources listed are either far left or far right. The red box sources are especially troubling in that they include misleading information and/or inaccurate or fabricated information geared toward either far left or far right media consumers. This is where you’ll find Occupy Democrats and the Palmer Report on the left and Fox News and Breitbart on the right. The chart notes that they are damaging to public discourse. (Duh.)

Using the Chart

How do I use this chart? First of all, it’s made me want to spend more time with sources like Bloomberg, Time, and the Economist. These look like they might be good sources of fact and unbiased analysis.

Next, when faced with a “news” story from an unfamiliar source, I’ll look it up on this chart. If it’s in the red box, I’ll basically disregard it. Why should I waste my time trying to figure out what part, if any, in the story is factual? I certainly won’t share it — and I’ll downgrade my opinion of the reliability and judgement of anyone who does.

If it’s in the orange box, I may or may not disregard it, depending on the topic and the availability of corroborating stories. But again, why should I waste my time trying to figure out what to believe in a story?

Instead, I’ll focus on what’s in the green and yellow boxes, as close to the middle of the X axis as possible.

What about You?

What do you think? I’m not talking about the accuracy of the chart here — if you have comments about that, leave them for the chart’s author and she’ll address them. I’m just curious about where people get their news, what they’re looking for, and what they share. Let us know what you think.

And please — do your best to fight real fake news. Don’t share links to unreliable or heavily biased “news” sources.