How YouTube Ad Revenue Works for Monetized Channels

A behind-the scenes look at how YouTube creators can make money on advertising.

A while back, I blogged about an unexpected windfall from my YouTube videos and how that had motivated me to create new content and keep my channel growing as a real source of income. Since then, I’ve learned a few things.

The most important thing I learned was how YouTube advertising revenue works, and I thought I’d share it with the folks who think that they can become rich quick as YouTube content creators. As you’ll see, it isn’t that easy.

Yes, once your channel is monetized — a step that requires the channel to have at least 10,000 subscribers, which is a challenge in itself — you can get a small part of the revenue that YouTube collects on the ads that appear before, on, after, and sometimes during your video.

As a creator, you get some control over what kind of ads appear and when they appear. You can do this on a video-by-video basis or set default options that apply to all new videos you publish. Here’s what the Video Monetization screen looks like for one of my longer videos:

Video Monetization Options
Here’s the Video Monetization settings for one of my upcoming videos.

Of course, all this is moot for a video if you turn monetization off. That doesn’t turn ads off — it just turns off your ability to collect ad revenue on the video. Why would you do that? Well, perhaps the video has a paid promotion in it; if so, YouTube requires you to turn off monetization. Failure to do so is a violation of the terms of service which is a serious no-no in YouTubeland.

If Monetization is turned on, you can select what kind of ads you’ll allow on the video and when they will appear. YouTube recommends that you turn all of them on and it’s pretty obvious that a lot of creators do. But because I hate seeing ads in the middle of a video, I keep the During Video option (at the bottom) turned off. (I wish everyone did.) Other than that, I keep them set as you see here, with most turned on. Skippable ads run for about 5 seconds before you can click to skip them and I think that’s a small price to pay for free content. (To my knowledge, skipping an ad does not reduce my revenue.) Non-skippable ads are a little more frustrating but they’re always short. Overlay ads and sponsored cards both appear over content and I have one turned on and the other turned off; I think my logic was that one is more obtrusive than the other.

Now you might think that turning these on results in ads appearing on every single view. That’s simply not the case. Surely you’ve seen YouTube videos without ads?

There’s actually a sitewide estimate of how often ads appear on YouTube content: 40% of the time. So if one of my videos is viewed 10,000 times, only 4,000 of those views were likely to include ads. This becomes an important number, as we’ll see in a moment.

I should mention here that you can actually calculate your current ad percentage manually by consulting two different analytics screens. The Channel Analytics Overview screen tells you the number of views for a specific period — 28 days by default. The Channel Analytics Revenue screen tells you the number of monetized playbacks. Divide monetized playbacks by total views to get the percentage:

For example, as of today, for the past 28 days my numbers are as follows:
Monetized Playbacks: 62.7 ÷ Total Views: 124.3K = Percent of Videos Monetized: 50.4%

So right now I’m having a higher percentage of monetized playbacks than average. That could be because one of my recent videos has become very popular and may be more attractive for advertisers so I’m getting more ad buys.
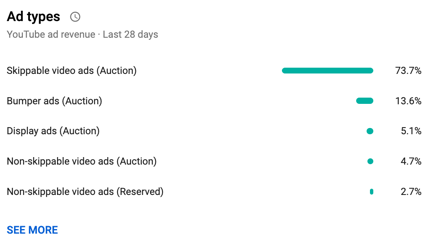
Ad Types
Here are the kinds of ads sold on my channel in the past 28 days.

Of course, I don’t see all the details of every single ad sale. All I see is a breakdown of the kinds of ads sold for videos on my channel and the all-important CPM. The breakdown is on the Channel Analytics Revenue screen and clicking a SEE MORE link brings up a full screen of detail.

The CPM, which also appears on that Revenue screen, is an average of what I’ll be paid per 1,000 monetized views. This number changes regularly — it’s $6.79 this morning, but was down to $4+ the other day. (Again, I suspect a popular video has made space on my channel more valuable.) I’ve seen it as high as $11+. I would not be surprised if I checked in this evening and it was different. (In a way, it’s kind of like a stock market per share valuation for my channel or a specific video. It rises and falls depending on the market for ads on my channel or specific video.) They say that $4 is an average CPM for YouTube creators, so I’ll stick to that for illustrative purposes.

But no, this doesn’t mean you get $4 per view or even $4 per monetized view. It means you get $4 per 1,000 monetized views.

So going back to my previous example, if a video got 10,000 views and 40% of them were monetized and you were getting $4 per monetized view, that’s

10,000 x 40% /1000 X 4 = $16.00

My channel is doing pretty well this month, mostly because of my 737 MAX video‘s popularity. I published it 8 days ago and it has almost 50,000 views as I type this. I can get analytics for just this video and the numbers are very nice: almost 50% monetized playbacks and an $8.38 CPM. That video has earned me $104.54 in ad revenue in just 8 days. Sounds great, right?

Well, let’s look at the video that came out right before it, the Autumn Cockpit POV flight. Although it has a higher percentage of monetized playbacks, it’s only been viewed 2,800 times in two weeks. Its CPM is just $5.91. In two weeks, it’s earned me a whopping $11.99. (That’s not per day, by the way. It’s for the entire two weeks. That’s less than $1 per day.)

And please do remember that a video will not earn the same amount per day/week/month/etc. throughout its whole life. Sometimes they start like duds and pick up steam, like the 737 MAX video — it wasn’t doing well at all for the first two days. And then sometimes they’re going like gangbusters and interest suddenly disappears. You never know what to expect and can only hope for a pleasant surprise.

Views
Here are the view analytics for my most popular video ever. It had hardly any views for the first year it was published and then took off like a rocket, with periodic surges. The current live analytic for the past 48 hours shows 4,466 views — three years after it was released! This is a YouTube content creator’s dream; I wish I had a dozen like this.

When I started writing this, I didn’t mean to get into the complex details of revenue calculations for specific videos. I just wanted to explain how ad revenue works for monetized channels on YouTube. To take some of the mystery out of it.

The takeaway on all this is that in order to make YouTube a full-time business — as some creators have — you need a strategy that combines ad revenue from wildly popular videos and other sources. This is why so many content creators on YouTube also sell merchandise and offer memberships or Patreon patron benefits.

I’ll be frank here: creating content for my YouTube channel is crazy expensive. Not only do I have to fly an aircraft that costs hundreds of dollars an hour to fly, but I have to have the cameras, camera mounts, and video editing equipment to record and edit the resulting footage. And the time I spend doing all this is time I’m not spending doing something that could earn money elsewhere so there’s a definite value to my time. I could easily drop $300 to $600 to make a video that will never earn more than what it cost to make.

I’m not complaining here — I’m just telling it like it is. I love flying and having an excuse to fly. I enjoy making the videos. I like most of the very positive feedback I get. But a girl has to make a living so I hope folks don’t mind me pushing Flying M Air hats and T-shirts or asking for Patreon patrons. If my video creation efforts wind up costing me more than I take in over the long term, I simply won’t be able to continue making them.

And every once in a while, I publish one that actually makes the ad revenue work for me. My Home to Airport by Helicopter video, which has over 9.5 million views, is one of them.

Now if only I could come up with about a dozen more like that.

Helicopter Flight: Fog in the Cascade Mountains

A cockpit POV video from the FlyingMAir YouTube channel.

Sit on the nose of my old helicopter as I fly over the Cascade Mountains and its fog-filled valleys. There’s some narration in the beginning; you can apply your own music.

This “Flashback Friday” video is an 11-minute clip from about 90 minutes of footage shot from takeoff in Wenatchee Heights (WA) to landing at Hillsboro (OR) Airport in July 2012. The flight was done on one of those very rare occasions when I could fly a direct, straight line route – normally, there are low clouds in the Cascades that force me to go around them to the south. You can find a montage of clips from the entire flight in a video I released back then, “Helicopter Flight from Wenatchee to Hillsboro” at https://youtu.be/hnIbY2y69Ug.

I remember this flight like it was yesterday. I had to take the helicopter to Hillsboro for a 100-hour inspection and needed to rush back to Wenatchee to finish cherry season. In this segment, I’m flying over the Cascade Mountains and the valleys below me are full of fog. I had taken off just after dawn and the mountain ridges cast long shadows ahead of me. It was absolutely gorgeous.

Back in July 2012, my divorce had just begun and it wasn’t in its crazy ugly stage yet. At this point in the flight, I recall thinking how much my future wasband would have enjoyed the flight and I was sad about that. (Now I can’t help thinking what an idiot he is and how much better off I am without him. Oh, well. Time does heal all wounds.)

I was also a little uneasy on this part of the flight. Flying VFR on top – which means flying in visual flight rules conditions over clouds – is not something I do very often. Helicopters normally fly quite low and I’m seldom above the clouds. I remember being surprised to see the fog and then nervous with the realization that if I had to make an emergency landing I wouldn’t be able to see my landing zone as I descended. But isn’t all that fog just wonderful to behold?

This was also memorable because it was Penny the Tiny Dog’s first helicopter flight. She was about 5 months old at the time and I had no idea how she would react. I put her in the front seat on a leash that would prevent her from getting into my controls. But after I started up, she just curled up in her bed on the seat and went to sleep. She slept until I began my descent at Hillsboro.

About Me and the Helicopter

  • I have been flying for about 20 years. My nearly 4,000 hours of flight time is in Robinson R44, Robinson R22, and Bell 206L (Long Ranger) helicopters.
  • The helicopter is a 2005 Robinson R44 Raven II — the same one that appears in the photo at the beginning of the video. This was my first R44, which was lost in a crash back in 2018. You can learn more about R44s here: https://robinsonheli.com/r44-specifications/ I owned this helicopter and now own another one very much like it, but blue. I’ve owned a helicopter since 2000.

About the Video

  • This video was recorded in 2012 with a GoPro Hero 3 camera mounted on the nose of the helicopter. Audio comes from the camera’s built-in speaker and has been incorporated into this video at 20% normal volume.
  • The video was stabilized prior to editing in iMovie software. Although I don’t like to edit in iMovie, it does have decent stabilization. If you compare this video to more recent nosecam video (for example, “Helicopter Nosecam Flight: Dawn on the East Side of the Cascades #2” at https://youtu.be/HXBznbtc54U), however, you’ll see that a GoPro Hero 7 Black shoots much more stable video than a Hero3.
  • Narration was done using a Røde Podcaster microphone (https://amzn.to/2IFnbNr) connected to a Macintosh. I recorded the brief narration while I was watching the video in the editing software.
  • The video was edited on a Macintosh using Screenflow software. Learn more about it here: https://www.telestream.net/screenflow/overview.htm
  • The intro music is by Bob Levitus, famed “Dr. Mac.” You can find him here: http://www.boblevitus.com/

I try to drop cockpit POV videos every Sunday morning and “extras” with more info about owning and operating a helicopter midweek. (Some channel members get early access to some of these videos.) I also host occasional livestreams with Q&A chats. Subscribe so you don’t miss anything new! And tell your friends. The more subscribers I have, the more motivated I am to keep producing videos.

Any Amazon links on my channel are affiliate links (https://amzn.to/32PLHTD). If you click one of them and buy something, Amazon sends me a few pennies. Enough pennies make a dollar. Enough dollars buy new equipment. It doesn’t cost you anything so I hope you’ll shop with one of those links. Thanks.

Still reading? Thanks! Maybe you’ll consider buying something from my Etsy store to help support this channel? Start here: https://www.etsy.com/shop/FlyingMAir

Or better yet, to support this channel on an ongoing basis, consider becoming a member. This link will get you started: https://www.youtube.com/channel/UCLGD_GbGsS6YKK_Ekx0QMqQ/join

Drones and Helicopters

A short, engaging video from the UK CAA for drone pilots.

This morning, one of my Twitter pilot friends in the UK shared a one-minute video from the UK CAA that quickly and effectively told drone pilots to be look and listen for helicopters that might be flying at their altitude. Remember drone pilots are supposed to stay under 400 feet altitude (in both the UK and the US) and helicopters have no minimum altitude (at least not in the US). That means we share that space. Of course, if drones illegally (or with a waiver) fly higher, that’s even more space that we share.

I watched the video. It was excellent. A link in the tweet pointed to the “full version” and I clicked it. It’s only 3 minutes long and has the same basic message but includes some interesting B-roll footage of an EMS helicopter and operations. Something to keep watchers engaged while the message is shared. Here it is:

Again, I know this is a UK CAA production, but it applies in the US, too. And likely many other countries that have drone/UAV regulations.

When I retweeted this with a mention the FAA’s Twitter account, the FAA — to my surprise — immediately responded to a link to their YouTube playlist:

I took a look. What I found didn’t surprise me at all. It was the same dull FAA content I’ve been looking at for the past 20 years. Short slideshows that look like they were produced with PowerPoint 95, narrated with a boring authoritative voice. Screen captures of 30+ minute long webinars featuring a tiny talking head and the same dull slide shows. This is the FAA’s idea of continuing education: producing content that no one wants to watch.

See for yourself. Watch the video I embedded above. Then try to watch a few that the FAA linked to. Do you see the difference? I do.

When I critiqued the FAA on Twitter, they responded with this:

I looked at a few of these videos. Some of them are indeed better. One or two are actually pretty good.

Of course, leave it to the FAA to try to enlist me as a volunteer to help them. They have a lot of nerve. Their often absurd rules cost me money that lines the pockets of other businesses without increasing safety. The requirement for VFR-only aircraft to spend $10K to $20K to install a completely useless radar altimeter is one example. The requirement to have a mechanic remove and reinstall my doors when I need them off is another. But now I’m getting way off topic. And angry.

My point is, the UK CAA put together a short, interesting, and informative video (embedded above). We need more of that and we need the FAA — with or without industry partners — to step up to the plate and provide it.

Why I Shop on Amazon

Where else can I get exactly what I want when what I want is something weird?

If you’ve been following this blog, especially lately, you know that I’ve been doing a lot of video work. A bunch of it requires two cameras that create a pair of videos that must be synchronized. As I explain in my video about the setup, I was creating a sort of key frame for synchronization by clapping my hands between the two cameras, which face each other.

That’s not the way professionals do it. They use what’s called a clapboard. It’s the iconic black and white (usually) device that’s snapped together right after the director calls “Action!” Typically, it’s got spaces on it that are filled in with information about the scene being shot, including the date, take, and scene identifying data.

The real benefit of a clapboard is that when you snap it shut hard, it makes a sharp clapping sound. If your video clips have an audio track, this clap appears as a spike in that audio track. That makes it super easy to align the clips so both spikes appear one after the other. Perfect alignment, right up to the frame.

I decided I wanted one of these things.

Now, I live in a rural area. While Wenatchee is a nice little city nearby, it doesn’t have any shops that cater to video producers. This isn’t Los Angeles. Although we have a few video production companies in town — I’ve done some flying work for two of them — the demand for video equipment will never be enough for someone to open a shop that carries the equipment they need.

Besides, I had very specific needs. I wanted one that was small so it would fit in my video kit but not a toy or novelty item. I wanted it to work with dry-erase markers instead of chalk. I wanted it to be sturdy with a good snap.

So I did what most people in the U.S. do these days: I went to Amazon.com and searched for movie clapboard. And Amazon immediately showed me hundreds of search results.

To be fair, some of them were really off-base. A coffee mug with a movie clapboard on it. A novelty director’s party kit that included a fake Oscar, megaphone, and clapboard. A picture frame designed to look like a clapboard. Clapboard keychains. Pillow covers with a movie theme that included a clapboard.

But the vast majority of the hundreds of items listed were actual, usable movie clapboards.

I went through them. It took some time — but not nearly as much time as it would to find a brick and mortar shop that sold clapboards, get to it, make my selection (if they had what I wanted), and get home. I eventually found the one I wanted: Action Cut Board, Andoer Acrylic Clapboard Dry Erase Compact Size TV Film Movie Director Cut Action Scene Clapper Board Slate (whew!). It was $10.99 with free shipping.

I read the reviews with a grain of salt. Amazon reviews are notoriously untrustworthy. You have to read a bunch from “verified purchasers” to get a real idea of the pros and cons of the item you’re considering. Disregard the 5 star reviews that seem a bit too glowing and short on details. Disregard the 1 star reviews that seem too critical and short on details. You know the kind. The rest of the reviews were good enough. One mentioned the solid clapping sound. I think a few complained about the small size — which is actually a feature I wanted.

So I ordered it. It arrived in two days.

The clapboard really is exactly what I wanted, but I admit it did not arrive in perfect condition. Two of the nuts/bolts holding the clapboard on were a tiny bit loose; I tightened them. And the acrylic board that had been glued into a slot on the clapper part wasn’t exactly aligned. Fortunately, it also wasn’t glued in very well, which made it loose in the slot. I pulled it out and glued it back in with more glue and better alignment. What do I expect for $11, right?

Clapboard
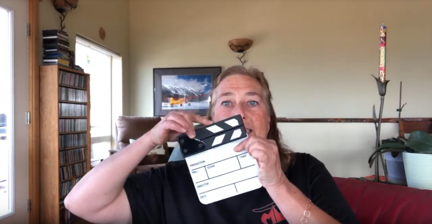
Here I am, showing off my new little clapboard during a livestream event on YouTube.

I showed it off to my YouTube channel viewers at the beginning the AMA Livechat I did last night. I snapped it for them.

This is the kind of thing that’s impossible to find in brick and mortar shops unless you’re in a large enough city with a large enough market for a niche item like this. And that’s why I turned to Amazon. Although it’s often a pain in the butt to wade through the search results and quality is becoming a bigger issue every day as they allow more and more junk to be listed, I will almost always find exactly what I’m looking for, usually at a price that I’m willing to pay.

Behind the Scenes: FlyingMAir Audio/Video Setup

A video on the FlyingMAir YouTube channel.

Ever wonder how I get the great sound and pictures for my cockpit POV videos? This video explains my setup in detail.

Products mentioned in this video

I purchased all of the equipment shown in this video. These are not paid endorsements — I use it all and recommend it based on my experience with the products shown. That said, if GoPro wants to send me a Hero 7 Black, I’ll gladly take it and thank them publicly for it. (Just saying.)

Buy On Amazon

If you want to buy any of these things, please use these affiliate links. When you shop on Amazon with one of my links, I get a tiny commission to help fund my own audio/video purchases and it doesn’t cost you a penny more.

About the Video

  • The video was recorded with an iPhone Xs. ‘Nuff said.
  • The video was edited on a Macintosh using Screenflow software. (Screenflow was the only affordable software I could find that allowed me to do picture-in-picture.) Learn more about it here: https://www.telestream.net/screenflow/overview.htm
  • The intro music is by Bob Levitus, famed “Dr. Mac.” You can find him here:
    http://www.boblevitus.com/

About My Channel

I’m trying to drop POV flying videos every Sunday morning and usually drop “extras” like this one midweek. I’m also working on putting together occasional livestreams with Q&A chat. Subscribe so you don’t miss anything new! And tell your friends. The more subscribers I have, the more motivated I am to keep producing videos like this one.

Still reading? Thanks! Maybe you’ll consider buying a T-shirt, mug, or sticker to help fund my video equipment acquisitions? Check out the Teespring links on any video page.