Apple Crisp for One (or Two)

Very easy, very tasty.

One of the great things about living near Wenatchee, Washington’s “Apple Capital,” is the wide availability of fresh-picked apples each autumn. Not only am I able to buy local apples direct from packing companies like Stemilt’s Bountiful Fruit store in North Wenatchee (which ships, by the way), but I can often get out in an orchard and pick the less marketable fruit left behind. Indeed, just last week, after dropping off some passengers for a meeting at an orchard, I walked through an organic gala apple block and picked a half dozen apples that were just too small to pick. (I get cherries and pears like this, too.)

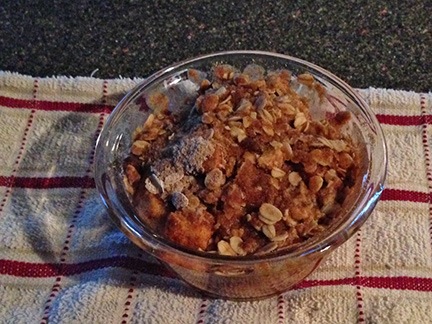
I was invited to dinner at a friend’s house the other day and told my host I’d bring apple crisp. I wanted to make just enough for him and his three guests. So I found a recipe that was easily scalable. It came out great with those galas. So good that I made myself a single serving of hot apple crisp the next day for breakfast.

Here’s my scalable recipe. This will serve one or two.

Ingredients:

  • 1 medium or large apple. I used gala.
  • 2 tablespoons raisins (optional). I didn’t use them. I really don’t care much for raisins, but they do go good in apple crisp.
  • 2 teaspoons sugar. I use raw cane sugar.
  • 1/4 teaspoon cinnamon
  • Pinch of salt (optional).
  • 2 tablespoons light brown sugar. Packed, of course.
  • 2 tablespoons oatmeal. Do not use instant oatmeal. Ever. (Ick.)
  • 1 tablespoon flour
  • 1 tablespoon cold butter. I used frozen butter cut into small pieces.
  • Additional butter to butter pan.

Instructions:

  1. Preheat oven to 350°F.
  2. Butter a small baking dish and set aside.
  3. Cut up the apple and place it in a small bowl. You can cut it however you like; keep in mind that the smaller the pieces, the faster they’ll cook.
  4. Add raisins (if you’re including them), sugar, cinnamon, and salt (if you’re including it). Toss to coat apples with sugar and cinnamon.
  5. Place apple mixture in the prepared baking dish.
  6. Mix together brown sugar, oatmeal, flour, and butter pieces. Using your fingers, blend until the butter is in very small pieces and well mixed in. This could take about 2 minutes.
  7. Apple Crisp for OneSprinkle the topping over the apples.
  8. Bake until apple is tender, 30 to 40 minutes, depending on the size of the apple pieces. (If you used a glass baking dish, you should see the apples bubbling in their juices.)
  9. Cool for at least 15 minutes before eating.

This is amazingly delicious with coffee for breakfast or with vanilla ice cream for dessert.

Easy Baked Brie

A recipe for a friend.

Baked BrieBaked brie is one of my favorite appetizers — and something I like to make for guests when having a dinner or cocktail party. I made it the other night for dinner at a friend’s house; I did all the prep at home and baked it in her oven. It was the second time she’d had it and she asked me to write down the recipe. I thought it would be easiest to just share it here. As you’ll see, it’s very easy.

Ingredients:

  • Small round of brie cheese.
  • Pillsbury French Loaf1 package Pillsbury Crusty French Loaf (or similar). You should be able to find this in the refrigerator section of your supermarket.
  • 2 tablespoons apricot preserves.
  • 2 tablespoons sliced almonds.
  • Cooking oil spray for pan.

Instructions:

  1. Preheat oven to 350.
  2. Coat cookie sheet or pizza pan with a thin layer of cooking oil spray.
  3. Carefully open bread dough package.
  4. On a flat surface (or the prepared pan), unroll the dough. This can be difficult, especially if the dough is at room temperature. You want to get it started on the entire length of the loaf first, then unroll evenly. When you’re done, you should have a flat sheet of dough. Do not handle it more than necessary.
  5. Place the dough on the prepared pan.
  6. Unwrap the brie and place it in the middle of the dough.
  7. Spread apricot preserves evenly over the top of the brie.
  8. Sprinkle almonds evenly over the apricot preserves.
  9. Bring one corner of the dough up over the cheese. Repeat this process with the opposite corner of the dough and then with the other two corners. The cheese should be completely covered.
  10. If necessary, pinch to seal cheese inside dough.
  11. If desired, sprinkle a few more almonds on top for decoration.
  12. Bake at 350 until bread is well browned. Cheese should melt inside dough.
  13. Serve hot on a serving plate. When you slice into the bread, the cheese may melt out.

Root Vegetable Soup

All natural, easy to make, and sweet as candy.

Root Vegetable SoupI know winter is over, but that doesn’t stop me from making soup. Soup, after all, is comfort food, and we can all use a little comfort now and then — some more than others.

Today’s concoction: my root vegetable soup.

I came upon this recipe a while back by accident. I was making some other kind of soup and simply put too many vegetables into it. The vegetable flavor overpowered the intended flavor — and it tasted good.

Here’s how I made it today.

Ingredients:

  • 3 tablespoons butter
  • 1 medium onion, coarsely chopped.
  • 3 stalks celery, cut into 1/4 inch pieces.
  • 3 carrots, cut into 1/4 inch pieces.
  • 1 small zucchini, halved lengthwise and then cut into 1/4 inch pieces.
  • 1 large parsnip, cut into 1/4 inch pieces.
  • 1 medium purple-top turnip, chopped into 1/4 inch pieces.
  • Water

You can also add or substitute in leeks (which I forgot to buy), yellow squash (in addition to or in place of zucchini), and other root vegetables. You don’t want to add vegetables that would take away that sweet taste, like peppers. Ick.

Of course, a real root vegetable soup would exclude the celery and zucchini. But I wouldn’t put potatoes in, even though they are root vegetables.

I guess what I’m trying to say is that you can be as creative as you like here.

You can also make or buy pre-made meatballs to add to the soup during or after the cooking process. I admit I buy the pre-made chicken meatballs, sold in vacuum packs in the supermarket section when you can find chicken sausage, etc.

You’ll note that the recipe does not include any seasoning. I don’t think it needs it. The vegetables are extremely sweet and flavorful. You might try adding herbs like sage or tarragon if you like that flavor, though. I use salted butter and that’s enough salt for me.

Instructions:

  1. In a medium to large pot, melt the butter on medium to low heat.
  2. Add the vegetables. I added them one by one as I prepared them in the order listed above. Each time I added one, I stirred the pot to keep the vegetables covered with the butter.
  3. Gently sauté the vegetables for 5 to 10 minutes. Do not allow them to brown.
  4. Add enough water to cover all the vegetables.
  5. Bring contents of pot to a boil, then cover pot and turn down to simmer.
  6. If you’re adding meatballs, this might be a good time to do it.
  7. Simmer for about an hour, stirring occasionally, until all vegetables are tender.
  8. Serve hot and enjoy!

If you like a soupier soup, add more water up front. I like mine to be more of a bowl of vegetables with vegetable broth, so I minimize the amount of water. (You can always add water later; you can’t take it away.)

I also thought about pureeing the soup in a blender, but I don’t have a blender. (It broke last year and was never replaced.) That might be something to try once I settle down again and get a blender.

15-Bean Soup

No, not just 15 beans. 15 kinds of beans.

Bean Soup
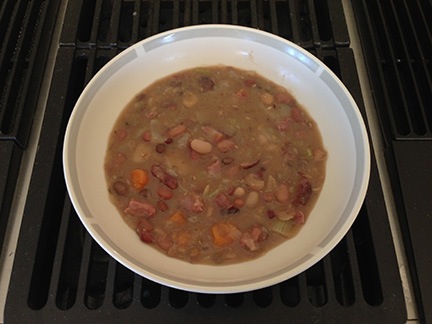
The other day, I made 15-bean soup, a great, hearty dish, especially good on cold days.

One of my Facebook friends asked what recipe I used. I told her I made it up as I went along. Here’s the recipe as I remember it. (This recipe should also work well for pea soup; just use split peas instead of the bean mix.)

Ingredients:

  • 1 bag dried beans. I used 15-bean mix, but you might want to try a different mix. The problem with the 15-bean mix is that it includes black beans which, when cooked, make the soup dark and uglier than it needs to be. But it still tastes good. If the beans came with any sort of soup “flavor packet,” throw it away.
  • Ham hocks. I used a package of 3. Two of them didn’t have much meat on them, but the third had a lot of meat. You could, if you prefer, use about 1/4 pound lean, thick sliced bacon (cut into 1-inch pieces) or smoked sausage (cut into 1-inch pieces). Or you could leave this out entirely if you want a vegetarian soup.
  • 1 cup carrots, cut into 1-inch slices. I used baby carrots, halved.
  • 1 cup celery, cut into 1-inch slices.
  • 1 large onion, chopped.
  • 1 tsp dried thyme.
  • 1 tsp dried tarragon.
  • 1 tsp dried sage. (The sage I had at home had evidence of mold, so I didn’t use any.)
  • 2 bay leaves.
  • Salt and pepper to taste.

Instructions:

  1. Rinse the beans, then put them in a pot with enough water to cover them by at least 2 inches. Soak for an hour, then drain. Then return to pot, cover with water again, and allow to soak overnight.
  2. Drain the beans again, then return to the pot.
  3. Add 6-7 cups water and ham hocks and bring to a boil.
  4. Reduce heat and simmer about 3 hours, stirring occasionally to prevent beans from sticking to the bottom of the pot. During this time, it may be necessary to skim some ugly foam off the top. I use a slotted spoon.
  5. Remove the ham hocks from the pot and set aside to cool.
  6. Add the vegetables and herbs to the pot and bring to a boil. Then reduce heat and simmer.
  7. Remove meat from ham hocks and return it to the pot. Discard fat, skin, and bones. (At this time, if there isn’t enough meat, you can add diced ham or something similar. I really like a meaty soup.)
  8. Continue simmering until vegetables are done.

Serve hot with some crusty bread.

I like a thick soup, so I usually just add 6 cups of water in step 3. If the soup seems to be too thick by step 5, I add more boiling water. The other day, I added about a cup to bring it up to 7 cups.

In all honesty, I’m clueless about herbs. I guessed on these and it tasted good.

I don’t know if it matters if you cover it. I covered it after step 6.

This soup freezes well. The recipe yielded about 3 quarts of soup; I divided most of it into pint-sized plastic containers, cooled it in the fridge, and then put most of them in the freezer. When I’m ready to eat the frozen soup, I can simply transfer it into a microwave safe dish and zap it on medium until done, stirring a few times along the way. Or let it defrost on the countertop and heat it on high until hot.

If you make it, let me know what you think.

Pot Roast (a la Deadspin)

The core recipe from the excellent article.

A few weeks ago, fellow author and Twitter/Facebook friend Jeff Carlson linked to a recipe with the comment that it was well-written. Wondering how well a recipe could be written, I followed the link to “How to Cook a Pot Roast: A Guide for People Who Want to Live, Dammit” on Deadspin‘s Foodspin column. And I discovered two things:

  • Jeff was right. It was the most entertaining recipe I ever read. Don’t believe me? Head over there and read it for yourself.
  • The recipe sounded not only easy but delicious.

So after finding a chuck roast in my freezer — left over from when my soon-to-be ex-husband bought half a local steer and had it butchered a while back — I decided to give the recipe a spin. (Okay, pun intended.)

The trouble is, although the recipe article is extremely entertaining to read, it’s not so easy to follow when you get into the kitchen and just want to make the damn thing. So I’ve distilled it down to its basic ingredients and instructions. This is how I’m making it tomorrow for some friends who are joining me for dinner. Pardon me if I’m vague about quantities; a real cook should be able to figure this stuff out.

But please, before you read and follow this recipe, treat yourself to the original article.

Ingredients

  • Beef roast such as rump roast or chuck roast
  • Salt and pepper
  • Canola or vegetable oil
  • Carrots (but not baby carrots), cut to finger length
  • Celery, cut to finger length
  • Onion, halved, or shallots
  • Canned skinless whole tomatoes, crushed
  • Cheap red wine
  • Fresh rosemary and thyme springs, tied together with twine (if possible)
  • Bay leaves
  • Cornstarch

Instructions

  1. Unwrap the roast (and rinse if you like to do that kind of thing) but do not trim the fat.
  2. Season generously — more than you normally might think is right — with salt and pepper. Press the seasonings into the meat.
  3. Heat a heavy bottomed pot or dutch oven on high heat on your stove. If you have a ventilation fan, turn it on.
  4. Add one “glug” of oil to the pot.
  5. Thoroughly brown the meat on all sides. This should take 10-15 minutes. Meat should turn a deep, dark sizzling brown.
  6. Remove meat to a plate or tray. Do not drain off any fat in the pot.
  7. Reduce heat on stove and add carrots, celery, onion (or shallots), and tomatoes to pot. Cook for several minutes or until they start to brown.
  8. Return the meat and any juices that may have drained off into the pot.
  9. Turn the heat back up.
  10. Add a full bottle of wine.
  11. Add the herbs.
  12. Heat the liquid to a low boil and reduce heat to simmer.
  13. Cover and let cook 2-1/2 to 7 hours. (Really; the longer, the better.)
  14. With tongs, remove the meat to a serving plate.
  15. With a slotted spoon, remove the vegetables to a serving plate.
  16. Bring liquid remaining in pot to a full boil.
  17. In a separate dish or mug, mix some cornstarch with cold water to get a paste that’s smooth and just thin enough to pour.
  18. Drizzle cornstarch mixture into pot while whisking; stop when gravy in pot is desired thickness.

Serve with mashed or roasted potatoes. Or noodles (which is what I prefer). Or, as the author of the recipe heartily recommends, some crusty bread.

I’m making this tomorrow. If I’m feeling very energetic and ambitious, I’ll take pictures and insert them as appropriate here.

Now all I need is a good recipe for crusty bread….